Continuous Deployment
Our Continuous Deployment (CD) approach focuses on a GitOps-based deployment model, using Git as a single source of truth for the deployment, management, and operations of our running application components. In this model, we have the flexibility to use multiple open-source to apply the single source of truth from a given Git repository onto a desired cluster environment. More detail around the background of GitOps and how it differs from traditional deployment models can be found in this blog post from WeaveWorks.
One of the main tools that we use in this space is a GitOps-focused continuous deployment project named ArgoCD. As documented by the IBM Garage for Cloud team, ArgoCD can monitor GitHub-based projects and apply changes stored in that repository's YAML files to a running Kubernetes-based cluster. We have documented our general ArgoCD Continuous Delivery workflow in the ibm-cloud-architecture/refarch-kc-gitops repository. The details of our ArgoCD-based GitOps deployments are covered in the ArgoCD deployments section below.
Another DevOps tool which provides the opportunity to deployment applications via the GitOps methodology is Tekton. The Tekton Pipelines project provides a declarative language for defining and executing both CI and CD-style pipelines, all defined with common Kubernetes-like nomenclature. It even has the capability to kick off pipeline runs based off of GitHub webhooks. The details of our Tekton & Appsody deployments are covered in the Tekton & Appsody deployments section below.
ArgoCD deployments
Our main continuous deployment pattern operates on the same principle of "zero-infrastructure overhead" as our continuous integration implementations. This allows us to be agile, adaptable, and efficient in what we deploy where. ArgoCD is a perfect companion to this principle, as we do not need additional long-running CD infrastructure to monitor either a source environment or a target deployment environment. Our CI process sits with our code (on the same hosted infrastructure), while our CD process sits with the target deployment environment (on the same Kubernetes-based cluster).
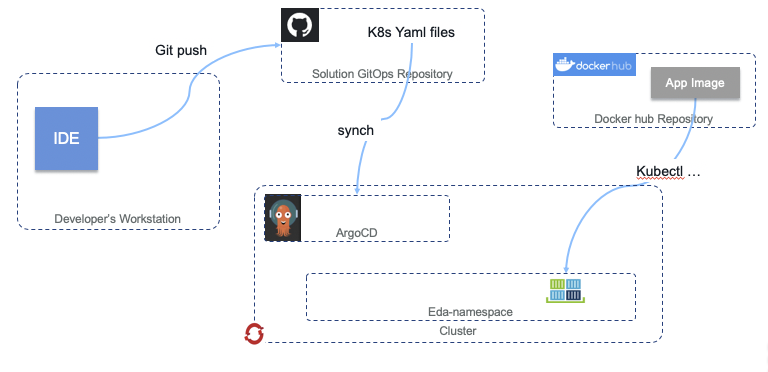
To utilize ArgoCD in this manner, we define a set of Kubernetes YAMLs generated from helm template commands, with environment, namespace, and cluster-specific parameters provided as needed. The details of generating those helm template YAMLs can be found in our main Application Components documentation. The templated YAMLs are generated with the names of the required ConfigMaps and Secrets specific to a namespace on the eventual target deployment cluster. This allows us to create a deployment artifact programmatically without exposing confidential and secret credentials via source code.
Once these YAMLs are generated, they are checked in to the main GitOps repository for the project, under a new branch with a branch name in the format of <namespace>/<cluster> for ease of identification. These will then have a folder structure of /<component-name>/templates/<artifact-type>.yaml, with most components providing Deployment, Service, and Route artifact YAMLs.
An ArgoCD application is then created on the ArgoCD deployment inside the target environment that can read from the GitOps repository. ArgoCD can also deploy between clusters, which does come in handy in certain use cases, but remember our squads main goal of "zero-infrastructure overhead", so we deploy from ArgoCD into the same cluster it is deployed on the majority of the time. The ArgoCD application is a Custom-Resource Definition, comprising of the details necessary to determine the remote code repository URL, the branch of the code to use, the target namespace, and any formatting capabilities that are necessary.
ArgoCD then handles automatically (or manually) syncing the deployments in the target namespace with the state that is described in the YAMLs on the specific branch in the GitOps repository. To keep in sync with the continuous integration implementation we have defined in Continuous integration, we have an additional GitHub Actions workflow defined in this repository that will update the YAML files contained in the repository with the latest microservice container images as they are modified, thus enabling a completely automated build-to-deployment lifecycle.
Defined in the .github/workflows/update-gitops-deployments-(eda-integration).yaml workflow file, the workflow will scan the repository for all templated use of container images in Kubernetes Deployment files (and recently updated to be extensible to any YAML-based file!), search Docker Hub for the latest version of that container image, update the YAML file in-place, and check in the YAML updates back to the same repository and branch. This process is kicked off by the webhook Jobs mentioned in our CI process, as well as on a regularly-scheduled cron-like timer.
Deploying a microservice with ArgoCD
You can deploy both the simulator and the scoring-mp microservices using ArgoCD in this reference implementation. The process is the same for either microservice, with minor parameter configuration being the only difference between the two.
Prerequisites
- Ensure all necessary Kubernetes ConfigMaps and Secrets have been created in the namespace in which the application will be running.
- Ensure ArgoCD has been deployed to the local cluster with connectivity to the internet.
Using the ArgoCD dashboard
- Access the ArgoCD Dashboard via it's exposed Route in the
argocdnamespace. This should be in the form ofhttps://argocd-server-argocd.apps.green.ocp.csplab.local. - Depending upon your cluster and ArgoCD, you will have specific login credentials. Login as directed and click NEW APPLICATION.
- Enter the following parameters for either the SpringContainerMS or scoring-mp microservice and click CREATE.
- SpringContainerMS
- Application Name:
springcontainerms - Project: Select
defaultfrom the drop-down - Sync Policy: Select
Automaticfrom the drop-down - Repository URL:
https://github.com/ibm-cloud-architecture/refarch-kc-gitops.git - Revision:
eda-sandbox/api-green-ocp-csplab-local(this is the branch in the GitOps repository for our specific project on our specific cluster) - Path:
springcontainerms - Cluster:
https://kubernetes.default.svc(this is our local cluster) - Namespace: Your desired target namespace
- Check the Directory: Include subdirectories checkbox
- Application Name:
- scoring-mp
- Application Name:
scoring-mp - Project: Select
defaultfrom the drop-down - Sync Policy: Select
Automaticfrom the drop-down - Repository URL:
https://github.com/ibm-cloud-architecture/refarch-kc-gitops.git - Revision:
eda-sandbox/api-green-ocp-csplab-local(this is the branch in the GitOps repository for our specific project on our specific cluster) - Path:
scoring-mp - Cluster:
https://kubernetes.default.svc(this is our local cluster) - Namespace: Your desired target namespace
- Check the Directory: Include subdirectories checkbox
- Application Name:
- SpringContainerMS
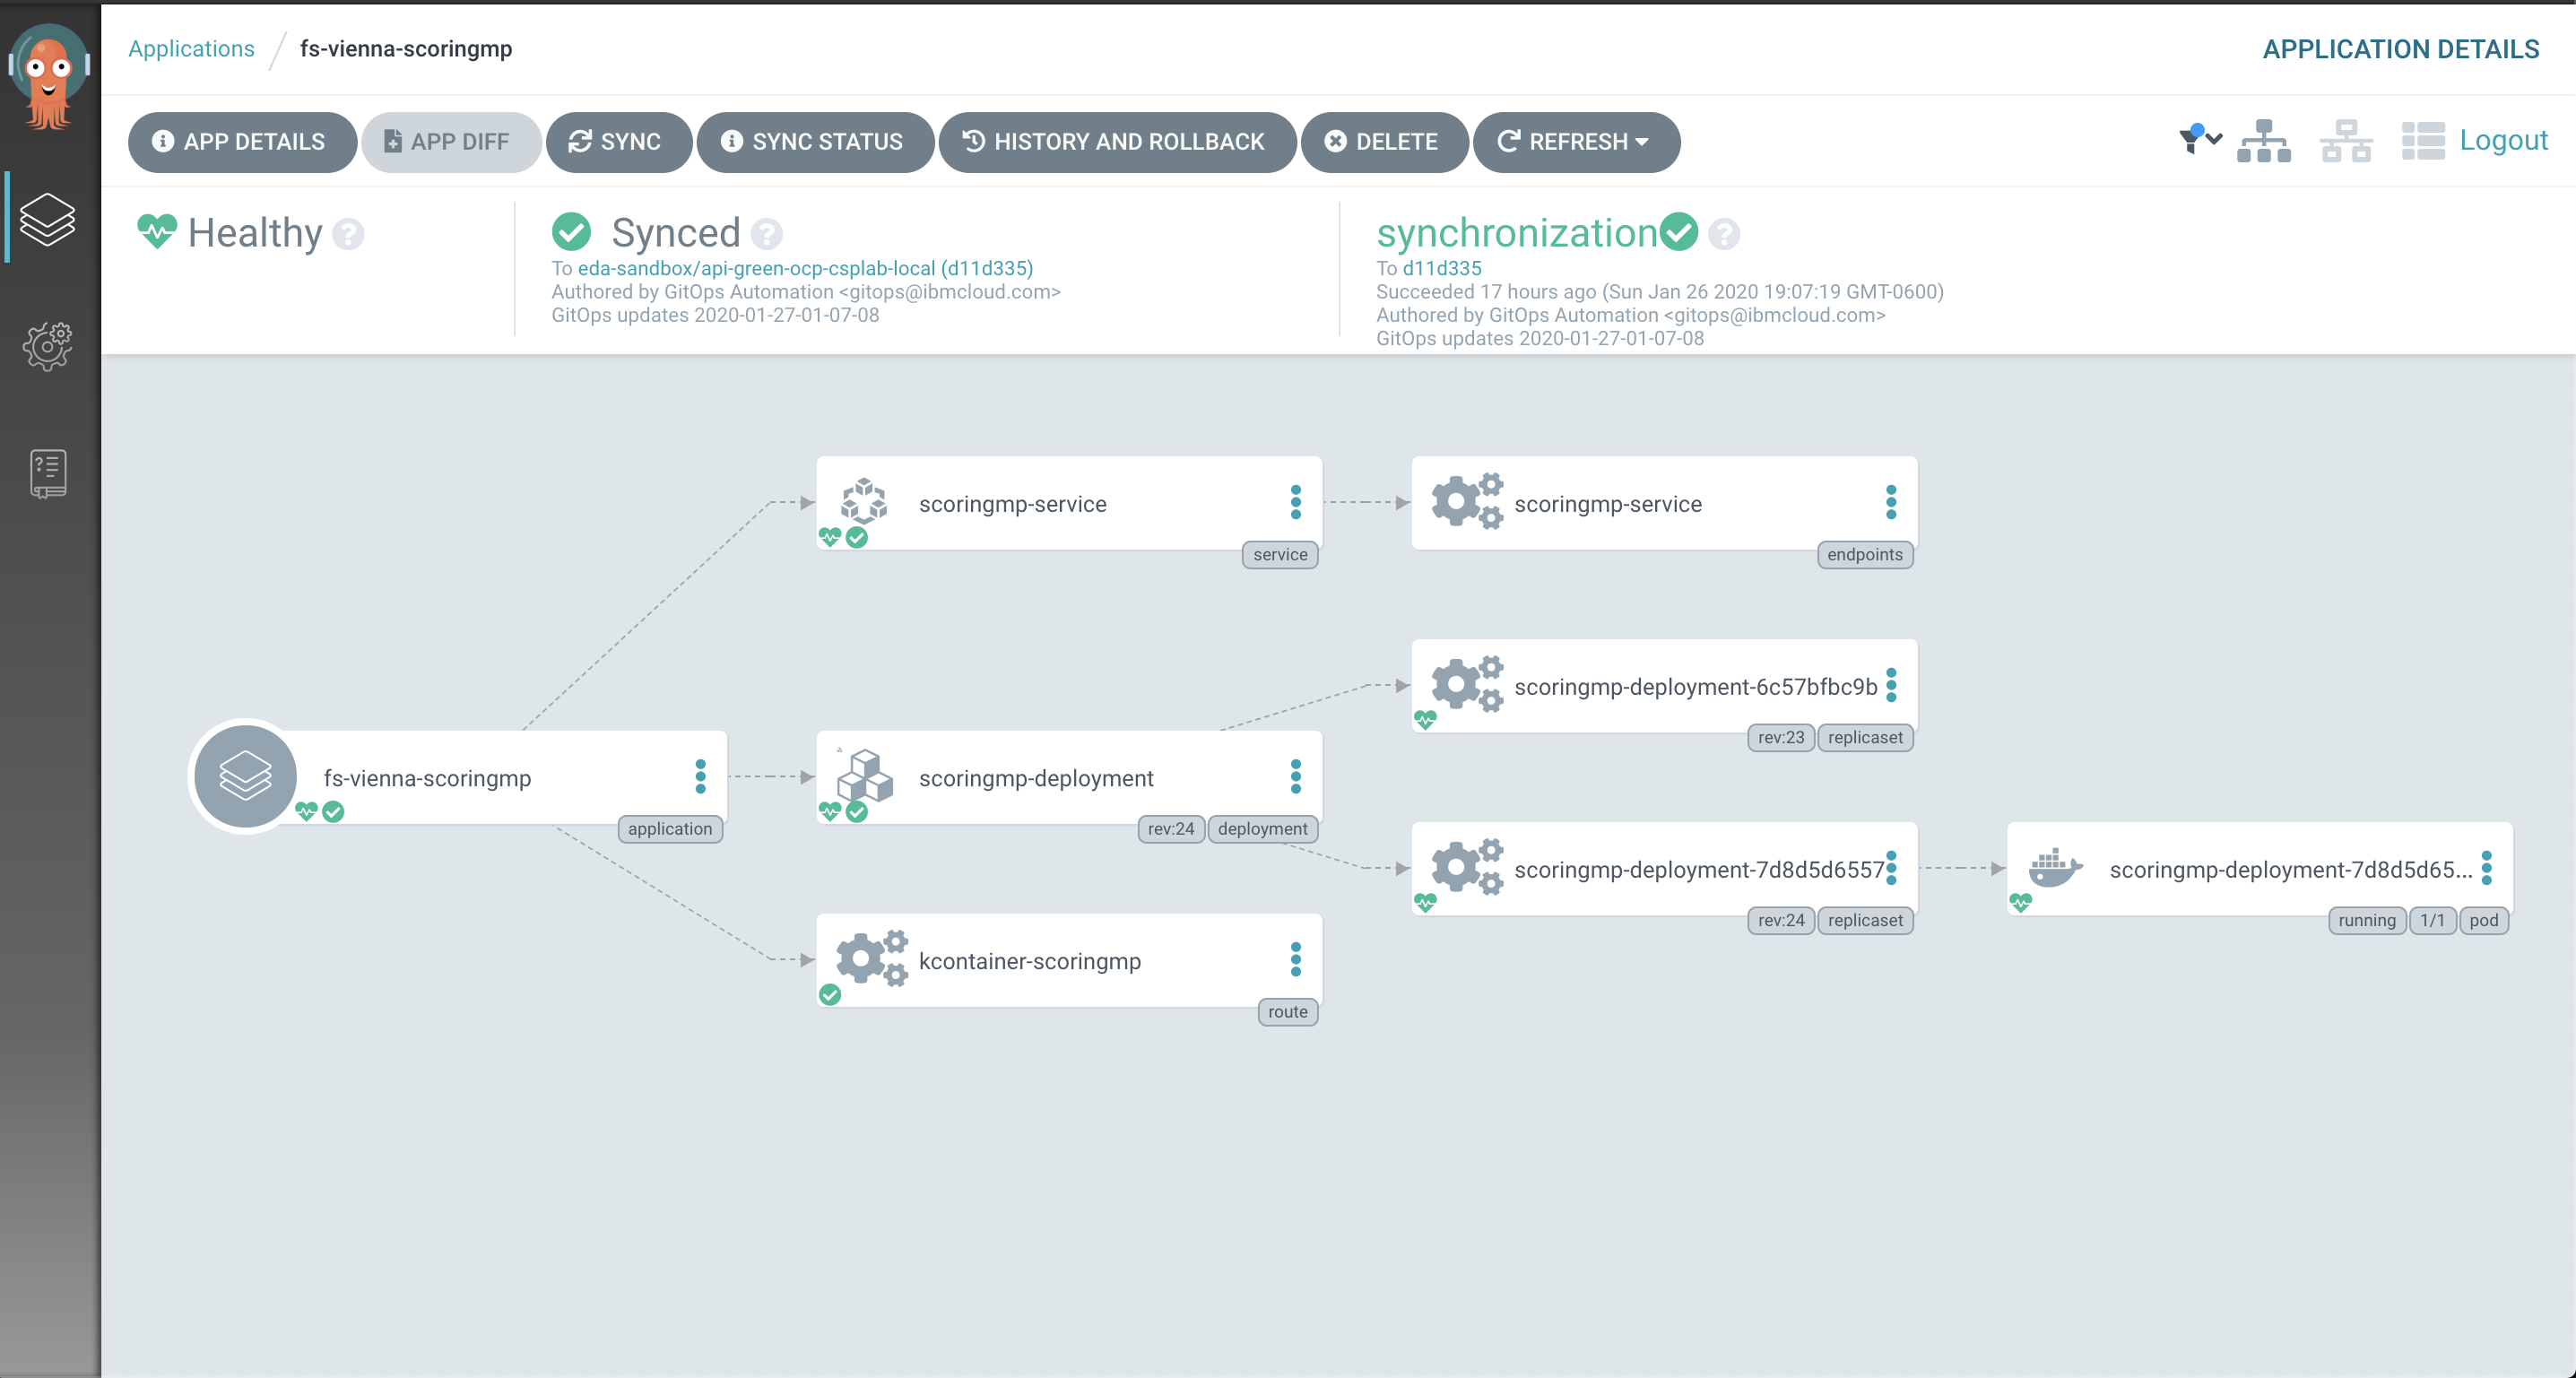
- Once the application is successfully created inside ArgoCD, you can click the application tile to see the latest status of the ArgoCD-managed, GitOps-deployed microservice instance. It should begin synchronizing immediately upon creation.
- As ArgoCD applies the desired configuration to the cluster, you should see the pods of the microservice being created:
kubectl get Pods
Using the command-line interface
ArgoCD provides a command-line interface as well, however we are not covering that in this reference implementation. Once you are satisfied with the ArgoCD dashboard-based deployment pattern, you can reference the ArgoCD Getting Started docs for further details on using the ArgoCD CLI and CRD YAMLs for programmatic interaction.
Tekton & Appsody deployments
We have also implemented some facets of the project deployment workflows using the Tekton Pipelines project and its inherent ease of support of the Appsody open-source developer experience project through the standard integration between the two built into the Kabanero open-source project, or more formally, the IBM Cloud Pak for Applications.
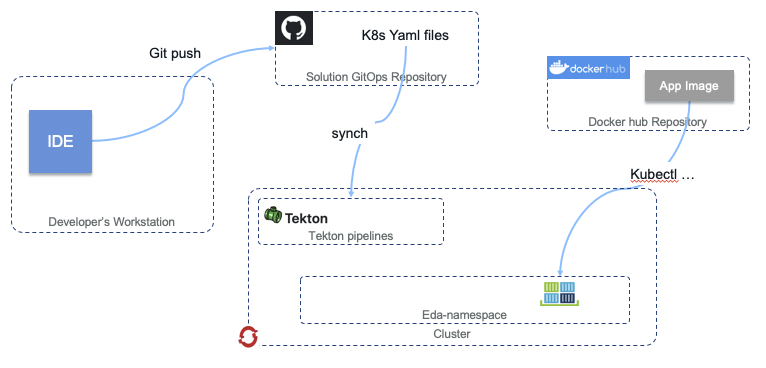
Defined in the /scripts/tekton directory, we have a simple pipeline that will utilize the appsody deploy command to deploy the generated AppsodyApplication CRD YAML to the target environment. Similar to our ArgoCD-based deployments of Helm-generated, standard Kubernetes YAMLs, AppsodyApplication YAMLs can also be deployed through ArgoCD in a GitOps manner. However, for demonstration inside this project, additional capabilities are provided to showcase how we can utilize different pieces of the platform to deploy similar applications when different requirements are presented. Similar to ArgoCD, Tekton Pipelines run on the same cluster (and often in the same namespace!) as your running application code, thus allowing for more programmatic control over the deployment, management, operations, and existence of your application components.
The key artifact that enables Tekton to deploy our Appsody-based refarch-reefer-ml/simulator microservice is the generated app-deploy.yaml file. The refarch-reefer-ml/simulator/app-deploy.yaml file was generated according to the appsody build command and then annotated with the required environment variables and metadata for successful operation in a given namespace, very similar to the pattern required for generating our Helm-templated YAMLs in the ArgoCD deployments section above.
We then make use of the Appsody Operator to apply the AppsodyApplication to the target environment through the appsody deploy --no-build command. As documented in the Appsody Docs, we are able to take advantage of the pre-built container images available on Docker Hub and the annotated app-deploy.yaml file that is now a synonymous GitOps-like deployment artifact to quickly apply the change to the target namespace in the same cluster. Once the appsody deploy command is succesful, the Appsody Operator and Kubernetes takes care of the rest and reconciles the necessary underlying Kubernetes artifacts that are required to fulfill the requirements of serving up the application code in real-time!
Deploying the simulator microservice with Tekton & Appsody
Prerequisites
- Ensure all necessary Kubernetes ConfigMaps and Secrets have been created in the namespace in which the application will be running.
- Ensure an Appsody Operator has been configured to watch the namespace in which the application will be running.
- Create a new or modify an existing Service Account in the target namespace and bind the required API RBAC requirements for the Appsody Operator.
- Further details available in the Appsody Docs
- A sample YAML document has been provided via rbac-sa.yaml, with environment-specific updates to the Namespace and Service Account name fields being required.
- From the
refarch-reefer-mldirectory, import the Tekton pipeline artifacts:kubectl apply -f scripts/tekton/
- Validate these items have been imported successfully by querying the cluster:
kubectl get Pipeline,Task,PipelineResource
Using the command-line interface
- Open the
/scripts/tekton/manual/simulator-pipeline-run.yamlfile in a text editor and ensure everything makes sense. - Kick off a new pipeline run with the Kubernetes CLI:
kubectl create -f scripts/tekton/manual/simulator-pipeline-run.yaml
- You can monitor the pipeline by common
kubectl getandkubectl describecommands:For further details on how to access the logs of a PipelineRun, reference the Tekton Pipelines documentation.kubectl get PipelineRun
- Once the pipeline completes, you should see a deployed instance of the Simulator Appsody application:
kubectl get Pods
Using the Tekton dashboard
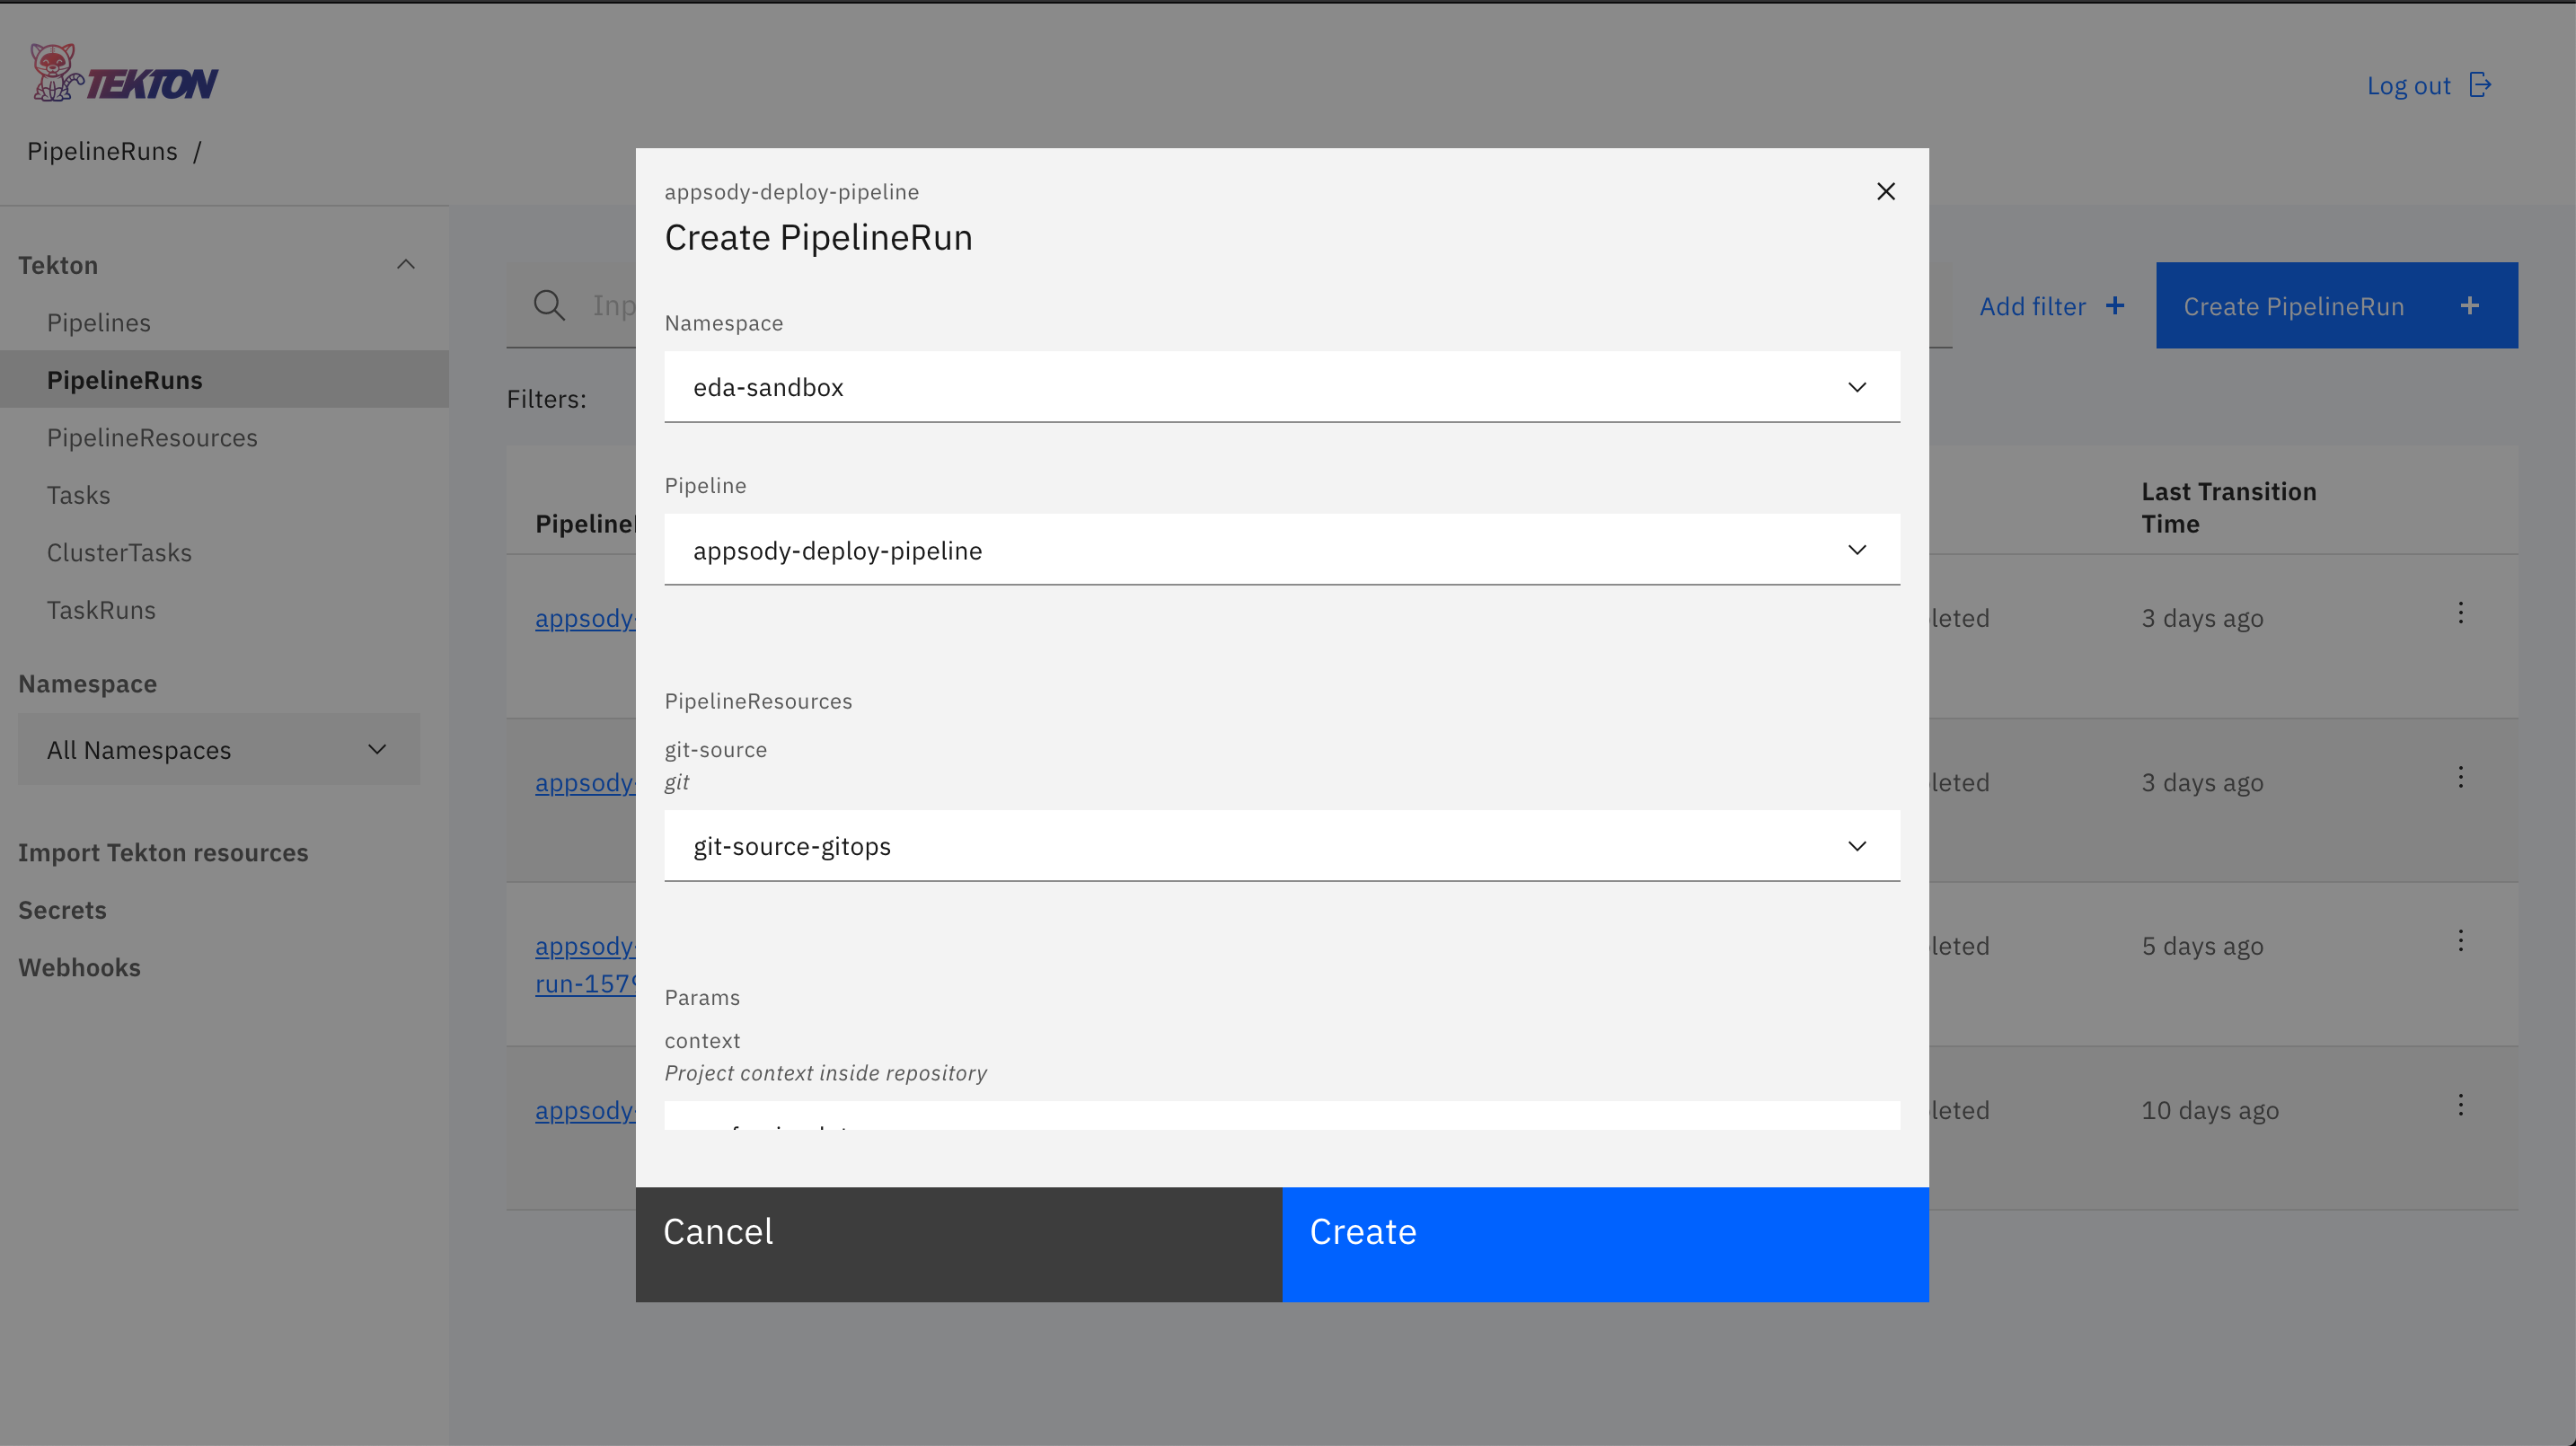
- Access the Tekton Pipelines dashboard from your Kabanero installation or directly via the defined Route. This will be something similar to https://tekton-dashboard-tekton-pipelines.apps.green.ocp.csplab.local.
- Click PipelineRuns in the left-nav menu and click Create PipelineRun from the upper-right of the page.
- Enter the following parameters and click Create:
- Namespace: Target namespace for application deployment target
- Pipeline:
appsody-deploy-pipeline - PipelineResources > git-source:
git-source-reefer-ml - Params > context:
simulator - Service Account:
reefer-simulator
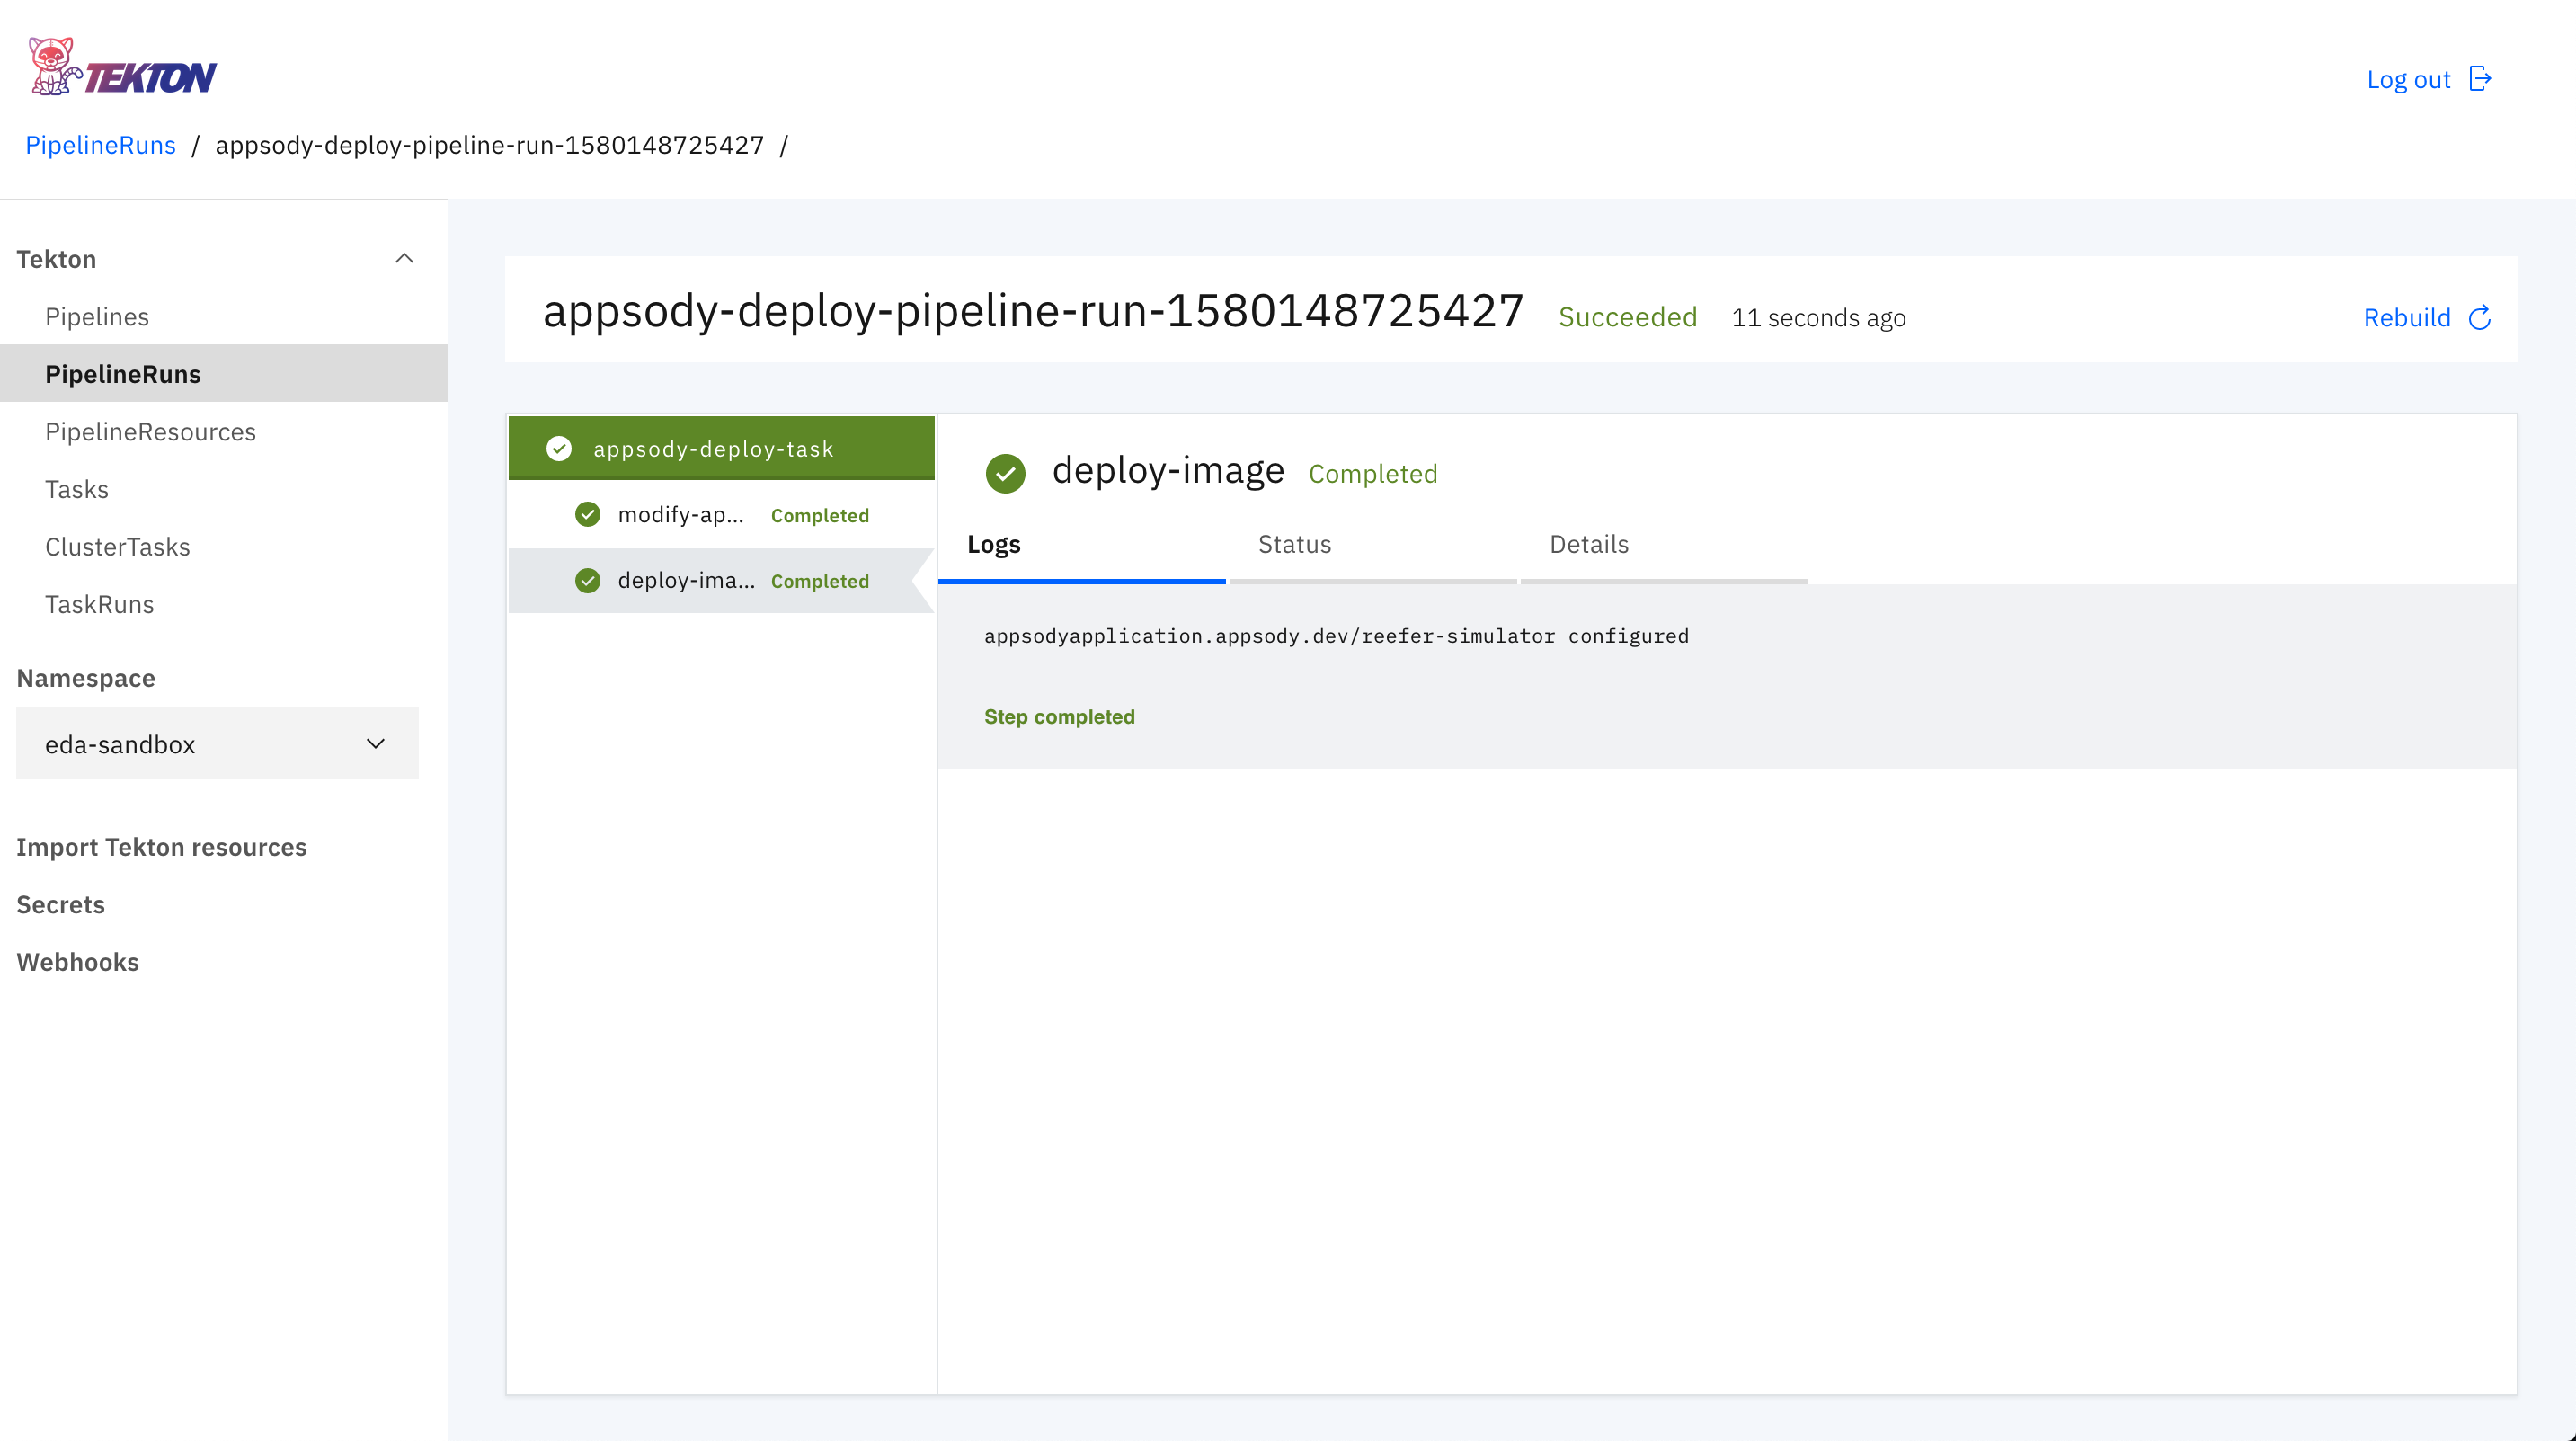
- A new PipelineRun will be created. Click on the name of the running PipelineRun.
- From here, you can monitor the live running logs of the pipeline, as well as see what is running from the command-line with Kubectl (
kubectl get pods). Note that the pipeline is actually running in pods deployed to the target namespace!