Generate telemetry data in MongoDB
We are using the simulator to generate data. In the industry, when developing new manufactured product, the engineers do not have a lot of data so they also use a mix of real sensors with simulators to create fake but realistic data to develop and test their models.
The historical data need to represent failure and represent the characteristics of a Reefer container. We have defined some sensors to get interesting correlated or independent features.
As of now, our telemetry event structure can be seen in this avro schema.
For the machine learning environment we can use a csv file or mongodb database or kafka topic as data source. The data generation environment looks like in the figure below:
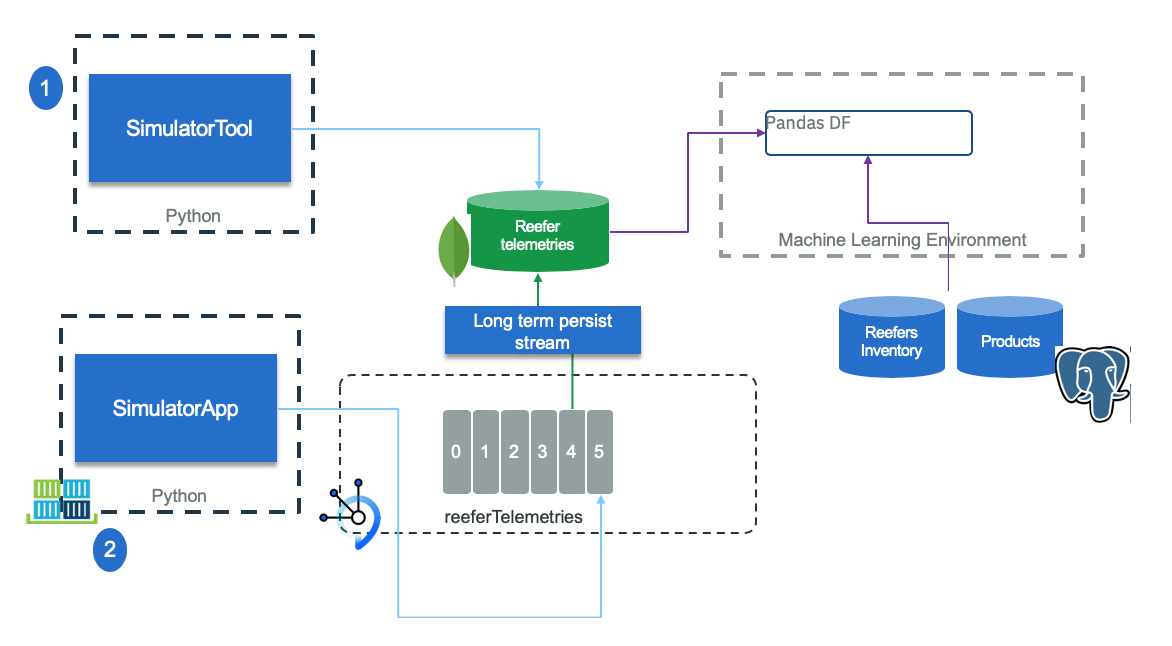 Figure 1: Data collection Simulation
The simulator can run as a standalone tool (1) to create training and test data to be saved in a remote mongodb database or can be used to save to csv file. when it runs to simulate reefer container telemetry generation (2), it creates events to Kafka topic, and a stream application can save telemetry records to MongoDB too.
We use MongoDB as a Service on IBM Cloud in our reference implementations.
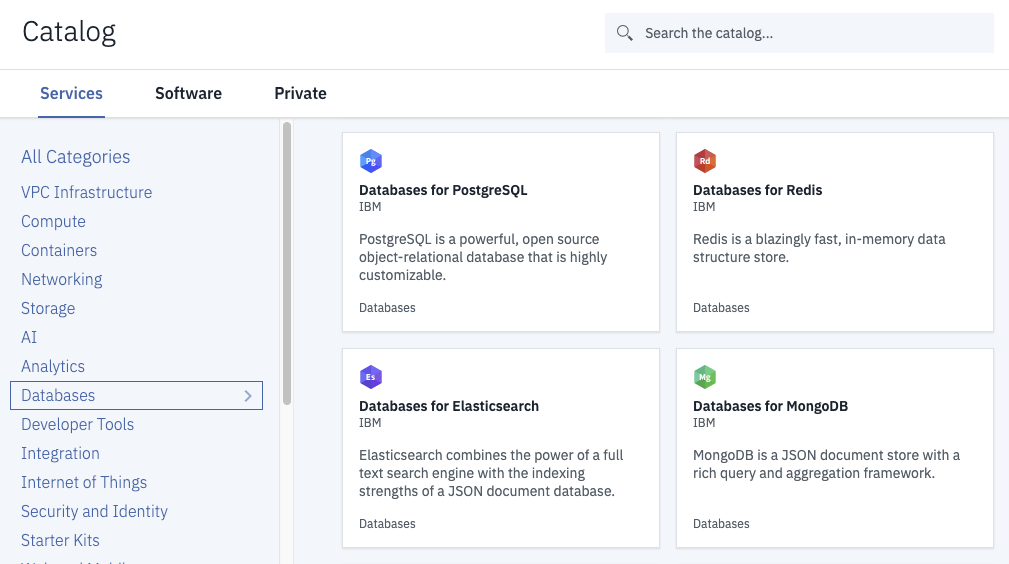 Figure 2: IBM Cloud Database
We have provided the following documented methods for populating the Product database:
- Create and save telemetry data with Kubernetes Job running on remote cluster (RECOMMENDED)
- Create local telemetry data manually
- Save local telemetry data to MongoDB
Create and save telemetry data with Kubernetes Job running on remote cluster
In an effort to keep development systems as clean as possible and speed up deployment of various scenarios, our deployment tasks have been encapsulated in Kubernetes Jobs. These are runnable on any Kubernetes platform, including OpenShift.
The predefined job for this task will create the required telemetry data and save it directly to the configured MongoDB database instance. This is the most direct method for telemetry data generation and what is necessary for the "happy path" version of the environment deployment. If you have use case needs that require other locations for data to be saved or transmitted, you can either adapt the Job here or follow the other sections of this document.
-
Utilizing Databases for MongoDB on IBM Cloud, the following Kubernetes Secrets are required to be created from the auto-generated Service credentials in the target namespace:
mongodb-url(in the format ofhostname-a,hostname-b, as the endpoint is a paired replica set)kubectl create secret generic mongodb-url --from-literal=binding='1a2...domain.cloud:30796,1a2c....cloud:30796'
mongodb-userkubectl create secret generic mongodb-user --from-literal=binding='ibm_cloud_...'
mongodb-pwdkubectl create secret generic mongodb-pwd --from-literal=binding='335....223'
mongodb-ca-pem(this requires use of the Cloud Databases CLI Plug-in for the IBM Cloud CLI)ibmcloud cdb deployment-cacert [MongoDB on IBM Cloud service instance name] > mongodb.crt kubectl create secret generic mongodb-ca-pem --from-literal=binding="$(cat mongodb.crt)"
-
Review
/scripts/createMongoTelemetryData.yamland update lines 32, 34, 36, or 38 with any additional modifications to the generated telemetry data. Additional rows can be added as needed in the same job execution. The following fields are acceptable inputs:stypecan thenormal,poweroff,o2sensor, andco2sensor.cidcan beC01,C02,C03, orC04.pidcan beP01,P02,P03, orP04.recordscan be any positive integer (within reason).
-
Create the
create-telemetry-dataJob from the root of therefarch-reefer-mlrepository:kubectl apply -f scripts/createMongoTelemetryData.yaml
-
You can tail the created pod's output to see the progress of the database initialization:
kubectl logs -f --selector=job-name=create-telemetry-data
Create local telemetry data manually
If not done yet, you can use our docker image to get an isolated python environment. For that do the following preparation steps:
# From refarch_reefer_ml folder
cd docker
docker build -t ibmcase/python -f docker-python-tools.yaml .
docker images | grep ibmcase
# .... results should include
ibmcase/python                                  latest                 a89153c0e14f
The dockerfile installed the needed dependencies and use pipenv. Also we preset the PYTHONPATH environment variable to /home to specify where python should find the application specifics modules.
Generate data as csv file
Start the python environment
From the docker image created before, use the provided script as:
# From refarch_reefer_ml folder
./startPythonEnv.sh
Generate power off metrics
When a reefer container loses power, restart and reloose it, it may become an issue. This is the goal of this simulation.
The simulator accepts different arguments as specified below:
usage reefer_simulator-tool
     --stype [poweroff | co2sensor | o2sensor | normal]
    --cid [C01 | C02 | C03 | C04 | C05]
    --product_id [ P01 | P02 | P03 | P04 | P05 ]
    --records <the number of records to generate>
    --file <the filename to create>
    --append | --db
- The
cidis for the container id. As the simulator is taking some data from internal datasource you can use only one of those values:[C01 | C02 | C03 | C04 | C05] product_idis also one of the value[ P01 | P02 | P03 | P04 | P05], as the simulator will derive the target temperature and humidity level from its internal datasource: ('P01','Carrots',1,4,0.4), ('P02','Banana',2,6,0.6), ('P03','Salad',1,4,0.4), ('P04','Avocado',2,6,0.4), ('P05','Tomato',1,6,0.4);--dbis when you want to save the telemetry into mongodb DB. In this case be sure to have set the credentials and URL in thescripts/setenv.shscript (see thescripts/setenv-tmp.shtemplate file)--fileis to specify a csv file to write the data-
--appendis used to append the output of this run to an existing file: It permits to accumulate different simulation in the same dataset. -
(Re)create a new file. It is an important step to get the column names as first row.
python simulator/reefer_simulator_tool.py --stype poweroff --cid C01 --records 1000 --product_id P02 --file telemetries.csv
- then new records are added by appending to existing file
python simulator/reefer_simulator_tool.py --cid C03 --product_id P03 --records 1000 --file telemetries.csv --stype poweroff --append
The results looks like:
    Generating  1000  poweroff metrics

    Timestamp   ID  Temperature(celsius) Target_Temperature(celsius)      Power  PowerConsumption ContentType  O2 CO2  Time_Door_Open Maintenance_Required Defrost_Cycle
    1.000000  2019-06-30 T15:43 Z  101              3.416766                           4  17.698034          6.662044           1  11   1        8.735273                    0             6
    1.001001  2019-06-30 T15:43 Z  101              4.973630                           4   3.701072          8.457314           1  13   3        5.699655                    0             6
    1.002002  2019-06-30 T15:43 Z  101              1.299275                           4   7.629094
From the two previous commands you should have 2001 rows (one for the header which will be used in the model creation):
wc -l telemetries.csv
2001 telemetries.csv
Generate Co2 sensor malfunction in same file
In the same way as above the simulator can generate data for Co2 sensor malfunction using the command:
python simulator/reefer_simulator_tool.py --cid C03 --product_id P02 --records 1000 --file basedata --stype co2sensor --append
Generate O2 sensor malfunction in same file
python simulator/reefer_simulator_tool.py --cid C03 --product_id P02 --records 1000 --file basedata --stype o2sensor --append
Save local telemetry data to MongoDB
MongoDB is a popular document-based database that allows developers to quickly build projects without worrying about schema. Mongo components include:
- mongod - the core process that runs the actual database
- mongos - controls routing to the databases in case of sharding
- config servers (CSRS) - stores the metadata in a sharded environment.
We propose to persist telemetry for a long time period. For example we can configure Kafka topic to persist telemetries over a period of 20 days, but have another component to continuously move events as JSON documents inside Mongodb.
Using Mongodb as service on IBM Cloud
Create the MongoDB service on IBM cloud using default configuration and add a service credentials to get the mongodb.composed url: (something starting as mongodb://ibm_cloud_e154ff52_ed) username and password.
Set those environment variables in scripts/setenv.sh the export MONGO_DB_URL="mongodb://ibm_c..."
Get the TLS certificate as pem file:
ibmcloud cdb deployment-cacert gse-eda-mongodb > certs/mongodbca.pem
Start python environment
Use IBMCLOUD if you use mongodb, postgresql and kafka on cloud, or LOCAL for kafka and postgresql running via docker compose.
 ./startPythonEnv IBMCLOUD

root@03721594782f: cd /home
If you are using your own environment, to access mongodb we use the pymongo driver (pip install pymongo)
The code below is a simple example of how to access mongodb.
 URL=os.getenv('MONGO_DB_URL')
 client = MongoClient(URL,ssl=True,ssl_ca_certs='/home/certs/mongodbca.pem')
 db = client['ibmclouddb']

 # insert a record
 result = db.telemetries.insert_one(telemetry)
 telemetry = db.telemetries.find_one({"_id": ObjectId(result.inserted_id)})

 # get all the records
 telemetries = db.telemetries.find()
 for t in telemetries:
See the rest of the code in ml/data/ToMongo.py to load records from CSV file, or the simulator/infrastructure/ReeferRepository.py for the one generating metrics and uploading them directly to MongoDB.
We propose two approaches to load data to MongoDB: use created csv file, or run the simulator tool connected to MongoDB.
Add data from csv file
Using the ToMongo.py script we can load the data from the ml/data/telemetries.csv file to mongodb. In a Terminal window uses the following commmand:
./startPythonEnv.sh IBMCLOUD

cd ml/data

python ToMongo.py
Add data using the telemetry repository of the simulator
Verify your MONGO* environment variables are set according to your created service in the scriptssetenv.sh file.
./startPythonEnv.sh IBMCLOUD

cd simulation

python simulator/reefer_simulator_tool.py --cid C03 --product_id P02 --records 1000  --stype poweroff --db

python simulator/reefer_simulator_tool.py --cid C03 --product_id P02 --records 1000  --stype co2sensor --db

python simulator/reefer_simulator_tool.py --cid C03 --product_id P02 --records 1000  --stype o2sensor --db
Verify data with mongo CLI
To verify the data loaded into the database we use mongo CLI with the following command:
# to connect
mongo -u $USERNAME -p $PASSWORD --tls --tlsCAFile mongodb.pem --authenticationDatabase admin --host replset/1a2ce8ca-<>.bn<>c0.databases.appdomain.cloud:30796 --tlsAllowInvalidCertificates
The full host name is masked.
The USERNAME and PASSWORD are environment variables you set from the IBM Cloud service credentials. Something like:
{
  "connection": {
    "cli": {
      "arguments": [
        [
          "-u",
          "ibm_cloud_<>_48b1_b899",
          "-p",
          "3359192a<>e5fbdf51fd573676e58aff4f9e223",
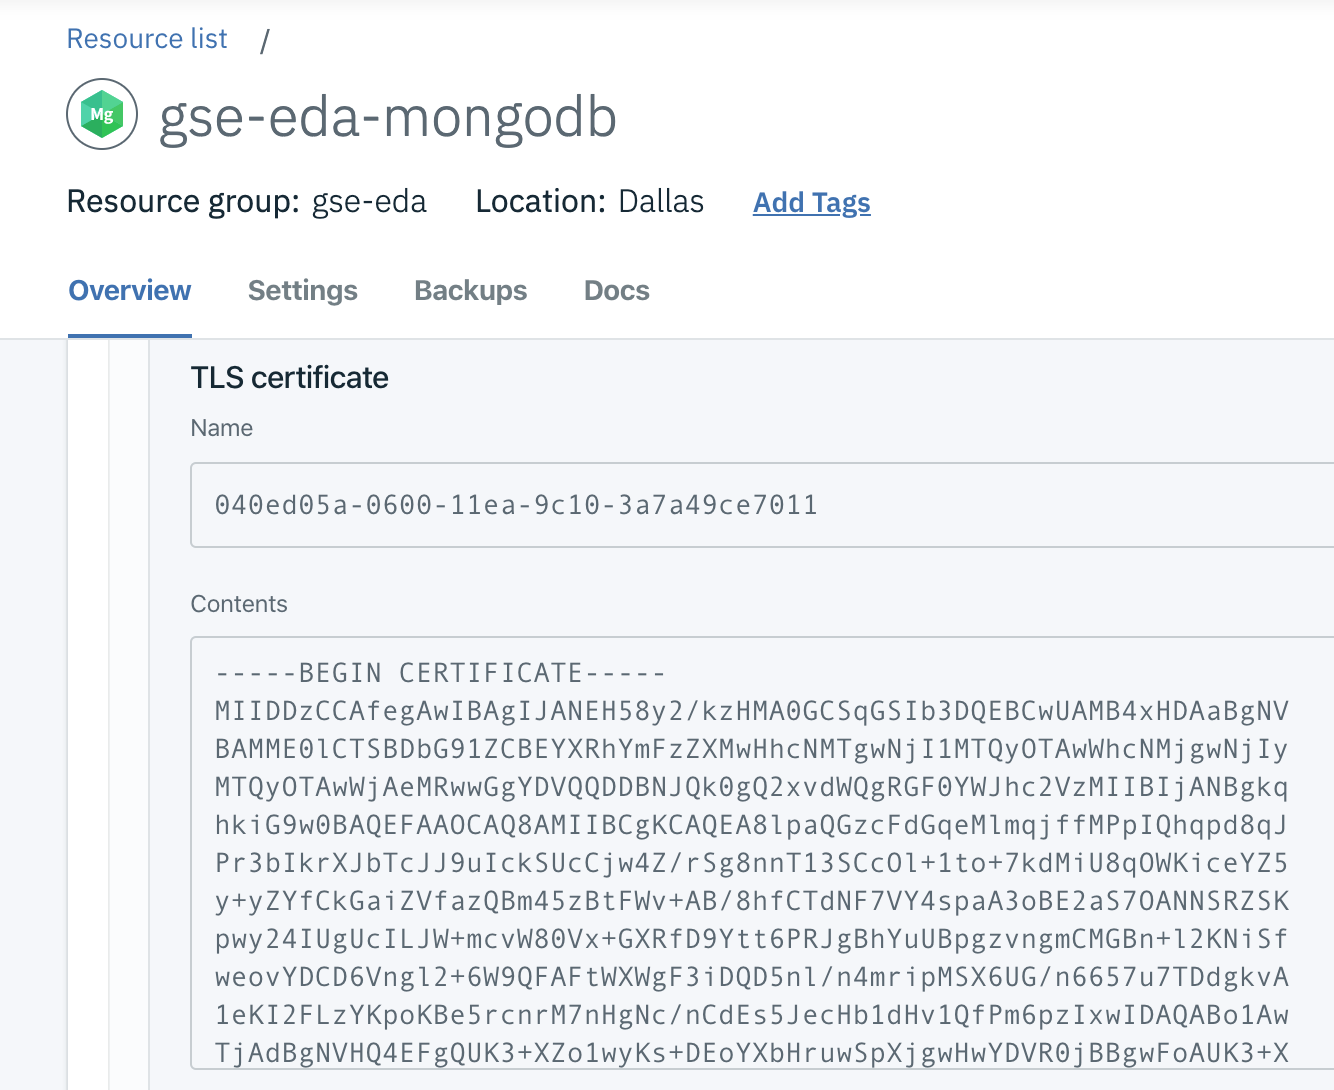
The mongodb.pem is the certificate in text save in a file. To get this certificate you can use the following command:
ibmcloud cdb deployment-cacert gse-eda-mongodb > mongodb.pem
or by using the IBM Cloud mongodb service user interface (Manage menu):
Once connected use the ibmclouddb database with mongo CLI:
MongoDB server version: 4.2.0
replset:PRIMARY> use ibmclouddb
replset:PRIMARY> db.getCollection("telemetries").find()
Using MongoDB on Openshift 4.2 on-premise
We assume you have provisioned an Openshift 4.2 cluster and logged in. We use the following container image: centos/mongodb-36-centos7. So to install it, we use the following command:
oc new-app -e \
    MONGODB_USER=mongo,MONGODB_PASSWORD=<password>,MONGODB_DATABASE=reeferdb,MONGODB_ADMIN_PASSWORD=<admin_password> \
    centos/mongodb-36-centos7
Connect to the pod and then use the mongo CLI
$ oc get pods
NAME                                         READY     STATUS             RESTARTS   AGE
mongodb-36-centos7-1-wcn7h                   1/1       Running            0          4d

$ oc rsh mongodb-36-centos7-1-wcn7h
bash-4.2$ mongo -u $MONGODB_USER -p $MONGODB_PASSWORD $MONGODB_DATABASE
MongoDB shell version: 2.4.9
connecting to: reeferdb
> show collections
To remove the db on openshift: oc delete dc
The document saved in mongo will not be a flat record as produced by the simulator when it creates records to Kafka, but a Json document which matches the following format, where sensors are in their own object:
{ "timestamp": "2019-09-04 T15:31 Z",
  "containerID": "C100",
  "product_id": "P02",
  "content_type": 2,
  "sensors": {
   "temperature": 5.49647,
   "oxygen_level" : 20.4543,
   "nitrogen_level" : 79.4046,
   "carbon_dioxide_level" : 4.42579,
   "humidity_level" : 60.3148,
   "fan_1": "True",
   "fan_2" : "True",
   "fan_3" : "True",
   "ambiant_temperature": 19.8447
  },
  "target_temperature": 6.0,
   "kilowatts": 3.44686,
   "latitude": "37.8226902168957,",
   "longitude": "-122.3248956640928",
   "time_door_open" : 0,
   "defrost_cycle": 6
}
First be sure to set at least the following environment variables in the setenv.sh file
MONGO_DB_URL, MONGO_SSL_PEM
If not done before or to ensure the mongo connection works fine, run the ReeferRepository.py tool to create the telemetries collection using the following command:
./startPythonEnv.sh IBMCLOUD
> python simulator/infrastructure/ReeferRepository.py
Delete records in database
In mongo CLI do:
db.telemetries.deleteMany({})