This section covers how to deploy the CustomerOrderServices application to Red Hat OpenShift using the pipelines provided by the Cloud Native Toolkit
Summary
This section has the following steps:
- Cloud Native Toolkit pipelines
- Prerequisites
- Create application database
- Create the application in Git
- Clone the application code locally
- Configure the application namespace
- Register the application with the Toolkit pipeline
- Execute the Toolkit pipeline
- Review the Sonar Scan for the application
- Validate the application
- Review and Next Steps
Cloud Native Toolkit pipelines
Cloud Native Toolkit is an open-source collection of assets that provide an environment for developing cloud-native applications for deployment within Red Hat OpenShift and Kubernetes. It embodies IBM Garage Method principles and practices for consistently developed applications, incorporating best practices that increase developer velocity for efficient delivery of business value.
The diagram below shows the flow of the pipeline which starts when the developer checks their code in to Git:

build: the container image for the application is created using buildah and pushed to the Image Registry in the local OpenShift cluster
trivy-scan: the container image in the local Image Registry is scanned for vulnerabilities using Trivy
deploy: deploy the application to the
devnamespacehealth-check: validate the the application is functioning correctly in the
devnamespace. Automated testing may occur at this step but is out of the scope of this solution.tag-release: create a new ‘release’ for the application in the Git repository
img-release: tag and push the container image to the central Image Repository
scan: scan the container image in the central Image Registry using IBM Vulnerability Advisor
helm-release: package a helm release for the application and load it in to the central Artifact Repository Artifactory
gitops: update the GitOps repository with the latest helm release information to trigger ArgoCD to deploy the application to the
testnamespace
Deploy the Application
The following steps will deploy the modernized Customer Order Services application in a WebSphere Liberty container to a Red Hat OpenShift cluster.
Prerequisites
You will need the following:
- Git CLI
- GitHub Personal Access Token
- Red Hat OpenShift Container Platfrom 4.4 with Cluster Admin permissions
- Cloud Native Toolkit installed and configured
- igc CLI
- oc CLI
- DB2 Database
Create application database
As said in the prerequisites section above, the Customer Order Services application uses uses DB2 as its database.
If you want to use a pre-configured DB2 database in a container in OpenShift, use the instructions provided here
Alternatively, if you have a DB2 server that you want to use, follow these steps to create the appropriate database, tables and data the application needs to:
Copy the createOrderDB.sql and initialDataSet.sql files you can find in the Common directory of this repository over to the db2 host machine (or git clone the repository) in order to execute them later.
ssh into the db2 host
Change to the db2 instance user: `su {database_instance_name}“
Start db2:
db2startCreate the ORDERDB database:
db2 create database ORDERDBConnect to the ORDERDB database:
db2 connect to ORDERDBExecute the createOrderDB.sql script you copied over in step 1 in order to create the appropriate tables, relationships, primary keys, etc:
db2 -tf createOrderDB.sqlExecute the initialDataSet.sql script you copied over in step 1 to populate the ORDERDB database with the needed initial data set:
db2 -tf initialDataSet.sql
If you want to re-run the scripts, please make sure you drop the databases and create them again.
Create the application in Git
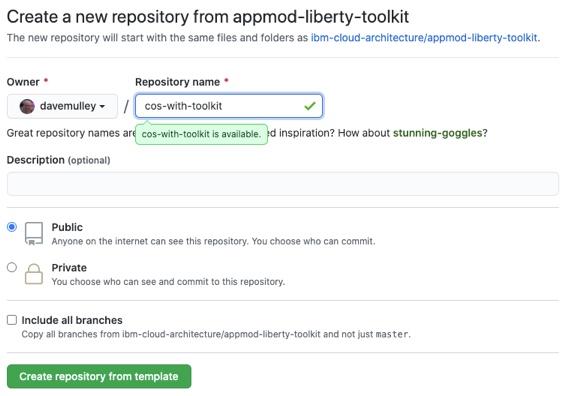
Create an instance of the template GitHub repository in your own GitHub account using the following steps:
Click here to create an instance of the template
Ensure that the
ownerfield is set correctly, and then enter a uniquerepository nameLeave the repository as a
publicrepository and click Create repository from this template
Clone the application code locally
The newly created repository will be shown in your browser. In order to clone the code locally, use the following steps
In the browser, click the green Code button and use the *copy icon to copy the
https://github.com/...URLNavigate to a
directory/folderon your local machine where you want to clone the codeEnter the following command, pasting the copied URL after the
git clone:
git clone <URL>
- Navigate in to the cloned code. The
folderwill have the same name as therepository
cd <REPO_NAME>

Configure the application namespace
Create a new OpenShift project for the dev namespace using the following steps
- Issue the following command to new OpenShift
projectand configure it with the requiredService Accounts,Config MapsandSecrets
oc sync cos-with-toolkit-dev --dev
- Issue the following command to set the current project to
cos-with-toolkit-dev
oc project cos-with-toolkit-dev
Register the application with the Toolkit pipeline
In order to configure the application to use the pipeline provided by the toolkit, use the following steps
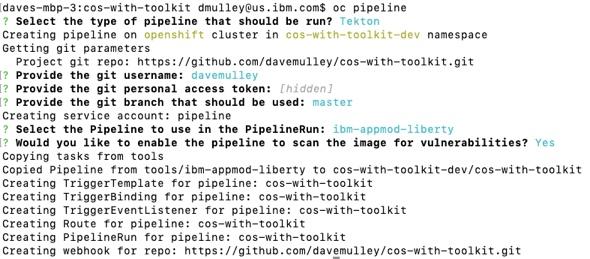
- Issue the following command
oc pipeline
When prompted to Select the type of pipeline that should be run, select
TektonWhen prompted for your git credentials use your
username,API tokenand themasterbranchWhen prompted to Select the Pipeline to use in the PipelineRun, select
ibm-appmod-libertyWhen prompted ? scan-image: Enable the pipeline to scan the image for vulnerabilities? (Y/n), enter
Y
When prompted ? health-endpoint: Endpoint to check health after deployment, liberty uses / not /health? (/), press enter
When promoted ? java-bin-path: The path to the java binaries. The default value is “target”? (target), enter
CustomerOrderServicesApp/target
The result will be a specialized tekton pipeline for Liberty applications that has been configured with a WebHook from your GitHub repository.
Review the Sonar Scan for the application
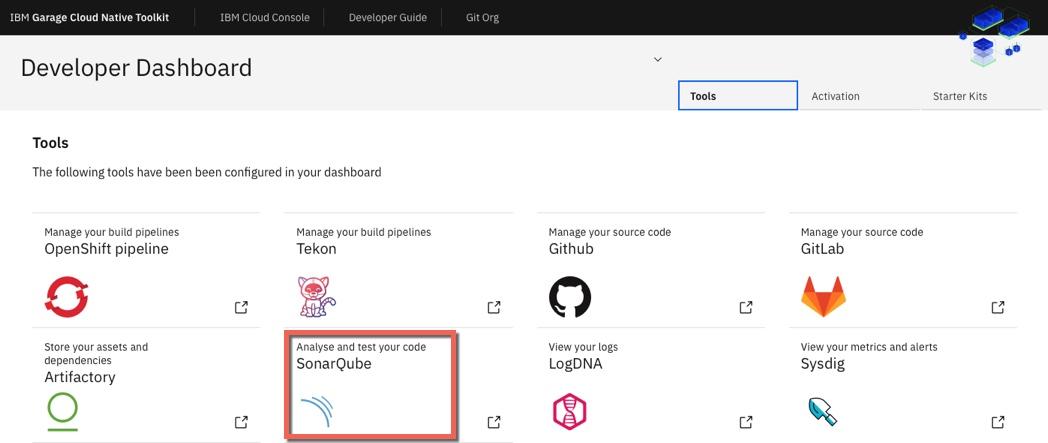
- Use the
Cloud Native Toolkit Dashboardto find the link to SonarQube in your environment
igc dashboard

- Once in the SonaQube UI, click Projects and review the results for your project

Validate the application
Now that the pipeline is complete, validate the Customer Order Services application is deployed and running in cos-with-tekton-dev project
- In the OpenShift Console, navigate to Workloads —> Deployments view and click on the
cos-with-toolkitDeployment to view deployment details
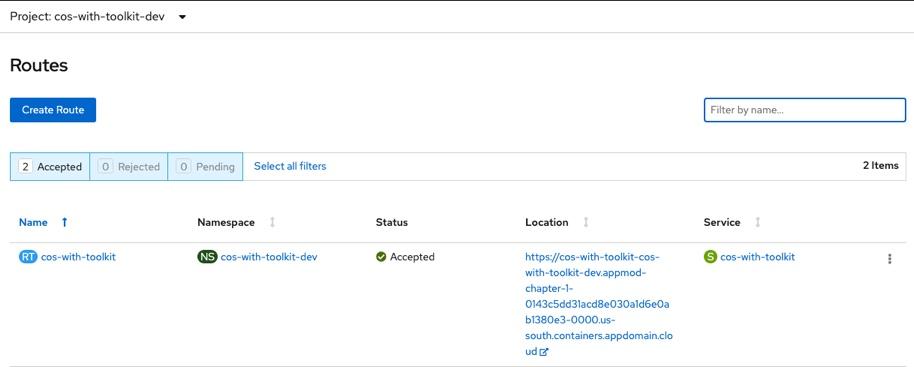
- Next, navigate to the Networking —> Routes view and click on the Location to open a browser session for the application

Add
/CustomerOrderServicesWebto the end of the URL in the browser to access the application
Log in to the application with
username: rbarciaandpassword: bl0wfish
Review and Next Steps
In this section you configured a CI/CD pipeline for the CustomerOrderServices application that builds, tests, scans and validates the application code and Container Image and results in the application running in a dev environment.