Order management and optimization demo
The vaccine order fullfilment is a complex problem to address as we need to optimize the shipment plan according to the demand and the constraints. A deep dive to the Operational Research problem is described in this note. In this use case / lab you will learn how to integrate with Kafka using the Outbox pattern, and Debezium to capture change to the postgresql table, how to integrate an Operational Research / advanced analytics component in an event-driven architecture which acts on new order events, to improve the shipment plan, how to deploy those component using GitOps approach, and finally how to use Quarkus and microprofile reactive messaging.
Target Audiences
You will be greatly interested by the subjects addressed in this use case if you are:
- an architect, as you will get a deeper understanding on how all the components work together, and how to adopt event-driven approach to this problem which is mostly seen as a batch processing in traditional It architecture.
- a developer, as you will get a broader view of the solution end-to-end, as well as insight into practices to reuse during your future implementations.
The what
In this scenario we want to demonstrate the order entry with an event-driven microservice, and the integration with an event driven linear programming stateful function. The scenario addresses the following features:
- Create Order(s) using a simple user interface as an order manager will do after interacting with the country health care request.
- Validate the transactional outbox pattern works to get OrderCreated, OrderUpdated or OrderCancelled Events created into a dedicated table in Postgresql
- Validate how Debezium Change Data Capture for Postgresql as a Kafka connector, produces OrderEvents from the table to Kafka
orderstopic. - Integrate with the Shipment plan optimization to get the updated shipment plan as events.
Components involved in this use case
Kafka Cluster using either Strimzi or IBM Event Streams
-
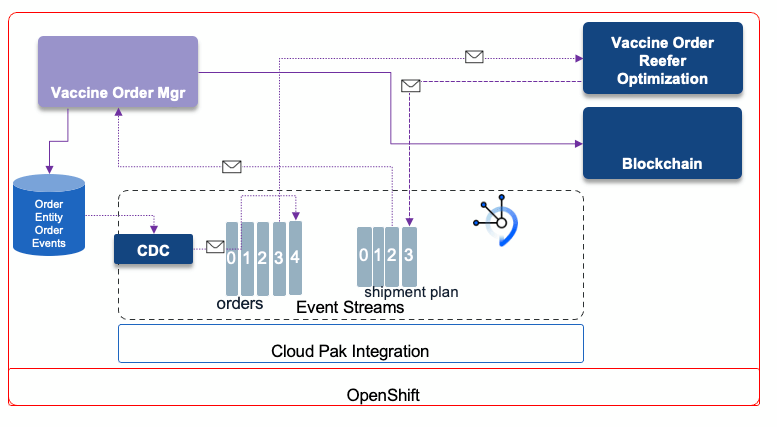
The blockchain integration is not done yet
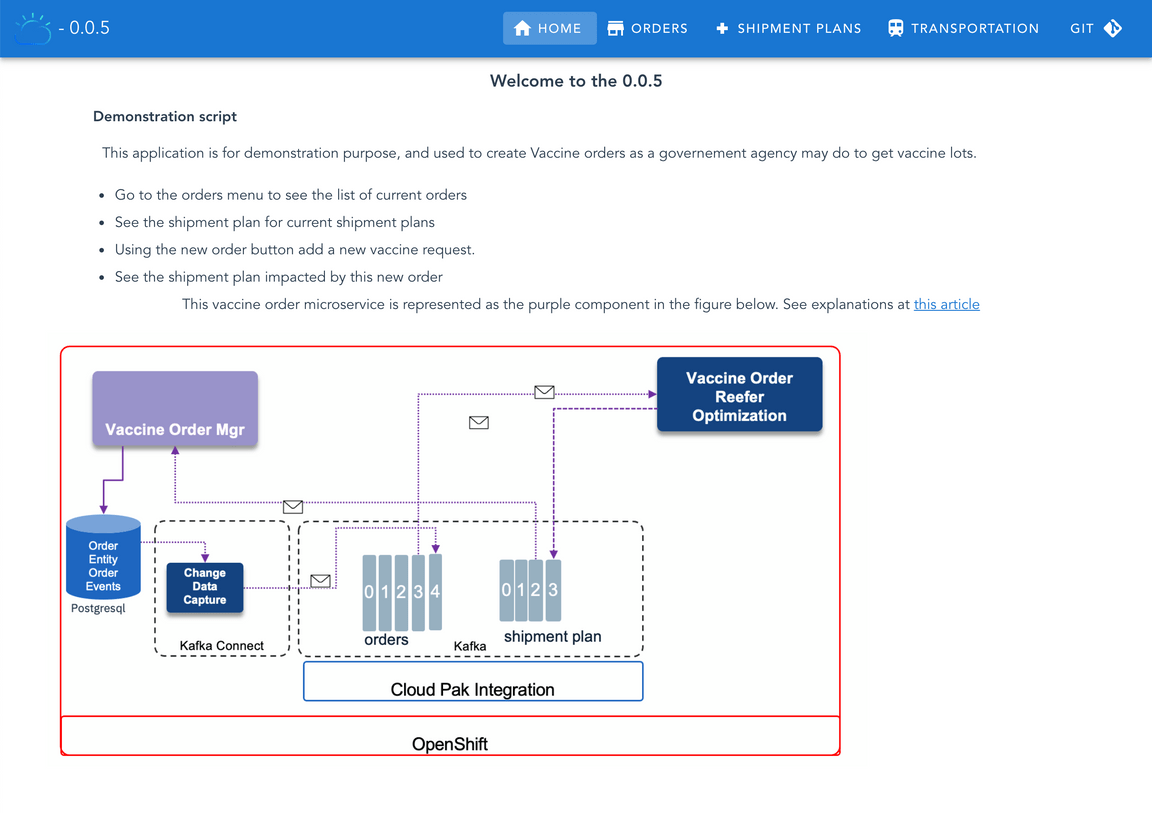
To have a deeper understanding of the order service read this overview section. For the Vaccine order reefer optimization service the design article details the optimization approach, while the solution article goes over the service implementation details.
Deploy to OpenShift
As already said, we need an OpenShift cluster to deploy this Vaccine Order Management and Optimization use case to. We are providing two approaches to deploy the use case:
- One Click Deploy - where we have automated the deployment of all the pieces making up this use case. We are using the open source Strimzi operator to get a Kafka cluster deployed and the open source Apicurio Registry to get a schema registry deployed.
- Manual Deploy - where we will drive you through all of the steps required to get all of the different pieces making up this use case deployed. This approach relies on the availability of an IBM Event Streams instance beforehand.
Pre-requisites
- You need access to an OpenShift Cluster with administrator access. You can use your own OpenShift cluster or use the IBM OpenLabs to gain access to a 4h free OpenShift Cluster (if you do so, please use
lab 6). - You would need the following tools installed on your latpop:
- Git client
- OpenShift CLI on your local environment.
- jq on your local environment.
One Click Deploy
This section will explain how to get the Vaccine Order Management and Optimization use case deployed following a one-click deployment approach.
Pull down the Vaccine GitOps GitHub repository:
git clone https://github.com/ibm-cloud-architecture/vaccine-gitopsChange directory to
vaccine-gitops/scriptscd vaccine-gitops/scriptsOpen the
env-strimzi.shand make sure to provide values for:OCP_ADMIN_USERandOCP_ADMIN_PASSWORDwhich correspond to your OpenShift cluster credentials. IMPORTANT: We recommend you to log into your OpenShift cluster from the same terminal you are going to later execute the one-click-deployment script so that you dont need to share your OpenShift cluster credentials.KAFKA_CLUSTER_NAMEwhich is the name you want to give to the Kafka cluster that will get deployed. It defaults tovaccine-kafkaand we highly recommend you to leave the default. Otherwise, you would need to modify some yaml deployment scripts…APICURIO_REGISTRY_NAMEwhich is the name you want to give to the Apicurio Registry that will get deployed. It defaults tovaccine-apicurioregistryand we highly recommend you to leave the default. Otherwise, you would need to modify some yaml deployment scripts…YOUR_PROJECT_NAMEwhich is the name of the OpenShift project the one-click-deployment script will create for you to get all the components of this Vaccine Order Management and Optimization use case deployed into. It defaults tovaccine-solution.
Log into your OpenShift cluster from your terminal (again, we recommend to do this instead of sharing your OpenShift cluster credentials in any script)
Execute the
deployOrderOptimWithStrimzi.shone-click-deployment script./deployOrderOptimWithStrimzi.sh --skip-loginwhere you would add the
--skip-loginflag if you previously logged into your OpenShift cluster.After some time (can easily take up to more than 15 min) you should see the following message:
********************** CONGRATULATIONS!! You have successfully deployed the Vaccine Order Managemente and Optimization use case.********************You can now jump to the demo section for this use case at https://ibm-cloud-architecture.github.io/vaccine-solution-main/use-cases/order/#demo(*)We suggest to open another terminal and execute
watch -n 5 oc get podsto follow the deployment status of the Vaccine Order Management and Optimization components.If you don’t see that success message, please checkout the logs to see where it failed.
If you execute
oc get podsyou should see the following pods running on your system:NAME READY STATUS RESTARTS AGEapicurio-registry-operator-698958454b-frhlk 1/1 Running 0 7m26spostgres-db-postgresql-0 1/1 Running 0 2m55svaccine-apicurioregistry-deployment-m9lnl-1-deploy 0/1 Completed 0 6mvaccine-apicurioregistry-deployment-m9lnl-1-kbbvf 1/1 Running 0 5m58svaccine-connect-cluster-connect-7b5b4b85d8-bzmwt 1/1 Running 0 93svaccine-kafka-cruise-control-77c8568f48-jp4gt 2/2 Running 0 9m10svaccine-kafka-entity-operator-dc999bff6-k4tbt 3/3 Running 0 9m36svaccine-kafka-kafka-0 1/1 Running 0 10mJump to the Demo section to see how the application works and what’s behind the scenes.
To clean up your OpenShift cluster and remove all the components the one-click-deployment script created, you just need to execute the deleteOrderOptimWithStrimzi.sh script (make sure you have previously logged into your OpenShift cluster)
Deploy the solution manually
In this section we are going to see how to deploy all the components of this use case manually on an OpenShift cluster. IMPORTANT: We asume IBM Event Streams has been deployed onto this cluster.
This is the summary of activities for deploying the use case manually:
- Pull down related GitHub repositories
- Prepare your OpenShift and Kafka environments
- Deploy Postgres
- Deploy the Vaccine Order Manager microservice
- Deploy Kafka Connect
- Deploy Debezium CDC Postgres connector
- Deploy the Vaccine Order Optimizer microservice
Pull down GitHub repositories
We are going to use three GitHub repositories for manually deploying the Order Management and Optimization use case. These are:
- Vaccine Order Manager for Postgres component:
- Vaccine Order Optimizer component:
- Vaccine GitOps:
To pull down the three GitHub repositories execute in your terminal:
git clone https://github.com/ibm-cloud-architecture/vaccine-order-mgr-pggit clone https://github.com/ibm-cloud-architecture/vaccine-order-optimizationgit clone https://github.com/ibm-cloud-architecture/vaccine-gitops
Prepare your OpenShift and Kafka Environments
In this section we are going to prepare our OpenShift and Kafka environments with all the pre-requisites needed for successfully deploying the following components that make up the Vaccine Order and Optimization use case:
- Vaccine Order Manager for Postgres component.
- Vaccine Order Optimizer component.
- Kafka Connect.
- The Debezium CDC for Postgres connector.
- Postgres.
This preparation will consist of creating configmaps and secrets that will hold infrastructure configuration required by the above components for their well functioning as well as creating the needed resources within our Kafka environment.
OpenShift project and service account
We are going to create a new OpenShift project in which we will deploy everything we need to get this order management and optimization use case working (except IBM Event Streams which we assume that has already been deployed in some other OpenShift project within this OpenShift cluster). Our new OpenShift project will be called
vaccine-omo(that stands for vaccine order management and optimization) but you can choose any of your likes. To create the project, execute in your terminal (after having logged onto your OpenShift cluster):oc new-project vaccine-omoAlso, we are going to create a new service account within our OpenShift project that provides an identity for processes that run in a Pod. The reason for this is that the postgres deployment in the following section requires certain privileges that aren’t granted with the default service account when a new OpenShift project is created and which will be used when you deploy anything into it unless you specify otherwise.
For creating the new service account specific for our vaccine order management and optimization use case, execute in the terminal:
cat <<EOF | oc apply -f -apiVersion: v1kind: ServiceAccountmetadata:name: vaccine-runtimeEOFFinally, we need to give that service account, that will be used to provide an identity to the processes running in the pods we deploy within this service account of our OpenShift project, the appropriate privileges the postgres processes need in order to successfully carry out the operations to get deployed and functioning in OpenShift. To give those privileges execute:
oc adm policy add-scc-to-user anyuid -z <SERVICE_ACCOUNT_NAME> -n <NAMESPACE>where
<SERVICE_ACCOUNT_NAME>is the service account we have created earlier (vaccine-runtime)<NAMESPACE>is the namespace where the service account is in (vaccine-omo)
Kafka TLS Certificate
This is the required server-side public TLS certificate of your IBM Event Streams instance to establish secure communication. This is provided by IBM Event streams in a Kubernetes secret we are going to copy from the OpenShift project where your IBM Event Streams instance is deployed into our Vaccine Order Management and Optimization project. We are also going to rename that secret to what the deployment scripts for the components in this Vaccine Order Management and Optmitization use case expect which is
kafka-cluster-ca-cert.In order to create the
kafka-cluster-ca-certsecret containing the server-side public TLS certificate of your IBM Event Streams instance, execute the following command:oc get secret <CLUSTER_NAME>-cluster-ca-cert -n <EVENTSTREAMS_NS> -o json | jq -r '.metadata.name="kafka-cluster-ca-cert"' | jq --arg project_name "<PROJECT_NAME>" -r '.metadata.namespace=$project_name' | oc apply -f -where
<CLUSTER_NAME>is the name of your IBM Event Streams instance. If you don’t remember your IBM Event Streams instance name you can find it out executing:oc get EventStreams -n <EVENTSTREAMS_NS><EVENTSTREAMS_NS>is the name of the OpenShift project/namespace were your IBM Event Streams is deployed in.<PROJECT_NAME>is the name of the OpenShift project where you are deploying this vaccine order management and optimization use case into.
You can verify that a new secret called
kafka-cluster-ca-certexists in the OpenShift project where you are deploying the vaccine order management and optimization use case by executing:oc get secretsKafka Authentication
IBM Event Streams has both internal and external configurable Kafka listeners. Both require the server-side public TLS certificate to establish secure communication. These listeners can also be configured to enforce SCRAM-SHA-512 (username and password) or Mutual TLS (user certificates) Kafka credentials for authentication. In this tutorial, we expect your IBM Event Streams to be deployed with the external kafka listener to enforce SCRAM-SHA-512 authentication and the internal tls kafka listener to enforce Mutual TLS authentication. You can check whether your IBM Event Streams is configured in such a way by executing:
oc get EventStreams <CLUSTER_NAME> -n <EVENTSTREAMS_NS> -o json | jq .spec.strimziOverrides.kafka.listenerswhere
<CLUSTER_NAME>is the name of your IBM Event Streams instance. If you don’t remember your IBM Event Streams instance name you can find it out executing:oc get EventStreams -n <EVENTSTREAMS_NS><EVENTSTREAMS_NS>is the name of the OpenShift project/namespace were your IBM Event Streams is deployed in.
The output you should get would be:
{"external": {"authentication": {"type": "scram-sha-512"},"type": "route"},"tls": {"authentication": {If you don’t have your IBM Event Streams instance configured in such a way, review the documentation here.
We are now going to create the corresponding SCRAM-SHA-512 and Mutual TLS authentication Kafka credentials that will be needed by the different components of this Vaccine Order Management and Optimization use case.
Mutual TLS certificate
In order to generate a set of TLS credentials to authenticate against the internal tls Kafka listener (which will create a Kafka User resource behind the scenes)
- Go to your IBM Event Streams user interface dashboard. You can find where it is by executing:oc get routes -n <EVENTSTREAMS_NS> | grep ui
- Click on the
Connect to this clusteroption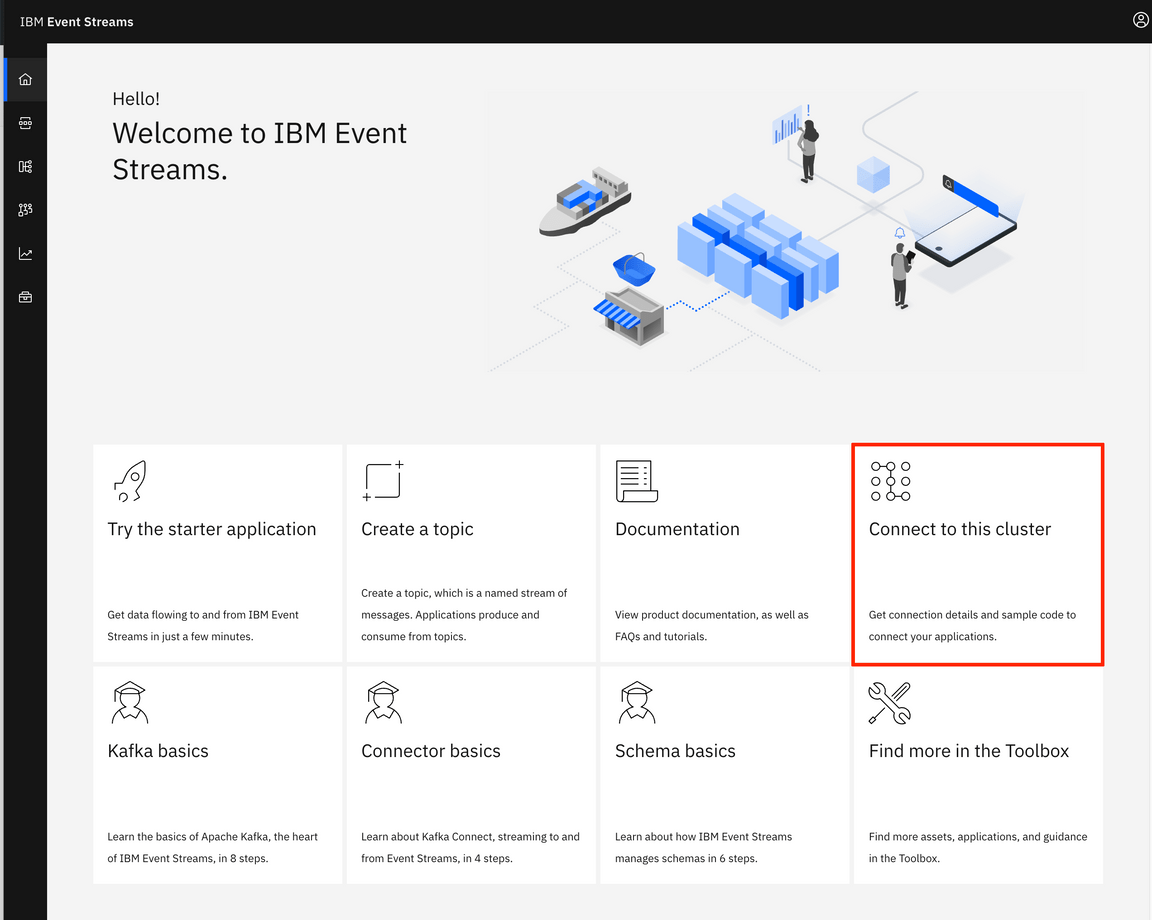
- A panel will slide from the right hand side of your screen. Under the
Kafka listener and credentialssection, click on theInternaltab and then on theGenerate TLS credentialsbutton.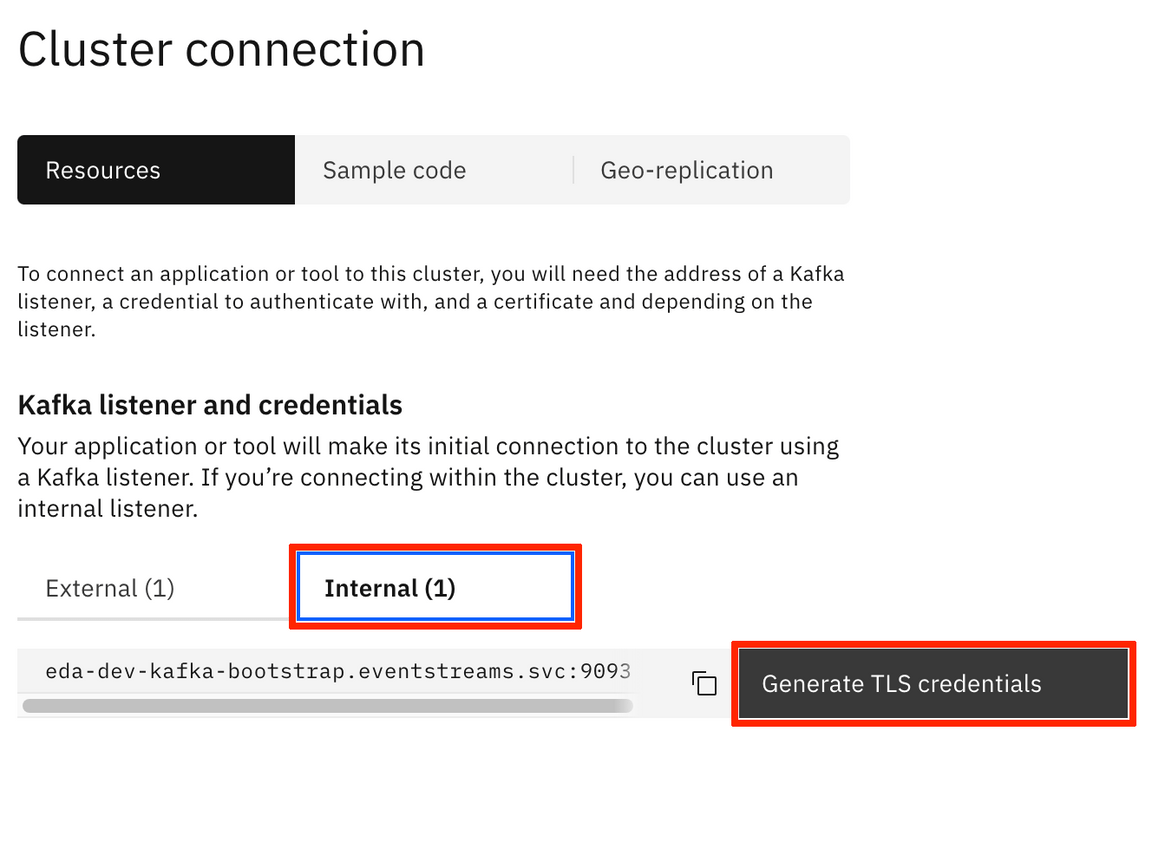 By the way, you can already see to the left of the
 Generate TLS credentialsthe Kafka bootstrap address for the internal listener we will be referencing to later on. - A multiple step wizard to generate credentials for your application will pop up. For the
Credential nameyou can choose any name you want. For the rest of the options, try to provide the most permissive in each step for easeness. - Once you have finished, you will be presented with the option to download the TLS certificates for your newly created Kafka User credentials as well as with a link to the instructions for retrieving these later.
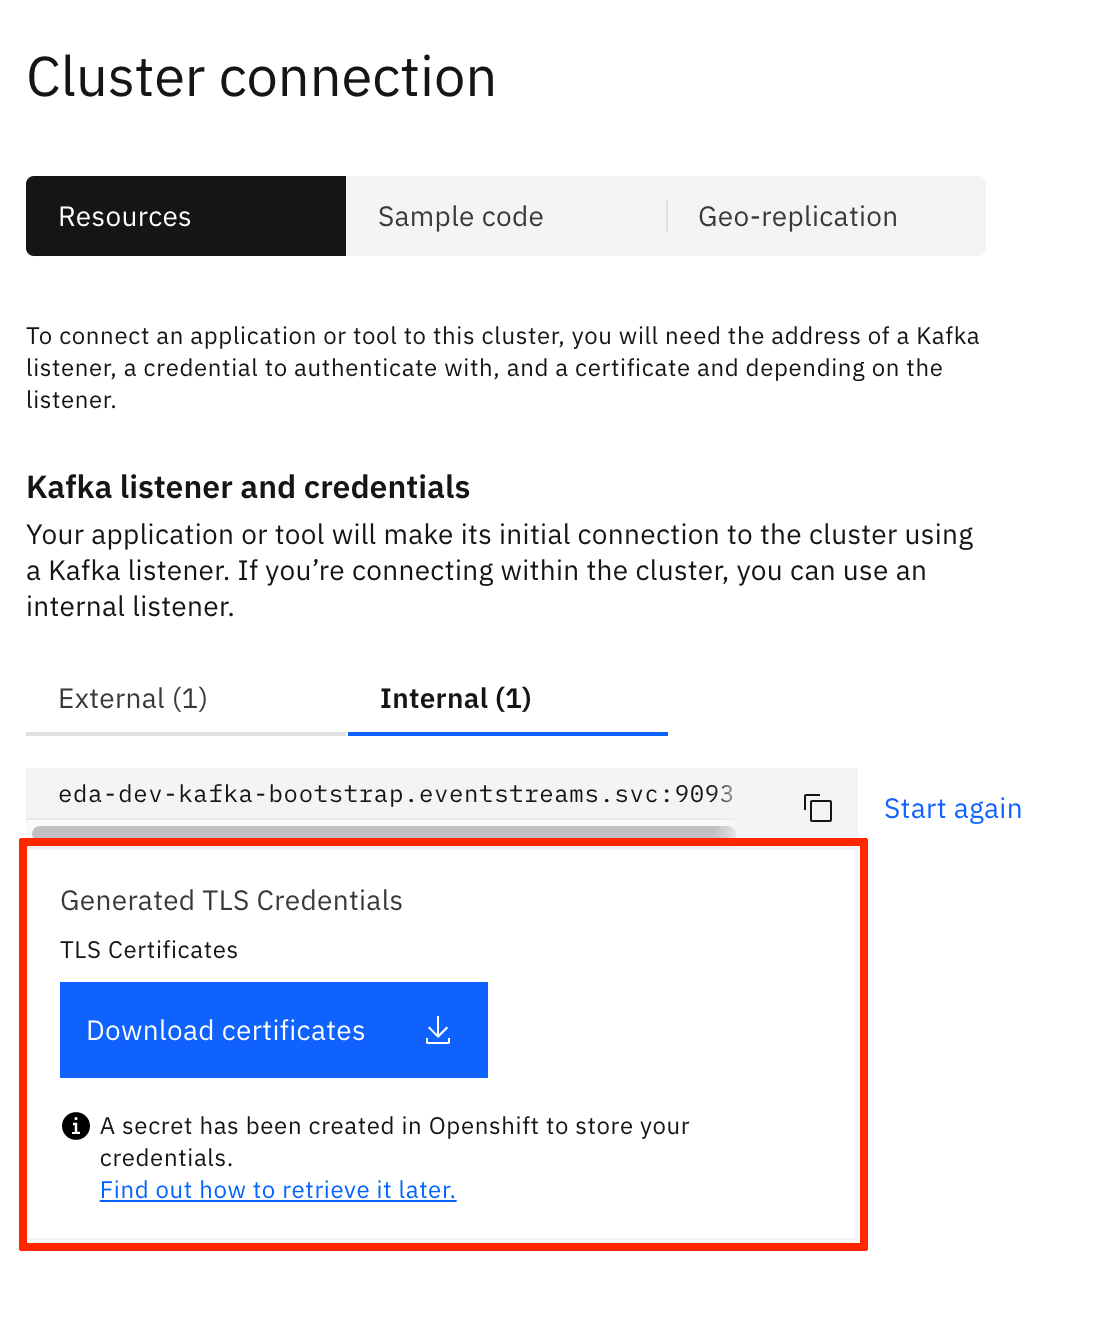 These instructions will consist of finding out that a new secret with the same name you gave to your TLS credentials (and Kafka User as a result) has been created in the OpenShift project your IBM Event Streams instance is installed in. You can double check it by running:oc get secrets -n <EVENTSTREAMS_NS> | grep <YOUR_CREDENTIALS_NAME>
Now that we have created a Kafka User with its corresponding TLS credentials to work with the internal tls Kafka listener and we know these TLS credentials are stored in a secret with the same name as the Kafka User, we only need to copy that secret from the OpenShift project where it is (i.e. the OpenShift project where your IBM Event Streams instance has been deployed into) to the OpenShift project where we are deploying our vaccine order and optimization use case so that our applications can make use of it and be able to work with IBM Event Streams. To do so, execute:
oc get secret <CREDENTIALS_NAME> -n <EVENTSTREAMS_NS> -o json | jq -r '.metadata.name="tls-user"' | jq --arg project_name "<PROJECT_NAME>" -r '.metadata.namespace=$project_name' | oc apply -f -where
<CREDENTIALS_NAME>is the name you gave to the TLS Credentials you created above.<EVENTSTREAMS_NS>is the OpenShift project where your IBM Event Streams instance is deployed into and where the secret holding the TLS Credentials you created above ends up into as well as a result.<PROJECT_NAME>is the OpenShift project where you are deploying the vaccine order management and optimization use case into.
You can see from the command above that we are renaming the secret from whatever your
<CREDENTIALS_NAME>was totls-usersince this is the name for the secret that holds the TLS credentials that the deployment scripts of the components for this Vaccine Order Management and Optimization use case expect.You can verify that a new secret called
tls-userexists in the OpenShift project where you are deploying the vaccine order management and optimization use case by executing:oc get secretsSCRAM Credentials
In order to generate a set of SCRAM-SHA-512 credentials for to authenticate with the external Kafka listener:
- Go to your IBM Event Streams user intergace dashboard. You can find where it is by executing:oc get routes -n <EVENTSTREAMS_NS> | grep ui
- Click on the
Connect to this clusteroption
- A panel will slide from the right hand side of your screen. Under the
Kafka listener and credentialssection, click on theExternaltab and then on theGenerate SCRAM credentialsbutton.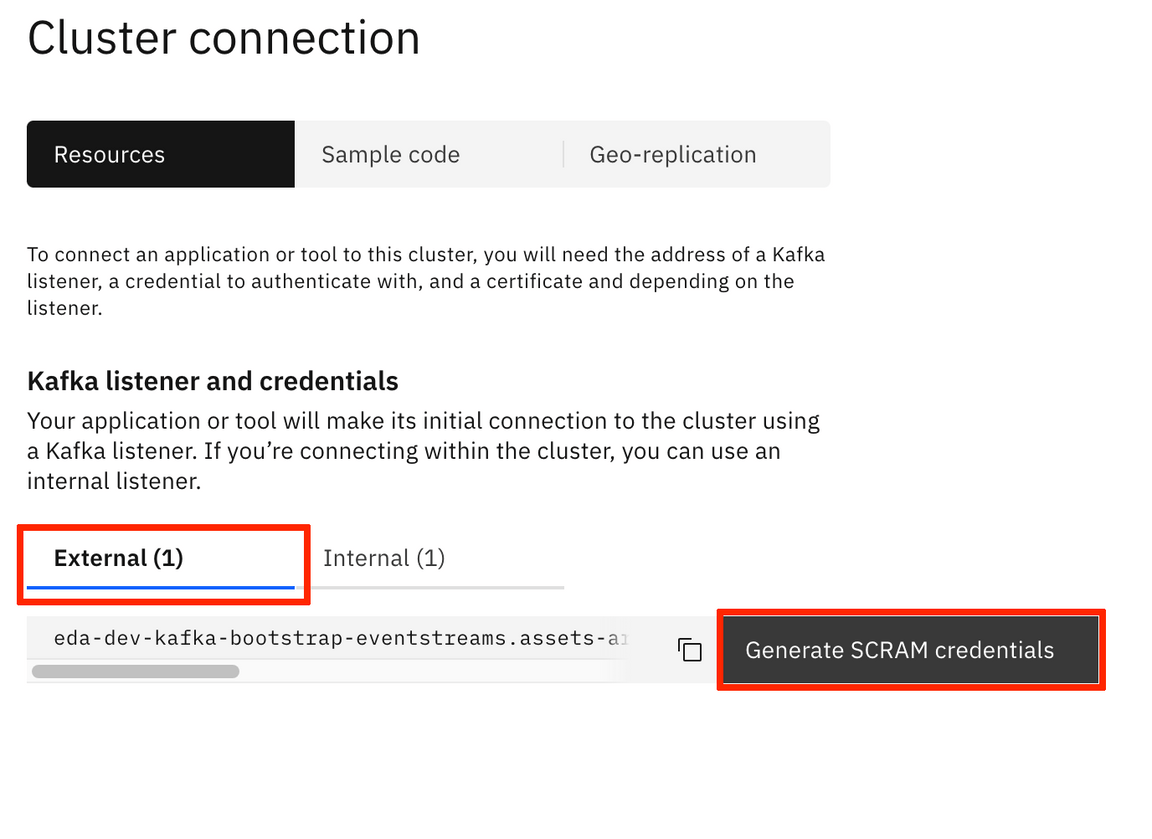 By the way, you can already see to the left of the
 Generate SCRAM credentialsthe Kafka bootstrap address for the external listener we will be referencing to later on. - A multiple step wizard to generate credentials for your application will pop up. For the
Credential nameyou can choose any name you want. For the rest of the options, try to provide the most permissive in each step for easeness. - Once you have finished, you will be presented with SCRAM username and password as well as with a link to the instructions for retrieving these later.
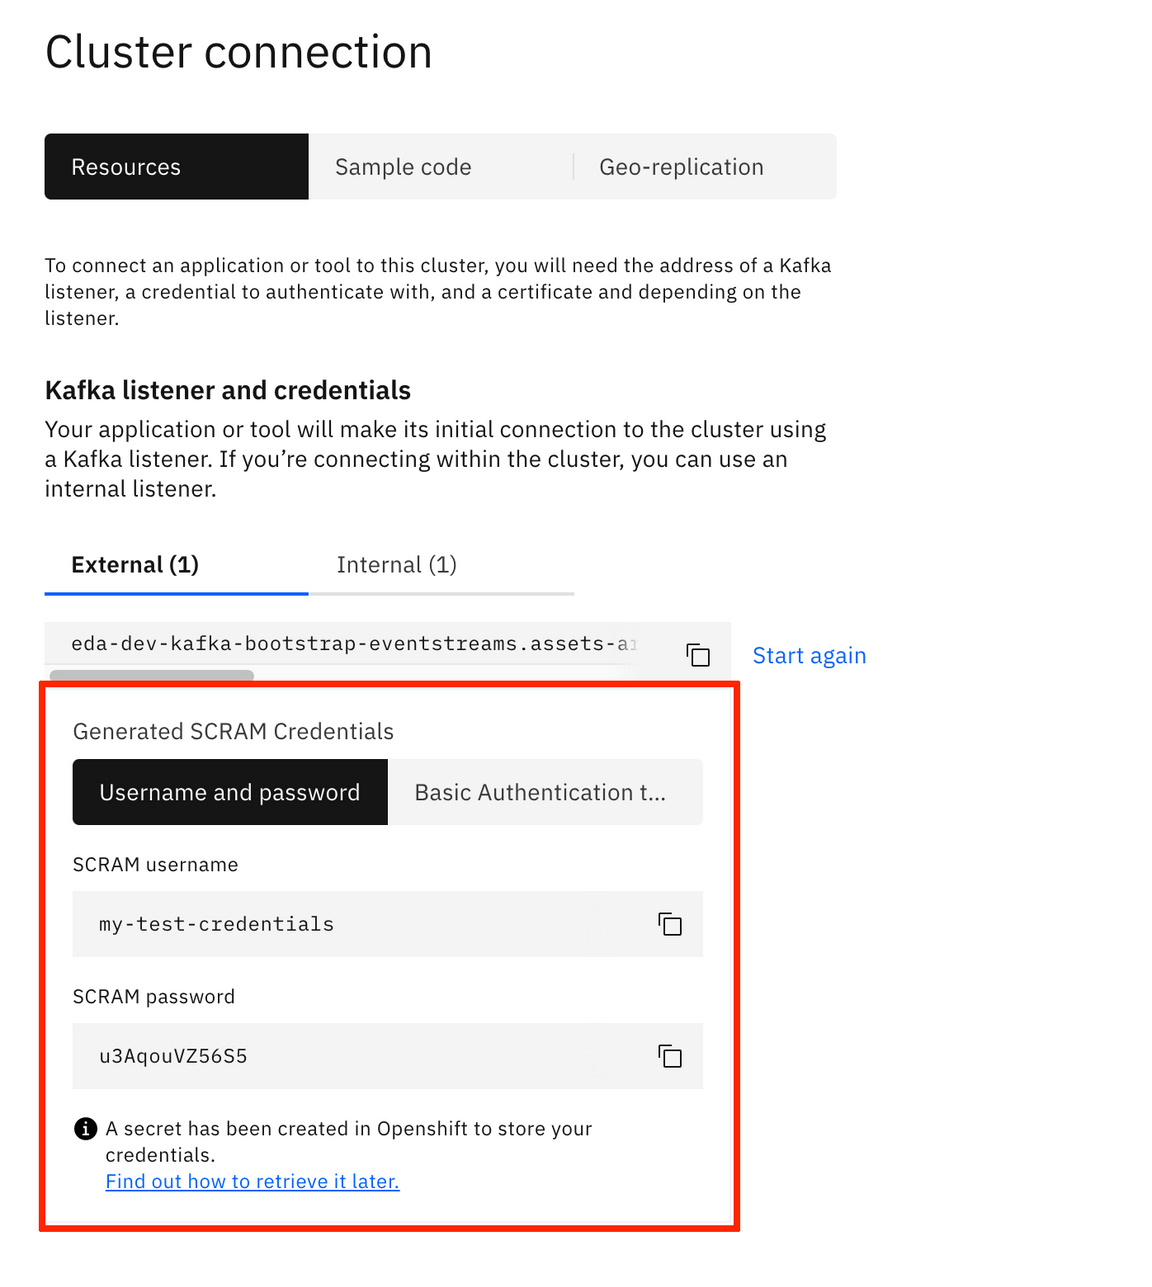 These instructions will consist of finding out that a new secret with the same name you gave to your SCRAM credentials (and Kafka User as a result) has been created in the OpenShift project your IBM Event Streams instance is installed in. You can double check it by running:oc get secrets -n <EVENTSTREAMS_NS> | grep <YOUR_CREDENTIALS_NAME>
Kafka Topics
We need to create the following Kafka topics in our IBM Event Streams instance that the different components in our Event-Driven Vaccine Order Management and Optimization solution will use:
<UNIQUE_ID>.vaccine.inventory- This topic will contain the events related with the vaccine lots by the different suppliers that will make up the inventory of the vaccine. The events in this topic will be consumed by the Vaccine Order Optimization component for the CPLEX computations that will optimize the shipment plans to carry out.<UNIQUE_ID>.vaccine.reefer- This topic will contain the events related with the reefer containers that will carry vaccines. Where they are, what status are they in, when they will be available, etc. The events in this topic will be consumed by the Vaccine Order Optimization component for the CPLEX computations that will optimize the shipment plans to carry out.<UNIQUE_ID>.vaccine.transportation- This topic will contain the events related with the routes or lanes available between different locations that will be then used in the CPLEX computations to optimize the shipment plans to carry out vaccine from the supplier to where the order of it is expected to be delivered. The events in this topic will be consumed by the Vaccine Order Optimization component for the CPLEX computations that will optimize the shipment plans to carry out.<UNIQUE_ID>.vaccine.public.orderevents- This topic will contain the events related to the new (or updated) orders managed by the Vaccine Order Management component. The events in this topic will be produced by the Debezium Change Data Capture (CDC) for Postgres connector that will be monitoring theordereventstable under thepublicschema of the postgres database the Vaccine Order Management component uses to store the state of the orders. The events in this topic will be consumed by the Vaccine Order Optimization component and will trigger the optimization process.<UNIQUE_ID>.vaccine.shipment.plan- This topic will contain the events related to the shipments plans resulting of the order optimization CPLEX computation carried out by the Vaccine Order Optmimization component. Hence, the producer of these events is the Vaccine Order Optimization component while the Vaccine Order Management component will consume these and display them in the user interface.
where
<UNIQUE_ID>is a unique identifier of your choice to be used for all the resouces created within the deployment of this Vaccine Order Management and Optimization solution so that they do not collide with any other user of the OpenShift or Kafka environments. We have chosendemoas our unique identifier for the rest of this tutorial.
If you don’t know how to create topics in your IBM Event Streams instance, see this link.
Kafka Topics Configmap
This step configures the configmap that will hold the values for the different Kafka topics as well as the Kafka internal and external bootstrap urls the components of the Vaccine Order Management and Optimization use case will make use of.
The yaml file containing the definition of the configmap we refer to is called
kafka-topics-configmap.yamland can be found in the Vaccine Order Manager for Postgres GitHub repository you pulled down earlier under thesrc/main/kubernetesfolder. Open up that yaml file and provide a value for:<UNIQUE_IDENTIFIER>which is the unique identifier you chose before to be used for all the resouces created within the deployment of this Vaccine Order Management and Optimization use case.<KAFKA_BOOTSTRAP_URL>which is the the Kafka internal bootstrap address of your IBM Event Streams instance.<EXTERNAL_KAFKA_BOOTSTRAP_URL>which is the the Kafka external bootstrap address of your IBM Event Streams instance.
You can find your Kafka internal bootstrap address by executing:
oc get EventStreams <CLUSTER_NAME> -n <EVENTSTREAMS_NS> -o json | jq '.status.kafkaListeners[] | select(.type=="tls") | .bootstrapServers'You can find your Kafka external bootstrap address by executing:
oc get EventStreams <CLUSTER_NAME> -n <EVENTSTREAMS_NS> -o json | jq '.status.kafkaListeners[] | select(.type=="external") | .bootstrapServers'where
<CLUSTER_NAME>is the name of your IBM Event Streams instance. If you don’t remember your IBM Event Streams instance name you can find it out executing:oc get EventStreams -n <EVENTSTREAMS_NS><EVENTSTREAMS_NS>is the name of the OpenShift project/namespace were your IBM Event Streams is deployed in.
Once you have set those two parameters, you can create the configmap by executing:
oc apply -f kafka-topics-configmap.yamlwithin the
src/main/kubernetesfolder of the vaccine order manager for postgres GitHub repository. You can checkout it has been properly created by executing:oc describe configmap kafka-topics-cmEvents Data Schemas
We are also integrating data schemas for the events involved in this Vaccine Order Management and Optimization use case. Enforcing the events in any of the topics of this use case comply with their data schemas will provide robustness to our solution. These data schemas also comply with the Cloud Events specification and we will use Apache Avro as the data serialization system. As a result, we need to create the appropriate data schemas in the IBM Event Stream Schema Registry for each of the topics involved in this solution that are listed above. In order to register a schema:
- Go to the Schema Registry in your IBM Event Stream user interface and click Add Schema.
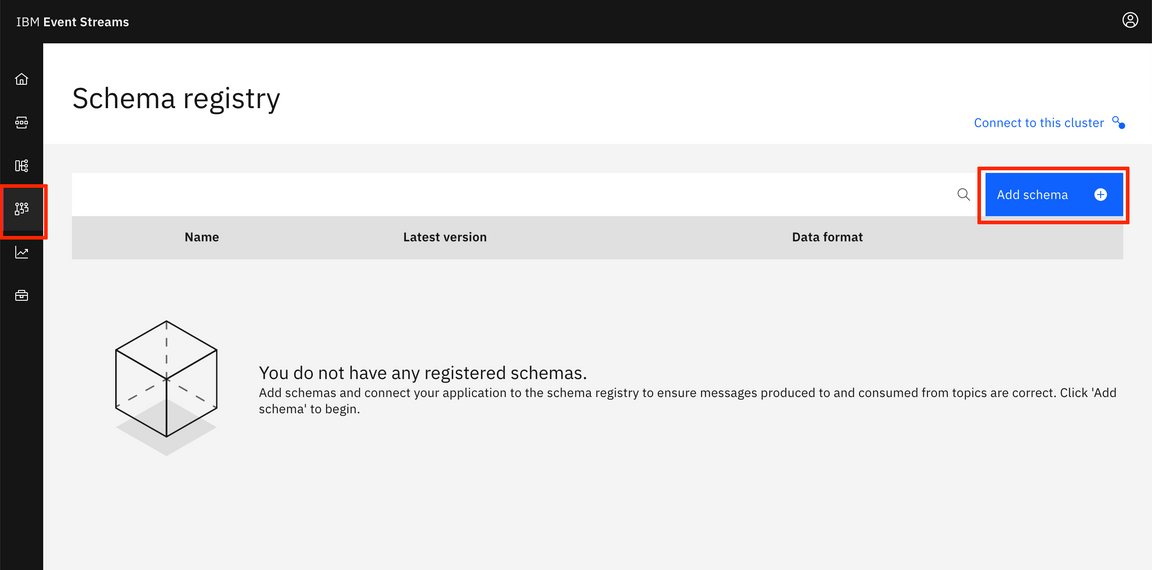
- Click Upload definition and select the CloudEvent.avsc file you will find in the Vaccine GitOps GitHub repository you pulled down at the beginning of this tutorial under the data folder.
- Change the Schema Name to the name of your Kafka topic appended with
-keyor-value, depending on whether you want this data schema to apply to the event’s key or value, that you want it to be enforced to. That is, if we wanted this data schema to be enforced to the event’s value of ourdemo.vaccine.reefertopic, we would fill in the Schema name as follows: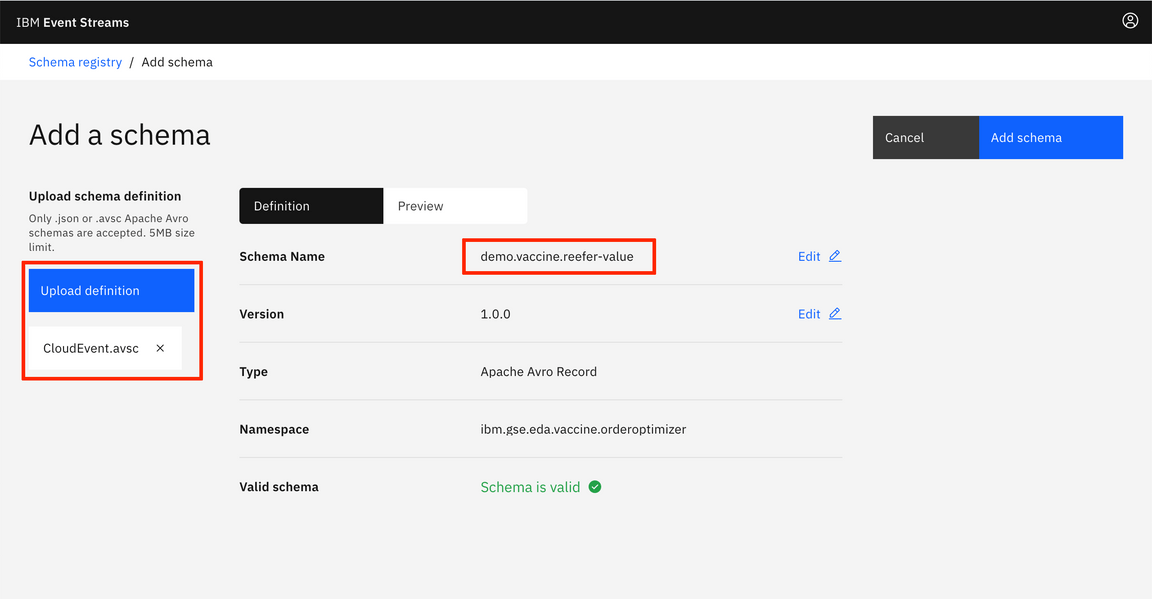
- Finally click on Add Schema.
- Repeat the steps a-d in order to create the data schema for the event’s value of your
<UNIQUE_ID>.vaccine.reefer,<UNIQUE_ID>.vaccine.inventory,<UNIQUE_ID>.vaccine.transportationand<UNIQUE_ID>.vaccine.shipment.plantopics. That is, you should have the following data schemas (using theCloudEvent.avscfile to create each of the data schemas from) in your schema registry:<UNIQUE_ID>.vaccine.reefer-value<UNIQUE_ID>.vaccine.inventory-value<UNIQUE_ID>.vaccine.transportation-value<UNIQUE_ID>.vaccine.shipment.plan-value
- Repeat the steps a-d to create the data schema for the
<UNIQUE_ID>.vaccine.public.ordereventstopic. However, the key and value data schemas for this topic will be created from their specfific avsc files you can also find under the data folder of the Vaccine GitOps GitHub repository. That is, use theOrderEventKey.avscandOrderEventValue.avscfiles to create the<UNIQUE_ID>.vaccine.public.orderevents-keyand<UNIQUE_ID>.vaccine.public.orderevents-valuerespectively.
After creating the data schemas explained abobe, your Schema Registry should present the following data schemas:
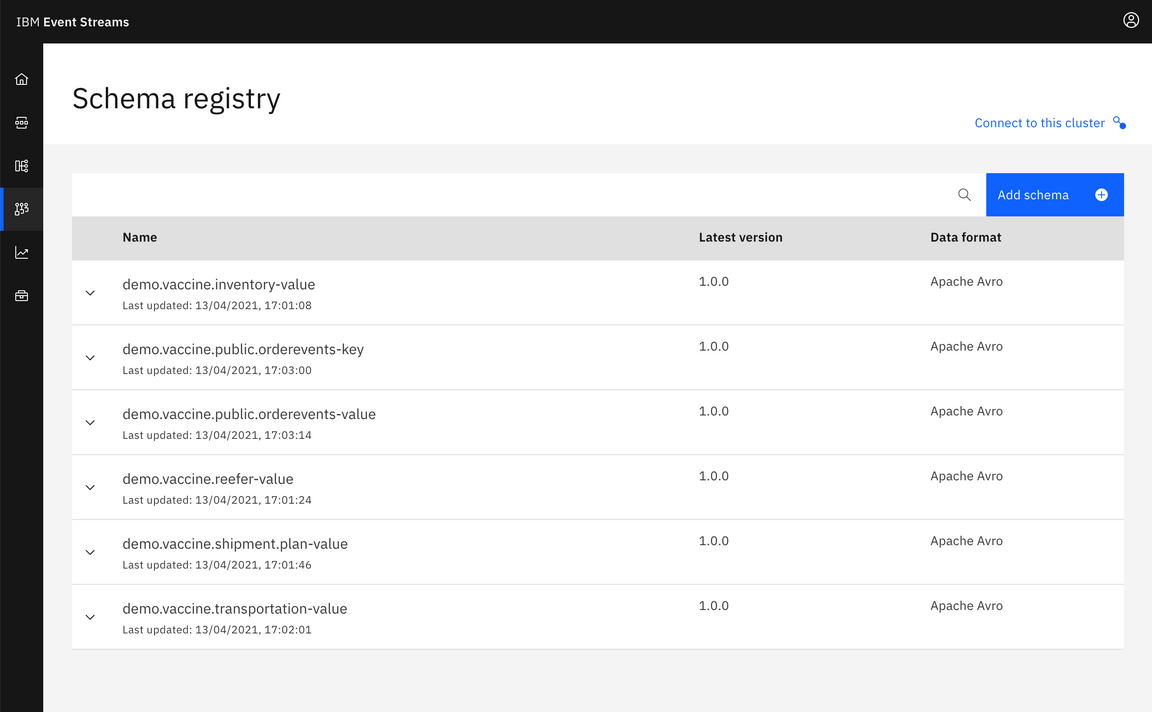
More information about Apache Avro, Data Schemas and Schema Registry can be found here
- Go to the Schema Registry in your IBM Event Stream user interface and click Add Schema.
Schema Registry Secret
The last step in this environment preparation section is to create the secret that will hold the IBM Event Streams Schema Registry url for the consumers and producers of the different components of this Vaccine Order Management and Optimization use case to be able to retrieve the data schemas to both serialize and deseralize the events against.
The yaml file containing the definition of the the secret we refer to is called
kafka-schema-registry-secret.yamland can be found in the Vaccine Order Manager for Postgres GitHub repository you pulled down earlier under thesrc/main/kubernetesfolder. Open up that yaml file and provide a value for:<SCRAM_USERNAME>and<SCRAM_PASSWORD>which are the SCRAM-SHA-512 credentials to get authenticated against the Kafka external listener of our IBM Event Streams instance that we have generated earlier in the Scram Credentials step within this environment preparation section.<SCHEMA_REGISTRY_URL>is the IBM Event Streams Schema Registry url that you can find executing the following command:oc get routes -n <EVENTSTREAMS_NS> | grep ac-reg-external
Once you have set those three parameters, you can create the secret by executing:
oc apply -f kafka-schema-registry-secret.yamlwithin the
src/main/kubernetesfolder of the Vaccine Order Manager for Postgres GitHub repository. You can checkout it has been properly created by executing:oc describe secret kafka-schema-registry
Deploy Postgres
Now, let’s deploy the Postgres database the Vaccine Order Manager for Postgres component will use to back up the creation of new orders, which will then be picked up by the Debezium Change Data Capture for Postgres connector that will be running on the Kafka Connect cluster we will deploy too.
For deploying postgres, we are going to make use of the scripts in the Vaccine GitOps GitHub repository we pulled down earlier. Thus, go into the vaccine-gitops/environments directory. In there you can see several folders (for the different components we might want to deploy) where there is one for postgres. Within that postgres folder, you can see several yaml files that describe the postgres deployment as well as the Kustomize files that describe how to apply all these yaml files.
Now, make sure you are within the vaccine-gitops/environments folder in the vaccine-gitops GitHub repository and execute:
oc apply -k postgres
After a minute or so, you can see all the pieces comprising our Postgres deployment as well as the actual pod running postgres are properly deployed and running:
$ oc get allNAME READY STATUS RESTARTS AGEpod/postgres-db-postgresql-0 1/1 Running 0 2m54sNAME TYPE CLUSTER-IP EXTERNAL-IP PORT(S) AGEservice/postgres-db-postgresql ClusterIP 172.21.130.178 <none> 5432/TCP 2m54sservice/postgres-db-postgresql-headless ClusterIP None <none> 5432/TCP 2m54sNAME READY AGE
Also, you can check that along those components above, the Kustomize scripts were also meant to deploy a secret called postgresql-creds that, as the name suggests, will hold the credential parameters for any other component to be able to connect and use this Postgres instance. You can check this secret out by executing:
oc describe secret postgresql-creds
where you should see:
Name: postgresql-credsNamespace: vaccine-omoLabels: <none>Annotations:Type: OpaqueData====url: 48 bytes
Deploy the Vaccine Order Manager microservice
In order to deploy the Vaccine Order Manager for Postgres microservice for this use case, we need to be, again, within the src/main/kubernetes folder in the Vaccine Order Manager for Postgres repository. Once there, you can execute the following commands:
oc apply -f configmap.yaml
that will create the vaccine-order-ms-cm configmap that holds some configuration info for the application
oc apply -f rolebinding.yaml
that will create the vaccineorderms-view role binding that will provide view ClusterRole role to the vaccine-runtime service account we created before that is responsible for providing an identity to the processes running in the pods we deploy.
oc apply -f deployment.yaml
that will, finally, deploy the Vaccine Order Manager for Postgres component (which is actually a pod). You can check out the status of the vaccineorderms-1-xxxxx is Running after a min or so by executing:
oc get pods
Finally, we need to make our newly deployed Vaccine Order Manager for Postgres component available to be accessed and we do so by creating a Kubernetes service (makes a pod internally discoverable and accessible) and an OpenShift route (makes a service externally accessible) for the deployment we carried out in the previous step. For creating the Kubernetes service and the OpenShift route execute respectively:
oc apply -f service.yaml
and
oc apply -f route.yaml
You can now access your Vaccine Order Manager for Postgres component of the use case by pointing your web browser to the route you just created. You can execute the following command to find out the route:
oc get route vaccineorderms -o json | jq '.status.ingress[0] | .host'
Deploy Kafka Connect
Now that we have one part of the puzzle working, which is the Vaccine Order Manager for Postgres deployed and running, we can proceed to get the Debezium CDC for Postges connector deployed so that it translates any change to our postgres database made by the Vaccine Order Manager for Postgres component into an event in our event backbone (Kafka) so that we can make the rest of our ecosystem aware without adding any extra load to our Postgres database.
However, for doing so we need a framework for the Debezium CDC for Postgres connector to run on. And this framework is Kafka Connect. Kafka Connect is a tool for scalably and reliably streaming data between Apache Kafka and other systems. It makes it simple to quickly define connectors that move large collections of data into and out of Kafka.
IMPORTANT: We assume you have deployed your IBM Event Streams instance with an internal TLS secured Kafka listener that uses Mutual TLS for authentication as described in the earlier Prepare your OpenShift and Kafka Environments section in this tutorial.
Now, follow the next steps in order to get your Kafka Connect cluster deployed:
Go to you IBM Event Streams dashboard, click on the
Find more on the toolboxoption.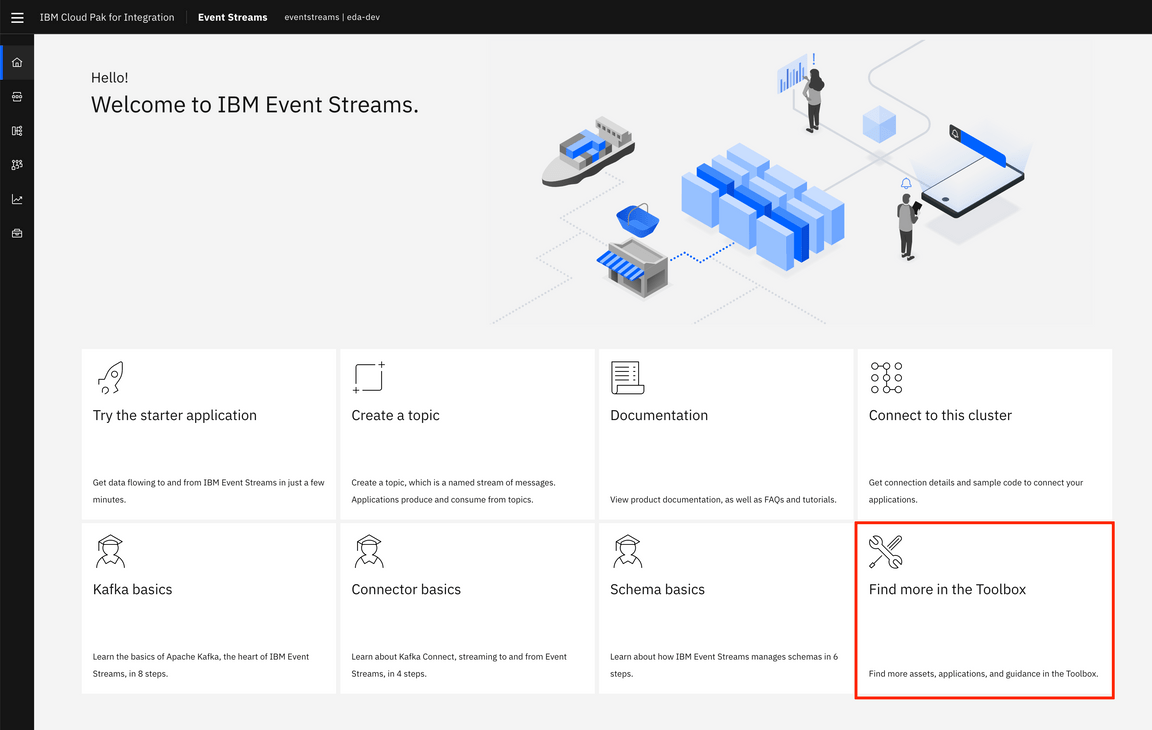
Click on the
Set upbutton for theSet up a Kafka Connect environmentoption.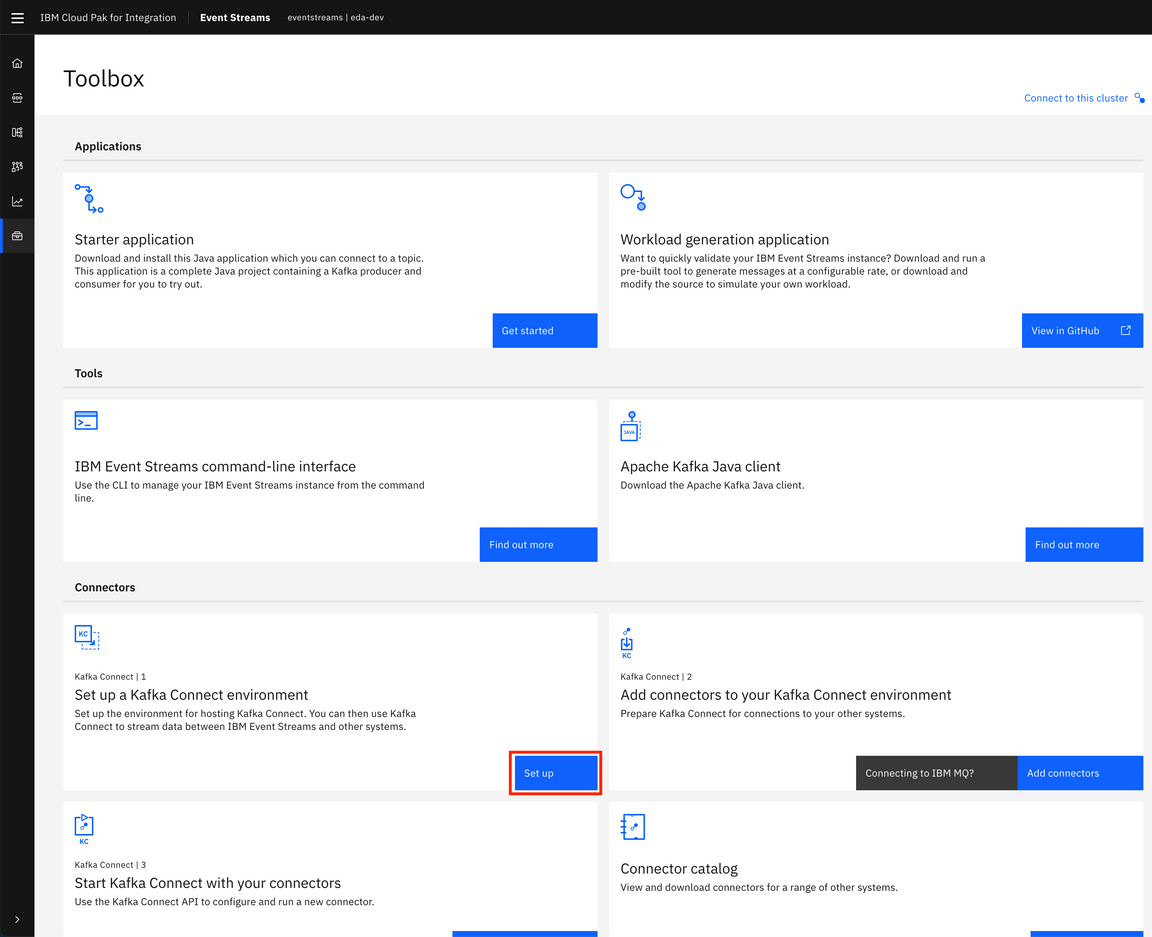
Click on
Download Kafka Connect ZIPbutton.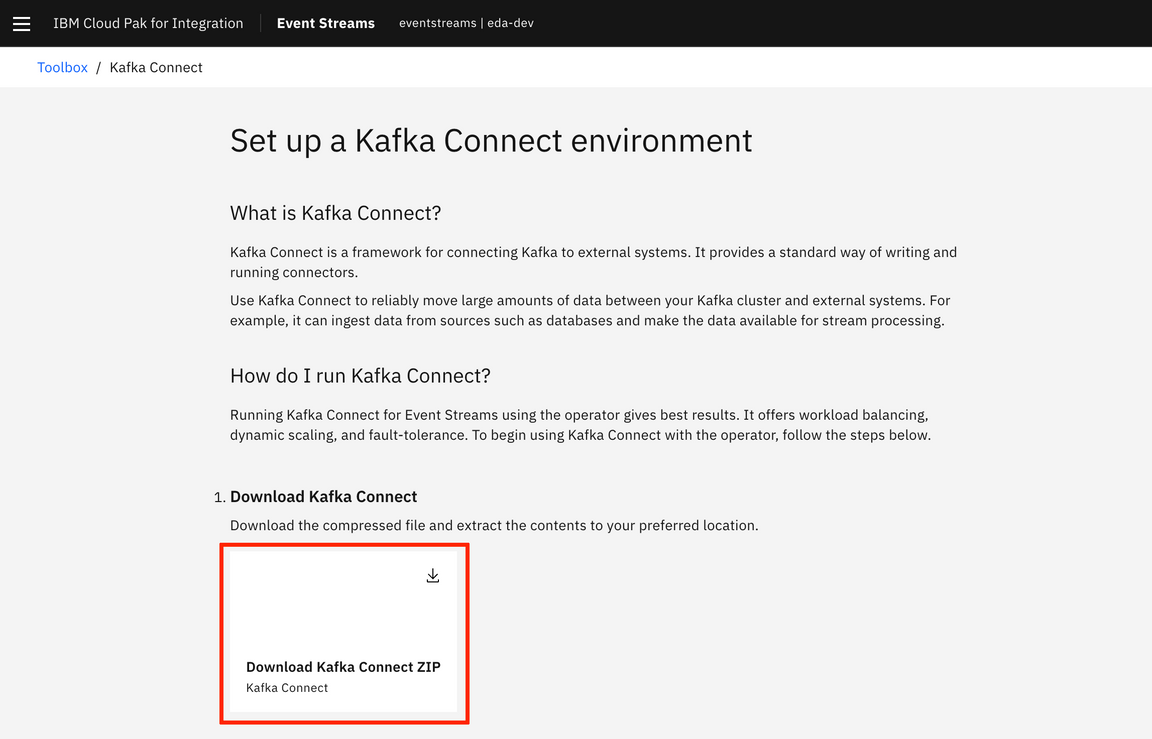
The above downloads a zip file which contains a
kafka-connect-s2i.yamlfile. Open that yaml file and take note of theproductIDandcloudpakIdvalues as you will need these in the following step.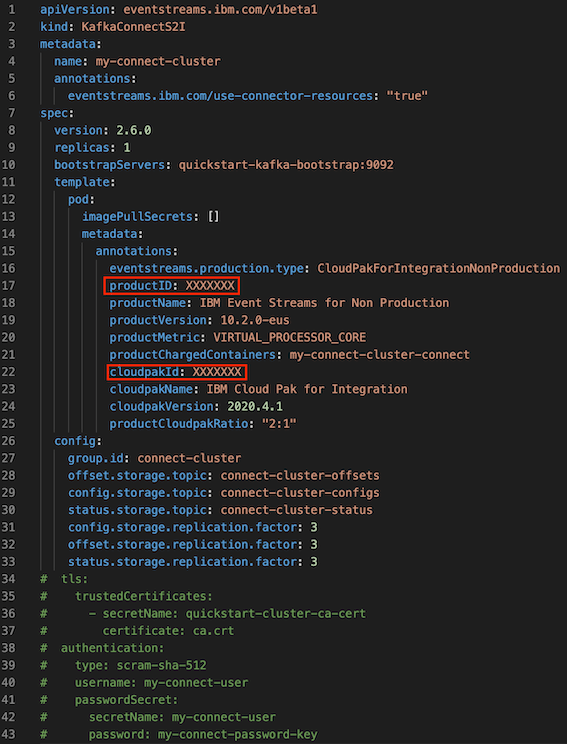
However, instead of using that kafka-connect-s2i.yaml we are going to use the one provided within the environment/cdc folder of the Vaccine Order Manager for Postgres GitHub repository. If you open up that file you will see the following placeholders:
<UNIQUE_ID>which you should replace for the unique identifier you chose before to be used for all the resouces created within the deployment of this Vaccine Order Management and Optimization use case.<GET_IT_FROM_EVENTSTREAMS>which should be replaced with theproductIDandcloudpakIdvalues you obtained in the previous step.<KAFKA_BOOTSTRAP_URL>which is the internal Kafka listener bootstrap url. You can review how to find this url in the Kafka Topics Configmap subsection within the Prepare your OpenShift and Kafka Environments section.
If we carefully inspect this yaml that would get a Kafka Connect cluster deployed, we should realise that we still have to create a secret called postgres-connector ahead of time that will be loaded as external configuration. This postgres-connect secret will hold the configuration that, later, the Debezium CDC for Postgres connector will need to function. In order to create that secret, we provide a file called connector.properties also under the environment/cdc folder of the Vaccine Order Manager for Postgres GitHub repository.
Again, if you open up that file you will see the following placeholders:
<UNIQUE_ID>which you should replace for the unique identifier you chose before to be used for all the resouces created within the deployment of this Vaccine Order Management and Optimization use case. In fact, it is IMPERATIVE that we use the same unique identifier. The reason for this is that the Debezium CDC for Postgres connector will be watching out for new records (which will be the result of any change in any of the tables of our Postgres database) on the tables of our Postgres deployment that are specified in itstable-whitelistconfiguration property. It will send those new records as events to a Kafka topic named the same as the table name specified in thetable-whitelistconfiguration property prefixed with the value of itsdatabase-server-nameconfiguration property. If you work that out, you see that theORDER_TOPICvalue we defined in the configmap holding the Kafka topic names was and must be<UNIQUE_ID>.vaccine.public.orderevents, as this is where the events will end up based on the Debezium CDC for Postgres connector configuration properties file.<SCRAM_USERNAME>,<SCRAM_PASSWORD>and<SCHEMA_REGISTRY_URL>are the SCRAM credentials for authentication against your IBM Event Streams instance and the Schema Registry url of it respectively that the Debezium CDC for Postgres connector will need in order to access the data schema it will need to AVRO serialize the events to be sent to Kafka. You can review how to find these values in the Schema Registry Secret subsection within the Prepare your OpenShift and Kafka Environments section.
In order to create that postgres-connector secret that holds the Debezium CDC for Postgres connector configuration out of the connector.properties file we have just tailored to our environment, we only need to run the following command:
oc create secret generic postgres-connector --from-file=./connector.properties
One last thing to do before deploying our Kafka Connect cluster is the need to copy the secret that holds your IBM Entitlement Key over from the OpenShift project where you have IBM Event Streams deployed into. This IBM Entitlement Key is needed to download any IBM product Docker image from IBM’s private Docker registry in Quay. This is something you must have present in all your OpenShift projects where you want IBM software to be deployed into. In order to copy that IBM Entitlement Key secret from the OpenShift project where you have your IBM Event Streams instance deployed into, execute the following command:
oc get secret ibm-entitlement-key -n <EVENTSTREAMS_NS> -o json | jq --arg project_name "<PROJECT_NAME>" -r '.metadata.namespace=$project_name' | oc apply -f -
where
<EVENTSTREAMS_NS>is the OpenShift project where your IBM Event Streams instance is deployed into (eventstreamsin this tutorial).<PROJECT_NAME>is the OpenShift project where you are deploying your Kafka Connect cluster into (vaccine-omoin this tutorial).
Finally, we are all set to deploy our Kafka Connect cluster. In order to do so, we only need to execute the following command:
oc apply -f kafka-connect-s2i.yaml
You can watch all the resources being created as a result and their progress by executing:
watch -n 5 oc get all
after a couple of minutes or so you should see something like this:
NAME READY STATUS RESTARTS AGEpod/connect-cluster-demo-connect-1-5d7f9 1/1 Running 0 65spod/connect-cluster-demo-connect-1-build 0/1 Completed 0 102spod/connect-cluster-demo-connect-1-deploy 0/1 Completed 0 66spod/postgres-db-postgresql-0 1/1 Running 0 46hpod/vaccineorderms-1-deploy 0/1 Completed 0 19hpod/vaccineorderms-1-jsx8n 1/1 Running 0 19hNAME DESIRED CURRENT READY AGE
where we can see the pod connect-cluster-demo-connect-1-xxxxx is running. This means your Kafka Connect cluster is running. However, we can see some other resources have been created as a result of telling OpenShift to deploy a Kafka Connect cluster. Amongst these you can see a couple of Image Streams (to build a Docker image from source code), a Build Config, a Build, a Deployment Config, etc. It is not the goal of this tutorial to explain what goes on behind the scenes when deploying a Kafka Connect cluster using the KafkaConnectS2I (kafka connect source to image) construct but it is something we highly recommend students investigate.
Now that we have our Kafka Connect cluster running, one thing we can check out is whether there is any connector configured in it that may be running. In order to do so, we are going to poke the /connectors API that the Kafka Connect Framework exposes. In order to do so, execute the following command:
oc exec -it <KAFKA_CONNECT_POD_NAME> -- curl localhost:8083/connectors
where
<KAFKA_CONNECT_POD_NAME>is the pod name of your Kafka Connect cluster (in this tutorial isconnect-cluster-demo-connect-1-5d7f9).
You should see [] as the output for the command above since there should not be any connector configured and running yet in your Kafka Connect cluster. This is something we are going to see in the next section.
Another thing we can check out is the connector plugins registered in our Kafka Connect cluster. That is the available plugins to create/instantiate a connector from. In order to see a list of the connector plugins in our Kafka Connect cluster, execute the following command:
oc exec -it <KAFKA_CONNECT_POD_NAME> -- curl localhost:8083/connector-plugins
and you should see an output like:
[{"class": "org.apache.kafka.connect.file.FileStreamSinkConnector","type": "sink","version": "2.6.0"},{"class": "org.apache.kafka.connect.file.FileStreamSourceConnector","type": "source",
where there is no Debezium CDC for Postgres connector plugin.
Deploy Debezium CDC Postgres connector
We have seen in the previous section that the Kafka Connect cluster we have just deployed does not contain any connector configured and running yet. And this makes sense since we have only deployed the Kafka Connect Cluster, with the configuration we will need for the Debezium CDC for Postgres connector that we plan to execute afterwards but we yet need to do two things for that:
- Provide the actual Debezium CDC for Postgres connector binaries. That is, the binaries our Kafka Connect cluster will use when instantiating a Debezium CDC for Postgres connector.
- Register, that is instantiate, a Debezium CDC for Postgres connector for our use case so that we get the records stored by the Vaccine Order Manager for Postgres microservice in our Postgres deployment in the
public.ordereventstable of itsorderdbdatabase as events in the<UNIQUE_ID>.vaccine.public.ordereventsKafka topic as we saw, explained and configured earlier in this tutorial.
Debezium CDC Postgres connector binaries
You can find the latest Debezium CDC for Postgres connector binaries here. Go into the folder for the latest version which should be called
X.Y.Z.Final. Within that folder find the file calleddebezium-connector-postgres-X.Y.Z.Final-plugin.tar.gzand download it. Once downloaded, untar the file. You will see several jar files. Something like:debezium-api-1.5.0.Final.jardebezium-connector-postgres-1.5.0.Final.jardebezium-core-1.5.0.Final.jarfailureaccess-1.0.1.jarguava-30.0-jre.jarpostgresql-42.2.14.jarprotobuf-java-3.8.0.jarAttention we used the version 1.5.0.Final at the time of the test, but if you use another version you may need to change the order-mgr-pg’s pom/xml file to reflect those version miss matches. The gitops project has the 1.5.0 jars.
They all are needed and what is more important is that we need to provide any connector to our Kafka Connect cluster within the following structure:
- /connectors|- /connector1|- jar1...- jarN...- /connectorNHowever, if you pay a close look at the jar files within the Debezium CDC for Postgres connector tar file we have downloaded, you will not see any jar file around Apicurio which is the schema registry IBM Event Streams deploys which we want to interact with. That is, we want the Debezium CDC for Postgres connector to automatically interact with IBM Event Streams Schema Registry for the events to be sent to comply with a schema and are serialized using the Apache Avro protocol. For doing this, we need to provide more binaries for our Debezium CDC for Postgres connector (see this Debezium post and this Debezium post for further detail).
To get all the extra binaries we need for our Debezium CDC for Postgres connector to automatically interact with the IBM Event Streams Apicurio Schema Registry and the Avro protocol, download the
Apicurio Registry Distro Connect Converterpackage from the Maven Central repository here. Click on the latestX.Y.Z.Finalversion and then click on theView Alllink displayed in theFilesrow within the table displayed under the title of the package. This will drive you to a the location where you should find a file calledapicurio-registry-distro-connect-converter-X.Y.Z.Final-converter.tar.gz. Download this file and untar it. Then, copy all thejarfiles with the other Debezium CDC for Postgres connector jar files in the connectors folder structure explained above.You should now have a list of jar files like the following (at the time of writting this tutorial March 2021):
├── debezium-connector-postgres│ ├── annotations-13.0.jar│ ├── apicurio-registry-client-2.0.0.Final.jar│ ├── apicurio-registry-common-2.0.0.Final.jar│ ├── apicurio-registry-distro-connect-converter-2.0.0.Final.jar│ ├── apicurio-registry-serde-common-2.0.0.Final.jar│ ├── apicurio-registry-serdes-avro-serde-2.0.0.Final.jar│ ├── apicurio-registry-serdes-jsonschema-serde-2.0.0.Final.jar│ ├── apicurio-registry-utils-converter-2.0.0.Final.jarWe are finally ready to upload the Debezium CDC for Postgres connector binaries to our Kafka Connect cluster. To do so, we need to start a new build of our build resource created as a result of having created a KafkaConnectS2I resource when we deployed the Kafka Connect cluster. This will build the source code for Kafka Connect once again but this time we are going to provide Debezium CDC for Postgres connector binaries to the build process so that these are then processed by the Kafka Connect Framework and the Debezium CDC for Postgres connector plugin is available as a result to be instantiated and used. In order to kick off a new build of Kafka Connect with the Debezium CDC for Postgres connector binaries execute the following command:
oc start-build <BUILD> --from-dir <CONNECTORS_DIR> --follow# Exampleoc start-build connect-cluster-demo-connect --from-dir ./connectors --followwhere
<BUILD>is the build resource name created as a result of having created a KafkaConnectS2I resource when deploying a Kafka Connect cluster. You can find the name of your Kafka Connect build by executing the following command:
where the name should be likeoc get buildconnect-cluster-<UNIQUE_ID>-connect<CONNECTORS_DIR>is the path to the directory containing the different connectors’ binaries we want to build our Kafka Connect cluster with which we created above containing all the Debezium CDC for Postgres connector binaries. IMPORTANT: the path should point to the outer folder containing a folder per connector. That is, something like./connectorsif we were to execute the command from the folder where we have theconnectorsfolder rather than./connectors/connector1.
After executing this command, you should see in your terminal the output of the build process with the binaries upload, the docker image creation, etc.
If you watch all the resources in your OpenShift project with
watch -n oc get all, you should see a new build resource, the desired replicas for the replica controller resource for the first Kafka Connect cluster down to 0 while the desired replicas for the replica controller resource for the second Kafka Connect cluster is set to 1, etc… Finally, you should see a newbuildanddeploypods for this second iteration of the Kafka Connect cluster and the most important pod, the pod where our Kafka Connect cluster runs into that should be calledconnect-cluster-demo-connect-2-xxxxx, withSTATUSequal toRunning.If we now poke the
/connector-pluginsAPI endpoint of our Kafka Connect cluster by executing:oc exec -it <KAFKA_CONNECT_POD_NAME> -- curl localhost:8083/connector-pluginswhere
<KAFKA_CONNECT_POD_NAME>is the name of the pod running our Kafka Connect cluster (connect-cluster-demo-connect-2-xxxxx)
we should see that the Debezium CDC for Postgres connector plugin is now listed:
[{"class": "io.debezium.connector.postgresql.PostgresConnector","type": "source","version": "1.2.0.Final"},{"class": "org.apache.kafka.connect.file.FileStreamSinkConnector","type": "sink",Register a Debezium CDC for Postgres connector
The last piece of the Outbox pattern is to get a Debezium CDC for Postgres connector instantiated in our Kafka Connect cluster now that we have both the Kafka Connect cluster running with the Debezium CDC for Postgres connector binaries in it and the resulting connector plugin available as a result.
For getting a Debezium CDC for Postgres connector instantiated, we provide, within the
environment/cdcfolder of the Vaccine Order Manager for Postgres GitHub repository, a file calledpg-connector.yamlwhich is nothing but the definition of a KafkaConnect resource. The Debezium CDC for Postgres connector specification within that KafkaConnect resource has been parametrized so that all its configuration is taken from the environment it runs on. That is, it will take its configuration from thepostgres-connectorsecret we load as external configuration when we deployed our Kafka Connect cluster if you remember thekafka-connect-s2i.yamlfile. And, if you remember, the configuration from that secret comes from theconnector.propertiesfile in turn. However, as in with practically all the resources we’ve created so far for this use case, we would still need to provide a unique identifier (demoin this tutorial) for the<UNIQUE_ID>placeholder in thepg-connector.yamlfile. Provide that unique identifier and then execute the following command to get that KafkaConnect resource created and a Debezium CDC for Postgres connector instantiated within your Kafka Connect cluster as a result:oc apply -f pg-connector.yamlAfter a minute or so, you can check the logs for the
connect-cluster-demo-connect-2-xxxxxpod to see some output refering to the newly created Debezium CDC for Postgress connector instance whose name ispg-connector-apicurio. You can also executeoc describe kafkaconnector pg-connector-apicurioto see the details of that newly created Kafka Connector. These two validations are kind of in depth validations. For something easier, we can poke the/connectorsAPI of our Kafka Connect cluster to see if a new connector has been registered and instantiated. To do so execute:oc exec -it <KAFKA_CONNECT_POD_NAME> -- curl localhost:8083/connectorswhere
<KAFKA_CONNECT_POD_NAME>is the pod name of your Kafka Connect cluster (in this tutorial isconnect-cluster-demo-connect-2-xxxxx).
You should see the following output:
["pg-connector-apicurio"]
Deploy the Vaccine Order Optimizer microservice
Finally, the last piece of this use case to have the entire end to end flow is to deploy the Vaccine Order Optimizer microservice. This microservice will be responsible for producing an optimized shipment plan for the new orders received as events in the <UNIQUE_ID>.vaccine.public.orderevents Kafka topic taking into account the transportation, inventory and Reefer containers information available at that point (which comes also as events from the <UNIQUE_ID>.vaccine.inventory, <UNIQUE_ID>.vaccine.reefer and <UNIQUE_ID>.vaccine.transportation Kafka topics).
In order to get the Vaccine Order Optimizer microservice deployed, go into the kubernetes folder of its GitHub repository you pulled down at the beginning of this tutorial. You should see in there a bunch of yaml files which we will work with in order to get the Vaccine Order Optimizer microservice deployed on your OpenShift project along with a Kubernetes service and an OpenShift route to make it accessible.
If we look at the deployment.yaml file, which is the yaml file that will eventually deploy the Vaccine Order Optimizer microservice, we’ll find that we need two configmaps (kafka-topics-cm and vaccine-oro-cm) and two secrets (kafka-schema-registry and scram-user) present in our OpenShift project beforehand to load the configuration for the Vaccine Order Optimizer microservice from.
kafka-topics-cmis the configmap that holds the information about the Kafka topic names and it should already be present in the OpenShift project where we are going to deploy the Vaccine Order Optimizer microservice if you followed the Prepare your OpenShift and Kafka Environments section.vaccine-oro-cmis the configmap defined in theconfigmap.yamlfile. In order to create it, execute the following command:oc apply -f configmap.yamlkafka-schema-registryis the secret that holds the Schema Registry url for consumers and producers to be able to retrieve the data schemas to both serialize and deseralize the events against and it should already be present in the OpenShift project where we are going to deploy the Vaccine Order Optimizer microservice if you followed the Prepare your OpenShift and Kafka Environments section.scram-useris the secret that will hold the Kafka User SCRAM-SHA-512 credentials for authentication and authorization of the communications going through the IBM Event Streams external Kafka listener. You should already have these (username and password) if you followed the Prepare your OpenShift and Kafka Environments section. However, we need to store these in a secret. For doing so, execute the following command:
where you would replaceoc create secret generic scram-user --from-literal=username=<SCRAM_USERNAME> --from-literal=password=<SCRAM_PASSWORD><SCRAM_USERNAME>and<SCRAM_PASSWORD>with the values of your Kafka User SCRAM-SHA-512 credentials.
Once you have the above configmaps and secrets created in your OpenShift project with the appropriate configuration for your environment, we can now, finally, deploy the Vaccine Order Optimization microservice. To do so, execute the following command:
oc apply -f deployment.yaml
If you list the pods in your OpenShift project using the command oc get pods you should a new pod called vaccine-order-optimizer-xxxxxxxxx-xxxxx. After a minute or so, you should see that the STATUS for that pod is Running. If you get the logs for the pod with the command oc get logs -f vaccine-order-optimizer-xxxxxxxxx-xxxxx you should see the following output that means your Vaccine Order Optimization microservice is ready to consume events and start the corresponding computations:
[ReeferConsumer] - Starting to consume events[TransportationConsumer] - Starting to consume events[InventoryConsumer] - Starting to consume events[OrderConsumer] - Starting to consume events
Last step is to make this application accessible by creating a Kubernetes service and an OpenShift route for it. To do so, execute the following commands:
oc apply -f service.yamloc apply -f route.yaml
To access the application, point your browser to the Vaccine Order Optimizer OpenShift route associated to it. You can find the url by executing
oc get route vaccine-order-optimizer -o json | jq '.status.ingress[0] | .host'
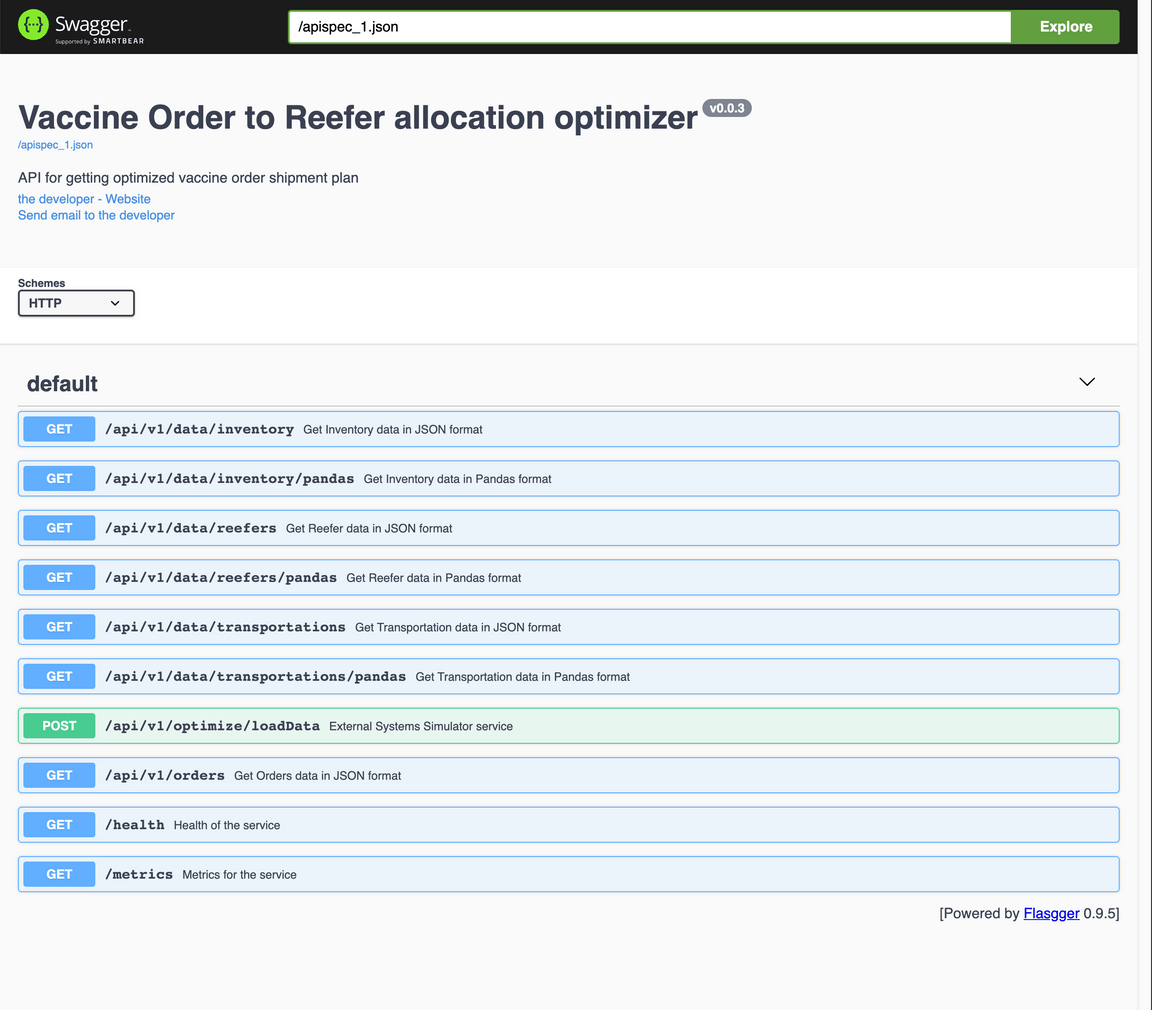
CONGRATULATIONS!!! you have now deployed all the components that make up this Vaccine Order Management and Optimization use case. Let’s now see it in action!
Demo
Ok, so we should have all of the Vaccine Order Management and Optimization use case components deployed and Running by now. That means that if we executed
oc get pods
we should see the following pods running in our OpenShift project:
NAME READY STATUS RESTARTS AGEconnect-cluster-demo-connect-2-snffv 1/1 Running 0 22hpostgres-db-postgresql-0 1/1 Running 0 4d20hvaccine-order-optimizer-6799bcf78c-dl6dq 1/1 Running 0 93mvaccineorderms-68ff4dd44-g5vkd 1/1 Running 0 24h
where
connect-cluster-demo-connect-2-xxxxxis the Kafka Connect cluster running the Debezium CDC for Postgres connector in it, which would monitor theordereventstable under thepublicschema of the Postgres database that our Vaccine Order Manager for Postgres component uses for storing the state the orders in the system. The Debezium CDC for Postgres connector will then produce as an event any new record in thatordereventstable. Records on theordereventstable represent any change to our database log.postgres-db-postgresql-0is the Postgres database that our Vaccine Order Manager for Postgres component uses for storing the state the orders in the system.vaccine-order-optimizer-xxxxxxxxxx-yyyyyis the Vaccine Order Optimizer component of the solution responsible for optimizing the shipment plans based on the vaccine orders in the system.vaccineorderms-xxxxxxxxxx-yyyyyis the Vaccine Order Manager for Postgres component of the solution responsible for managing the orders in the system.
Load Inventory, Reefer and Transportation data
The first thing we need to do is to load inventory, reefer (containers) and transportation data into the Vaccine Order Optimization component so that the shipment plan optimization CPLEX algorithm has proper data when we create new vaccine delivery order to produce a meaningful shipment plan.
Ideally, the inventory, reefer and transportation data will be live data provided by other components in the ecosystem of the Vaccine Order Management and Optimization use case that would be taking care of those entities and making the system aware of any changes through events accordingly. However, we are simulating those entities for now and just providing mockup data for the Vaccine Order Optimizer component.
To load the inventory, reefer and transportation mockup data
Open up the Vaccine Order Optimizer application in your web browser. Point your browser to the Vaccine Order Optimizer OpenShift route associated to it. You can find the url by executing
oc get route vaccine-order-optimizer -o json | jq '.status.ingress[0] | .host'
In there you should see a POST API called
/api/v1/optimize/loadDatathat will load the inventory, reefer and transportation data if you execute. Therefore, click on that API to expand it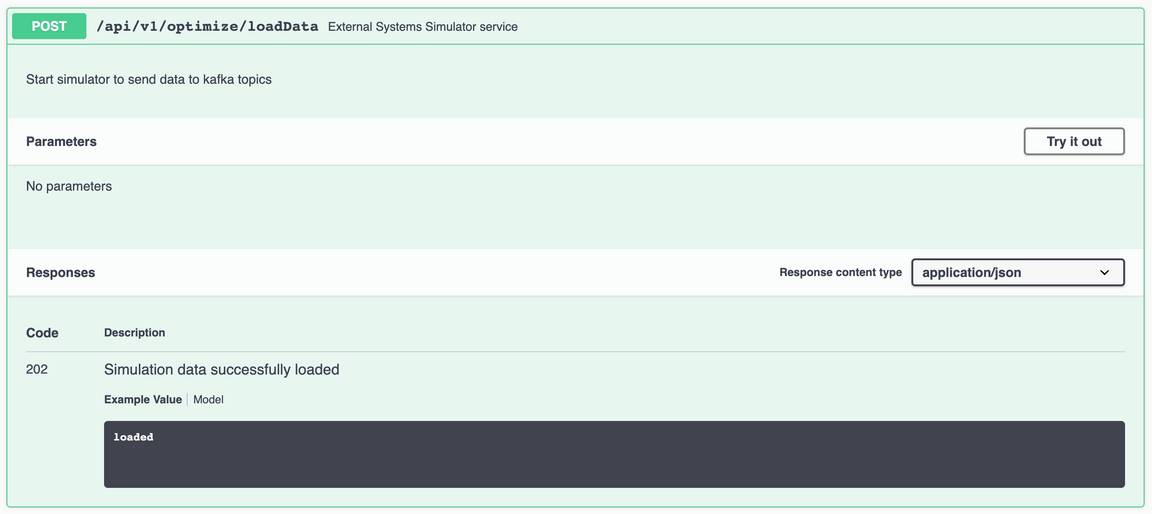
Click on Try it out and then in Execute.
After some time, you should see the message loaded in the Response body. That means the inventory, reefer and transporation mockup data has been properly loaded.

If you inspect the Vaccine Order Optimizer component’s log messages
oc logs vaccine-order-optimizer-xxxxxxxxxx-yyyyyyou should see messages in the logs of the type
[DataProducer] - Producing inventory events[KafkaAvroProducer] - Message delivered to demo.vaccine.inventory [0][InventoryConsumer][KafkaAvroConsumer] - New event receivedTopic: demo.vaccine.inventoryPartition: 0Offset: 36key: L0001value: {'type': 'ibm.gse.eda.vaccine.orderoptimizer.VaccineOrderCloudEvent', 'specversion': '1.0', 'source': 'Vaccine Order Optimizer producer endpoint', 'id': '41927bd6-6c5f-4fb4-8804-bc2c3c553679', 'time': '2021-04-14T16:45:26.920195+00:00', 'dataschema': 'https://raw.githubusercontent.com/ibm-cloud-architecture/vaccine-order-optimizer/master/data/avro/schemas/inventory.avsc', 'datacontenttype': 'application/json', 'data': {'lot_id': 'L0001', 'qty': 200, 'location': 'Beerse, Belgium', 'date_available': ''}}for inventory, reefer and transportation.
You can also execute any of the other GET APIs in the user interface that would return you the inventory, reefer and transportation data in json format or as a pandas object.
Create a new vaccine delivery order
After providing the Vaccine Order Optimizer component the inventory, reefer and transporation data its shipment plan optimization CPLEX algorithm needs to produce meaningful output, we are ready to create a new vaccine delivery order and get a shipment plan back as a result. To do so,
Open the Vaccine Order Manager for Postgres component’s user interface by pointing your browser to that component’s OpenShift route. You can find that url by executing:
oc get route vaccineorderms -o json | jq '.status.ingress[0] | .host'
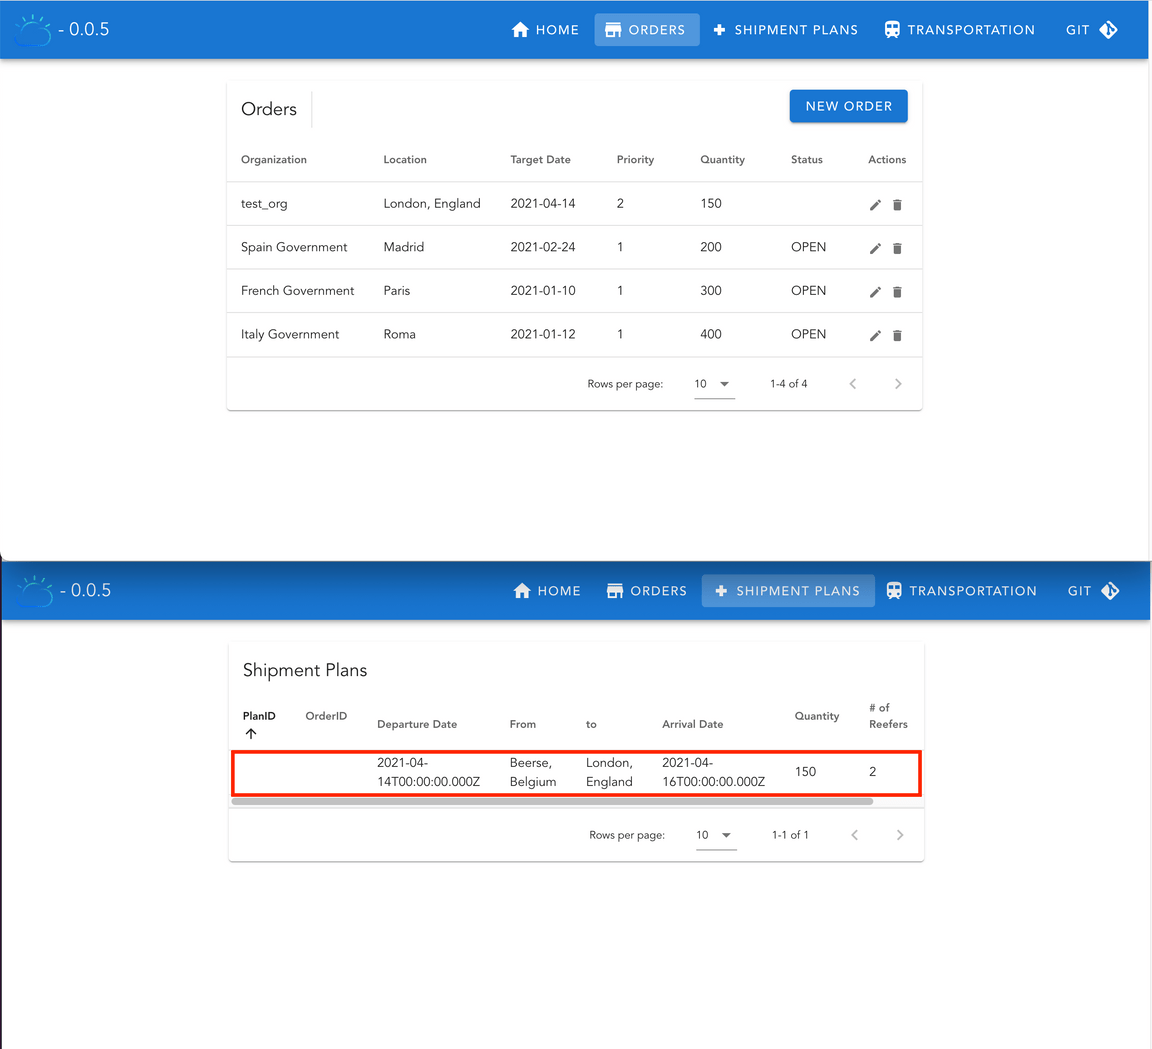
Open the Vaccine Order Manager for Postgres component’s user interface in two different web browser windows and open the ORDERS page in one and the SHIPMENT PLANS page in the other. The reason for this is that we want to see how the order is created in one window while the shipment plan arrives to the other as a result. The SHIPMENT PLANS page implements a server side event stream, meaning that the web page must be open when the event arrives to the topic it creates the event stream to in order to pick it up and display it and not miss it.
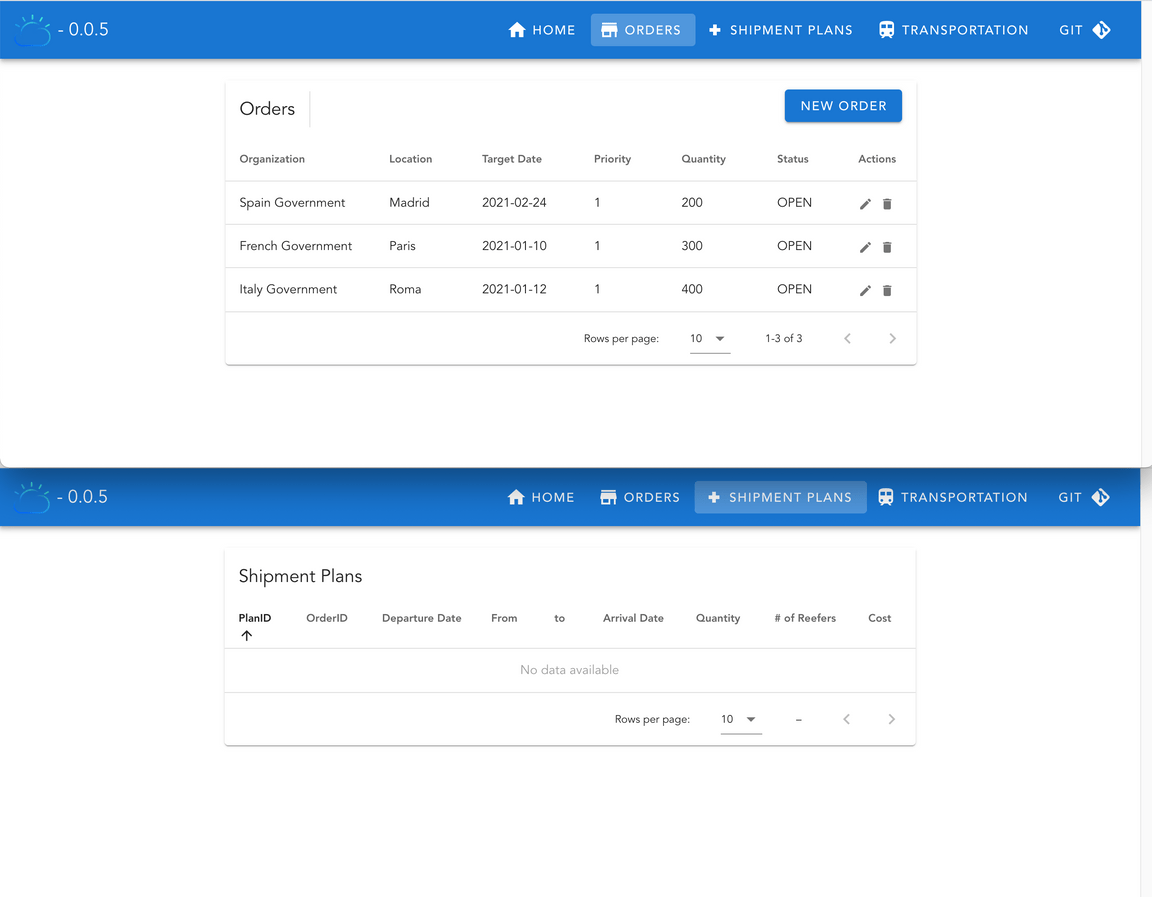
In the ORDERS page we can see there are aleready three orders created out of the box. Please, disregard these orders as they don’t have any effect on the system at all. Instead, let’s create a new order. Click on NEW ORDER, give a name of your choice to the Organization and set the Delivery Location to London, England (the reason to provide such a Delivery Location is to match the mockup data we loaded in the Vaccine Order Optimizer component earlier).
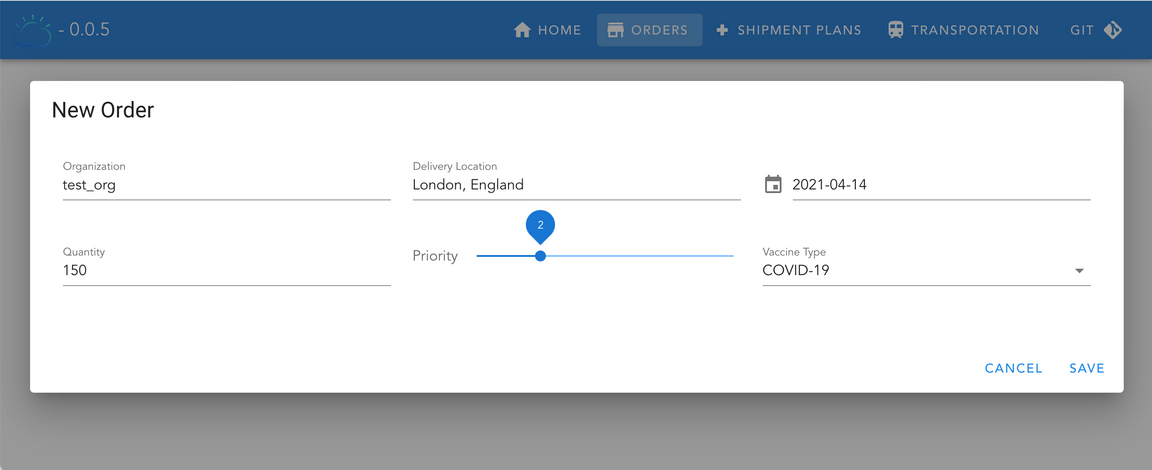
Click SAVE and watch the SHIPMENT PLANS page for a new shipment plan to arrive and get displayed as a result of the optimization algorithm for the new order.
Behind The Scenes
The demo above looks great. We have seen how the creation of a new order results in a new optimized shipment plan for the orders to be delivered in the system. However, we have not paid the close look at each of the different pieces and patterns deployed for this Vaccine Order Management and Optimization use case that this use case really deserve. The most interesting part of this use case isn’t in the actual shipment plan output but in the different pieces, technologies and patterns that allow for it. Hence, the deep dive we are doing in this section.
So far we know that, after the Vaccine Order Manager for Postgres component has created a new order, which is considered to be a successfully finished action once that new order gets stored in the Postgres database, that new fact needs to be delivered as an event into Kafka since that is what Event Driven Architectures are about. That is, the system is made aware of any new fact that has happened so that all the components of that system can react to it if needed. For doing so, we have decided to use the Outbox pattern, which consists of monitoring the database log for any changes on specifics tables and translate those changes into events to Kafka. More on the Outbox pattern here.
To implement the Outbox pattern for this use case, we have decided to implement the Vaccine Order Manager for Postgres component using Quarkus not only because it is one of the best Java stacks for cloud native applications due to its Java stack tailored to work best in containers in Kubernetes but also to take advantage of its Outbox extension. This extension will leverage the database transactional nature to translate in a transactional manner any change on its tables to a specific table with a tailored format best suited to be delivered as an event to Kafka. Then, Kafka Connector in charge of monitoring database changes and translating these into events to Kafka only needs to focus on one table with the addition of having the records in that table in a more appropriate shape and form to be sent as events into Kafka.
You can see that we are using the Debezium Quarkus Outbox extension for the Vaccine Order Manager for Postgres component by looking at its pom.xml file where you should find the following dependency:
<dependency><groupId>io.debezium</groupId><artifactId>debezium-quarkus-outbox</artifactId><version>1.4.0.Final</version></dependency>
Then, the outbox pattern is configured in the application.properties file under src/main/resources where you can find:
################################## Outbox setting for Quarkus Debezium pluginquarkus.debezium-outbox.id.name=idquarkus.index-dependency.outbox.group-id=io.debeziumquarkus.index-dependency.outbox.artifact-id=debezium-quarkus-outboxquarkus.debezium-outbox.table-name=orderevents# change to true in prodquarkus.debezium-outbox.remove-after-insert=false
which tells the Debezium Quarkus Outbox extension to transactionally translate any change in any of the tables in the database as a new record into the orderevents table. That means that our new order should have produced a new record on that orderevents table. Let’s check it out:
Exec into the postgres container:
oc rsh postgres-db-postgresql-0You should now have a shell running in the postgres container.
Start the psql client using the
postgresuser which our Postgres deployment was configued with:psql -U postgresList all the databases in the Postgres deployment:
\lwhich should give you the following output:
List of databasesName | Owner | Encoding | Collate | Ctype | Access privileges-----------+----------+----------+------------+------------+-----------------------orderdb | postgres | UTF8 | en_US.utf8 | en_US.utf8 |postgres | postgres | UTF8 | en_US.utf8 | en_US.utf8 |template0 | postgres | UTF8 | en_US.utf8 | en_US.utf8 | =c/postgres +| | | | | postgres=CTc/postgrestemplate1 | postgres | UTF8 | en_US.utf8 | en_US.utf8 | =c/postgres +| | | | | postgres=CTc/postgresConnect to the
orderdbdatabase (this is the database we had our postgres deployment configured to create and the Vaccine Order Manager for Postgres component to use):\c orderdbDisplay all the relations in the
orderdbdatabase.\dtwhich should output all the different tables the Vaccine Order Manager for Postgres component will work with including the
ordereventstable that the Debezium Quarkus Outbox extension has created and will use to help us implement the Outbox pattern:List of relationsSchema | Name | Type | Owner--------+--------------------+-------+----------public | ordercreatedevent | table | postgrespublic | orderevents | table | postgrespublic | orderupdatedevent | table | postgrespublic | vaccineorderentity | table | postgres(4 rows)List the orders in the
vaccineorderentitytable which is the table used by the Vaccine Order Manager for Postgres component to store the state of any vaccine order object.select * from public.vaccineorderentity;where we should see our newly created order:
id | askingorganization | creationdate | deliverydate | deliverylocation | priority | quantity | status | vaccinetype----+--------------------+----------------------+--------------+------------------+----------+----------+--------+-------------1 | Spain Government | 10-Nov-2020 02:02:40 | 2021-02-24 | Madrid | 1 | 200 | 0 | COVID-192 | French Government | 15-Nov-2020 02:02:40 | 2021-01-10 | Paris | 1 | 300 | 0 | COVID-193 | Italy Government | 15-Nov-2020 02:02:40 | 2021-01-12 | Roma | 1 | 400 | 0 | COVID-1915 | test_org | 14-Apr-2021 18:38:43 | 2021-04-14 | London, England | 2 | 150 | 0 | COVID-19(4 rows)Now, let’s see if the Debezium Quarkus Outbox extension has done its job by looking at the
ordereventstable:select * from public.orderevents;where we should, indeed, see how the Debezium Quarkus Outbox extension has transactionally created a new record with the data from the new record in the
vaccineorderentitybut in a better form and shape to be sent as a Kafka event:id | aggregatetype | aggregateid | type | timestamp | payload | tracingspancontext-------------------------------------+--------------------+-------------+--------------+----------------------------+----------------------------------------------------------------------------------------------------------------------------------------------------------------------------------------------------------------------------+-----------------------------------------------------------------------33e99eb0-55b8-4660-b7c9-d7cdddcdf4aa | VaccineOrderEntity | 15 | OrderCreated | 2021-04-14 18:38:43.476686 | {"orderID":15,"deliveryLocation":"London, England","quantity":150,"priority":2,"deliveryDate":"2021-04-14","askingOrganization":"test_org","vaccineType":"COVID-19","status":"OPEN","creationDate":"14-Apr-2021 18:38:43"} | #Wed Apr 14 18:38:43 GMT 2021 +| | | | | | uber-trace-id=471009333509d7ba\:721aed36f54c2294\:471009333509d7ba\:0+| | | | | |(1 row)
We have just verified that the first step in the Outbox pattern provided by the Debezium Quarkus Outbox extension works fine and that now we have our new order in a table with the shape and form we want it to be sent as an event to Kafka. We can also look at the logs of the Vaccine Order Manager for Postgres component to see what is in there:
Get the logs of the Vaccine Order Manager for Postgres component:
oc logs vaccineorderms-xxxxxxxxx-yyyyywhere we should spot the following:
18:38:43 INFO [ib.gs.ed.va.do.OrderService] (executor-thread-2) saveNewOrder for test_org nullHibernate:selectnextval ('hibernate_sequence')Hibernate:insertintoVaccineOrderEntity(askingOrganization, creationDate, deliveryDate, deliveryLocation, priority, quantity, status, vaccineType, id)which are the instructions to transactionally store the new order in both
vaccineorderentityandordereventstable that will result in the what we’ve checked above in the Postgres database.
Ok, so we have a new record in the orderevents table in the form and shape we like to be sent as an event to Kafka. Now, we need to make sure that happened. That is, that our Kafka Connect cluster which is running the Debezium CDC for Postgres connector has actually monitored such table and transalate new records of this into events in Kafka. This is as simple as opening your IBM Event Streams user interface, go to the topics section on the left hand side menu and select the <UNIQUE_ID>.vaccine.public.orderevents topic. In there, click on the Messages tab at the top:
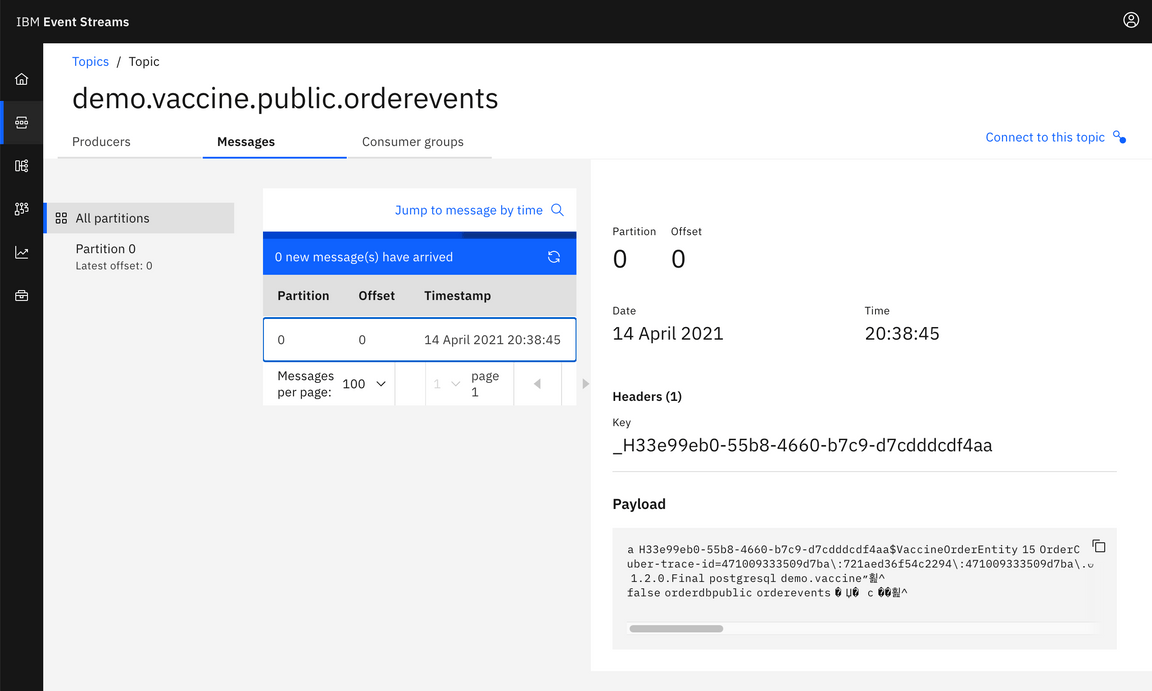
And, as expected, the message is there. You can also see strange character in the message payload. This is the result of having our events Avro serialized as explained earlier in this tutorial.
However, how did it actually happen? How did we configure the Debezium CDC for Postgres connector to make this happen? If we look at the pg-connector.yaml file you can find under environment/cdc in the Vaccine Order Manager for Postgres GitHub repository, you will find the configuration for the Debezium CDC for Postgres connector we have instantiated. You can see there two types of configuration. One related to the database the connector needs to monitor and the other related to the Apicurio Registry the connector needs to interact with to get the Avro data schemas to serialize the events it will send with.
For now, we are only interested in the configuration for the database. If you look at the database properties you will find their values are defined as placeholders to some properties file and property name by looking at the end of those placeholders that look like: connector.properties:property_name. And that property file containing the properties names and appropriate values for our scenario is the connector.properties file you can also find under environment/cdc in the Vaccine Order Manager for Postgres GitHub repository. That property file is injected into the Kafka Connect cluster environment, where our Debezium CDC for Posgres connector will run into, from a secret in OpenShift which we have created out of the connector.properties file when we deployed the Kafka Connect cluster. You can go back to the section where we deployed the Kafka Connect cluster for more information. What is important now for us is that in such connector.properties files we can see the following property and value: table-whitelist=public.orderevents which tells our Debezium CDC for Postgres connector what table to monitor and translate records from into events to Kafka.
Now that we have the new order as an event in Kafka, we should have gotten the shipment plan CPLEX optimization algorithm in the Vaccine Order Optimization component kicked off as a result. So let’s check if that actually happened.
Get your Vaccine Order Optimization component’s logs
oc logs vaccine-order-optimizer-xxxxxxxxxx-yyyyyYou should spot the following pieces for the vaccine order optimization process:
A new event was received by the
[OrderConsumer]Kafka consumer that is consuming from the<UNIQUE_ID>.vaccine.public.ordereventstopic:[OrderConsumer][KafkaAvroCDCConsumer] - New event receivedTopic: demo.vaccine.public.ordereventsPartition: 0Offset: 0key: {'id': '33e99eb0-55b8-4660-b7c9-d7cdddcdf4aa'}value: {'before': None, 'after': {'id': '33e99eb0-55b8-4660-b7c9-d7cdddcdf4aa', 'aggregatetype': 'VaccineOrderEntity', 'aggregateid': '15', 'type': 'OrderCreated', 'timestamp': 1618425523476686, 'payload': '{"orderID":15,"deliveryLocation":"London, England","quantity":150,"priority":2,"deliveryDate":"2021-04-14","askingOrganization":"test_org","vaccineType":"COVID-19","status":"OPEN","creationDate":"14-Apr-2021 18:38:43"}', 'tracingspancontext': '#Wed Apr 14 18:38:43 GMT 2021\nuber-trace-id=471009333509d7ba\\:721aed36f54c2294\\:471009333509d7ba\\:0\n'}, 'source': {'version': '1.2.0.Final', 'connector': 'postgresql', 'name': 'demo.vaccine', 'ts_ms': 1618425523877, 'snapshot': 'false', 'db': 'orderdb', 'schema': 'public', 'table': 'orderevents', 'txId': 857, 'lsn': 31482856, 'xmin': None}, 'op': 'c', 'ts_ms': 1618425524300, 'transaction': None}Now that the event is Avro deserialized we can read the event and realise it is composed of two main pieces:
beforeandafter, which represents the change in the database for a specific record. As this is a new order, thus a new record, we can see that thebeforepiece comes empty.The optimization process gets triggered:
[OrderConsumer] - calling optimizeOrderThe summary of the optimization process:
[OrderConsumer] - optimizeOrder summary:Planning Horizon: (2021-04-14 - 2021-04-21)------ Data Summary ------Customers: 2Supplies : 2Orders : 1---- Network Summary -----Nodes: 33Arcs : 82The results of the optimization process where we can already see the shipment plan that will be produced, as a fact that happened (a new shipment plan was created), to Kafka so that the rest of the components of our system are aware and react accordingly if needed:
[OrderConsumer] - optimizeOrder retults:{'Orders': '[{"Order ID":15,"DeliveryLocation":"London, England","Order Qty":150,"Order Priority":2,"Order RDD":"2021-04-15T00:00:00.000Z","First Delivery":"2021-04-16T00:00:00.000Z","Last Delivery":"2021-04-16T00:00:00.000Z","Number of Deliveries":1,"Delivered Qty":150,"Remaining Qty":0}]', 'OrderDetails': '[{"Order ID":15,"Supplier":"Beerse, Belgium","Departure Date":"2021-04-14T00:00:00.000Z","Delivery Date":"2021-04-15T00:00:00.000Z","Qty":150,"Cost":42.0}]', 'Shipments': '[{"Type":"Delivery","From":"Beerse, Belgium","Departure Date":"2021-04-14T00:00:00.000Z","To":"London, England","Arrival Date":"2021-04-16T00:00:00.000Z","Qty":150,"Reefers":2,"Cost":42}]'}Finally, as said above, the shipment plan event is prepared and sent to the
<UNIQUE_ID>.vaccine.shipment.plantopic:[OrderConsumer] - producing shipment plan[OrderConsumer] - Shipment Plan event to be produced:{'type': 'ibm.gse.eda.vaccine.orderoptimizer.VaccineOrderCloudEvent', 'specversion': '1.0', 'source': 'Vaccine Order Optimizer engine', 'id': '5cf26c04-866b-46a2-886f-8df29c4dff35', 'time': '2021-04-14T18:39:06.880652+00:00', 'dataschema': 'https://raw.githubusercontent.com/ibm-cloud-architecture/vaccine-order-optimizer/master/data/avro/schemas/shipment_plan.avsc', 'datacontenttype': 'application/json', 'data': {'Shipments': [{'Type': 'Delivery', 'From': 'Beerse, Belgium', 'DepartureDate': '2021-04-14T00:00:00.000Z', 'To': 'London, England', 'ArrivalDate': '2021-04-16T00:00:00.000Z', 'Qty': 150, 'Reefers': 2, 'Cost': 42}]}}[KafkaAvroProducer] - Message delivered to demo.vaccine.shipment.plan [0]
The last step into this Behind the scenes deep dive for how the Vaccine Order Management and Optimization use case works is the reception of the shipment plan event produced by the Vaccine Order Optmization component by the Vaccine Order Manager for Postgres component. We can check that out by just getting again the logs for the Vaccine Order Manager for Postgres component:
oc logs vaccineorderms-xxxxxxxxx-yyyyy
where we should spot the following:
18:39:10 INFO [ib.gs.ed.va.do.ShipmentPlanProcessor] (vert.x-eventloop-thread-0) {"type": "ibm.gse.eda.vaccine.orderoptimizer.VaccineOrderCloudEvent", "specversion": "1.0", "source": "Vaccine Order Optimizer engine", "id": "5cf26c04-866b-46a2-886f-8df29c4dff35", "time": "2021-04-14T18:39:06.880652+00:00", "dataschema": "https://raw.githubusercontent.com/ibm-cloud-architecture/vaccine-order-optimizer/master/data/avro/schemas/shipment_plan.avsc", "datacontenttype": "application/json", "data": {"Shipments": [{"Type": "Delivery", "From": "Beerse, Belgium", "DepartureDate": "2021-04-14T00:00:00.000Z", "To": "London, England", "ArrivalDate": "2021-04-16T00:00:00.000Z", "Qty": 150, "Reefers": 2, "Cost": 42}]}}18:39:10 INFO [ib.gs.ed.va.do.ShipmentPlanProcessor] (vert.x-eventloop-thread-0) ibm.gse.eda.vaccines.domain.ShipmentPlan@2238d6d1
that represents the optimized shipment plan for the new vaccine order we created and the event that should get displayed in the SHIPMENT PLANS page of the Vaccine Order Manager for Postgres user interface. And this would close the deep dive on how the entire Vaccine Order Management and Optimization use case works in detail.