Quickstart Tutorial
Introduction
In this tutorial, you will:
- Deploy the reference implementation to a standalone OpenShift cluster.
- Create an order via the UI.
- Check on existing orders.
- View information about the Fleet.
Each of these business processes will be executed step-by-step using the demonstration APIs and some scripts.
Pre-requisites
- Red Hat OpenShift Container Platform - this quickstart utilizes either the OpenShift Playgrounds or the IBM OpenLabs.
- … and that’s it!!! Everything else is provided for you via OpenShift Operators or through existing GitHub repositories.
- Additional self-paced learning can be done to integrate the deployed reference implementation with additional Kafka offerings, such as IBM Event Streams, Red Hat AMQ Streams, or Confluent Platform.
Deploy the reference implementation
OpenShift Playgrounds
In this section, we are going to see how to deploy the KContainer Shipping Container Reference Implementation on the OpenShift Playgrounds hosted environment.
Go to
https://learn.openshift.com/playgrounds/openshift45/in a browser and click Start Scenario.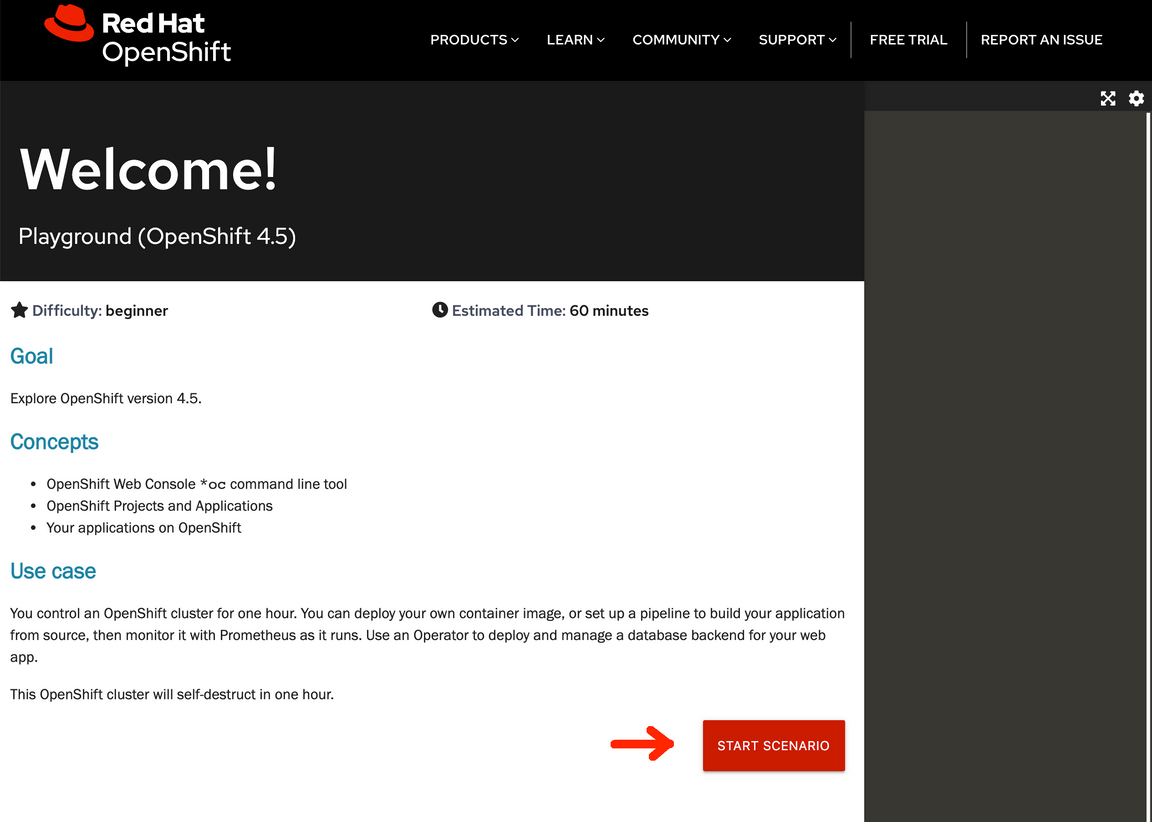
From a terminal that has access to your OpenShift cluster, download the kcontainer-quickstart-ocp.sh file:
curl -o kcontainer-quickstart-ocp.sh https://raw.githubusercontent.com/ibm-cloud-architecture/refarch-kc/master/scripts/quickstart/kcontainer-quickstart-ocp.shchmod +x kcontainer-quickstart-ocp.sh
(*) To override the default username and password used in the quickstart script for use in a different OpenShift environment, set environment variables with names of
OCP_ADMIN_USERandOCP_ADMIN_PASSWORDto the appropriate values before executing the script.Execute the quickstart deployment script with the following command:
./kcontainer-quickstart-ocp.shWait for the deployment to be active and ready when you are prompted with
Press any key to continue once an order has been submitted....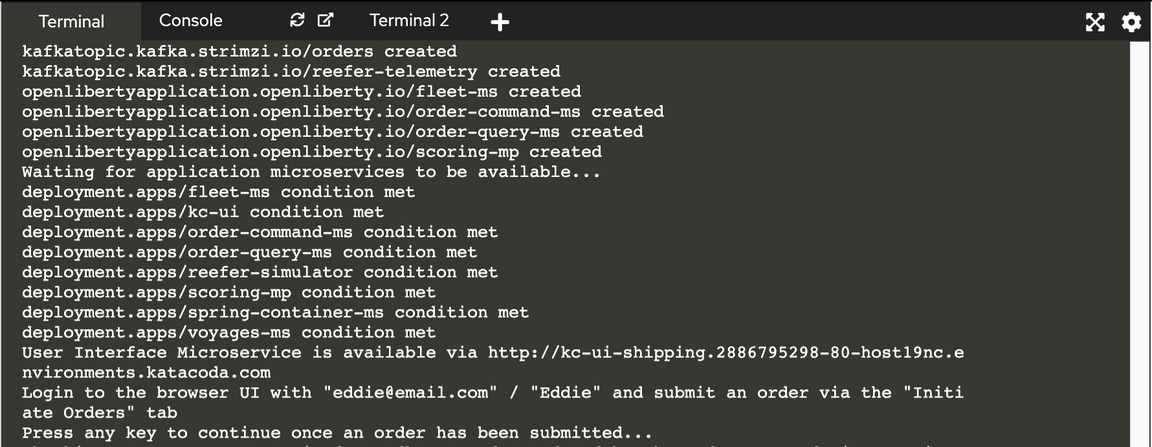
Grab the User Interface Microservice url and credentials and open it up in your web browser.
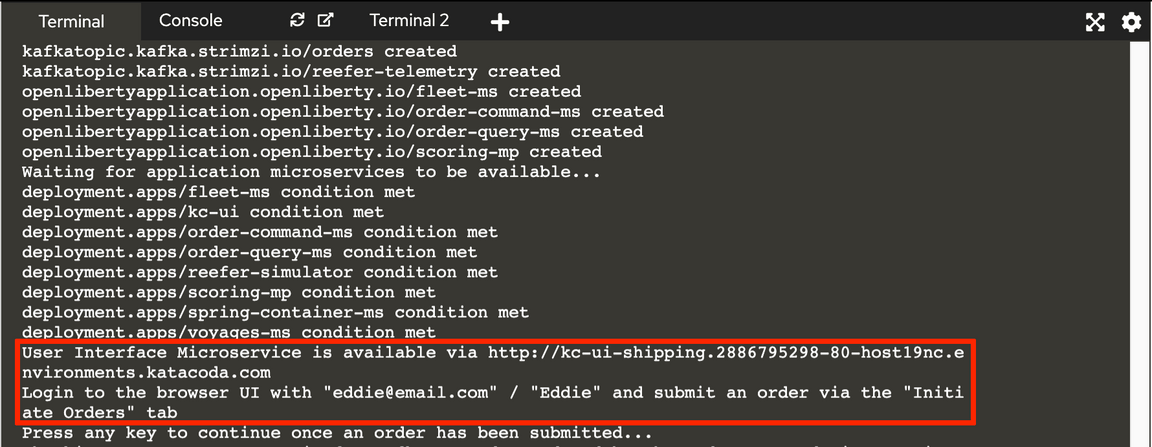
(*) This will be referred to as
kc-ui-shipping.cluster.localin the step 2 of this quickstart.You can also check all the resources created by the
kcontainer-quickstart-ocp.shscript in the RedHat OpenShift console by clicking on the console tab and using the appropriate credentials displayed on the instructions section to log in.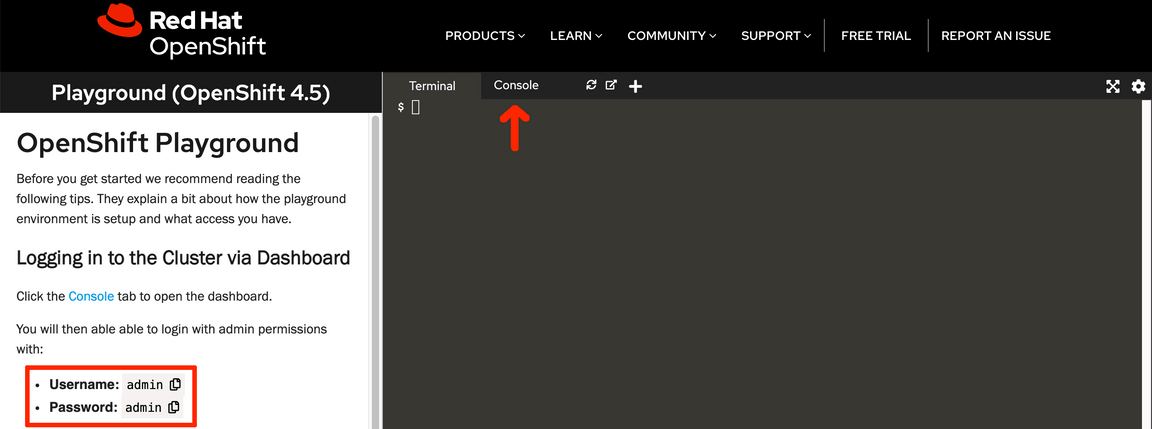
Run the Demo
In this section, we are going to guide you through different scenarios to not only demonstrate the end goal of the KContainer application of creating an order to ship goods from a source port to a destination port but some of the EDA patterns that it implements as well.
Setup
First thing we want to do is to be able to inspect the state of each of the components involved in the creation of an oder. These are:
- User Interface - Will provide us with a user interface.
- Order Command - Will take care of the write responibilities in the CQRS pattern.
- Order Query - Will take care of the read responsibilities in the CQRS pattern.
- Container Management - Will take care of the management of the containers.
- Voyage Management - Will take care of the management of the voyages for the different ships in our fleet.
In order to check the state of each of these components and see how these evolve and react to the events happening within our application, we need to expose them individually through OpenShift routes. Of course, this is not a best practice for production-ready applications but a tool for us to be able to understand what is going on behind the scenes in our Event Driven Architecure KContainer reference implementation.
We have created the following get_state.sh script that will grab the route for each of the KContainer components involved in the creation of an order listed above, set these up with the appropriate context path and poke them to retrieve their state so that you don’t have to do so manually in the terminal and web browser (which you may want for a client demo so that it may be a bit more visual…).
To grab the script and make it executable, run the following in your terminal:
curl -o get_state.sh https://raw.githubusercontent.com/ibm-cloud-architecture/refarch-kc/master/scripts/quickstart/get_state.shchmod +x get_state.sh
These script runs and infinite while loop to get the state of each of the KContainer components involved in the creation of an order every time to press any key. Execute the script by running ./get_state.sh:
These are the endpoints for each of the KContainer components-------------------------------------------------------------* User Interface --> kc-ui-shipping.dte-ocp44-new-aghbjd-915b3b336cabec458a7c7ec2aa7c625f-0000.us-east.containers.appdomain.cloud/api/orders/GoodManuf* Order Command --> order-command-ms-shipping.dte-ocp44-new-aghbjd-915b3b336cabec458a7c7ec2aa7c625f-0000.us-east.containers.appdomain.cloud/orders* Order Query --> order-query-ms-shipping.dte-ocp44-new-aghbjd-915b3b336cabec458a7c7ec2aa7c625f-0000.us-east.containers.appdomain.cloud/orders* Containers --> spring-container-ms-shipping.dte-ocp44-new-aghbjd-915b3b336cabec458a7c7ec2aa7c625f-0000.us-east.containers.appdomain.cloud/containers* Voyages --> voyages-ms-shipping.dte-ocp44-new-aghbjd-915b3b336cabec458a7c7ec2aa7c625f-0000.us-east.containers.appdomain.cloud/voyagePress any key to get the state for each of the KContainer components
We can see that the initial state of our KContainer application does not count with any order already in the system which is what we should expect after a new clean deployment of the solution. However, it does have 4 voyages already in the system (disregard the plannedDeparture and plannedArrival attributes. We are only interested in the srcPort, dstPort and freeCapacity attributes). Also, there is no container at all in the system which we need if we want to carry goods from a source port to a destination port.
As a result, the first thing we need to do before creating an order is to add a new container at the source port into our system. For that, the Container Management component exposes and API which the following create_container.sh script will make use of. On a new terminal tab, download the script and make it executable:
curl -o create_container.sh https://raw.githubusercontent.com/ibm-cloud-architecture/refarch-kc/master/scripts/quickstart/create_container.shchmod +x create_container.sh
Create a container of size 10 executing ./create_container.sh 10
Creating a new container with ID = 8090 and size = 10{"id": "8090","latitude": 31.4,"longitude": 121.5,"type": "Reefer","status": "Empty","brand": "itgtests-brand",
As you can see, we have created an Empty container whose currentCity is Shanghai, where there is also a voyage to carry goods from to Oakland, and capacity of 10.
You can go back to the terminal tab where you executed the get_state.sh script and hit any key again to see what the state of the system is now:
These are the states for each of the KContainer components at Mon 8 Mar 2021 13:29:27 CET---------------------------------------------------------------------------------------User Interface:[]Order Command:Order Query:[]
that shows, again, the container we have just created is reflected in the system as you would expect.
We are now ready to create a new order in our KContainer application to carry some goods up to 10 from Shanghai, where we created the new container, to Oakland which is one of the existing voayages in the system.
KContainer Manufacturer creating an order
In this section, we are going to create a new order to ship goods of 10 items overseas from Shanghai to Oakland as the GoodManuf manufacturer. By creating this order, we are going to observe how our Event Driven Architecture KContainer reference implementation works both from the outside (the order gets assigned which means it has a container assigned to carry the goods and a voyage allocated to ship the container overseas) and from the inside looking at the CQRS, SAGA, Event Sourcing, etc patterns as well as the different events in Kafka, our event backbone.
Open up the KContainer application user interface on your web browser by pointing it to the route you got presented with at the end of the previous Deploy the reference implementation section. You can also find the route executing:
oc get route kc-ui -o jsonpath="{.spec.host}"
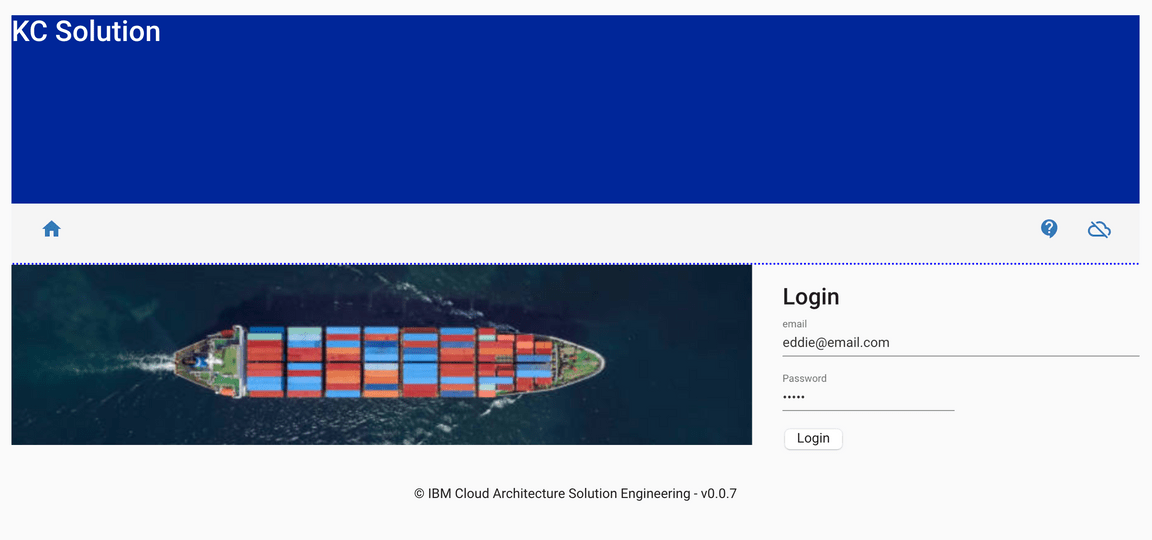
To log in to the home page, you will need the following user email and password:
- Email:
eddie@email.com - Password:
Eddie
The initial UI homepage shows an illustrated version of the business process. There are four tiles that can be used to simulate different parts of the outlined business process.
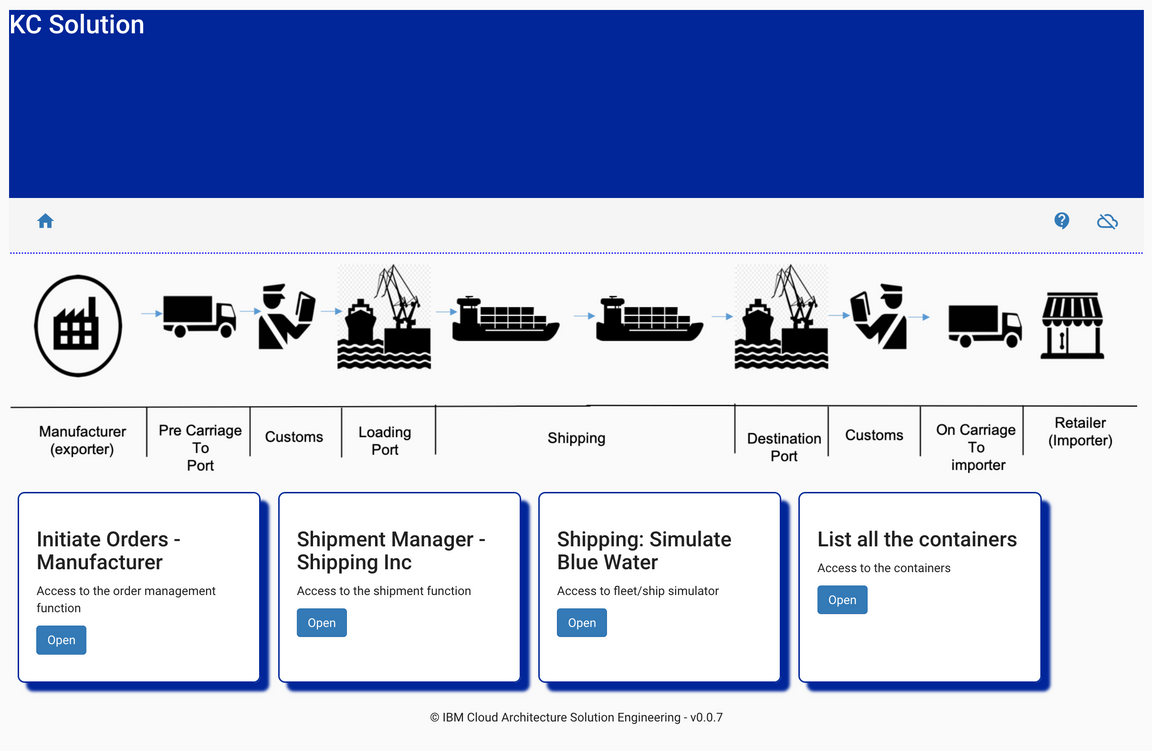
Click on the Initiate Orders - Manufacturer tile to create a new ‘fresh product’ order to ship overseas. This simulates the activity that would usually be carried out by the manufacturer in our scenario.
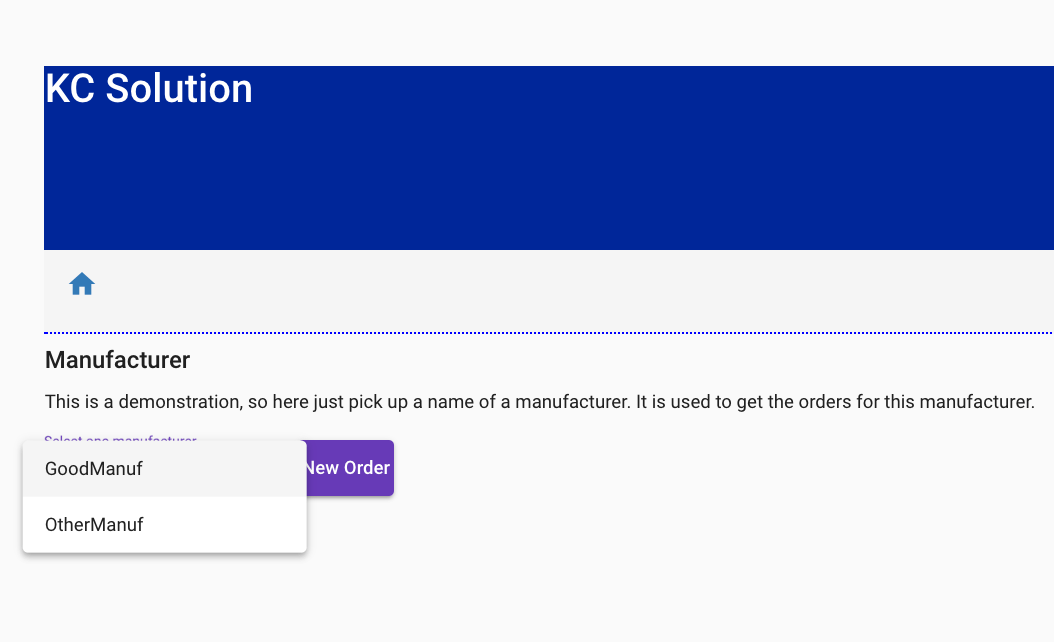
To represent different manufacturers, the first select box has been designed to support multiple scenarios in the future. For the purposes of this quickstart tutorial, select GoodManuf.
Once the manufacturer is selected, a list of existing orders will be displayed. As expected, there is no orders in the system yet for the GoodManuf manufacturer.
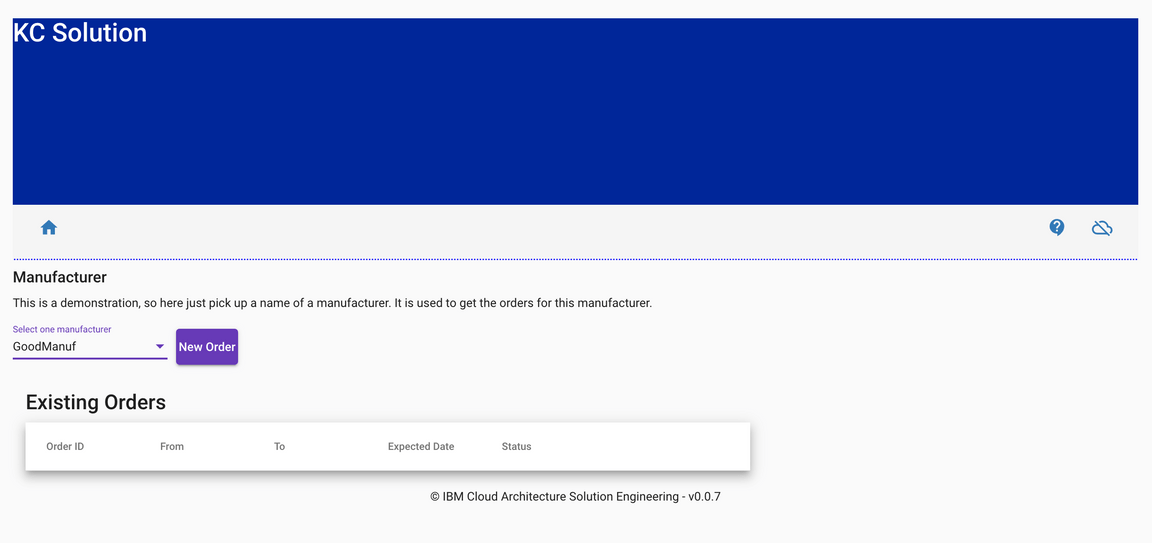
Click on New Order and a form to create a new order will be displayed on the right hand side of your screen:
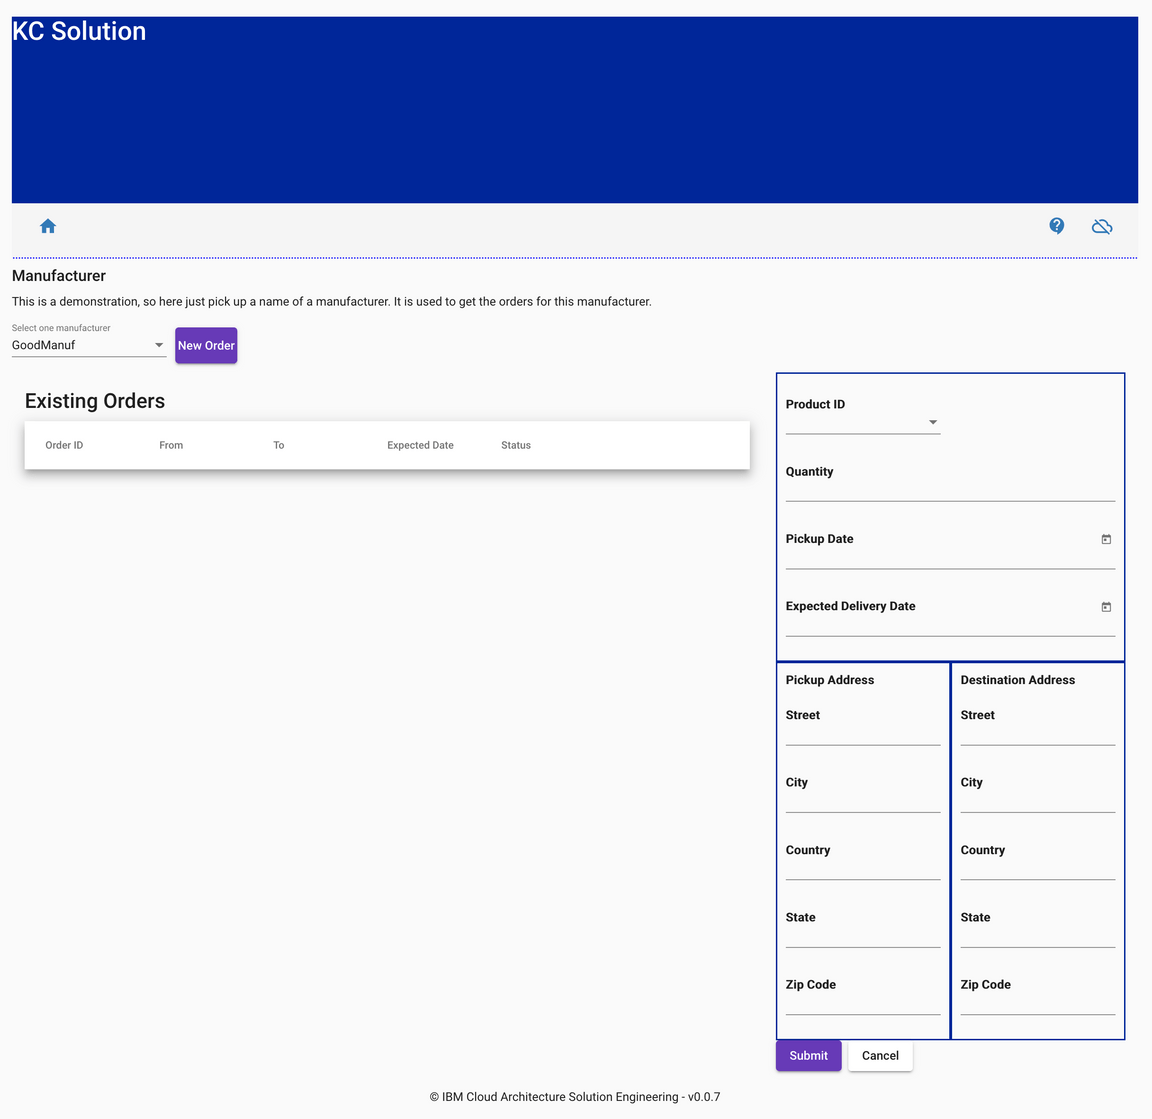
Now, in order for the demo to work, we must make sure that the new order we submit has
10or lessQuantityShanghaias thePickup Address CityOaklandas theDestination Address City
the reason for this is that we created in the Setup section a container in Shanghai with a capacity of 10 and we know there is only one voyage whose source port is Shanghai and that voyage ships containers to Oakland. The rest of the attributes, will not have effect on the order management. DO NOT click Submit yet.
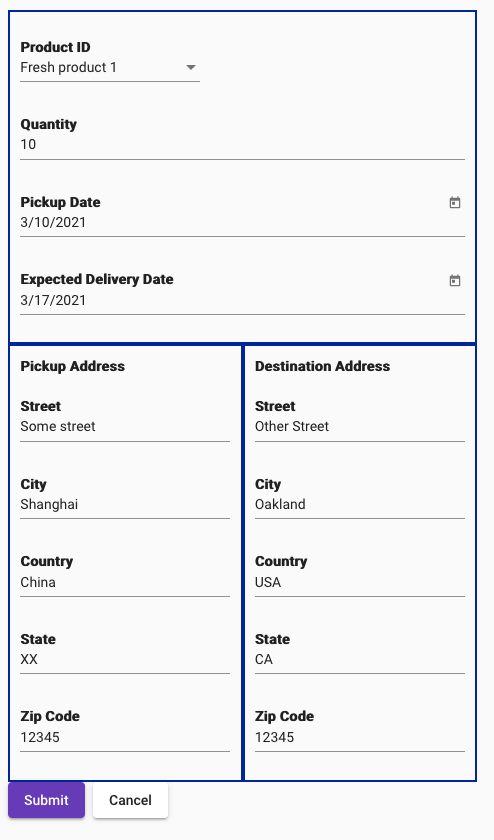
We are ready to submit our new order for the KContainer application to process it. But first, let’s go over what is meant to happen behind the scenes as a result:

Clicking the Submit button on the user interface will call the API to create a new order in the
Order Commandcomponent. As explained in the Event Sourcing pattern, any request from the users of the application or any third party will become a command event (specific type of event) that will get registered in our event backbone and that our application will need to act upon. That is, the system will obey to a command. As a result, we should see aCreateOrderCommandevent in theorderCommandstopic. The idea behind Event Sourcing and logging the actions we want our system to take into our event backbone as commands is to make sure these actions are taken no matter what. Commands will not get “marked” as “accomplished/executed” until we are 100% sure the needed actions have been taken as a result. To make sure of this, we are making use of the technology and capabilities that Kafka provides (such us transactionality and idempontence) along with the Consume-transform-produce loop pattern.The Order Command component is listening to the
orderCommandstopic for thoseCreateOrderCommandcommand events to go off and create those new orders. As a result, it will pick up ourCreateOrderCommandevent and will create the corresponding new order. In this case, it will be as “simple” as creating a new record into an in-memory database and then, once again, to comply with the Event Sourcing pattern, logging an event into the event backbone as the fact that has happened. As a result, we should see anOrderCreatedevent being dropped in theorderstopic. Only then, the initialCreateOrderCommandcommand event will get marked as “accomplished/executed” (which translates in the Kafka terminology as get its offset committed). The actions of creating a new object into theOrder Commandsin-memory’s database and sending out theOrderCreatedevent into the event backbone are the two actions (could be more if we needed) that must happen as a result and the Consume-transform-produce loop pattern is what makes sure of it.Now, we have created a new order in the
Order Commandcomponent and dropped anOrderCreatedevent into the event backbone following the Event Sourcing pattern as something that has happened. This allows any other component in our system to be aware of this change (and any other that happens) and be able to appropriately react to these if needed as a result. This makes our components completely decoupled through asynchronous communication, which makes our application reactive, resilient and scalable (see The Reactive Manifesto).However, the creation of a new order “object” in the
Order Commandcomponent is useless for us from the business point of view because our end goal is to get those orders shipped overseas and, in order to do that, we need to allocate a container and assign a voyage to the order or reject the order. To allocate a container and assign a voyage to an order another two components of our distributed solution need to step in. The need of taking several actions on distributed components for an end goal is what is known as a long running transaction. To address this long running transaction, we implemented the choreography variant of the SAGA pattern where theOrderCreatedevent will trigger a sequence of actions to happen in a distributed manner before “marking” the new order object created previously asAssigned(which means accepted and ready for delivery) orRejected(in the case that there wasn’t a suitable container or voyage available). Until then, the order will remain asPending.As said above, the
OrderCreatedevent will trigger a long running transaction in our distributed system on a choreography manner. That is, the next actor in such long running transaction, theContainer Managercomponent is listening to theorderstopic forOrderCreatedevents. Once it sees one of those events, it will try to allocate a container for that order. If it finds one it will allocate the container to the order and will, following the Event Sourcing pattern again, log that fact in the form of aContainerAllocatedevent intoorderstopic of the event backbone. If a suitable container could not be found, then it will drop aContainerNotFoundevent into theorderstopic of the event backbone so the rest of the components involved in this long running transaction can carry out a compensation process accordingly (we will cover this later on).We hope to have a
ContainerAllocatedevent into theorderstopic by now which will then trigger the next action on this long running transaction part of the SAGA pattern that involves theVoyages Manager. TheVoyages Manageris listening forContainerAllocatedevents in theorderstopic in our event backbone in order to assign a voyage to these. As a result, it will then log aVoyageAssignedevent if a suitable voyage for the order (source port and destination port) and for its allocated container (capacity) has been found. If a suitable voyage could not be found, aVoyageNotFoundevent will get logged into theorderstopic in our event backbone instead so that a compensation process is carried out (more on this later).Finally, the
Order Commandcomponent, which initiated the long running transaction as a result of having created a new order, listens forVoyageAssignedevents in theorderstopic in our event backbone. Once theVoyageAssignedevent is received, the order is marked asAssignedand the long running transaction is considered successfully completed.
Ok, this time we really are ready for creating a new order. Make sure you have the get_state.sh script running on a terminal so that you execute it right after hitting the submit button for the new order in the user interface. This way, we would see the intermediate Pending state of the order:
These are the states for each of the KContainer components at Mon 8 Mar 2021 13:40:43 CET---------------------------------------------------------------------------------------User Interface:[{"containerID": "8090","customerID": "GoodManuf","destinationAddress": {"city": "Oakland",
where we can already see the following interesting facts:
- As per the
Order Commandcomponent, a new order with ID0e75b3f5-a15e-42c9-a05b-9c8c55a4e0dchas been created and it is still inPendingstate since the long running transaction implemented using the SAGA pattern has not yet finalised (since a voyage has not yet been assigned. See theVoyage Managerstate where no voyage has yet decreased theirfreeCapacity). - As per the
Container Managercomponent, the container with ID8090we previously created on purpose is now loaded (capacityis0). - In the
User InterfaceandCommand Querycomponents, we can not only see see the full information of the order compared to what theOrder Commandcomponent shows but also that the container with ID8090has been allocated to it. The reason for this is that theOrder Commandcomponent implements the write portion of the Command Query Responsibility Segregation pattern whereas theOrder Querycomponent implements the read portion of it. As a result, theOrder Commandcomponent only cares about managing the state of the order whereas theOrder Querycomponent implements the complex queries our application needs to address by building the projections on the appropriate data that is gathered from the different distributed components by processing the events flowing through the event backbone it is interested in.
If we had the ability to refresh the user interface and select the GoodManuf manufacturer once again to get its orders listed, we should see the order is also in pending state.
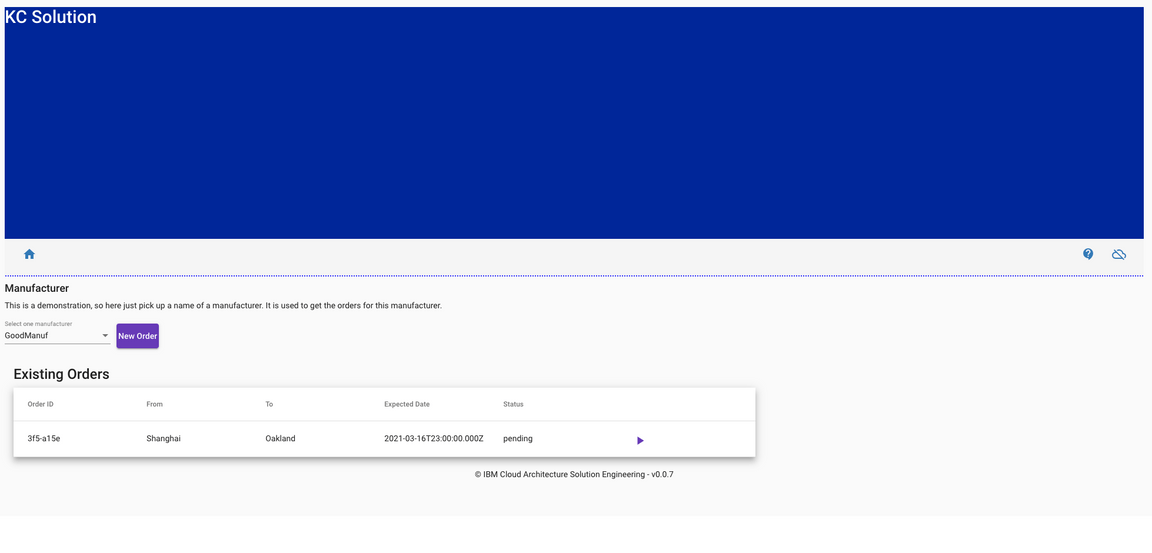
If we now, after 10 secs aprox, hit again any key in the terminal where we have running the get_state.sh script:
These are the states for each of the KContainer components at Mon 8 Mar 2021 13:43:03 CET---------------------------------------------------------------------------------------User Interface:[{"containerID": "8090","customerID": "GoodManuf","destinationAddress": {"city": "Oakland",
we should see that:
- As per the
Order Commandcomponent, the order is nowAssignedas a result of having a voyage assigned to it. - As per the
User InterfaceandOrder Querycommands, we should see the voyage that has been assigned to the order (ID101). Again, we see how theOrder Querycomponent is building up those projections with the data it is interested in from the different distributed components through the events being published in the event backbone (Command Query Responsibility Segregation pattern) - As per the
Voyages Managementcomponent, we can see that voyage with ID101has nowfreeCapacityof990as opposed to thefreeCapacityof1000at the beginning as a result of having allocated our container with ID8090and capacity of10on it.
Again, if we refresh the user interface and select the GoodManuf manufacturer, we should now see the order in assigned state.
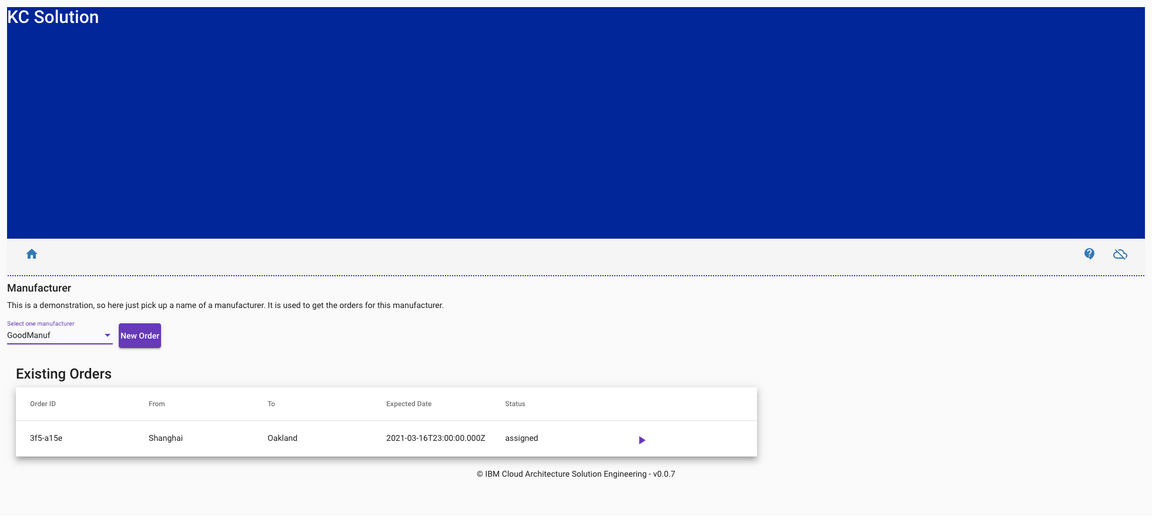
Finally, we want to inspect the events in both the orderCommands and orders topics of our event backbone.
Check out the events in the
orderCommandstopic by executing in a terminal:oc rsh my-cluster-kafka-0 bin/kafka-console-consumer.sh --bootstrap-server localhost:9092 --from-beginning --timeout-ms 10000 --topic order-commands{"payload":{"orderID":"0e75b3f5-a15e-42c9-a05b-9c8c55a4e0dc","productID":"Fresh product 1","customerID":"GoodManuf","quantity":10,"pickupAddress":{"street":"Some street","city":"Shanghai",where we can see the
CreateOrderCommandcommand event as a result of calling the create new order API of theOrder Commandcomponent and applying the Event Sourcing pattern.Check out the events in the
orderstopic as a result of the new order command event above by executing in a terminal:oc rsh my-cluster-kafka-0 bin/kafka-console-consumer.sh --bootstrap-server localhost:9092 --from-beginning --timeout-ms 10000 --topic orders{"payload":{"orderID":"0e75b3f5-a15e-42c9-a05b-9c8c55a4e0dc","productID":"Fresh product 1","customerID":"GoodManuf","quantity":10,"pickupAddress":{"street":"Some street","city":"Shanghai",where we can see the
OrderCreatedevent as a result of having processed the initialCreateOrderCommandcommand event from theorderCommandstopic followed by theContainerAllocatedandVoyageAssignedevents that are part of the long running transaction of the SAGA pattern theOrderCreatedevents triggers.
Clean up
If you wish to cleanup your environment to the initial state where no order or container was created and your kafka topics where empty, execute the following steps from the terminal:
Scale all the Appsody/OpenLiberty apps to 0 replicas so that there is no consumer or consumer group hooked up to any kafka topic
for APP in $(oc get AppsodyApplication,OpenLibertyApplication | grep "-" | awk '{print $1}'); do oc patch $APP --type 'json' -p '[{"op":"add", "path":"/spec/replicas", "value":0}]'; doneDelete the postgresql database that stores the state of the existing containers so all those existing containers are removed
oc delete pod/postgres-db-postgresql-0Delete all kafka topics so that we get rid of all existing events in them
for i in `oc get kafkatopics | grep '-' | awk '{print $1}'`; do oc delete kafkatopic $i; doneWait until the below command returns 1. This is to ensure that all the topics have been removed (it may take a couple of minutes to the Strimzi operator to accomplish the task)
oc exec -it my-cluster-kafka-0 -- ./bin/kafka-topics.sh --list --bootstrap-server localhost:9092 | wc -lDownload the definition of the kafka topics in order to recreate these
curl -o kafka-topics.yaml https://raw.githubusercontent.com/ibm-cloud-architecture/refarch-kc-gitops/master/environments/dev/apps/refarch-kc/base/kafka/kafka-topics.yamlRecreate the kafka topics
oc apply -f kafka-topics.yamlWait until the below command returns 10 or greater. This is to ensure that all the topics have been created (it may take a couple of minutes to the Strimzi operator to accomplish the task)
oc exec -it my-cluster-kafka-0 -- ./bin/kafka-topics.sh --list --bootstrap-server localhost:9092 | wc -lScale all the Appsody/OpenLiberty apps back to 1 replica
for APP in $(oc get AppsodyApplication,OpenLibertyApplication | grep "-" | awk '{print $1}'); do oc patch $APP --type 'json' -p '[{"op":"add", "path":"/spec/replicas", "value":1}]'; doneYou may need to wait a couple of minutes for these Appsody and OpenLiberty applications to get started. You can check the status of these running
oc get pods -l app.kubernetes.io/part-of=refarch-kc
This quickstart guide will be updated as the project evolves and new capability is added. If you have any issues or queries with this quickstart guide, please raise an issue in the github repo.