Cold-chain monitoring
- UPDATED 03/21/2021
The vaccine lots need to be kept at a constant temperature from the manufacturing to the delivery time period. The sensor telemetry data coming from the refrigerated shipping containers is processed to assess cold-chain violations.
The solution for this use case includes streaming telemetry events, a stateful microservice to implement aggregation & alarm generation, and integration with a microservice to log issues against the refrigerated shipping container, and a Freezer manager service.
Components involved in this use case
- Vaccine Refrigerator container Simulator
- Vaccine Reefer Monitoring Agent
- IBM Event Streams or Strimzi Kafka
- Freezer manager service.
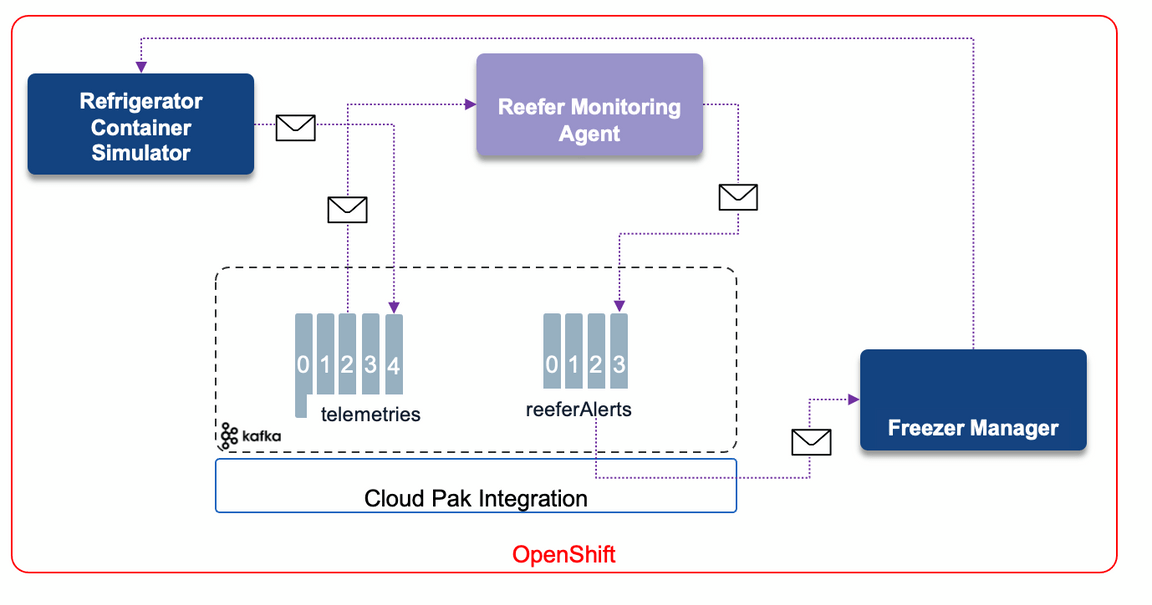
Understand the components
- The Reefer simulator is a python Flask app, which supports simple API to control the Refrigerator container simulation. It is described in this note, also see next section to deploy it on OpenShift.
- The Monitoring Agent is a Quarkus app, using Kafka Streams, and microprofile reactive messaging to monitor the telemetries and assess any cold chain violation via stateful logic. For each uniquely identified refrigerator, it keeps the last measured temperatures and compute some min, max, average and the total number of concutives violated records: temperature above a Threshold. It may potentially call an Anomaly detection scoring service deployed on Watson ML service. We describe this scenario in another use case. To read more on the monitoring agent, see the implementation note.
- The Freezer manager service) is a simple quarkus app with Reactive messaging to process the alerts and support the Freezer inventory.
Run on OpenShift
Pre-requisites
You need an existing OpenShift Cluster with administrator access.
We can use Kafka 2.7 open source using the Strimzi operator, Event Streams Operator as part of Cloud Pak for Integration or Confluent add-on.
If you are sharing the IBM Event Streams instance with other people for this tutorial, you may want to add a unique suffix to the name of the resources to be created next, such as topics, projects, etc. If so, make sure you provide the appropriate name for these throught the rest of the tutorial.
If you want to use Strimzi, you can deploy it within your own project using our gitops yaml files (see next section)
If you use Confluent or Event Streams or RedHat AMQ Streams you need to have those Kafka Cluster running.
Clone the vaccine-gitops repository:
git clone https://github.com/ibm-cloud-architecture/vaccine-gitopsCreate a new project to deploy of all components. This will be refered as
YOUR_PROJECT_NAMEthroughout the rest of this tutorial. For the instructions on this tutorial, we use the project name:vaccine-solution.OpenShift CLI on your local environment.
jq on your local environment.
Kustomize for one script deploy
Use a Terminal and the
occli.
Strimzi - One Click Deploy
Go to vaccine-gitops folder and do the following steps:
Set your personal deployment parameters within the
scripts/env-strimzi.shfile. Normally only the name of the YOUR_PROJECT_NAME and KAFKA_NS needs to be changed.- KAFKA_NS to the name of the project where you will deploy Strimzi and the solution (
vaccine-solution) - YOUR_PROJECT_NAME to the name of the project (
vaccine-solution).
- KAFKA_NS to the name of the project where you will deploy Strimzi and the solution (
Use the
oc login --token... --server ....command to log to the OpenShift cluster. (From the OpenShift admin console, top right menu)Be sure to be in your project, for example:
oc project vaccine-solution
If not done deploy Strimzi with the command
./scripts/deployStrimzi.sh --skip-loginThree kafka pods and three zookeeper pods should be started.
Start the secret creation and app deployment:
./scripts/deployColdChainWithStrimzi.sh --skip-loginThe following pods should be up and running:
NAME READY STATUSreefer-monitoring-agent-7dd5f7ccd9-z4cf9 1/1 Runningvaccine-reefer-simulator-669c5f5d8b-7mms4 1/1 Runningfreezer-mgr-1-7x979 1/1 Runningvaccine-kafka-cruise-control-76d68b845f-zqx6d 2/2 Runningvaccine-kafka-entity-operator-76f94d4d6d-zfr59 3/3 Runningvaccine-kafka-kafka-0 1/1 Runningvaccine-kafka-kafka-1 1/1 Runningvaccine-kafka-kafka-2 1/1 Running
If you go to the OpenShift Console, and review the Installed Operator within your project, you should have the Strimzi operator console and the elements created:
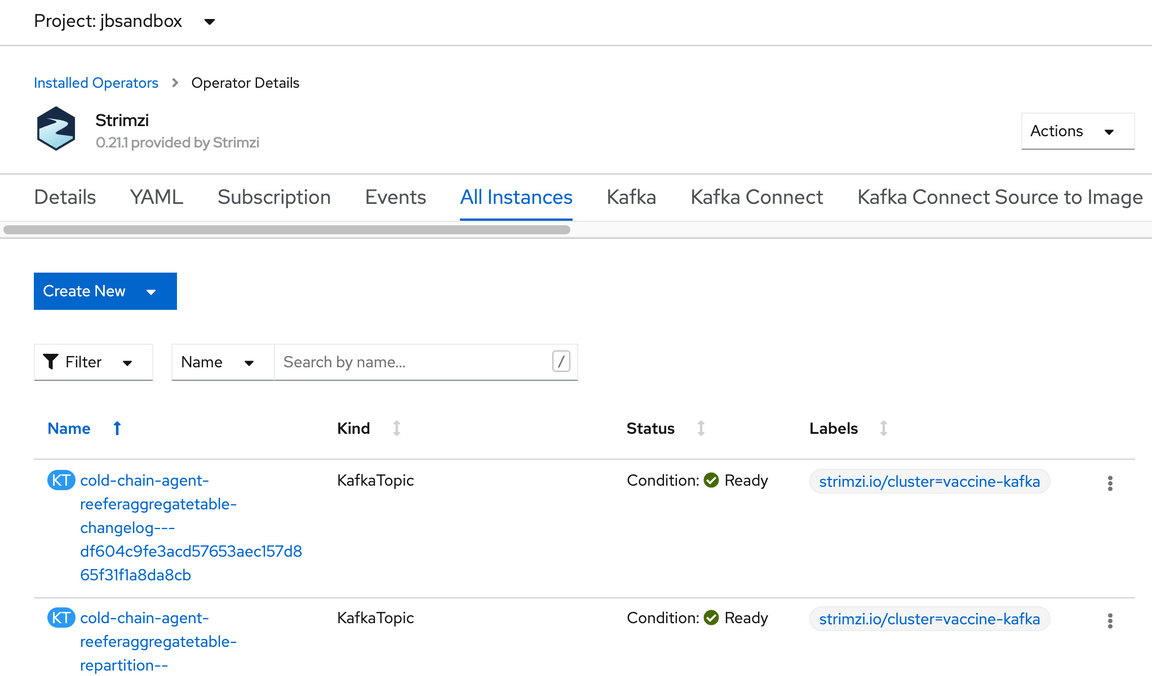
- Next step is to run the demonstration.
Event Streams - One Click Deploy
- Set the project name in the
scripts/env.sh: - Run the command:
./scripts/deployColdChainWithEventStreams.sh --skip-login
- Verify in the Event Streams console the created topics.
- Go to the demonstration section to run the demo.
Deploy the solution manually
If you want to do this scenario step by step as a lab, then this section addresses how to build and deploy the components to OpenShift:
Set Event streams resources
Define your OpenShift project name (Kubernetes namespace) as environment variable in the
./scripts/env.sh:CLUSTER_NAME=<YOUR_CLUSTER_NAME>KAFKA_NS=<YOUR_EVENT_STREAMS_NAMESPACE>PROJECT_NAME=<YOUR_PROJECT_NAME># modify the cluster URL for external and schema registryEXTERNAL_KAFKA_BOOTSTRAP_SERVERSwhere
<YOUR_EVENT_STREAMS_NAMESPACE>is the name where you installed your IBM Event Streams instance in the pre-requisites section above.<YOUR_CLUSTER_NAME>is the name of your IBM Event Streams cluster which can be found with the followingoccommand:$ oc get eventstreams -n ${EVENTSTREAMS_NS}NAME STATUSeda-dev Ready
Be sure to be on your target project:
source ./scripts/setenv.shoc project ${PROJECT_NAME}Create users and topics using the gitops environment:
oc apply -k environments/event-streamsCopy the server-side public TLS certificate of your IBM Event Streams instance to your local project so that each components are able to establish secure connection with your IBM Event Streams instance:
oc get secret ${CLUSTER_NAME}-cluster-ca-cert -n ${EVENTSTREAMS_NS} -o json | jq -r '.metadata.name="kafka-cluster-ca-cert"' | jq --arg project_name "${PROJECT_NAME}" -r '.metadata.namespace=$project_name' | oc apply -f -*NOTE: We are copying and renaming the certificate in a single command to minimize the need for editing deployment documents. That is, we are providing the server-side TLS certificate in the secret the Vaccine Reefer Simulator and the Vaccine Monitoring Agent microservices are expecting to find it.
Deploy the Freezer manager service
Define the
freezer-mgr-secretsecret: In the gitops repository do the following commands:# if needed rerun source ./scripts/env.sh to get the environement variables setoc create secret generic freezer-mgr-secret \--from-literal=KAFKA_BOOTSTRAP_SERVERS=$INTERNAL_KAFKA_BOOTSTRAP_SERVERS \--from-literal=REEFER_TOPIC=$YOUR_REEFER_TOPIC \--from-literal=ALERTS_TOPIC=$YOUR_ALERT_TOPIC \--from-literal=KAFKA_USER=$TLS_USER \--from-literal=KAFKA_CA_CERT_NAME:kafka-cluster-ca-cert# Then deploy the Freezr mgroc apply -k apps/freezer-mgr/
Verify the pods runs:
oc get pods | grep freezer
Get the URL:
FREEZER_URL=$(oc get route freezer-mgr -o jsonpath="http://{.status.ingress[0].host}")
And get the list of predefined Refrigerators containers:
curl -X GET $FREEZER_URL/reefers
Expected results:
[{"brand":"Binder","capacity":80,"reeferID":"C02","status":"Empty","type":"B12"},{"brand":"Binder","capacity":100,"reeferID":"C01","status":"Empty","type":"B13"},{"brand":"Binder","capacity":100,"reeferID":"C03","status":"Empty","type":"B13"}]
Deploy the Vaccine Reefer Simulator
To get more details of this Python Flask application read this note.
- Define the
reefer-simul-secretsecret as:
oc create secret generic reefer-simul-secret \--from-literal=KAFKA_BOOTSTRAP_SERVERS=$EXTERNAL_KAFKA_BOOTSTRAP_SERVERS \--from-literal=KAFKA_MAIN_TOPIC=$YOUR_TELEMETRIES_TOPIC \--from-literal=FREEZER_MGR_URL=$FREEZER_MGR_URL
where
<YOUR_KAFKA_BOOTSTRAP_EXTERNAL_ADDRESS>is your IBM Event Streams External cluster bootstrap address presented to you during the creation of your SCRAM-based KafkaUser you went through in the pre-requisites section. You can get that value again by executing the followingoccommand:oc get route -n ${EVENTSTREAMS_NS} ${CLUSTER_NAME}-kafka-bootstrap -o jsonpath="{.status.ingress[0].host}:443"
Deploy Vaccine Reefer Simulator microservice components (application plus a service and a route to make it accessible) via the following command:
oc apply -k apps/reefer-sinukatorYou should see the following output:
service/vaccine-reefer-simulator createdroute.route.openshift.io/vaccine-reefer-simulator createdodeployment.apps/vaccine-reefer-simulator createdYou can verify the deployment state with the following
occommand:oc get podsNAME READY STATUS RESTARTS AGEvaccine-reefer-simulator-7dcfcf5cb-4nvl7 1/1 Running 0 5m55sor the via the Openshift console:
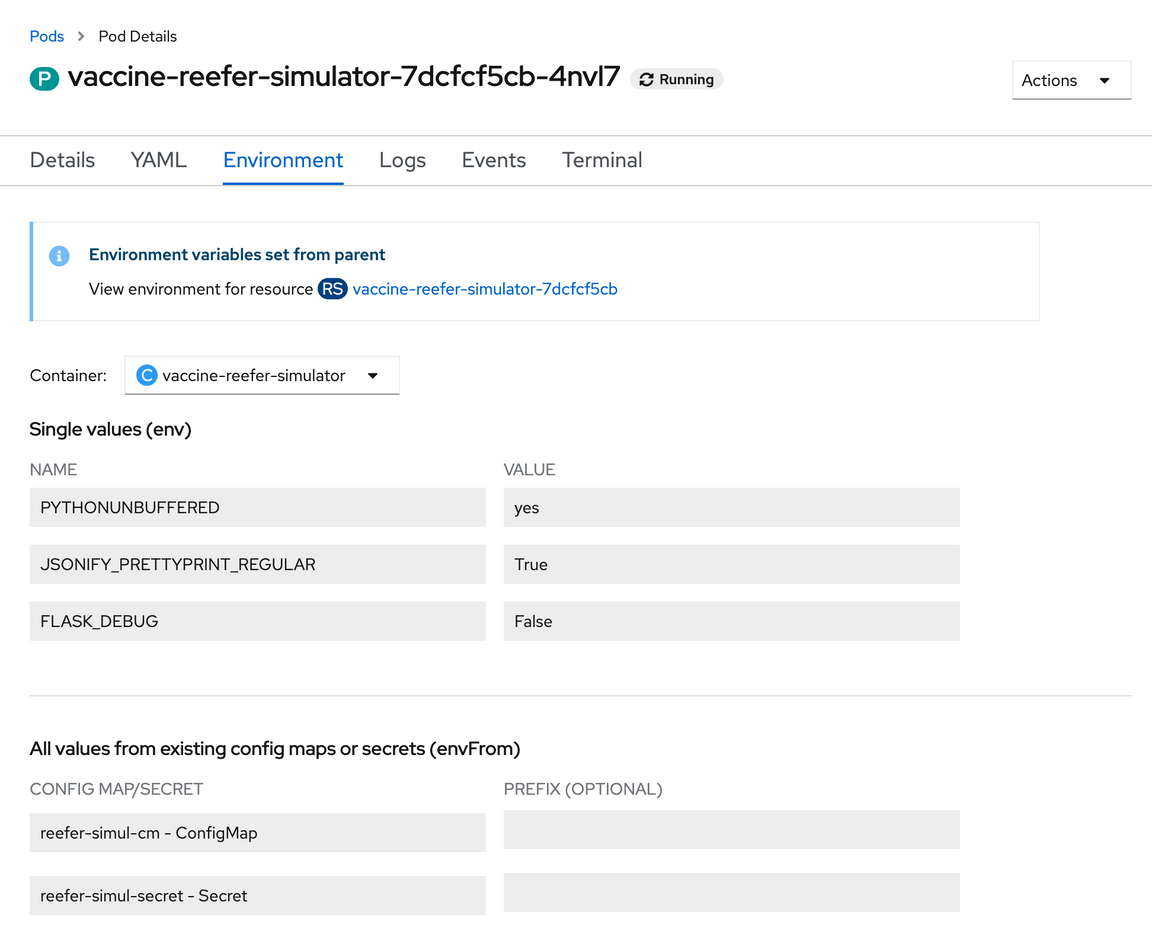
*NOTE: If you want to build from scratch, clone the repository and follow the README.
Get the route to access the Vaccine Reefer Simulator application with the
oc get routescommand.
Deploy the Vaccine Monitoring Agent
To get more detail of this Java Quarkus microprofile application read this note. The project repository is in this GitHub repository.
Follow the steps below to get the Vaccine Monitoring Agent microservice deployed on your OpenShift cluster:
Ensure you are working inside the correct project via the following
occommand:oc project ${PROJECT_NAME}Verify in the
./scripts/env.shyou have a TLS-based KafkaUser name:TLS_USER=<YOUR_TLS_USER>where
<YOUR_TLS_USER>is the name you gave when creating the tls credentials in the pre-requisites section. If you don’t remember the tls KafkaUser you created, you can check it out with the followingoccommand:
*NOTE: We are copying and renaming the credentials in a single command to minimize the need for editing deployment documents.$ oc get kafkausers -n ${EVENTSTREAMS_NS}NAME CLUSTER AUTHENTICATION AUTHORIZATIONtls-user eda-dev tls simple
If not done already in the previous section where we deployed the Vaccine Reefer Simulator microservice, copy the server-side public certificate of the Event Streams instance to your local project:
oc get secret ${CLUSTER_NAME}-cluster-ca-cert -n ${EVENTSTREAMS_NS} -o json | jq -r '.metadata.name="kafka-cluster-ca-cert"' | jq --arg project_name "${PROJECT_NAME}" -r '.metadata.namespace=$project_name' | oc apply -f -*NOTE: We are copying and renaming the certificate in a single command to minimize the need for editing deployment documents. That is, we are providing the server-side TLS certificate in the secret the Vaccine Reefer Simulator and the Vaccine Monitoring Agent microservices are expecting to find it.
Copy your TLS-based KafkaUser’s credentials you created in the pre-requisites section to the local namespace with the following
occommand:oc get secret ${TLS_USER} -n ${EVENTSTREAMS_NS} -o json | jq -r '.metadata.name="tls"' | jq --arg project_name "${PROJECT_NAME}" -r '.metadata.namespace=$project_name' | oc apply -f -Create a secret named
reefer-monitoring-agent-secretto hold the configuration for the Vaccine Monitoring Agent microservice with the followingoccommand:oc create secret generic reefer-monitoring-agent-secret \--from-literal=KAFKA_BOOTSTRAP_SERVERS=$INTERNAL_KAFKA_BOOTSTRAP_SERVERSDeploy Vaccine Monitoring Agent microservice by executing the following
occommand:oc apply -k apps/monitoring-agentYou should see the following output:
serviceaccount/reefer-monitoring-agent createdservice/reefer-monitoring-agent createdrolebinding.rbac.authorization.k8s.io/reefer-monitoring-agent-view createdimagestream.image.openshift.io/openjdk-11 createddeploymentconfig.apps.openshift.io/reefer-monitoring-agent createdroute.route.openshift.io/reefer-monitoring-agent created
Scenario script
Once the solution is up and running, execute the following steps to present an end-to-end demonstration:
Generate vaccine container telemetry events
Obtain the Vaccine Reefer Simulator’s UI via the following
occommand:oc get route vaccine-reefer-simulator -o jsonpath="http://{.status.ingress[0].host}" && echoOpen the above url in your web browser to access the user interface

In the form, update the values of the records accordingly:
{"containerID": "C21","nb_of_records": 100,"product_id": "P01","simulation": "tempgrowth"}
After sometime the temperature curve in the Gauge grows up to the ambiant temperature and an Alert should come in the table.
Analyze simulated reefer telemetry data
Obtain your IBM Event Streams Console UI’s url via the following
occommand:oc get route -n ${EVENTSTREAMS_NS} ${CLUSTER_NAME}-ibm-es-ui -o jsonpath="https://{.status.ingress[0].host}"Open your IBM Event Streams Console UI by pointing your browser to the above url.
Click on Topics from the left navigation menu and select your
YOUR_TELEMETRY_TOPICyou created in the pre-requisites section from the topic list.Explore the messages tab and the individual telemetry records emitted by the Vaccine Reefer Simulator component.

Analyze generated cold-chain violations
Open your IBM Event Streams Console UI by pointing your browser to the above url.
Click on Topics from the left navigation menu and select your
YOUR_ALERT_TOPIC.Explore the messages tab and the observed vaccine cold-chain violation alert events.
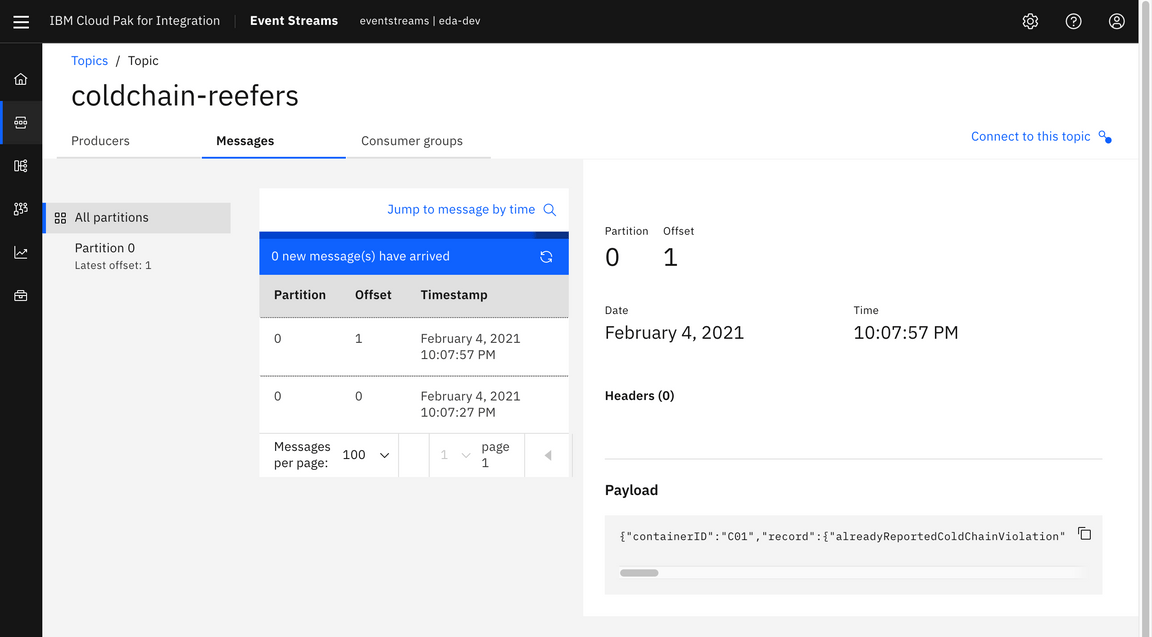
The reefer container information contained in this topic have been identified as having observed temperatures outside the allowable range more than the allowable number of times, as determined to preserve the state of the vaccine doses contained.
Get the route to the Vaccine Monitoring Agent microservice with the following
occommand:oc get route reefer-monitoring-agent -o jsonpath="https://{.status.ingress[0].host}"Point your browser to the
/swagger-uiSwagger API endpoint that the Vaccine Monitoring Agent microservice exposes by using the above url. That is, point your browser to<URL>/swagger-ui/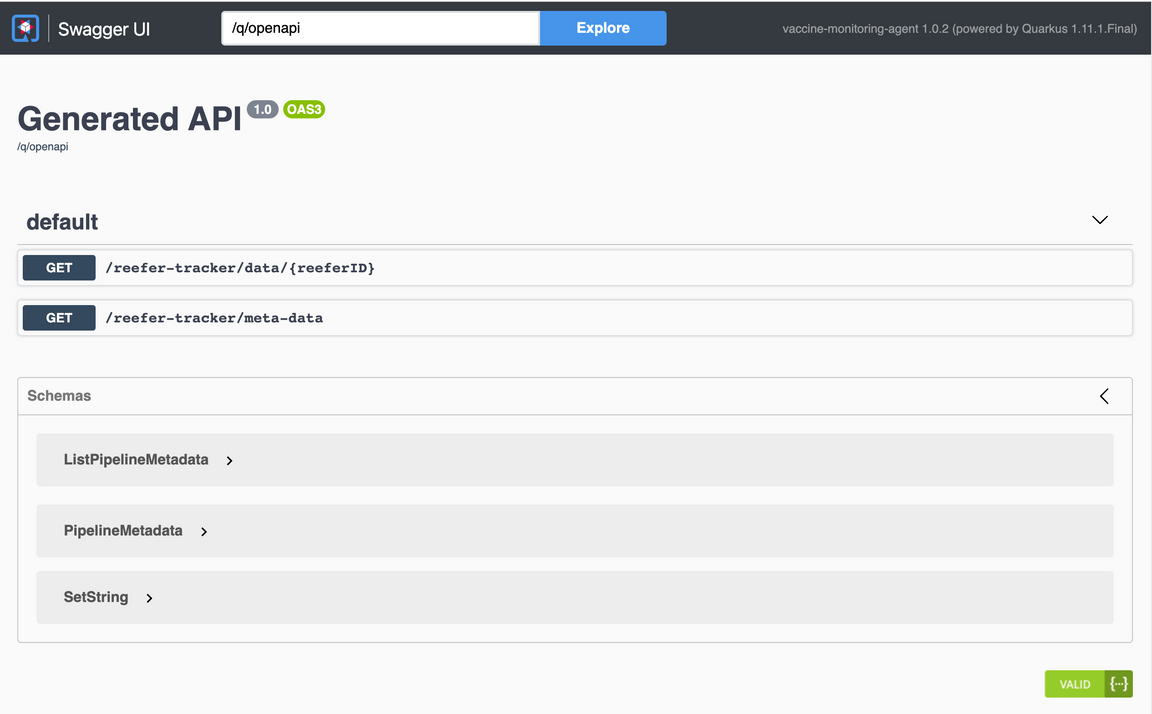
Click on the first API endpoint definition the Swagger UI lists (
/reefer-tracker/data/{reeferID}) that would allow us to query the Vaccine Monitoring Agent microservice to retrieve the monitoring data for a specific reefer container ID.Once this API endpoint definition gets expanded, click on the Try it out button on the top right corner. That will make the
reeferIDtext input box active. Insert the reefer ID you used in the previous Generate vaccine container telemetry events section to simulate telemetries for and click on Execute. You should see the monitoring data for that reefer container similar to the following picture: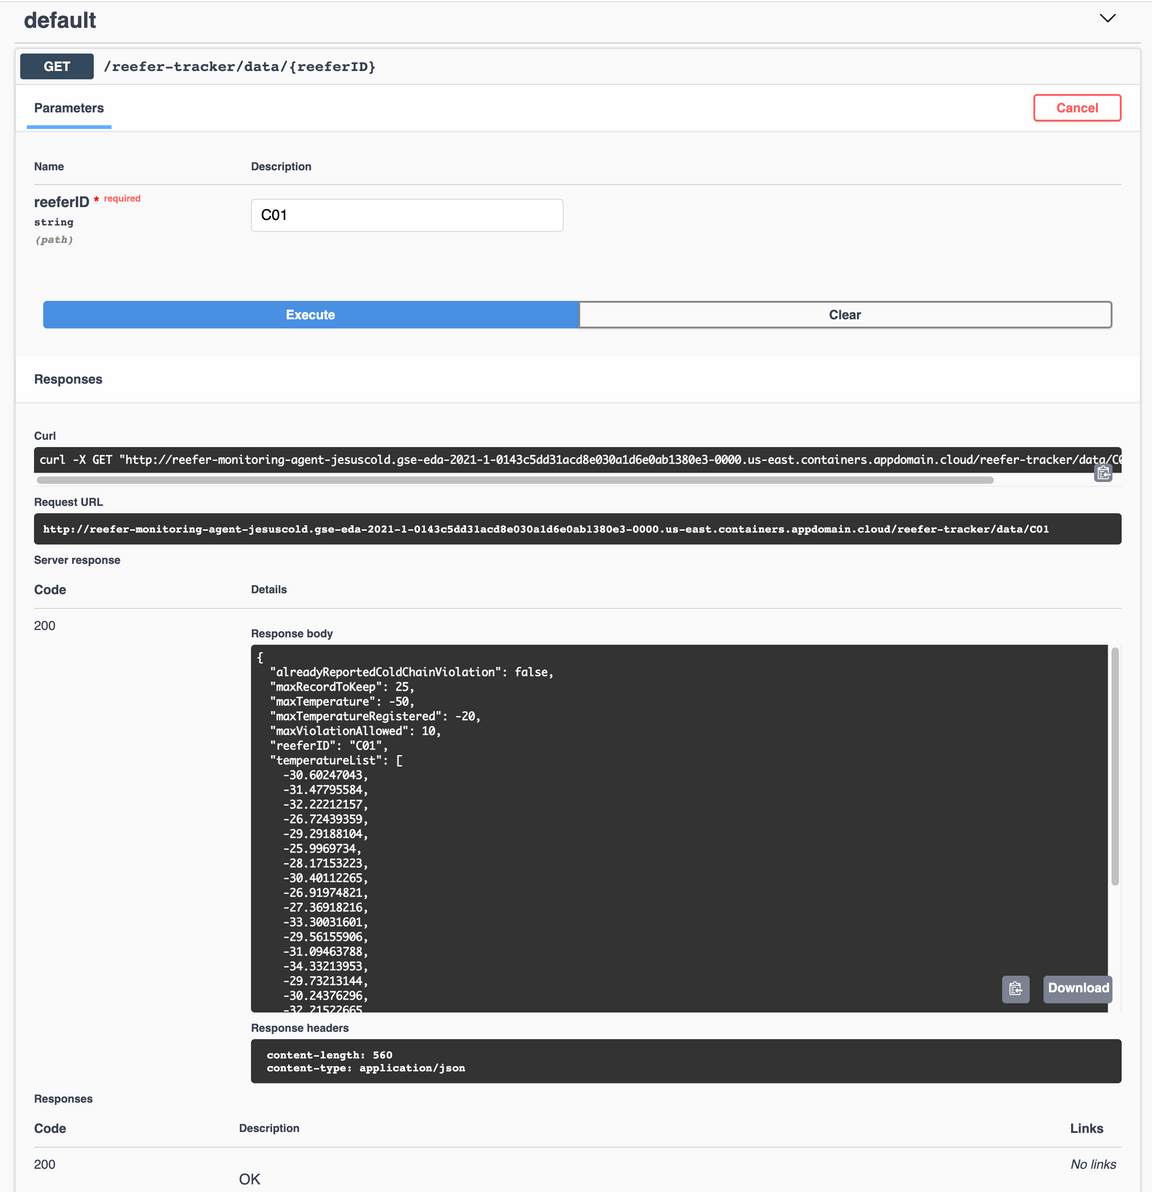
where you will see in the reponse body a json object representing the monitoring data for the reefer container you requested it for. You will be able to see if there has been any cold chain temperature violations, how many, the last temperatures, etc…
Clearing the project
To delete the different resources we have created on your OpenShift cluster throughout this tutorial do the following:
oc delete -k apps/cold-chain-use-case/oc delete project ${PROJECT_NAME}
Finally, delete all the topics created in your IBM Event Streams instance. These are your YOUR_TELEMETRY_TOPIC and YOUR_REEFER_TOPIC you created in the pre-requisites section. The other two are internal topics created as a result of the Kafka Streams stateful operations being done in the Vaccine Monitoring Agent microservice code (see here for more detail on those). These two internal topics should have the following names:
cold-chain-agent-<YOUR_SUFFIX>-reeferAggregateTable-changelogcold-chain-agent-<YOUR_SUFFIX>-reeferAggregateTable-repartition
To delete these topics, you simply need to go to your IBM Event Streams instance UI dashboard, click on topics on the left hand side navigation menu, click on the three-dots options button that appears on the right hand side of each of the topics in the topics list and select delete.