Schema registry
This documentation aims to be a introductory hands-on lab on the IBM Event Streams (v11.0.2) Schema Registry installed throught the IBM Cloud Pak for Integration V2022.2 on an Openshift cluster. It uses Python applications for producer and consumer with schema registry API. For a Quarkus based producer and consumer see the EDA-quickstarts project sub-folders: quarkus-reactive-kafka-producer and quarkus-reactive-kafka-consumer which includes docker compose with Apicur.io and reactive messaging implementation, plus all needed instructions to test schema management.
Requirements
This lab requires the following components to work against:
- An IBM Event Streams V10 instance installed through the IBM CloudPak for Integration V2020.2.X or greater.
- An IBM Cloud Shell - https://www.ibm.com/cloud/cloud-shell
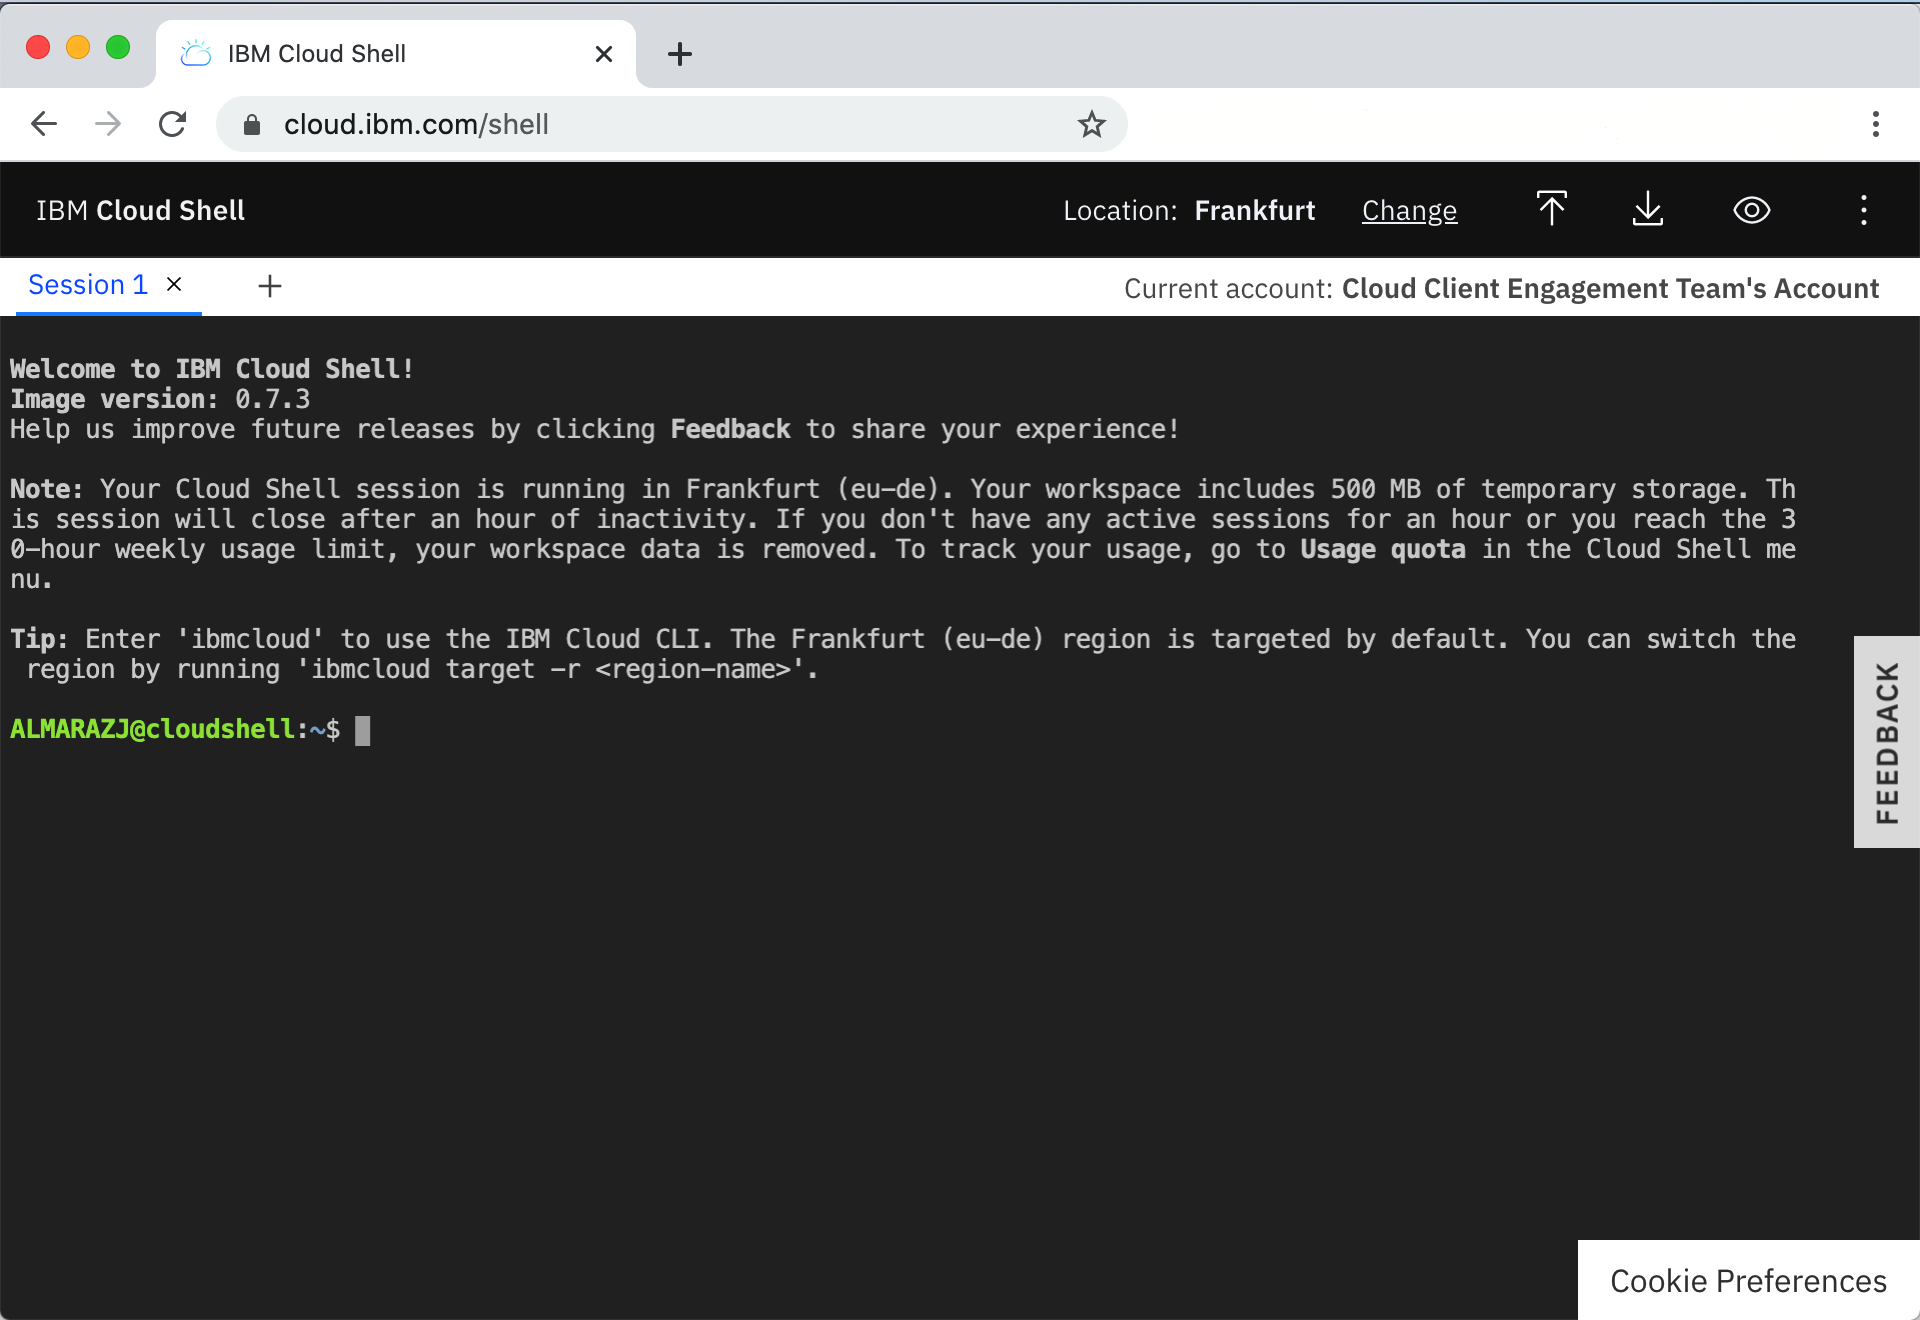
IBM Cloud Shell
Here we are going to set up our IBM Cloud Shell with all the tools required to carry out this lab.
Start your IBM Cloud Shell by pointing your browser to https://cloud.ibm.com/shell
IBM Cloud Pak CLI
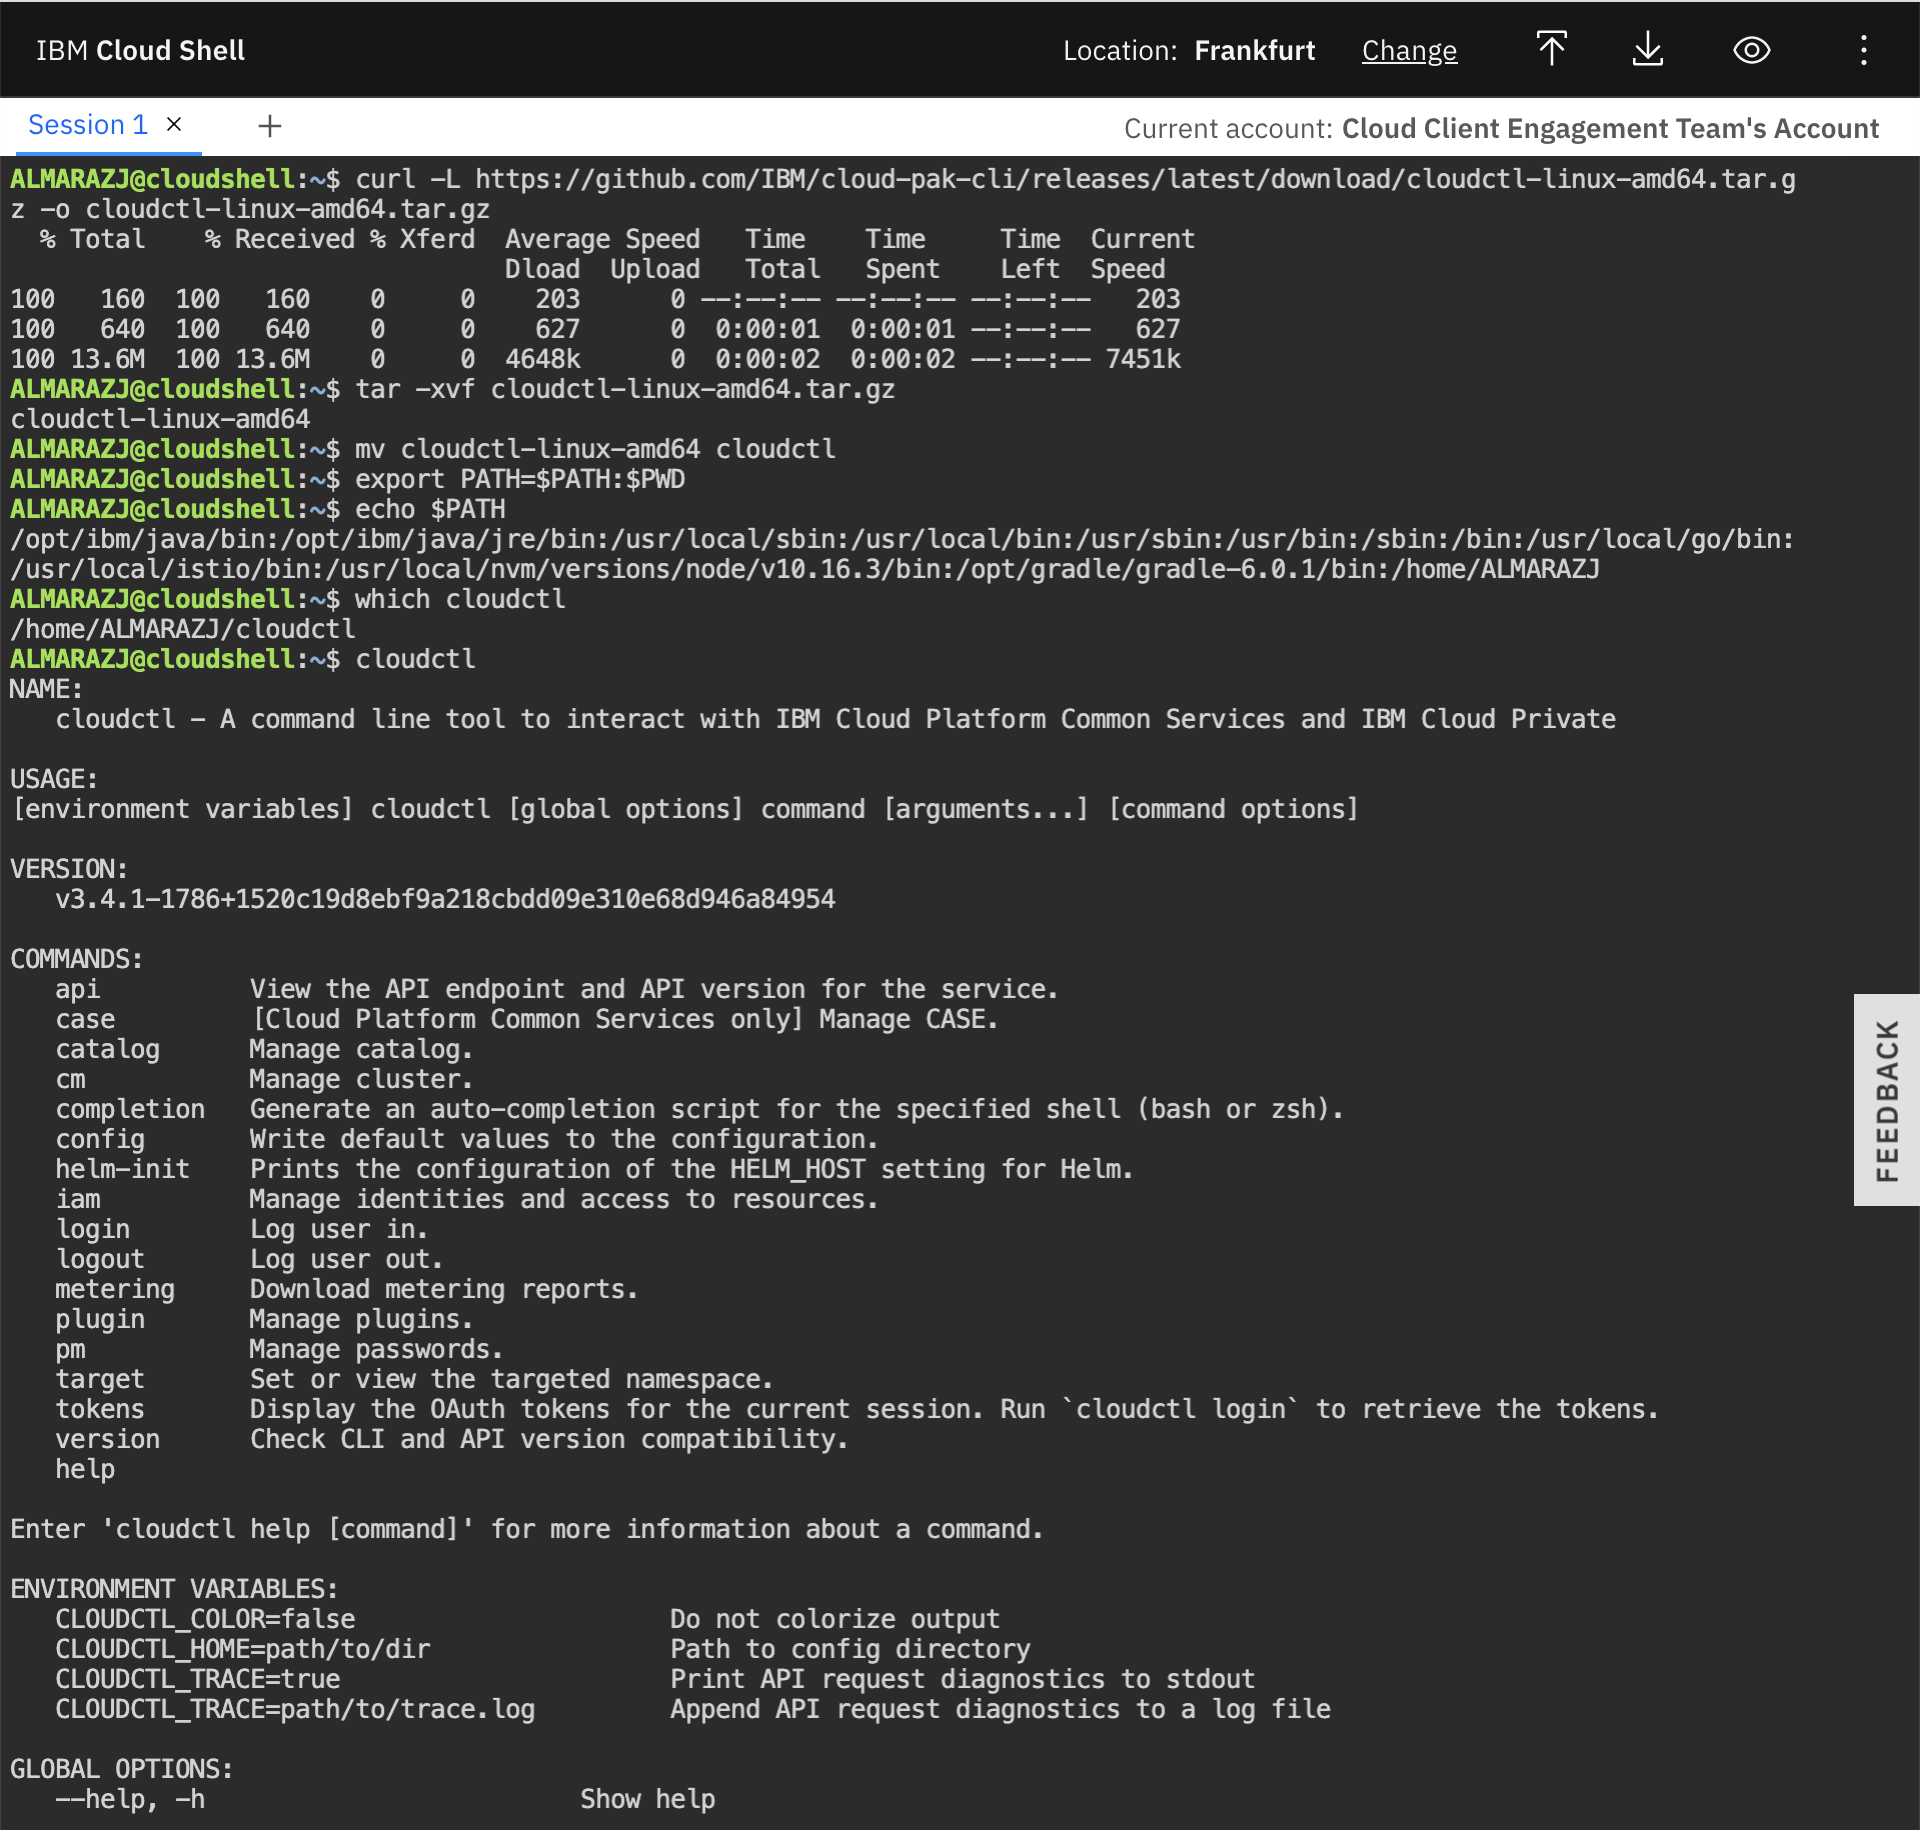
Cloudctl is a command line tool to manage Container Application Software for Enterprises (CASEs). This CLI will allow us to manage Cloud Pak related components as well as software, like IBM Event Streams, installed through any IBM Cloud Pak.
In order to install it, execute the following commands in your IBM Cloud Shell:
- Download the IBM Cloud Pak CLI -
curl -L https://github.com/IBM/cloud-pak-cli/releases/latest/download/cloudctl-linux-amd64.tar.gz -o cloudctl-linux-amd64.tar.gz - Untar it -
tar -xvf cloudctl-linux-amd64.tar.gz - Rename it for ease of use -
mv cloudctl-linux-amd64 cloudctl - Include it to the PATH environment variable -
export PATH=$PATH:$PWD - Make sure your IBM Cloud Pak CLI is in the path-
which cloudctl - Make sure your IBM Cloud Pak CLI works -
cloudctl help
Note: If you are not using the IBM Cloud Shell to run the lab, be aware that the cloudctl CLI requires the kubectl CLI. To install the kubectl CLI on your personal environment, follow the instructions here
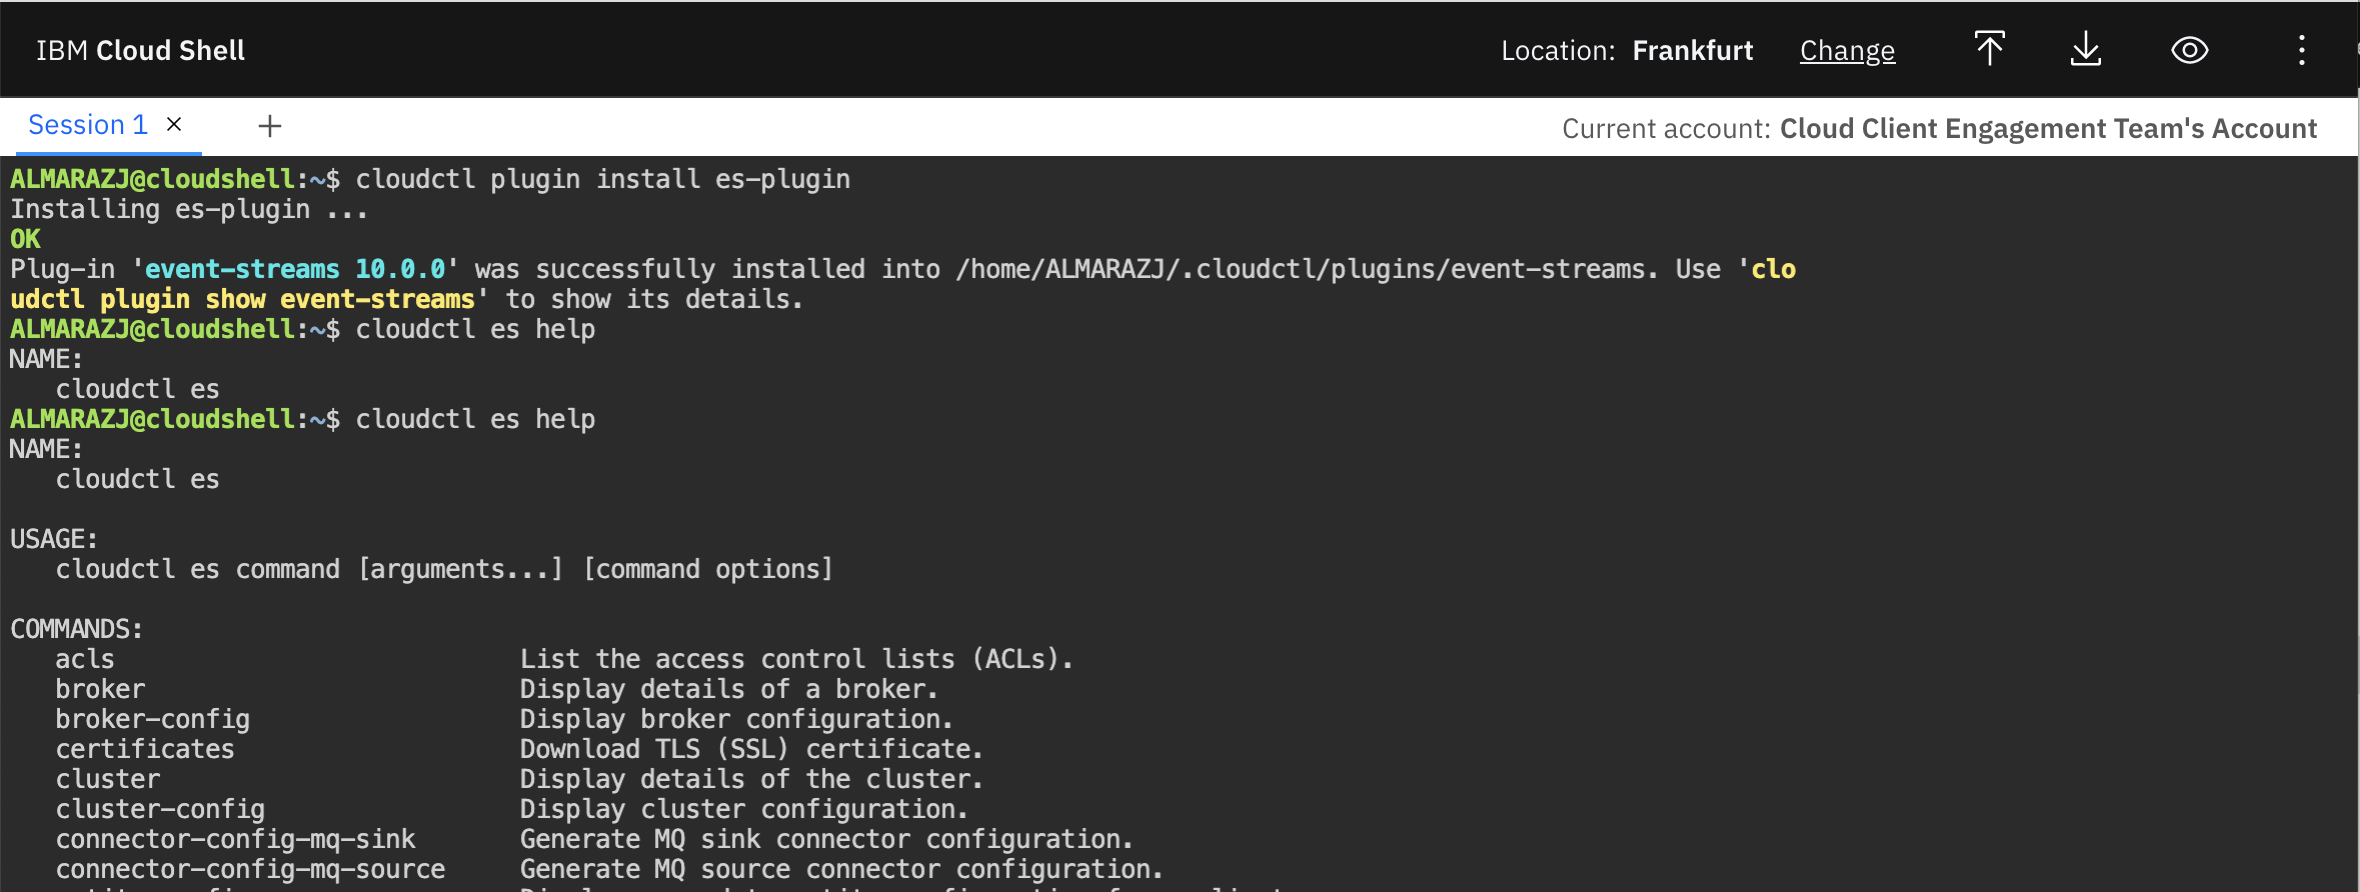
Event Streams plugin for IBM Cloud Pak CLI
This plugin will allow us to manage IBM Event Streams.
In order to install it, execute the following commands in your IBM Cloud Shell:
- Download the Event Streams plugin for IBM Cloud Pak CLI -
curl -L http://ibm.biz/es-cli-linux -o es-plugin - Install it -
cloudctl plugin install es-plugin - Make sure it works -
cloudctl es help
Git
IBM Cloud Shell comes with Git already installed out of the box.
Vi
IBM Cloud Shell comes with Vi already installed out of the box.
Python 3
IBM Cloud Shell comes with Python 3 already installed out of the box. However, we need to install the following modules that will be used later on in this tutorial when we run a Python application to work with Avro, Schemas and messages. These modules are confluent_kafka and avro-python3
In order to install these modules, execute the following command in your IBM Cloud Shell:
- Install the modules -
python3 -mpip install avro-python3 confluent_kafka --user
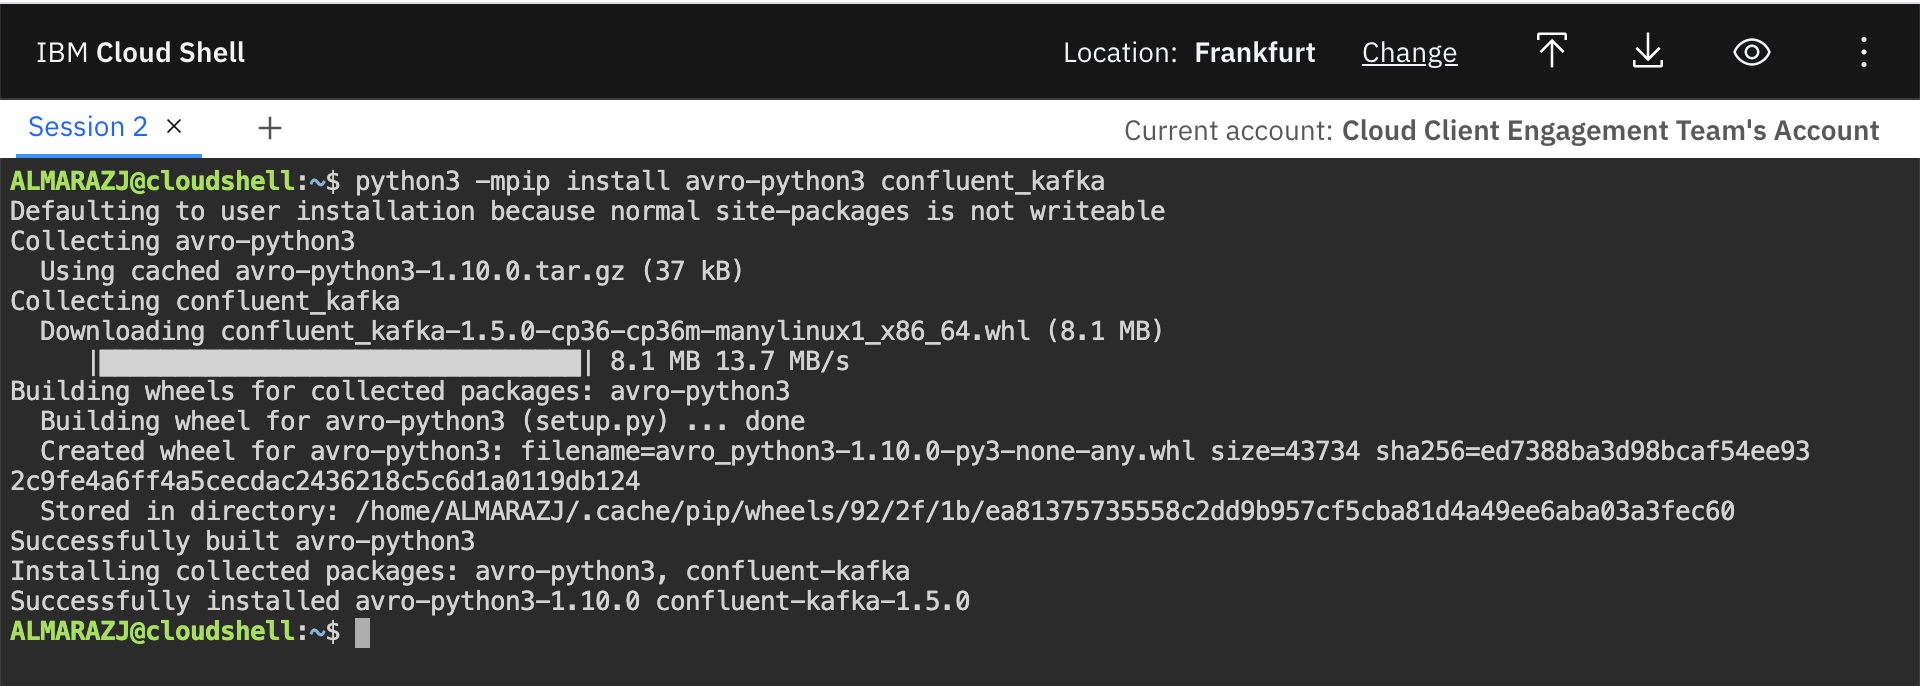
Congrats! you have now your IBM Cloud Shell ready to start working.
Schema Registry
One of the most common technologies used in the industry these days to define, serialize and deserialize messages flowing through your Kafka topics is Apache Avro (https://avro.apache.org/docs/current/). To learn more about Apache Avro, how to define Apache Avro data schemas and more, we strongly recommend to read through our documentation on Avro and data schemas here
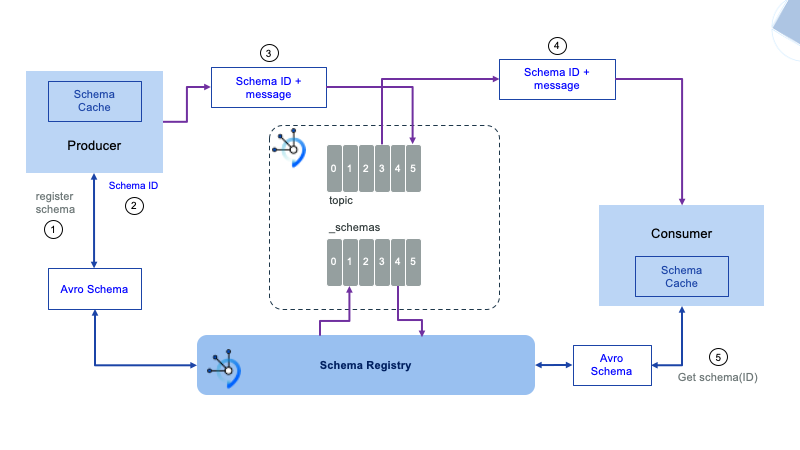
IBM Event Streams development team has developed a Schema Registry to work along your Kafka cluster to provide a place to store descriptions of the message formats used by your producers and consumers. The benefit of storing these descriptions is that you are able to validate that your producing and consuming applications will correctly inter-operate. The Schema Registry will also provide the ability for schemas to evolve in time.
Accessing the Schema Registry
UI
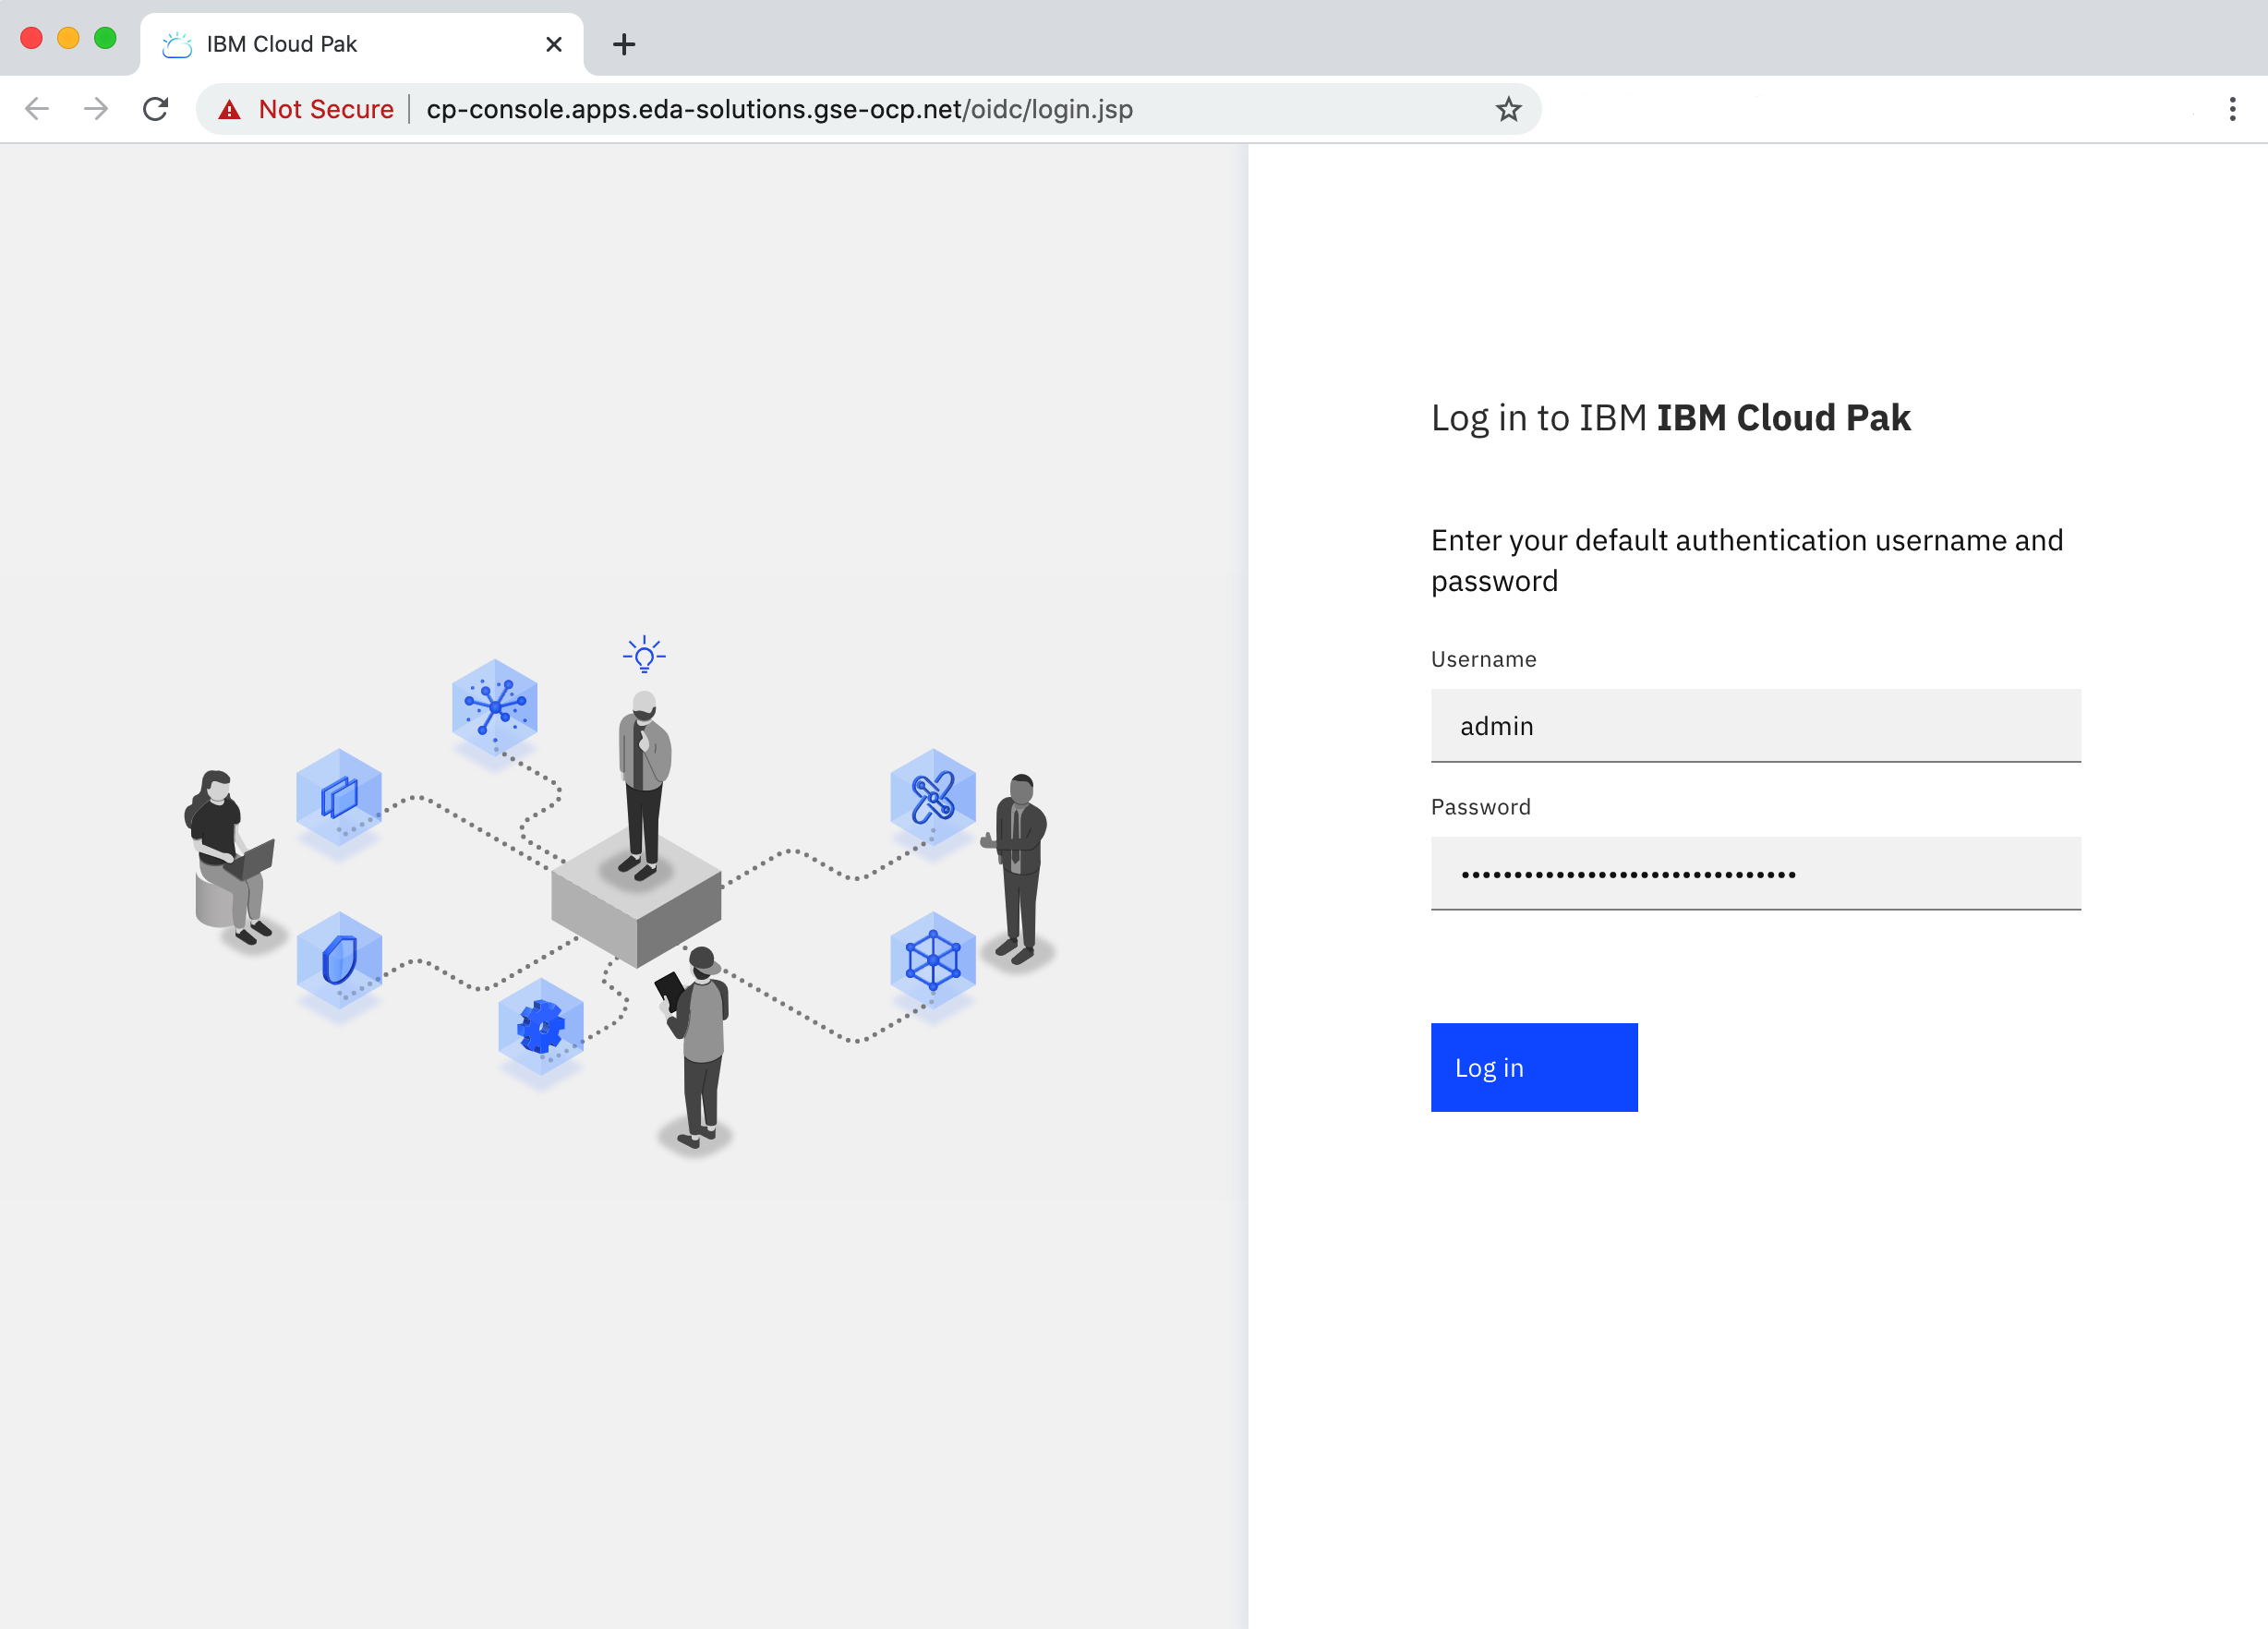
To access the schema registry, we first need to log into IBM Event Streams.
-
Point your browser to your IBM Event Streams instace's user interface url and introduce your credentials
-
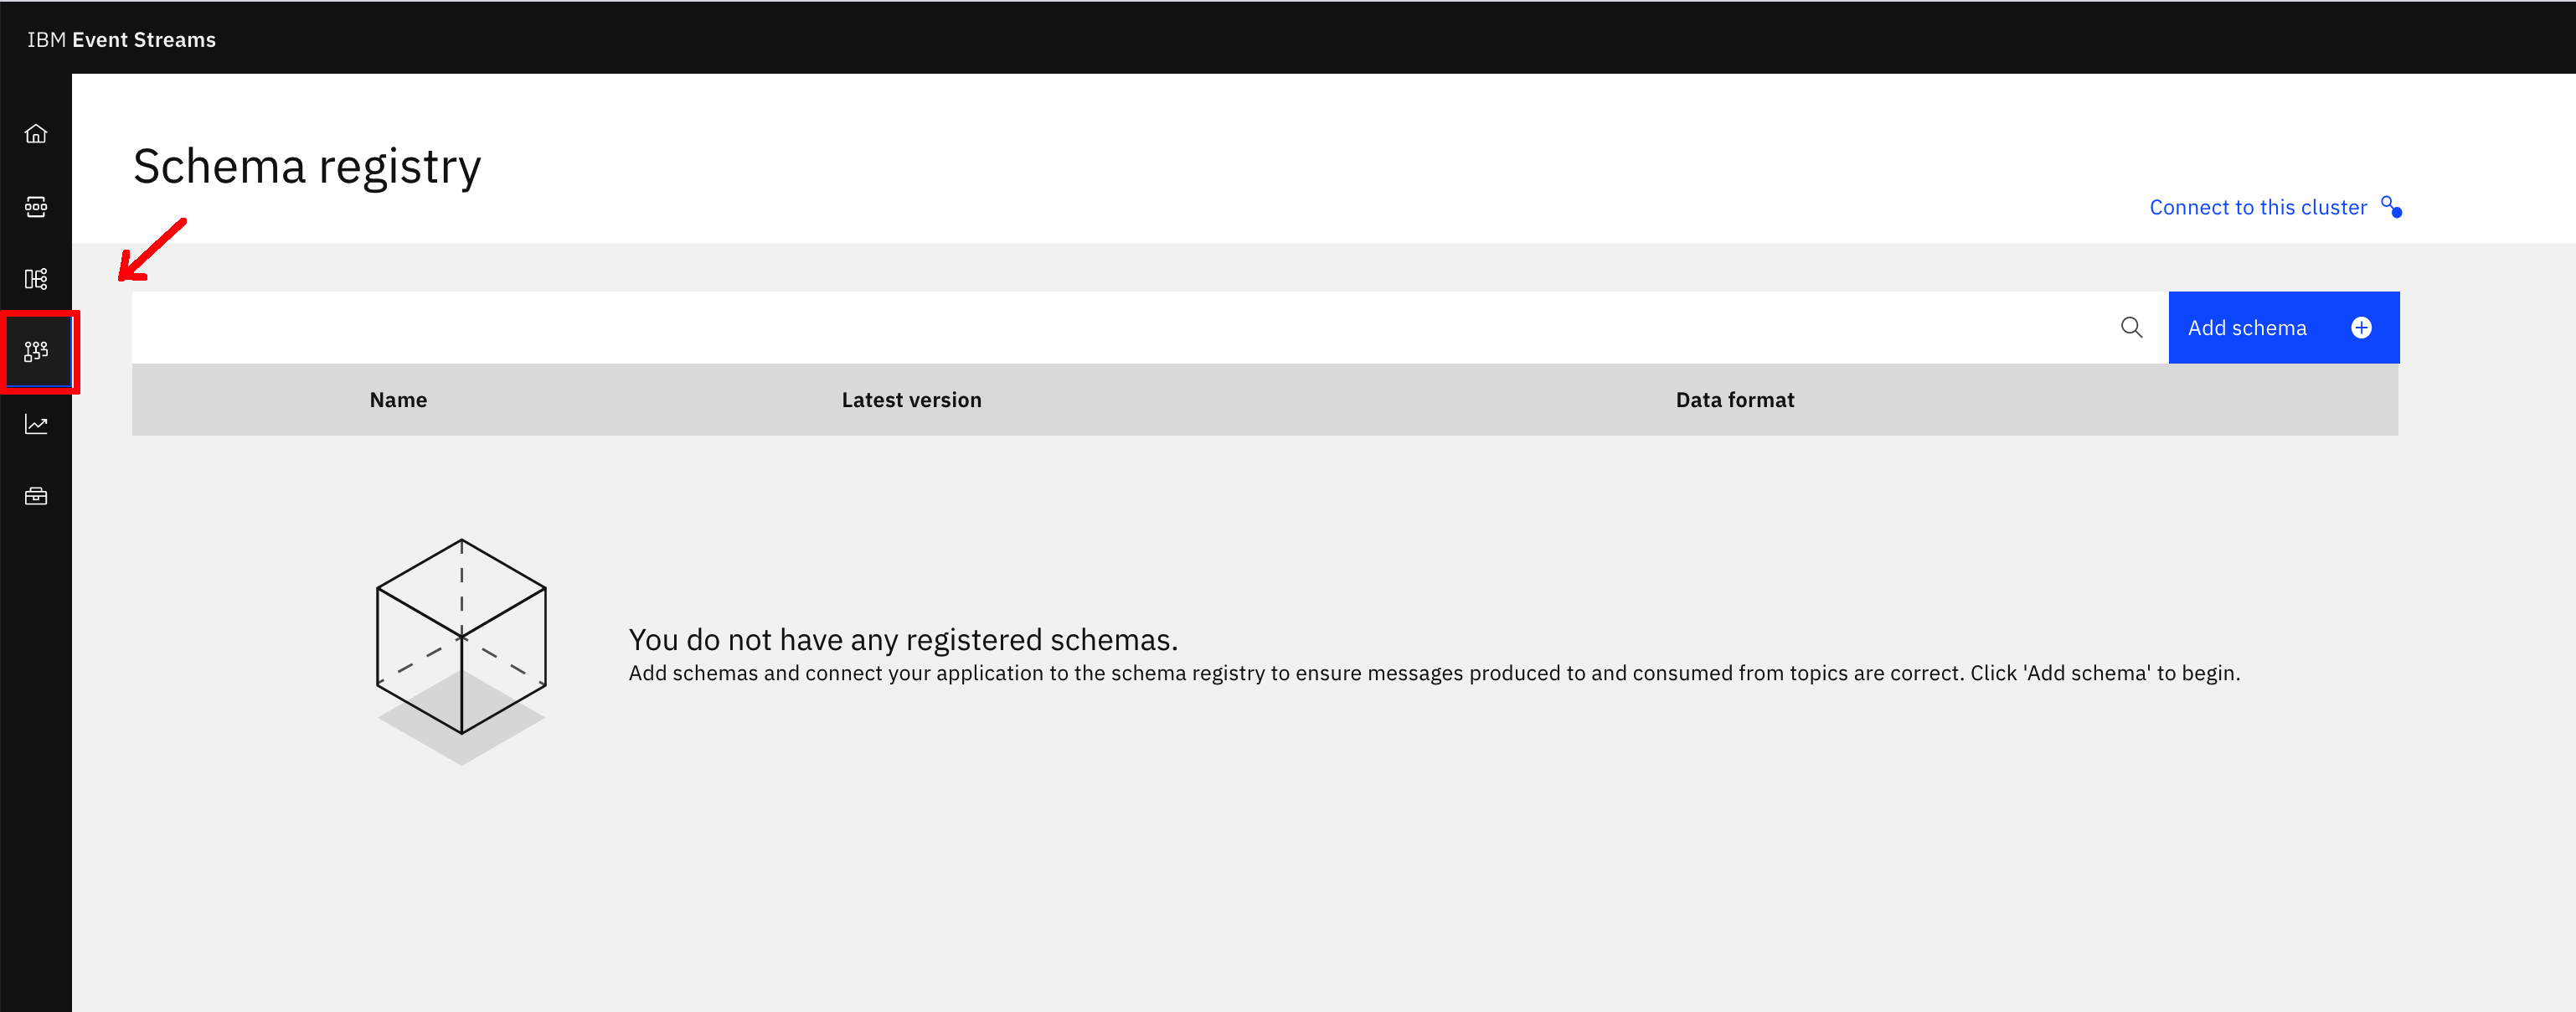
Once you are logged into your IBM Event Streams instance, you simply need to click on the Schema Registry button on the main left hand vertical menu bar:
CLI
We can also interact with the Schema Registry through the IBM Event Streams CLI. In order to do so, we first need to log in with the IBM Cloud Pak CLI:
-
Log into your cluster with the IBM CloudPak CLI
Make sure to use the appropriate credentials and select the namespace where your IBM Event Streams instance is installed
cloudctl login -a https://cp-console.apps.eda-solutions.gse-ocp.net --skip-ssl-validation Username> admin Password> Authenticating... OK Targeted account mycluster Account Enter a namespace > integration Targeted namespace integration Configuring kubectl ... Property "clusters.mycluster" unset. Property "users.mycluster-user" unset. Property "contexts.mycluster-context" unset. Cluster "mycluster" set. User "mycluster-user" set. Context "mycluster-context" created. Switched to context "mycluster-context". OK Configuring helm: /Users/user/.helm OK -
Initialize the Event Streams CLI plugin
cloudctl es init

IBM Cloud Platform Common Services endpoint:   https://cp-console.apps.eda-solutions.gse-ocp.net
Namespace:                                     integration
Name:                                          es-1
IBM Cloud Pak for Integration UI address:      No instance of Cloud Pak for Integration has been found. Please check that you have access to it.
Event Streams API endpoint:                    https://es-1-ibm-es-admapi-external-integration.apps.eda-solutions.gse-ocp.net
Event Streams API status:                      OK
Event Streams UI address:                      https://es-1-ibm-es-ui-integration.apps.eda-solutions.gse-ocp.net
Event Streams Schema Registry endpoint:        https://es-1-ibm-es-schema-external-integration.apps.eda-solutions.gse-ocp.net
Event Streams bootstrap address:               es-1-kafka-bootstrap-integration.apps.eda-solutions.gse-ocp.net:443
OK
(*)The above information will later be used in the IBM Event Streams Credentials section as these are neeeded by the Python application we will work with.
-
Make sure you can access the IBM Event Streams Schema Registry:
Schemas
In this section we will finally get our hands dirty with the IBM Event Steams Schema Registry capability by working with Apache Avro schemas and the Schema Registry.
We recommend to complete most of the UI steps from your local workstation since these will require you to upload the files your create/modify to IBM Event Streams and that requires having your files available locally on your workstation rather than on the IBM Cloud Shell
Create a schema
Let's see how can we create a schema to start playing with.
UI
The IBM EVent Streams user interface allow us to create schemas only from json or Avro schema avsc files.
-
Create an Avro schema file avsc with your schema:
Change USER1
-
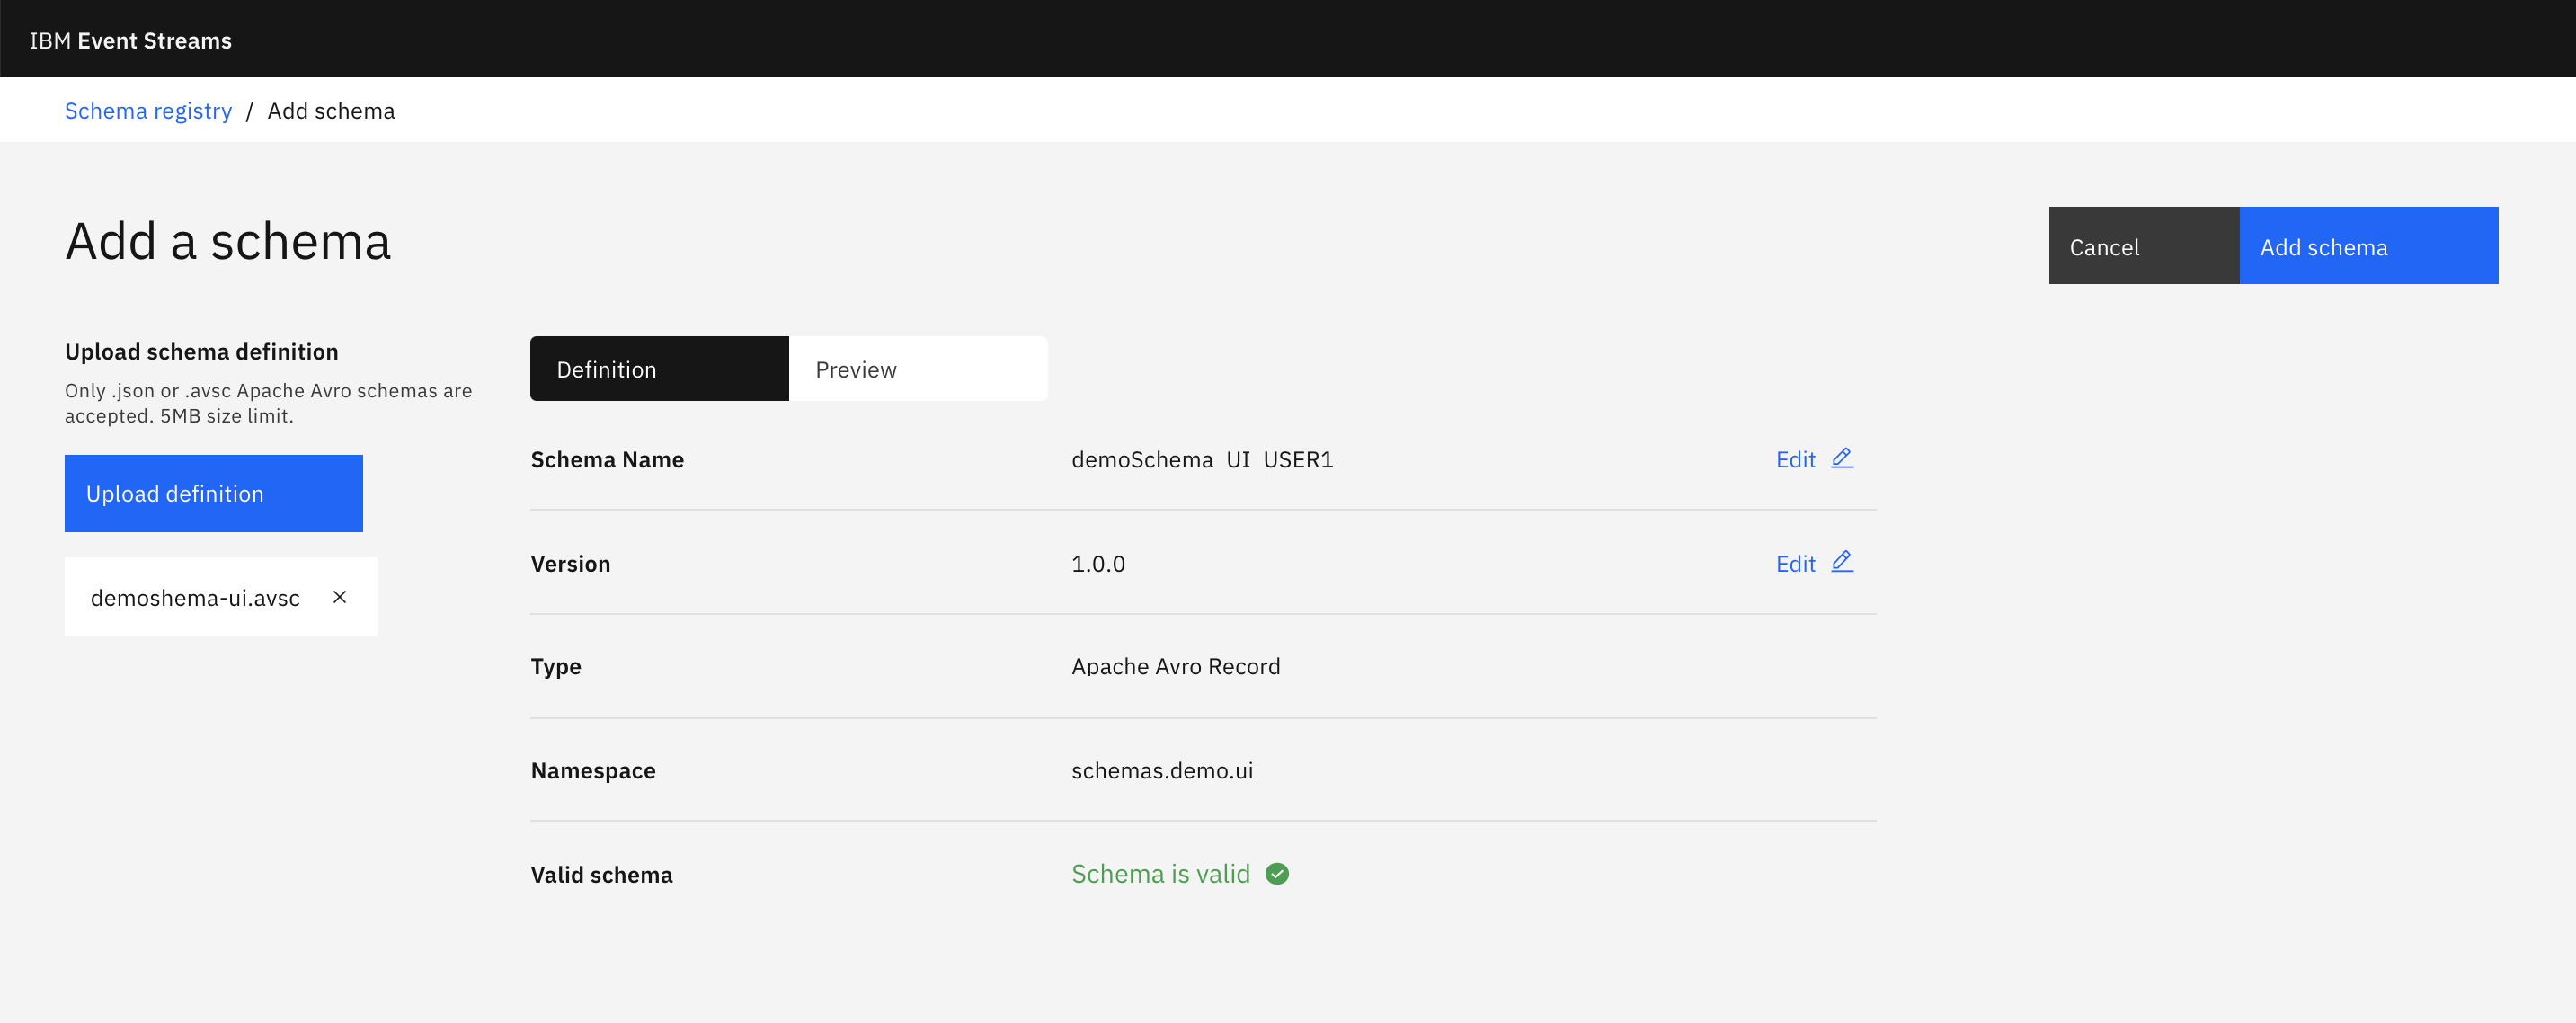
On the IBM Event Streams Schema Registry User Interface, Click on Add schema button on the top right corner.
-
Click on Upload definition button on the left hand side and select the
demoschema-ui.avscfile we just created. -
You should now see you Avro schema loaded in the UI with two tabs, definition and preview to make sure your schema looks as desired:
-
Click on Add schema button at the top right corner and you should now see that schema listed among your other schemas.
CLI
-
Create another Avro schema avsc file with a different schema:
Change USER1
-
Create a schema by executing the following command:
List schemas
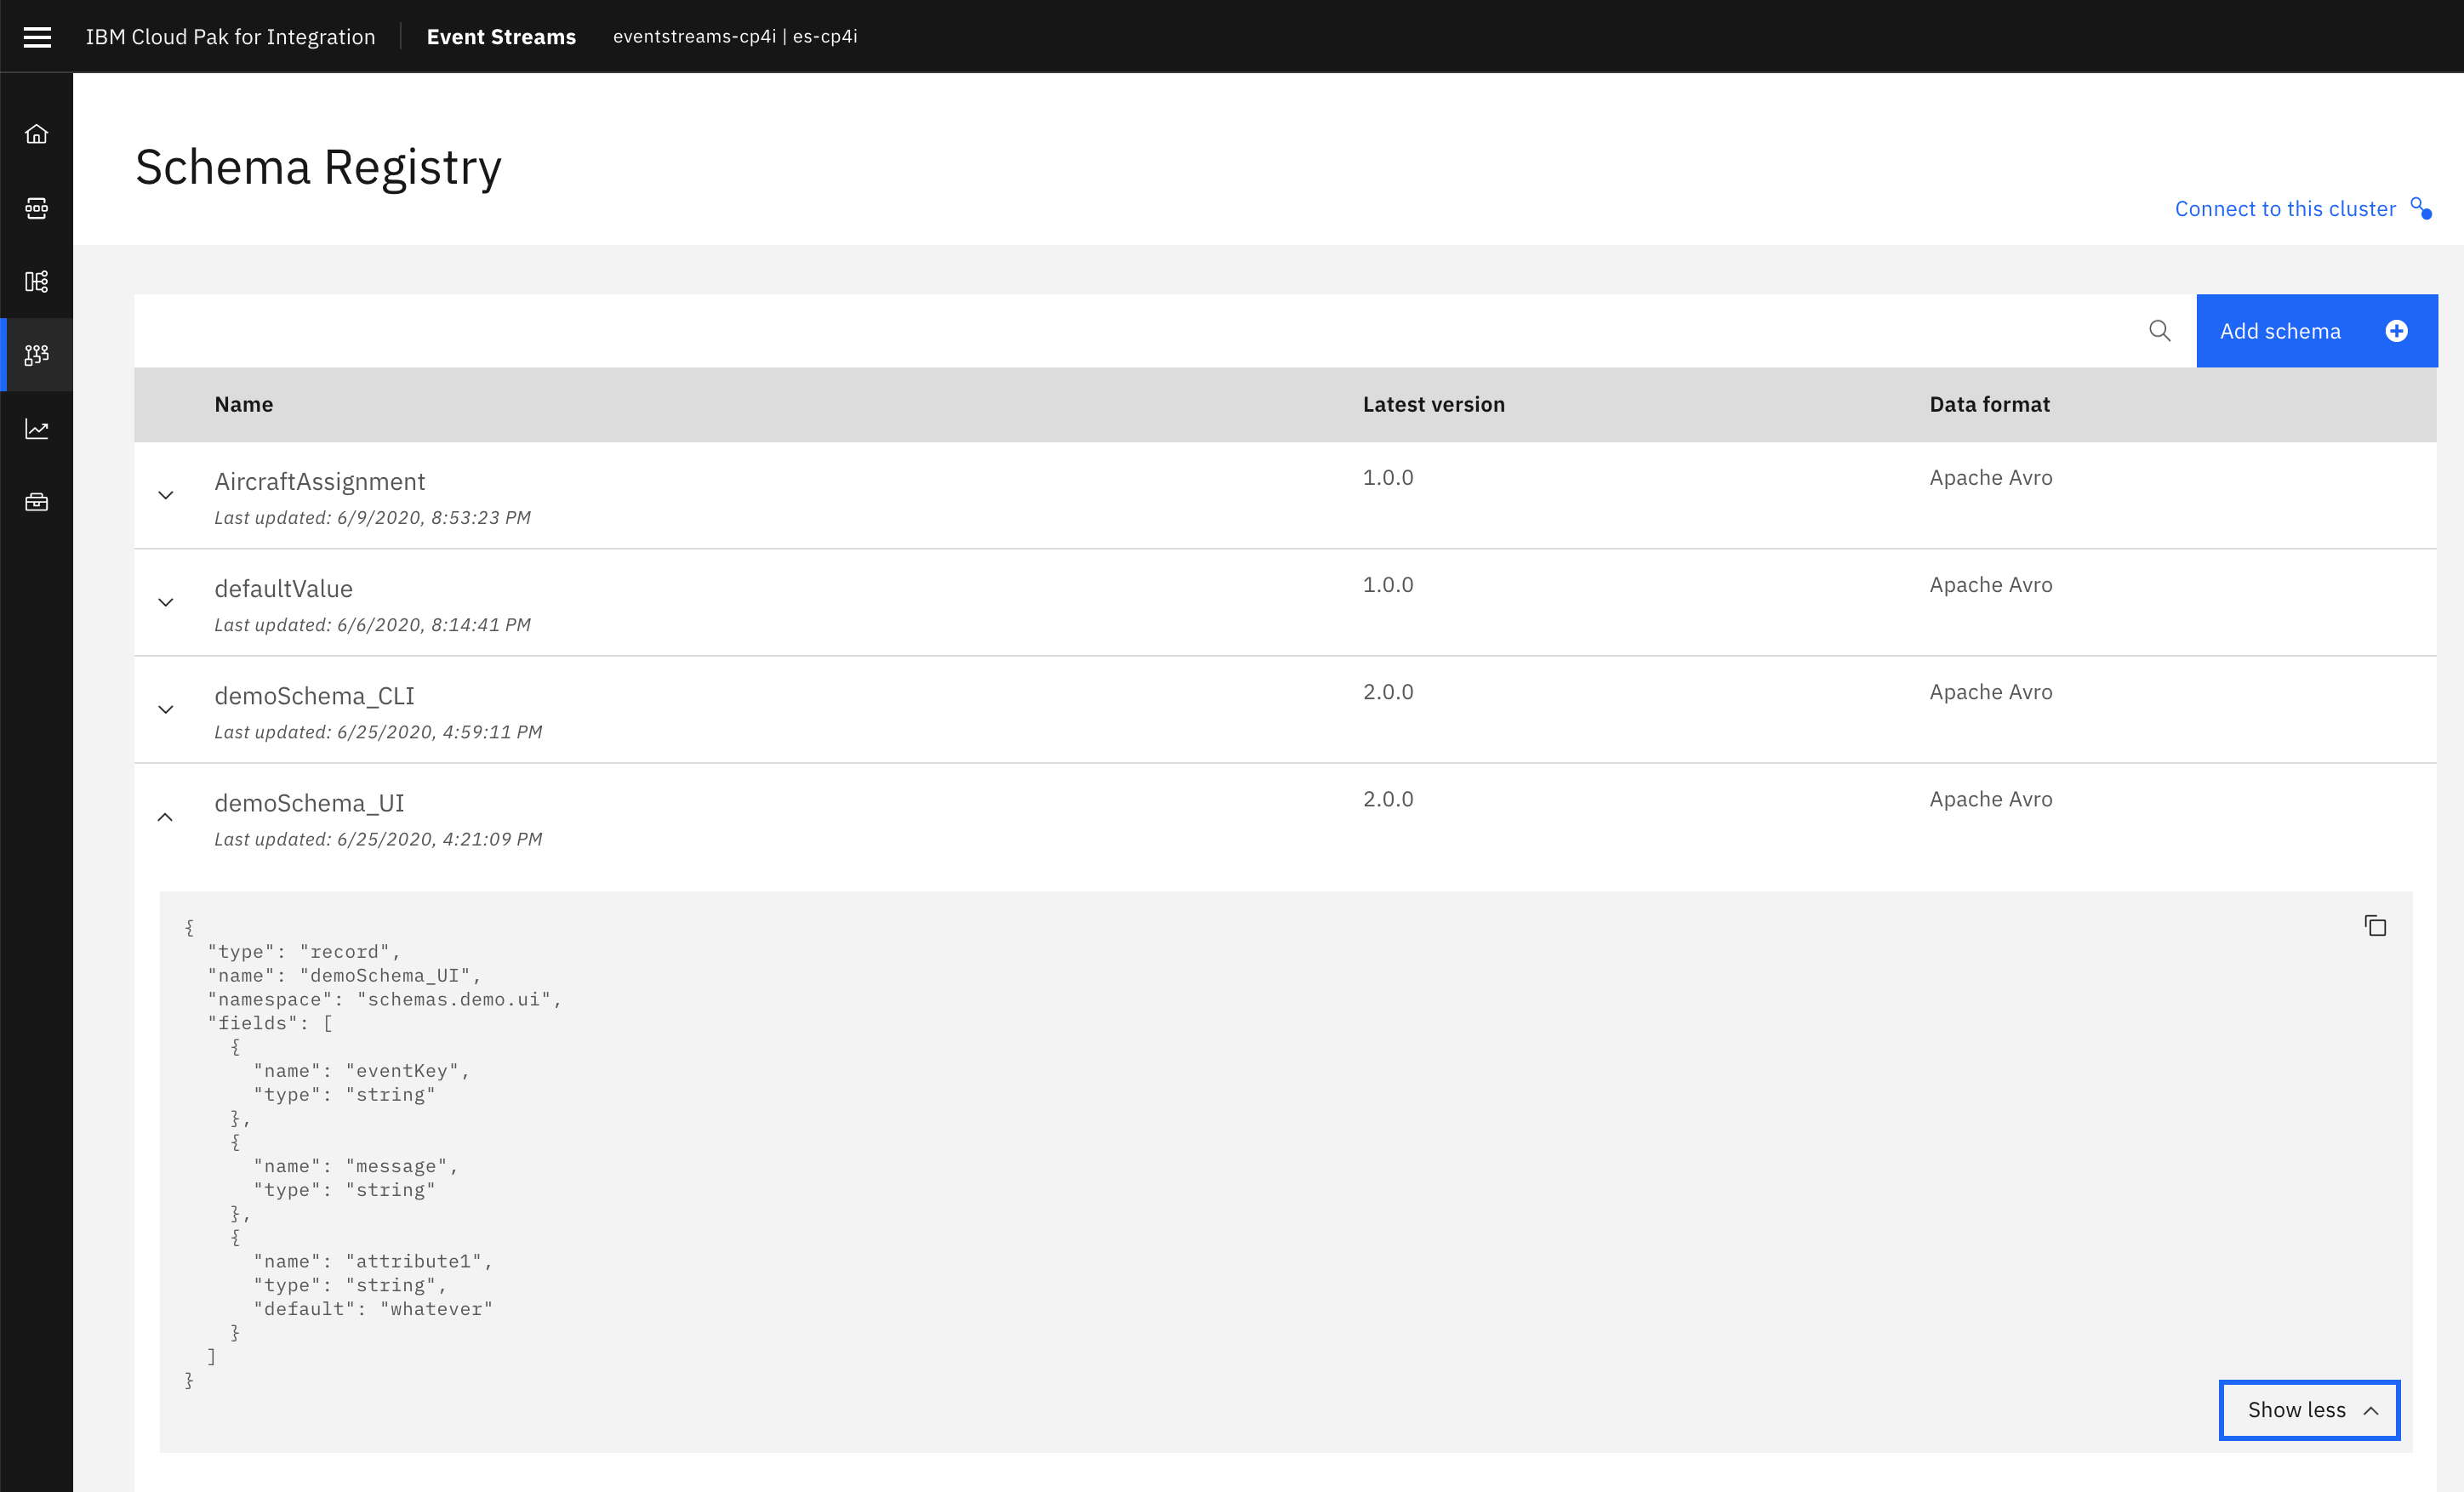
UI
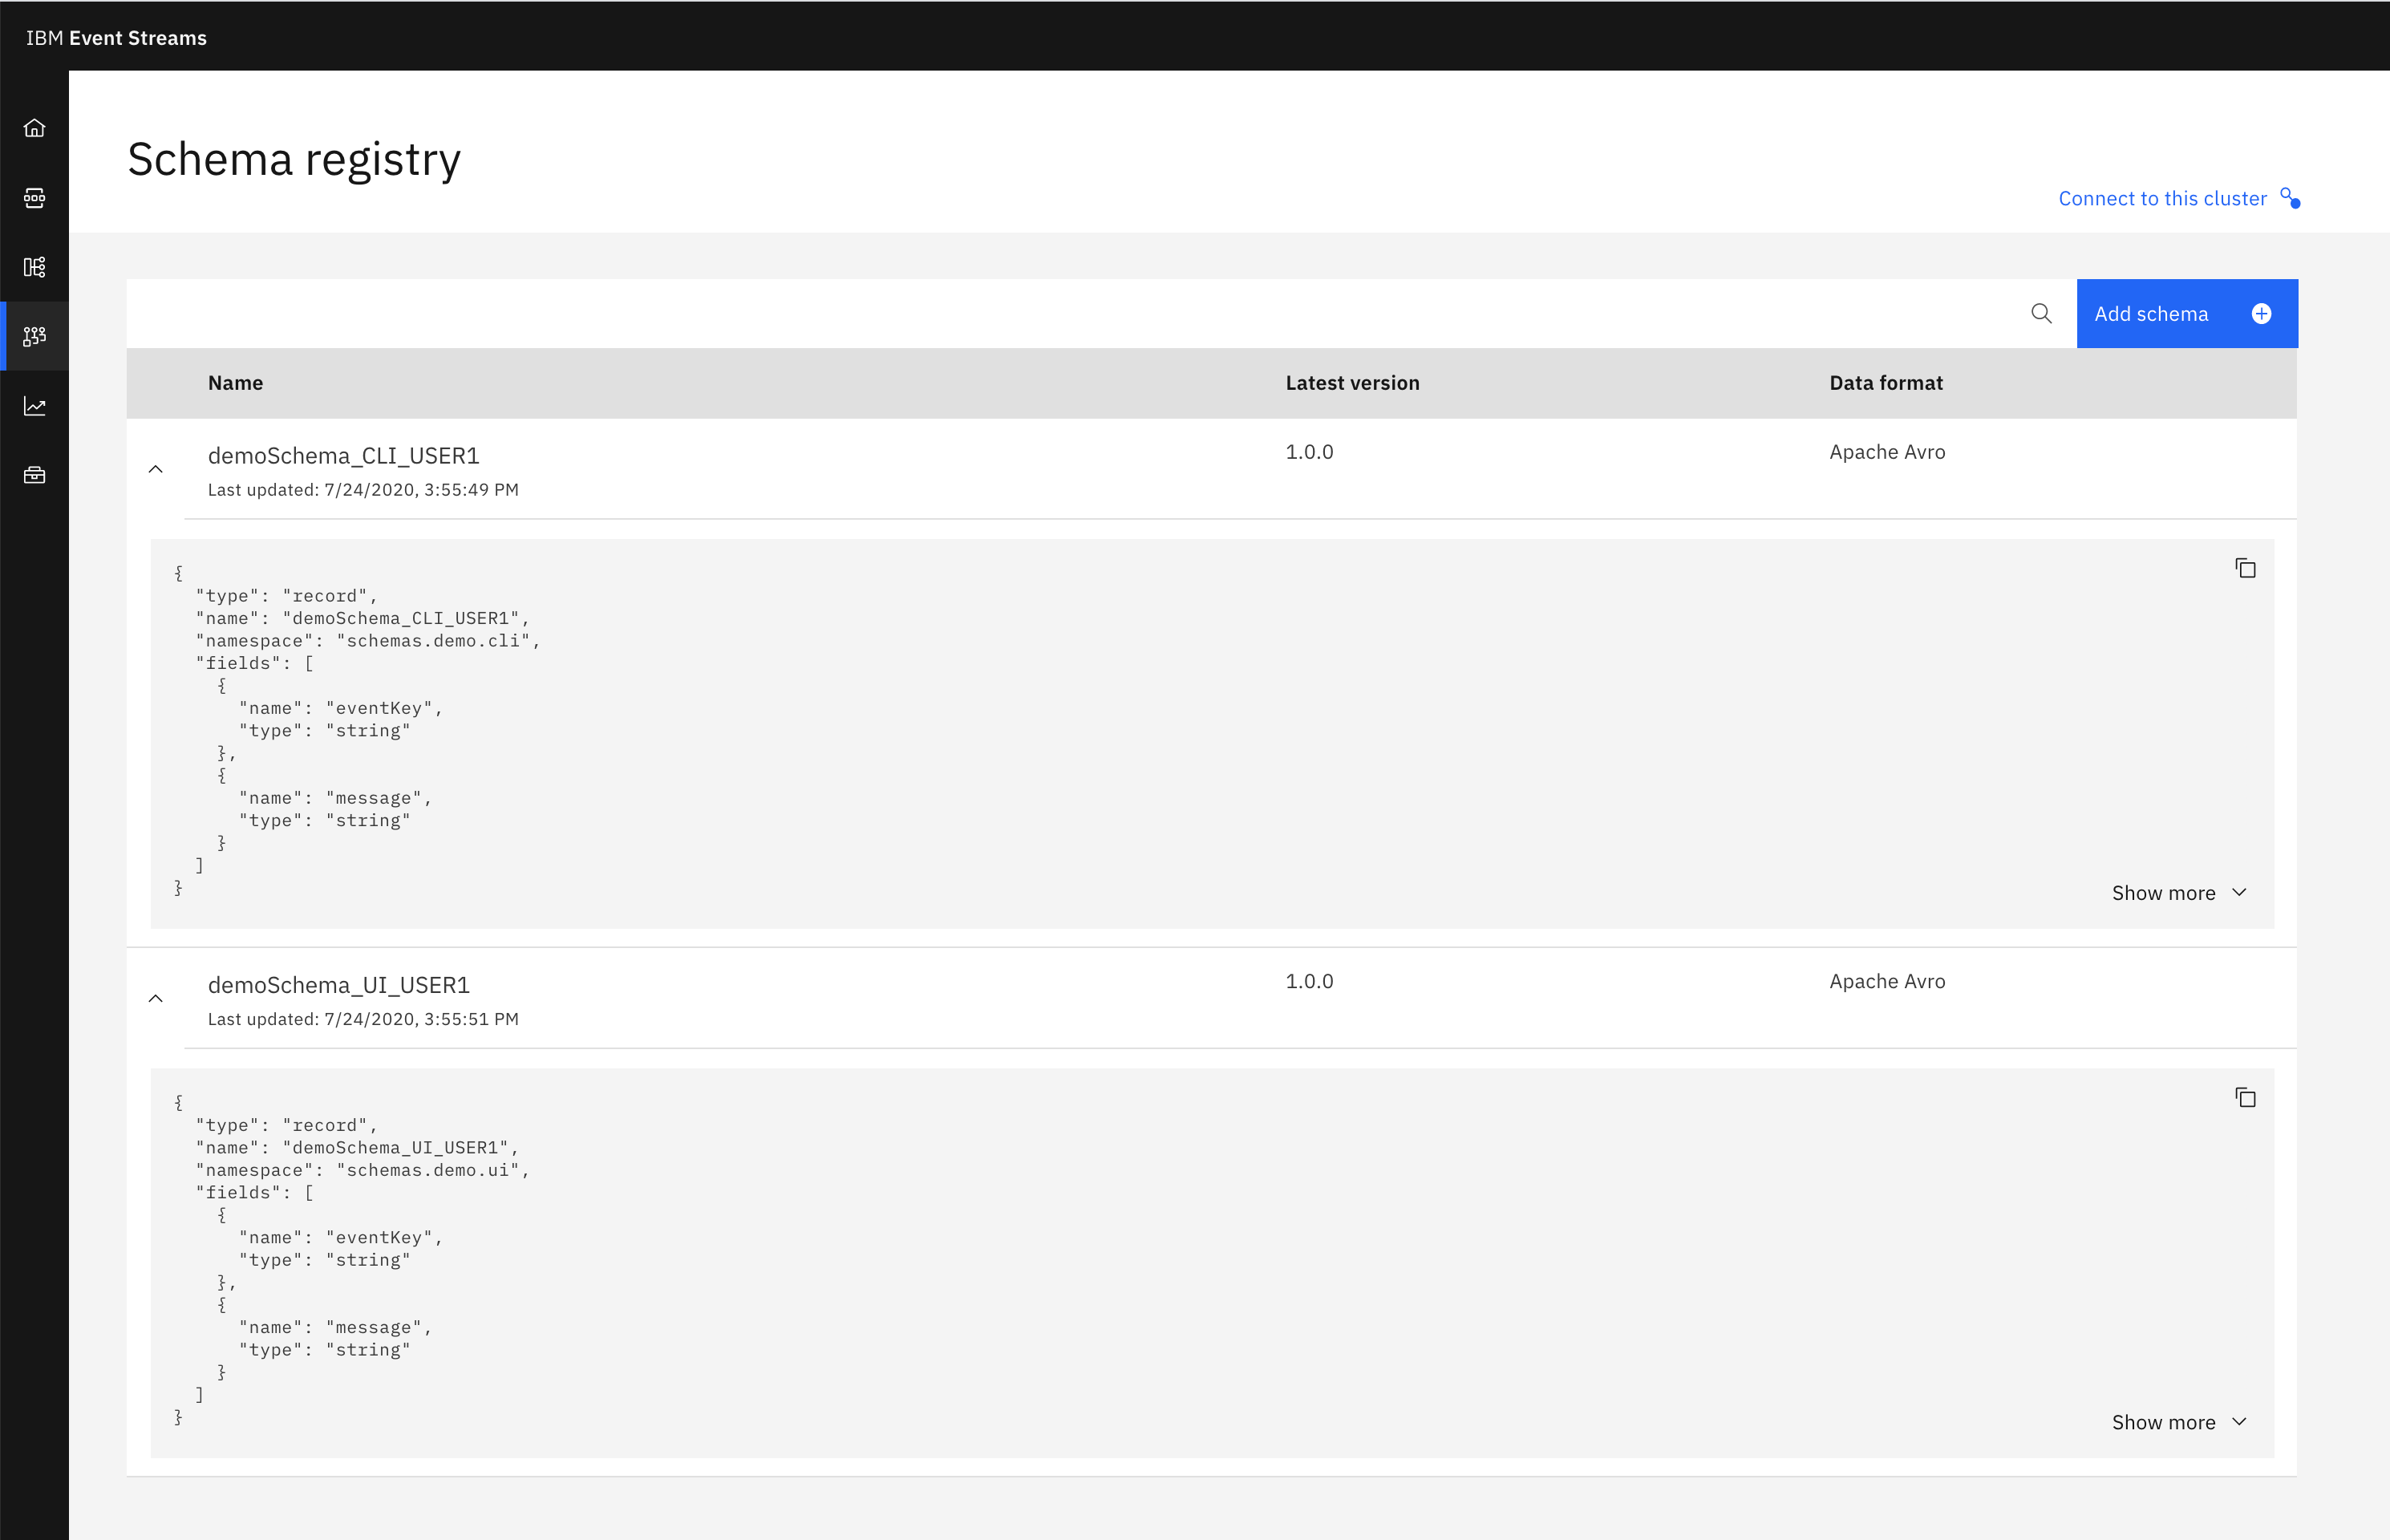
In order to list the schemas in the UI you just simply need to open up the Schema Registry User Interface and schemas will get listed in there automatically. You also have a search tool bar at the top. You can also see more details about your schema by clicking the drop down arrow on its left:
CLI
-
Execute the following command to list the schemas in your Schema Registry:
Delete schemas
UI
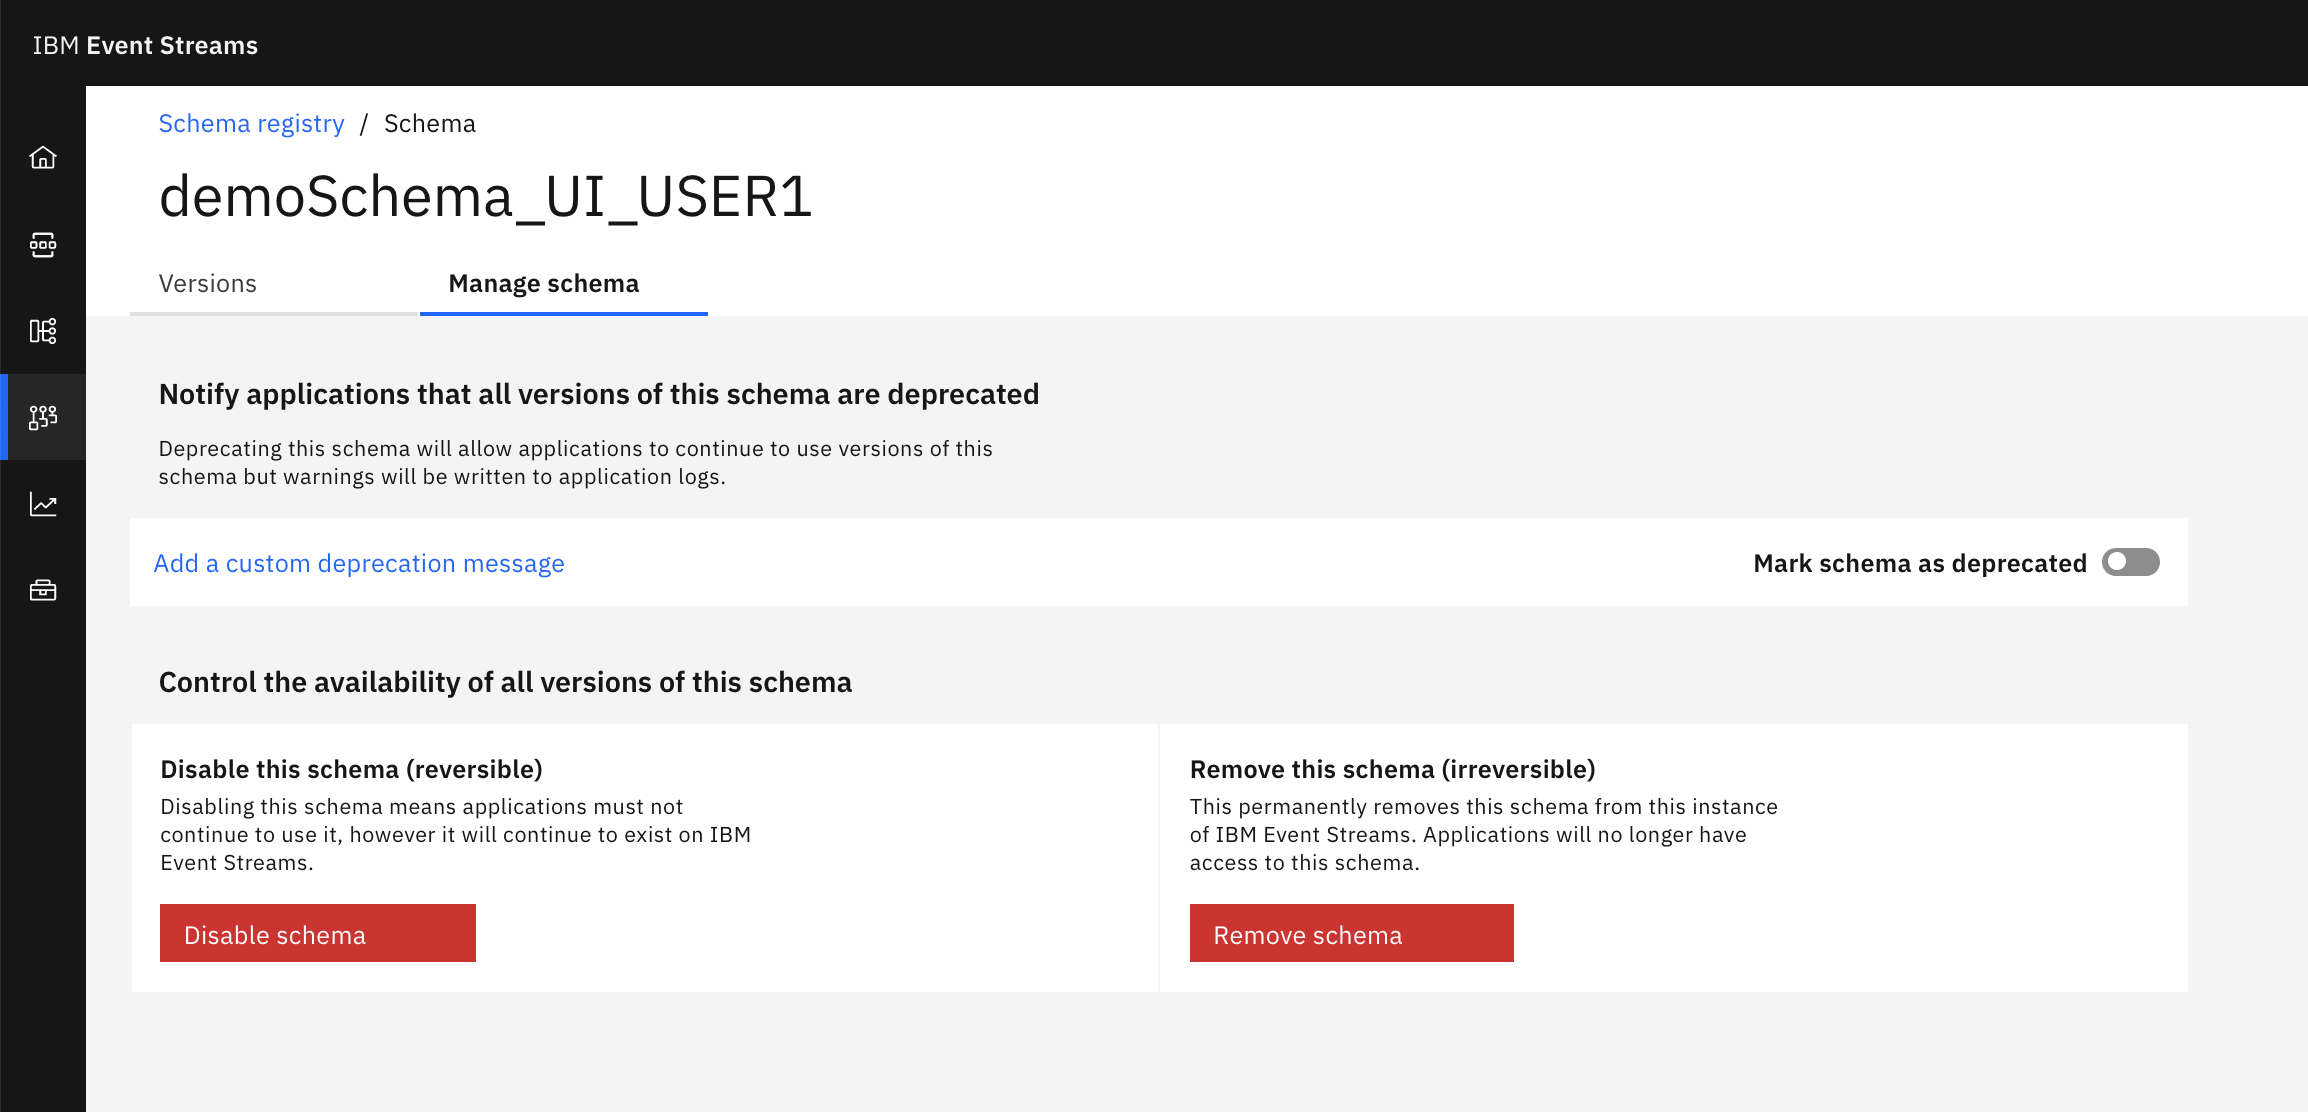
- Click on the schema you want to delete.
- Click on the Manage schema tab at the top.
-
Click on Remove schema
CLI
To remove a schema using the CLI, simply execute the following command and confirm:
Change USER1
cloudctl es schema-remove demoSchema_CLI_USER1

Remove schema demoSchema_CLI_USER1 and all versions? [y/n]> y
Schema demoSchema_CLI_USER1 and all versions removed.
OK
Create new schema version
To create a new version of a schema,
-
Let's first create again the previous two schemas:
Change USER1
-
Add a new attribute to the schemas by editing their Avro schema avsc files:
Change USER1
UI
- Click on the schema you want to create a new version for.
- Click on the Add new version button on the left hand side.
- Click on Upload definition button on the left hand side.
-
Select the Avro schema avsc file and click ok.
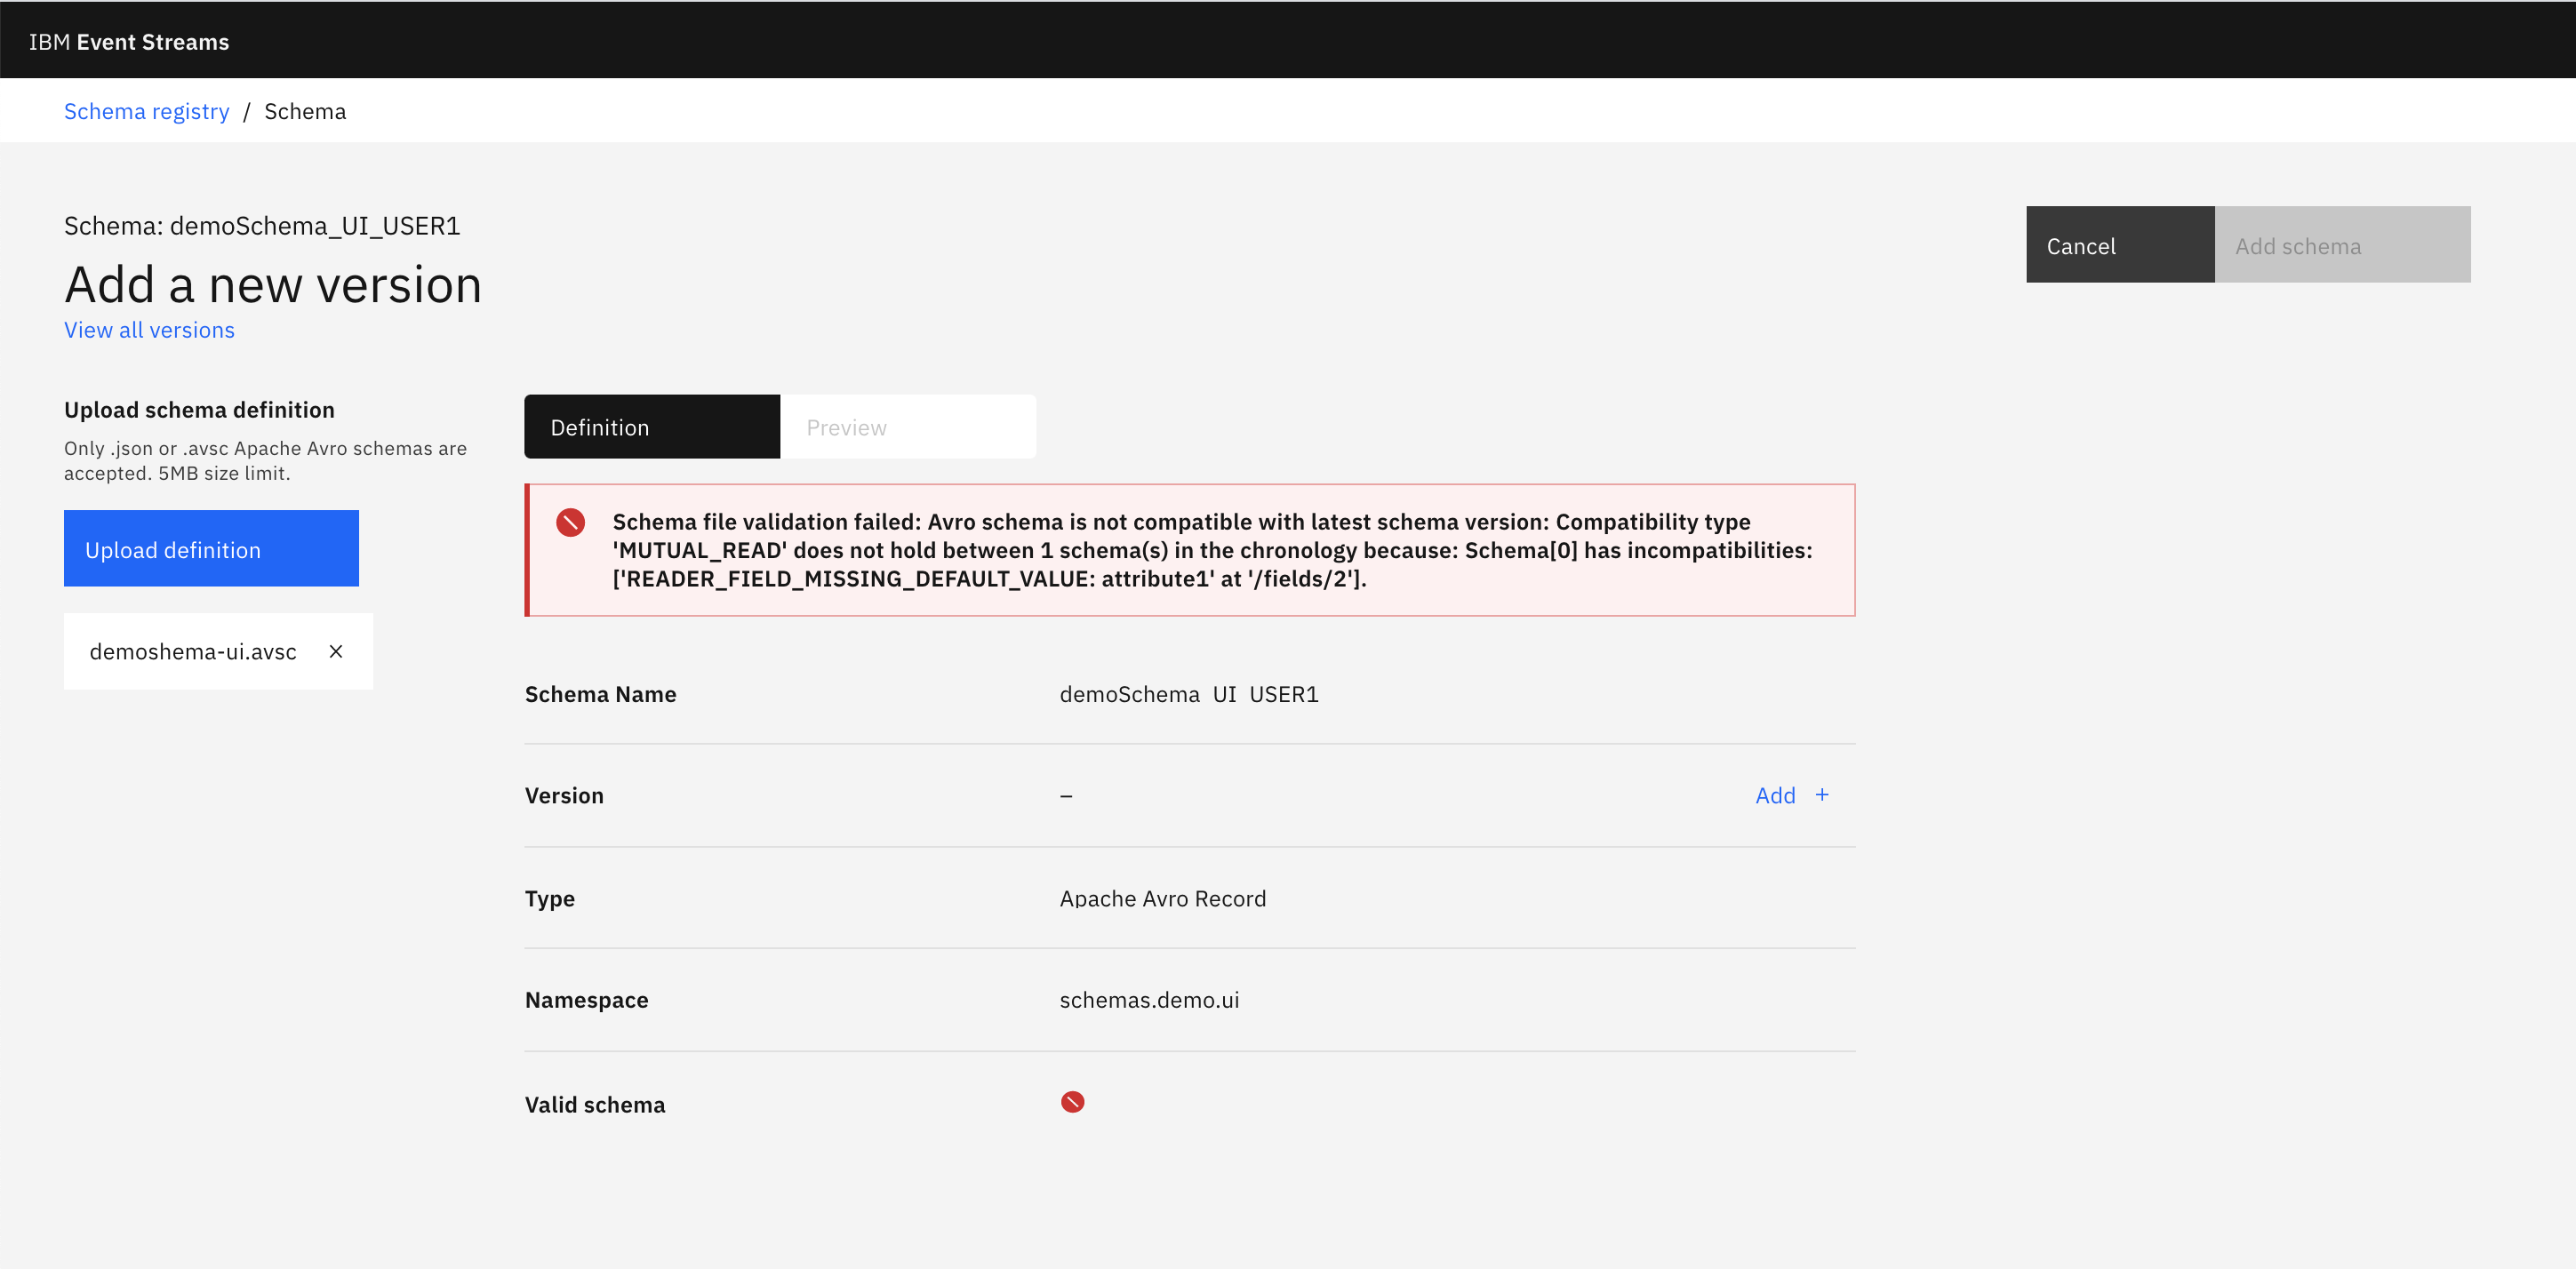
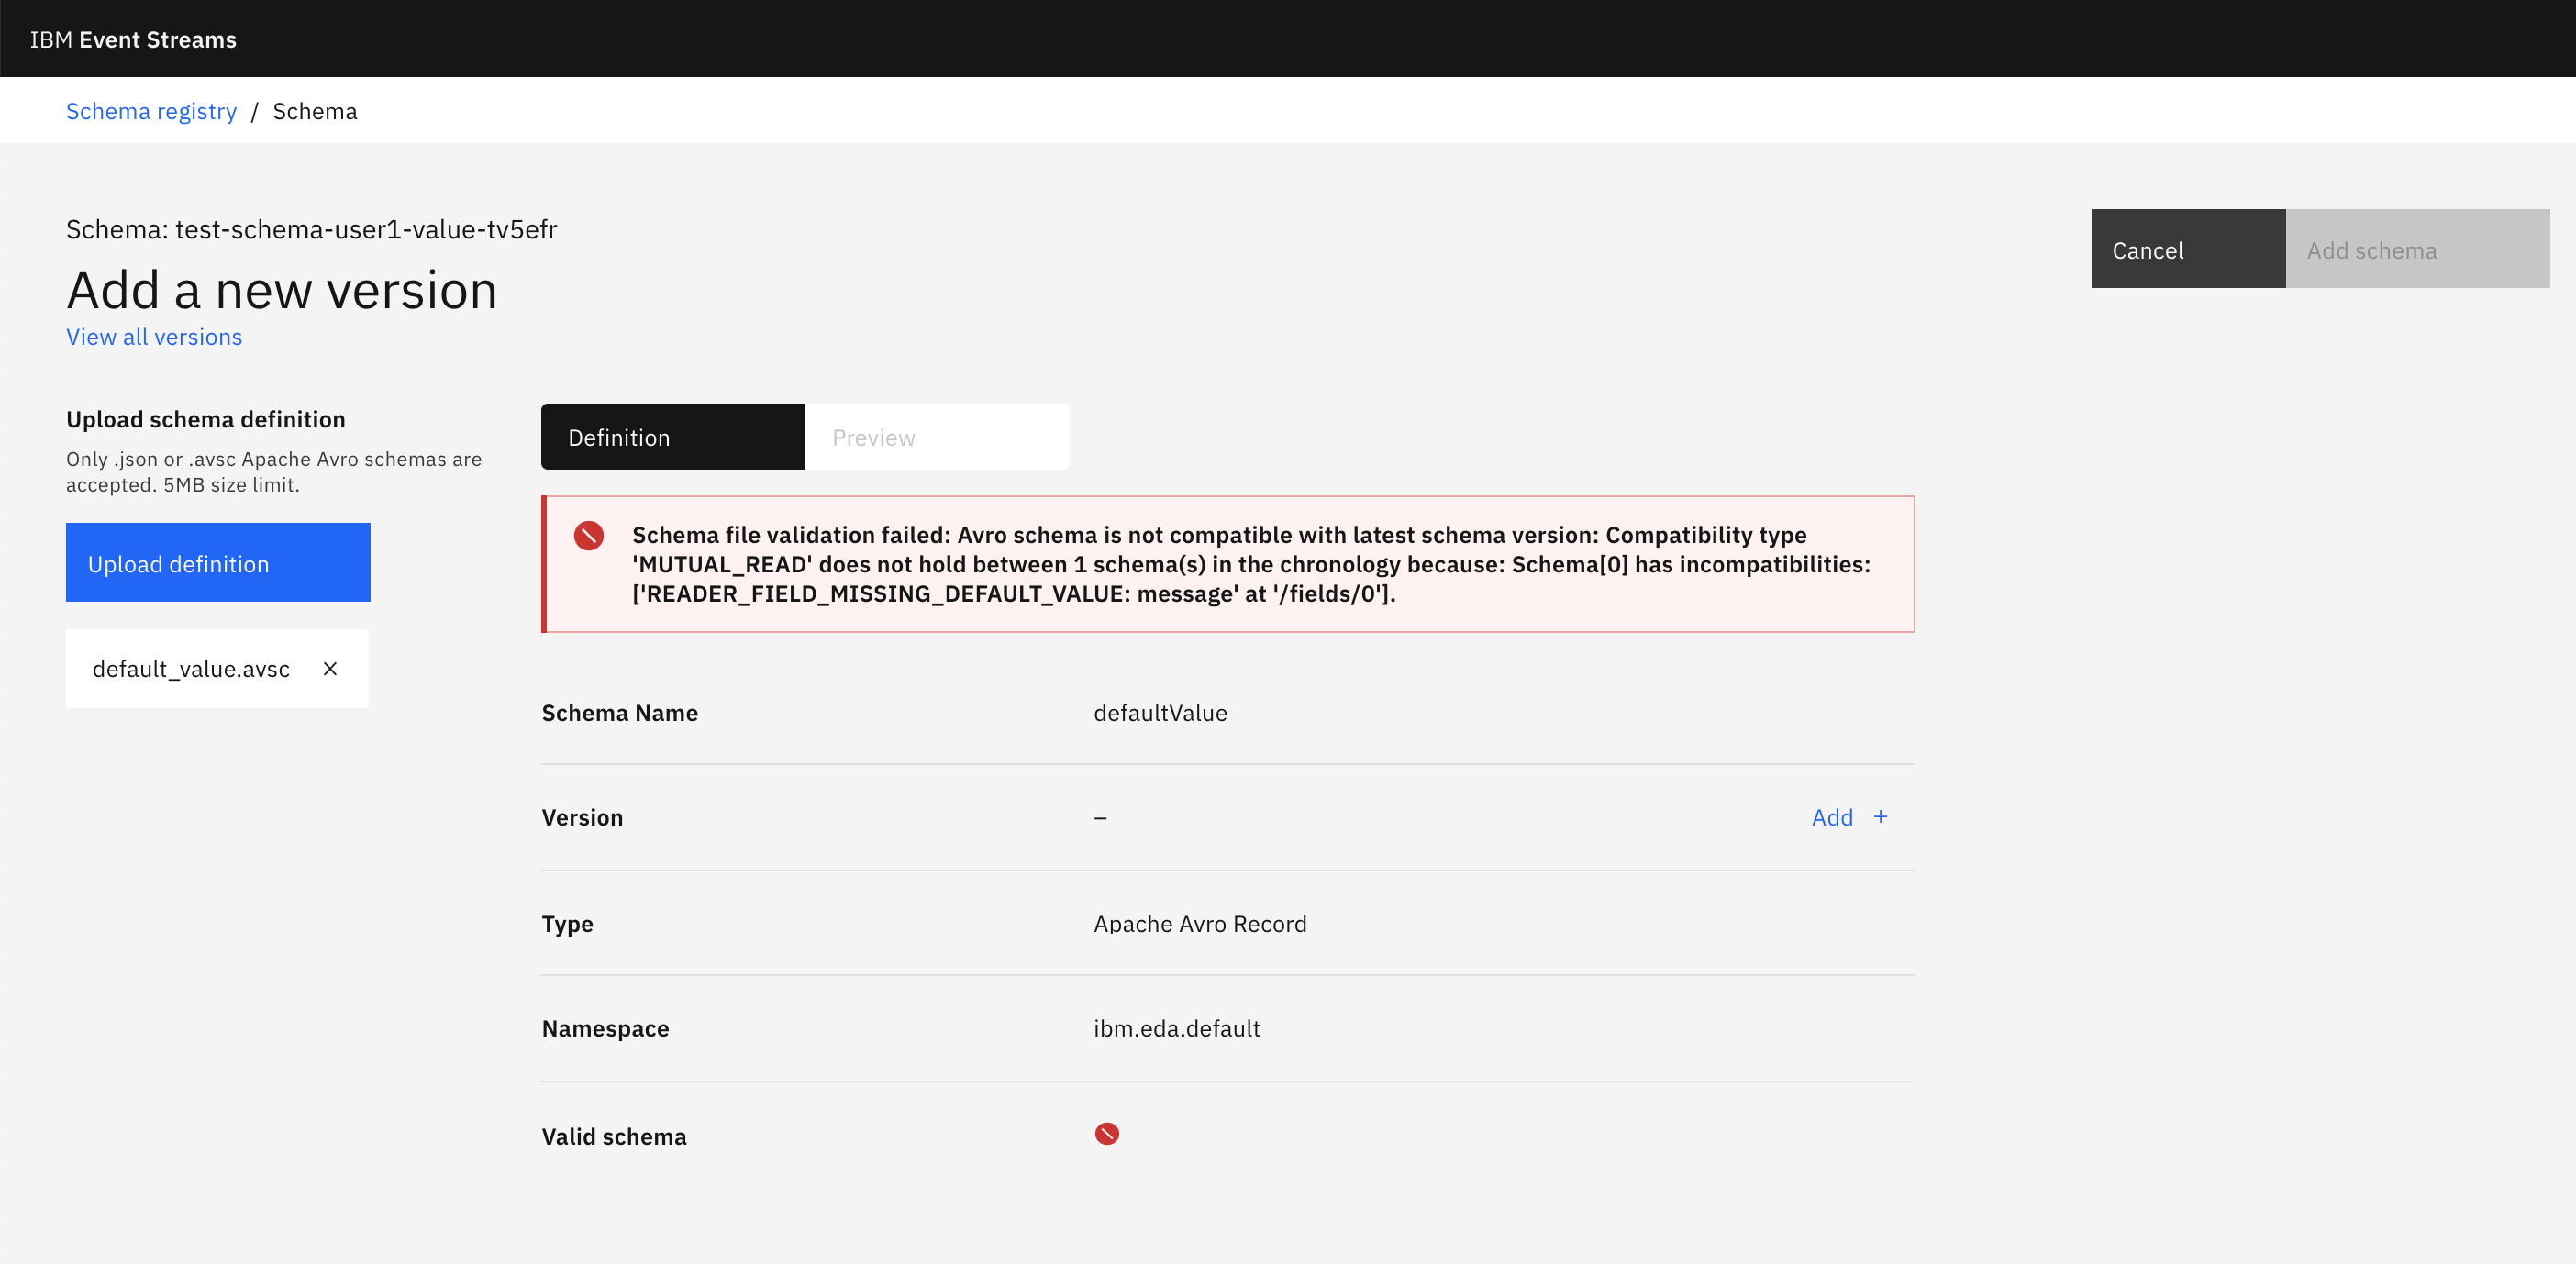
ERROR: The error we are seeing on the screen is because the IBM Event Streams Schema Registtry enforces full compatibility: https://ibm.github.io/event-streams/schemas/creating/#adding-new-schema-versions
Full compatibility for data schemas means that messages that have been serialized with an earlier version of a schema can be deserialized with a later version. To be compatible, fields in later versions of a schema cannot be removed, and any new schema field must have a default value. More on data schema compatibility on the section Data Evolution towards the end of this lab.
As explained in the error notification above, we need to add a default value for our new attribute in our data schema so that messages serialized with an older version of the data schema which won't contain this new attribute can later be deserialized with the newer version of the data schema that expects such attribute. By providing a default value, we allow deserializers to consume messages that do not contain newer attributes.
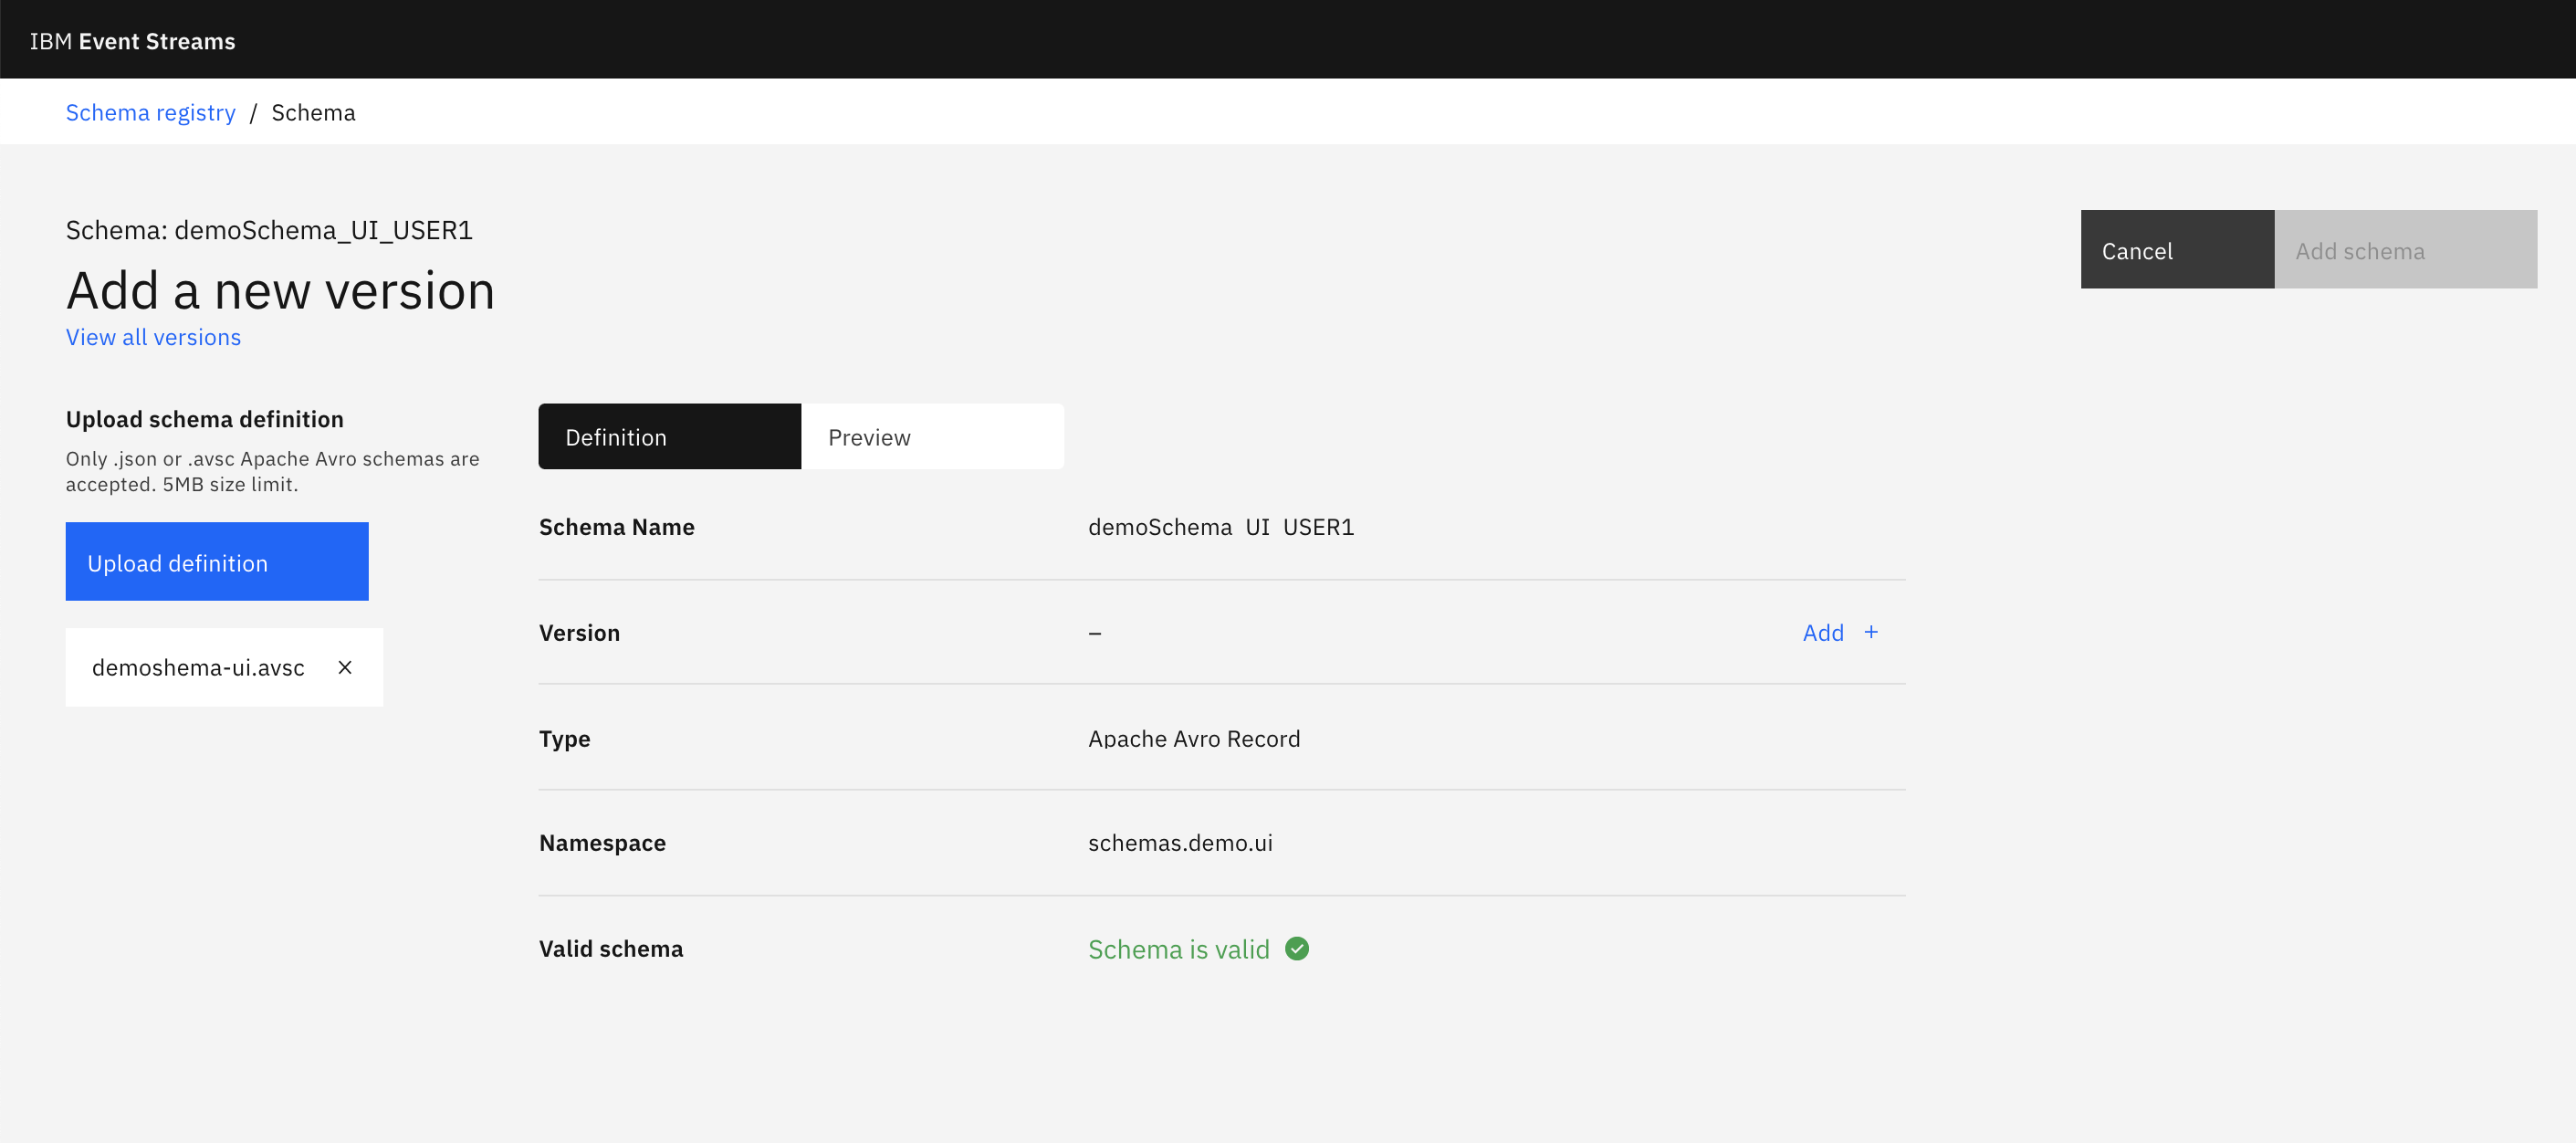
-
Add a default value for the new attribute:
Change USER1
-
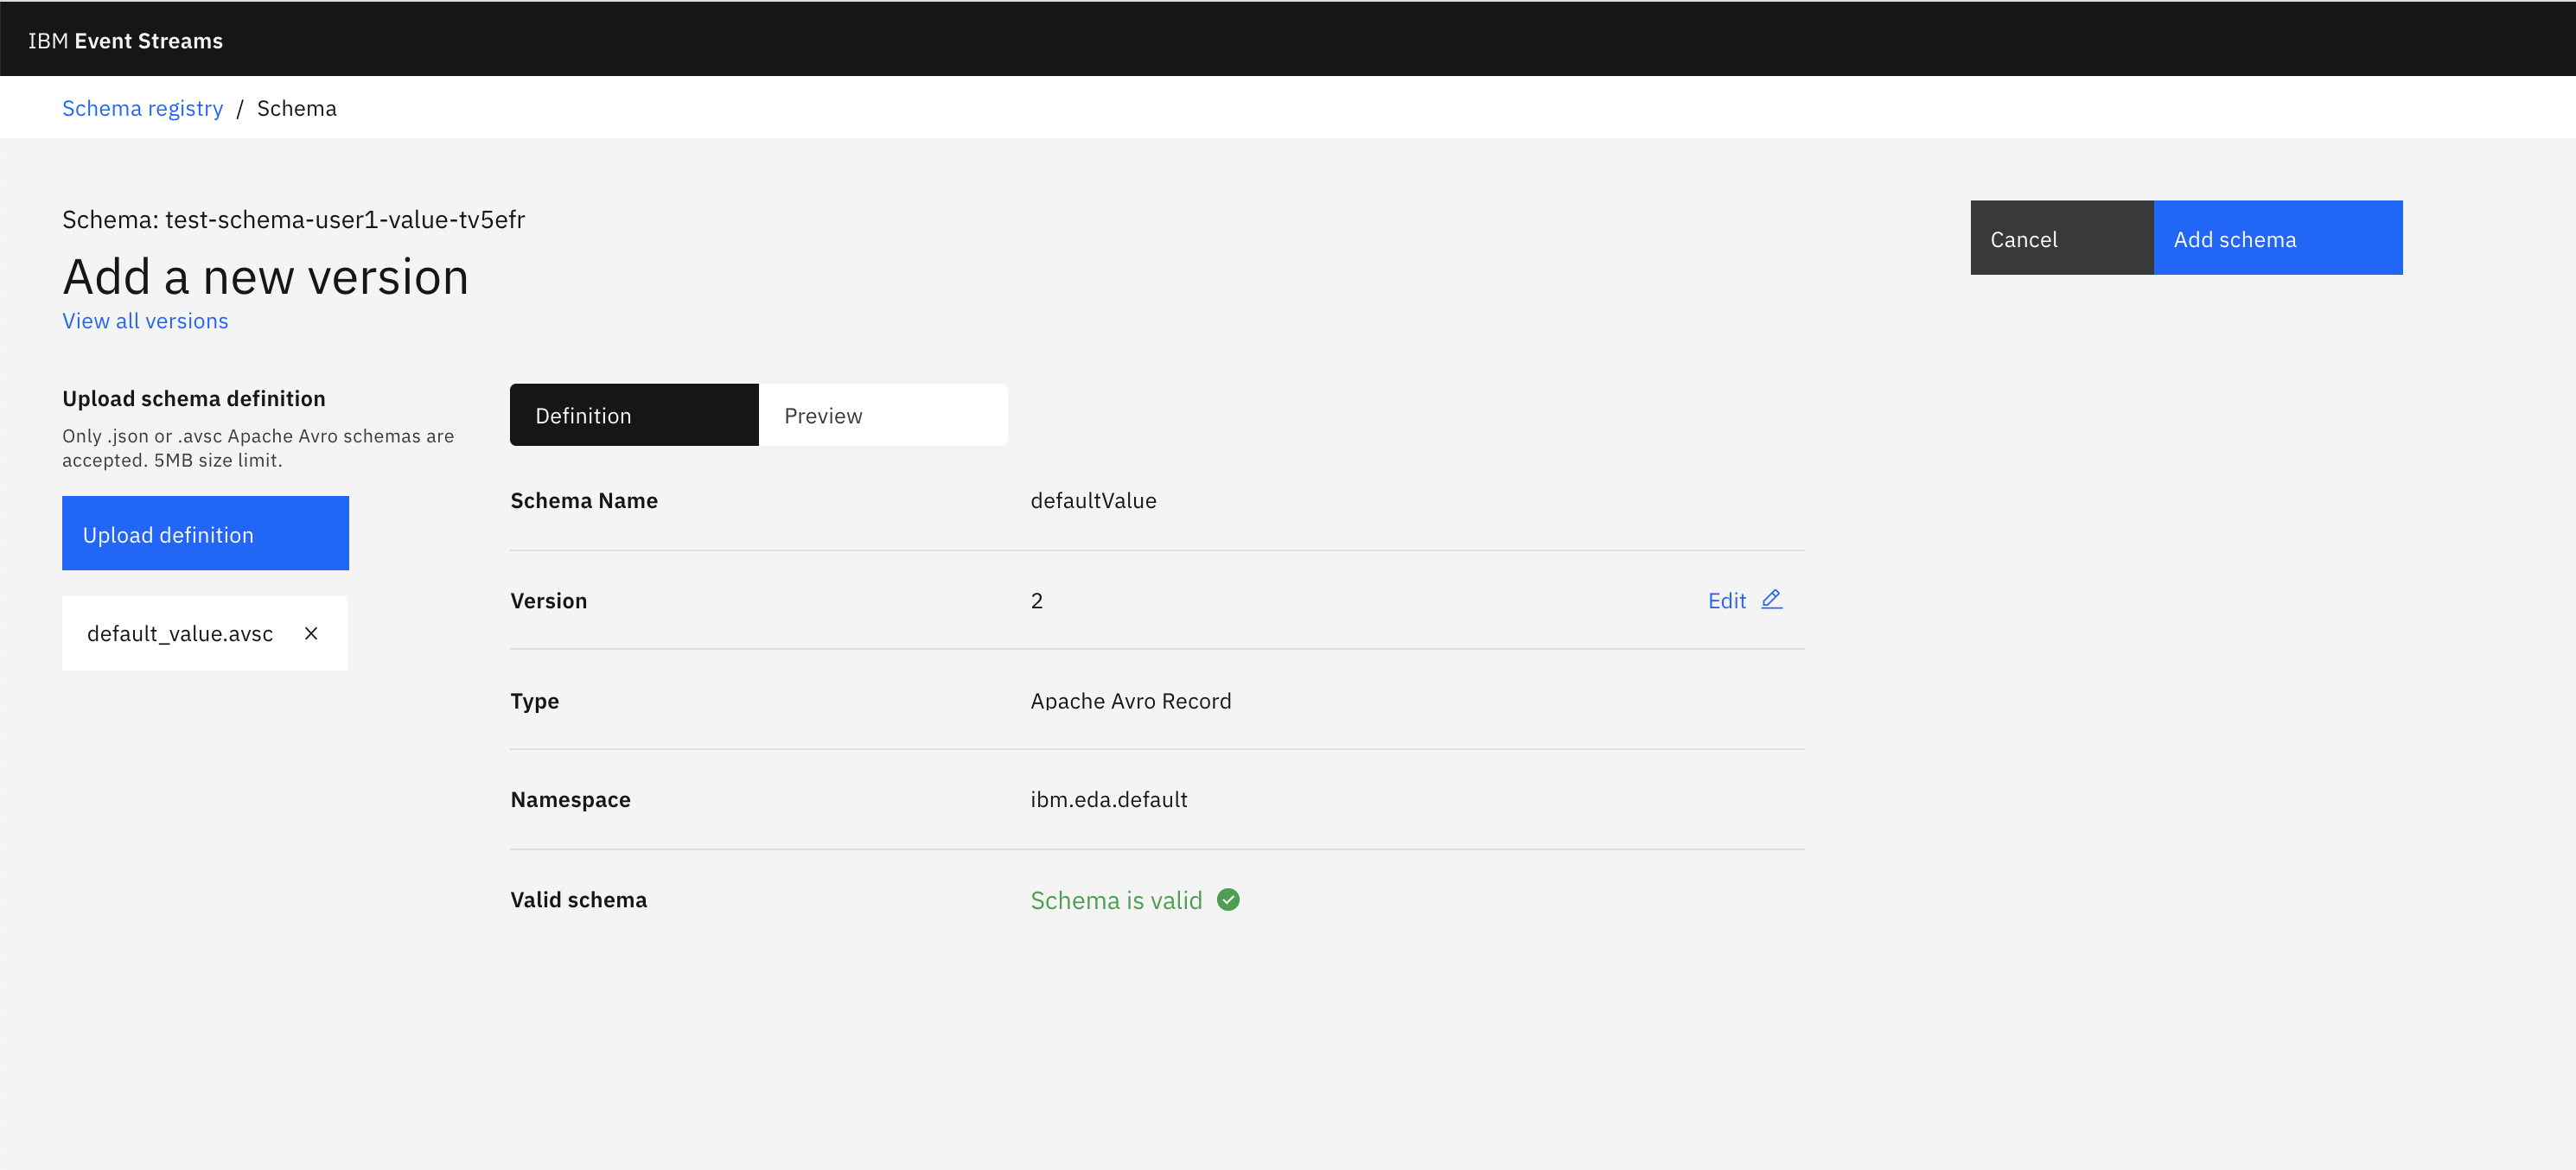
Repeat the steps for adding a new version of a schema above.
-
This time you should see that the schema is valid:
-
However, it still does not let us add this new version to the data schema until we actually provide a version for it. Click on the Add + link on the right of the version attribute of the schema and give it
2.0.0for example (hit enter for the version to take the value you type in). - Click on Add schema.
-
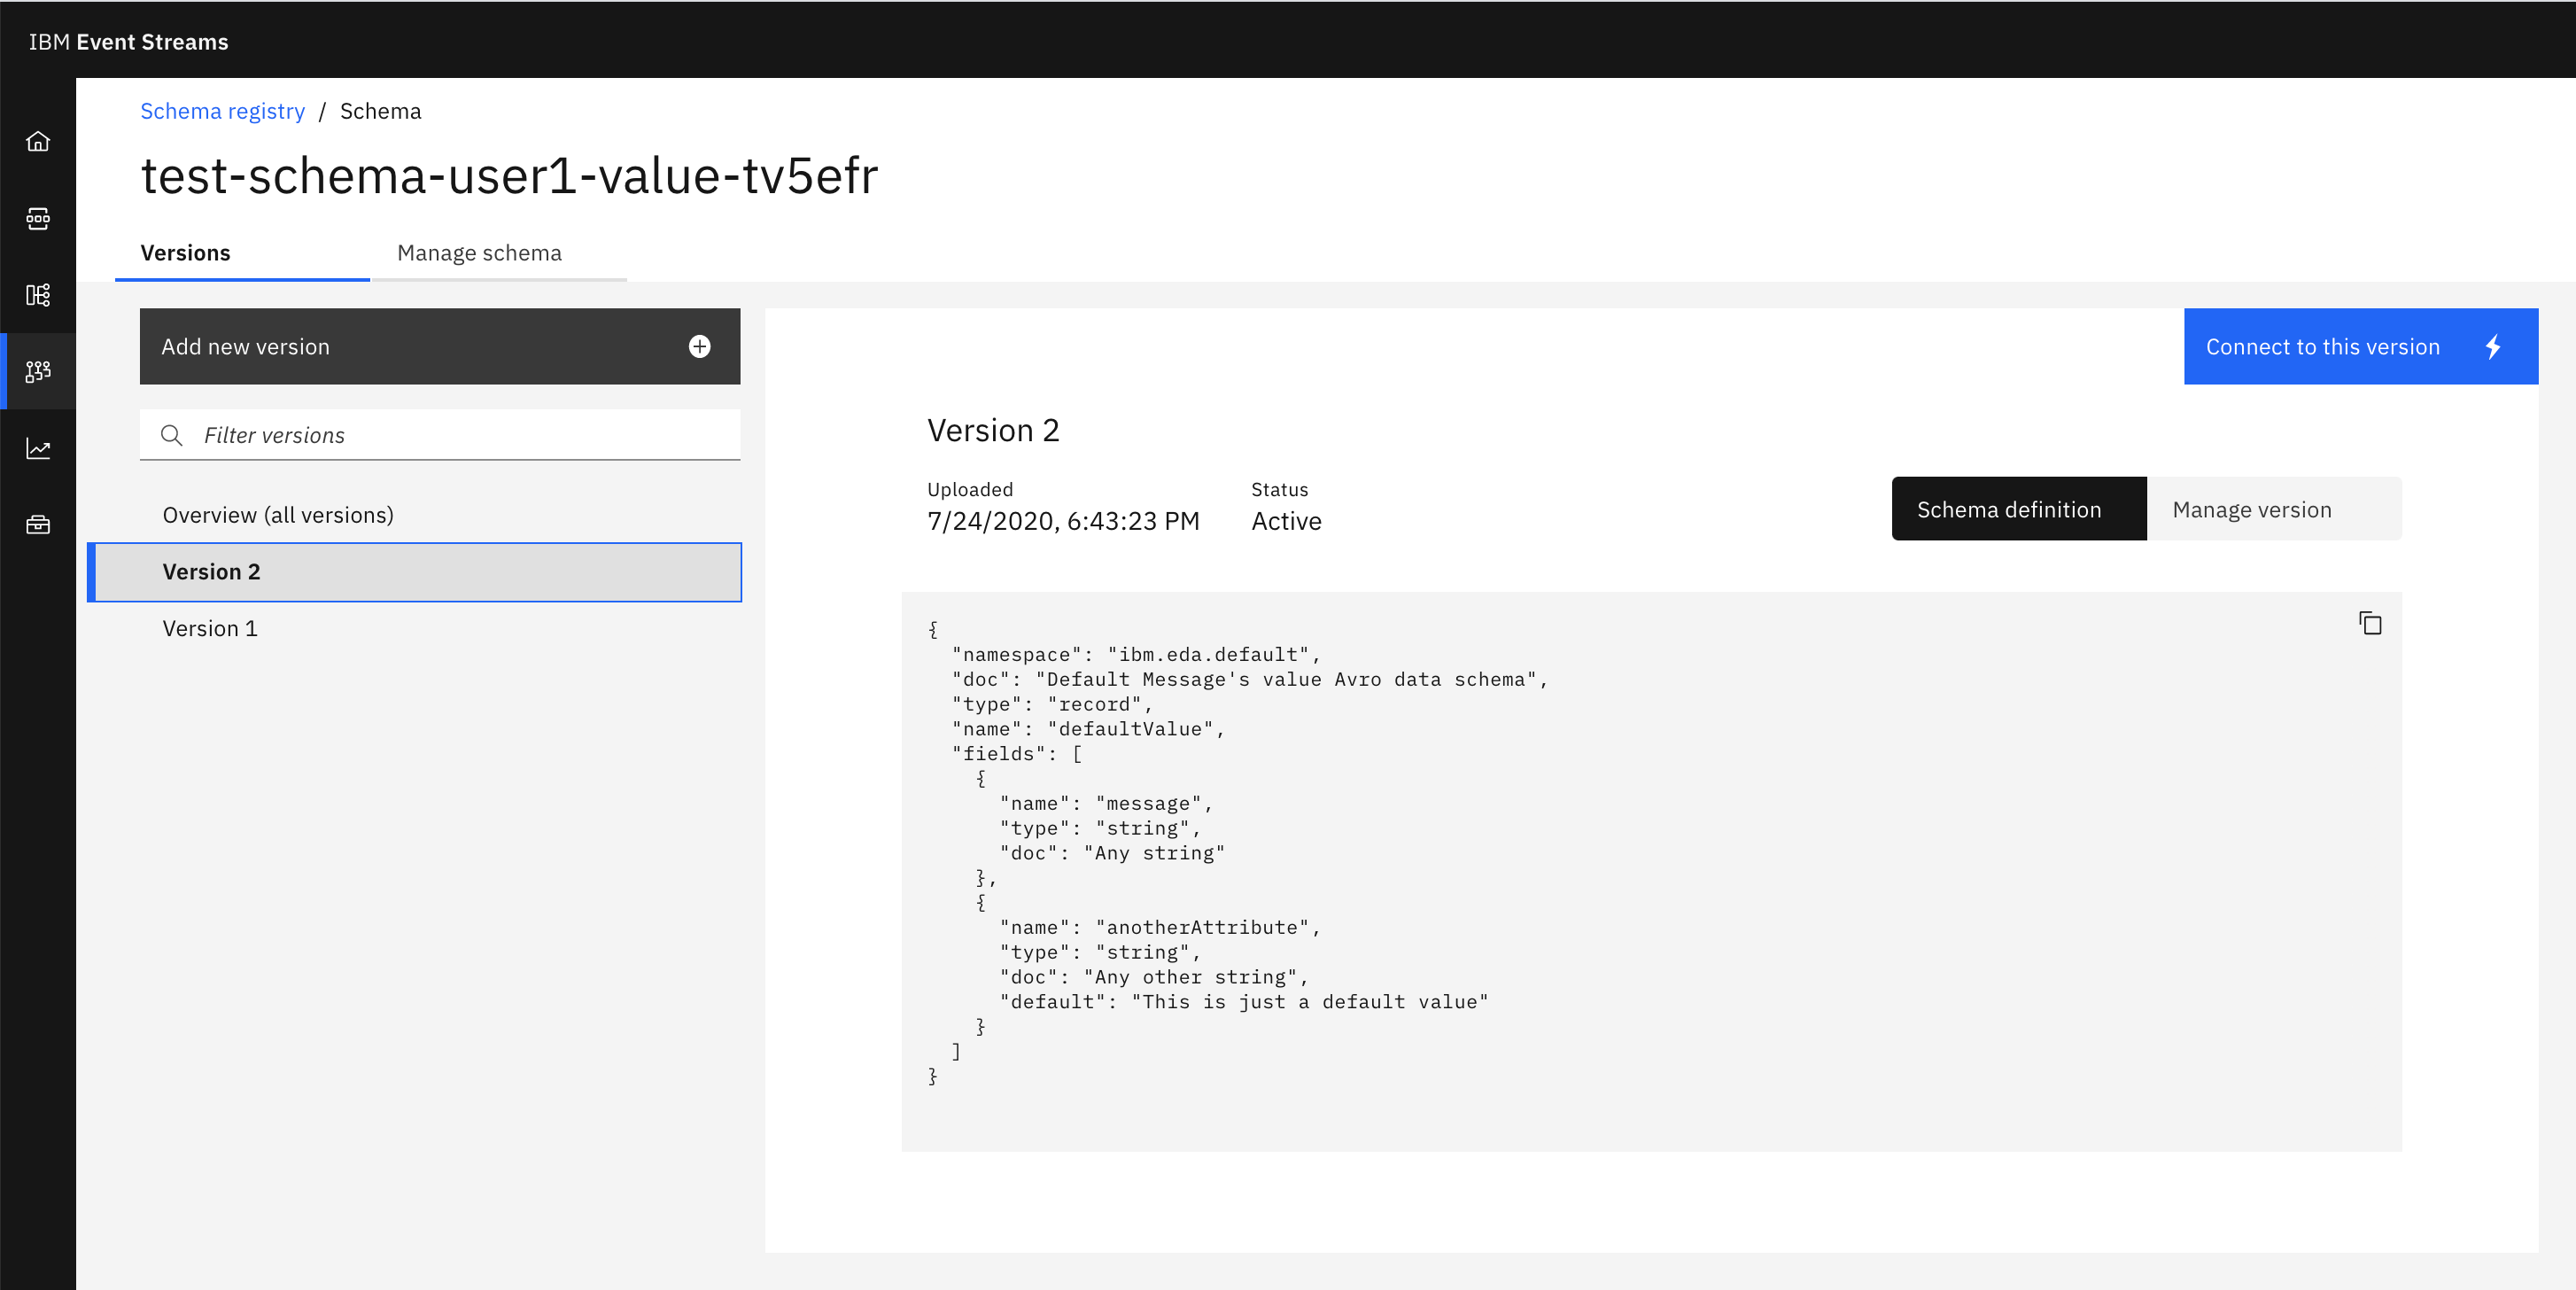
You should now see the two versions for your data schema on the left hand side.
-
If you go back to the Schema Registry page where all your schemas are listed, you should now see that the latest version for your data schema is
2.0.0now.
CLI
-
If we try to add the new version of the schema from its
demoschema-cli.avscAvro schema file, we will get the same error as in the previous UI example:cloudctl es schema-add --file demoshema-cli.avsc FAILED Event Streams API request failed: Error response from server. Status code: 400. Avro schema is not compatible with latest schema version: Compatibility type 'MUTUAL_READ' does not hold between 1 schema(s) in the chronology because: Schema[0] has incompatibilities: ['READER_FIELD_MISSING_DEFAULT_VALUE: attribute1' at '/fields/2']. Unable to add version 1.0.0 of schema demoSchema_CLI_USER1 to the registry. -
Add the default value for the new attribute in your Avro schema avsc file and try to add that new version of the schema:
-
We see that we still have an error because we have not specified a new version value. Specify a new version value when adding this new version of the schema:
cloudctl es schema-add --file demoshema-cli.avsc --version 2.0.0

Schema demoSchema_CLI_USER1 is active.

Version   Version ID   Schema                 State    Updated                         Comment
1.0.0     1            demoSchema_CLI_USER1   active   Fri, 24 Jul 2020 14:00:45 UTC
2.0.0     2            demoSchema_CLI_USER1   active   Fri, 24 Jul 2020 14:09:37 UTC

Added version 2.0.0 of schema demoSchema_CLI_USER1 to the registry.
OK
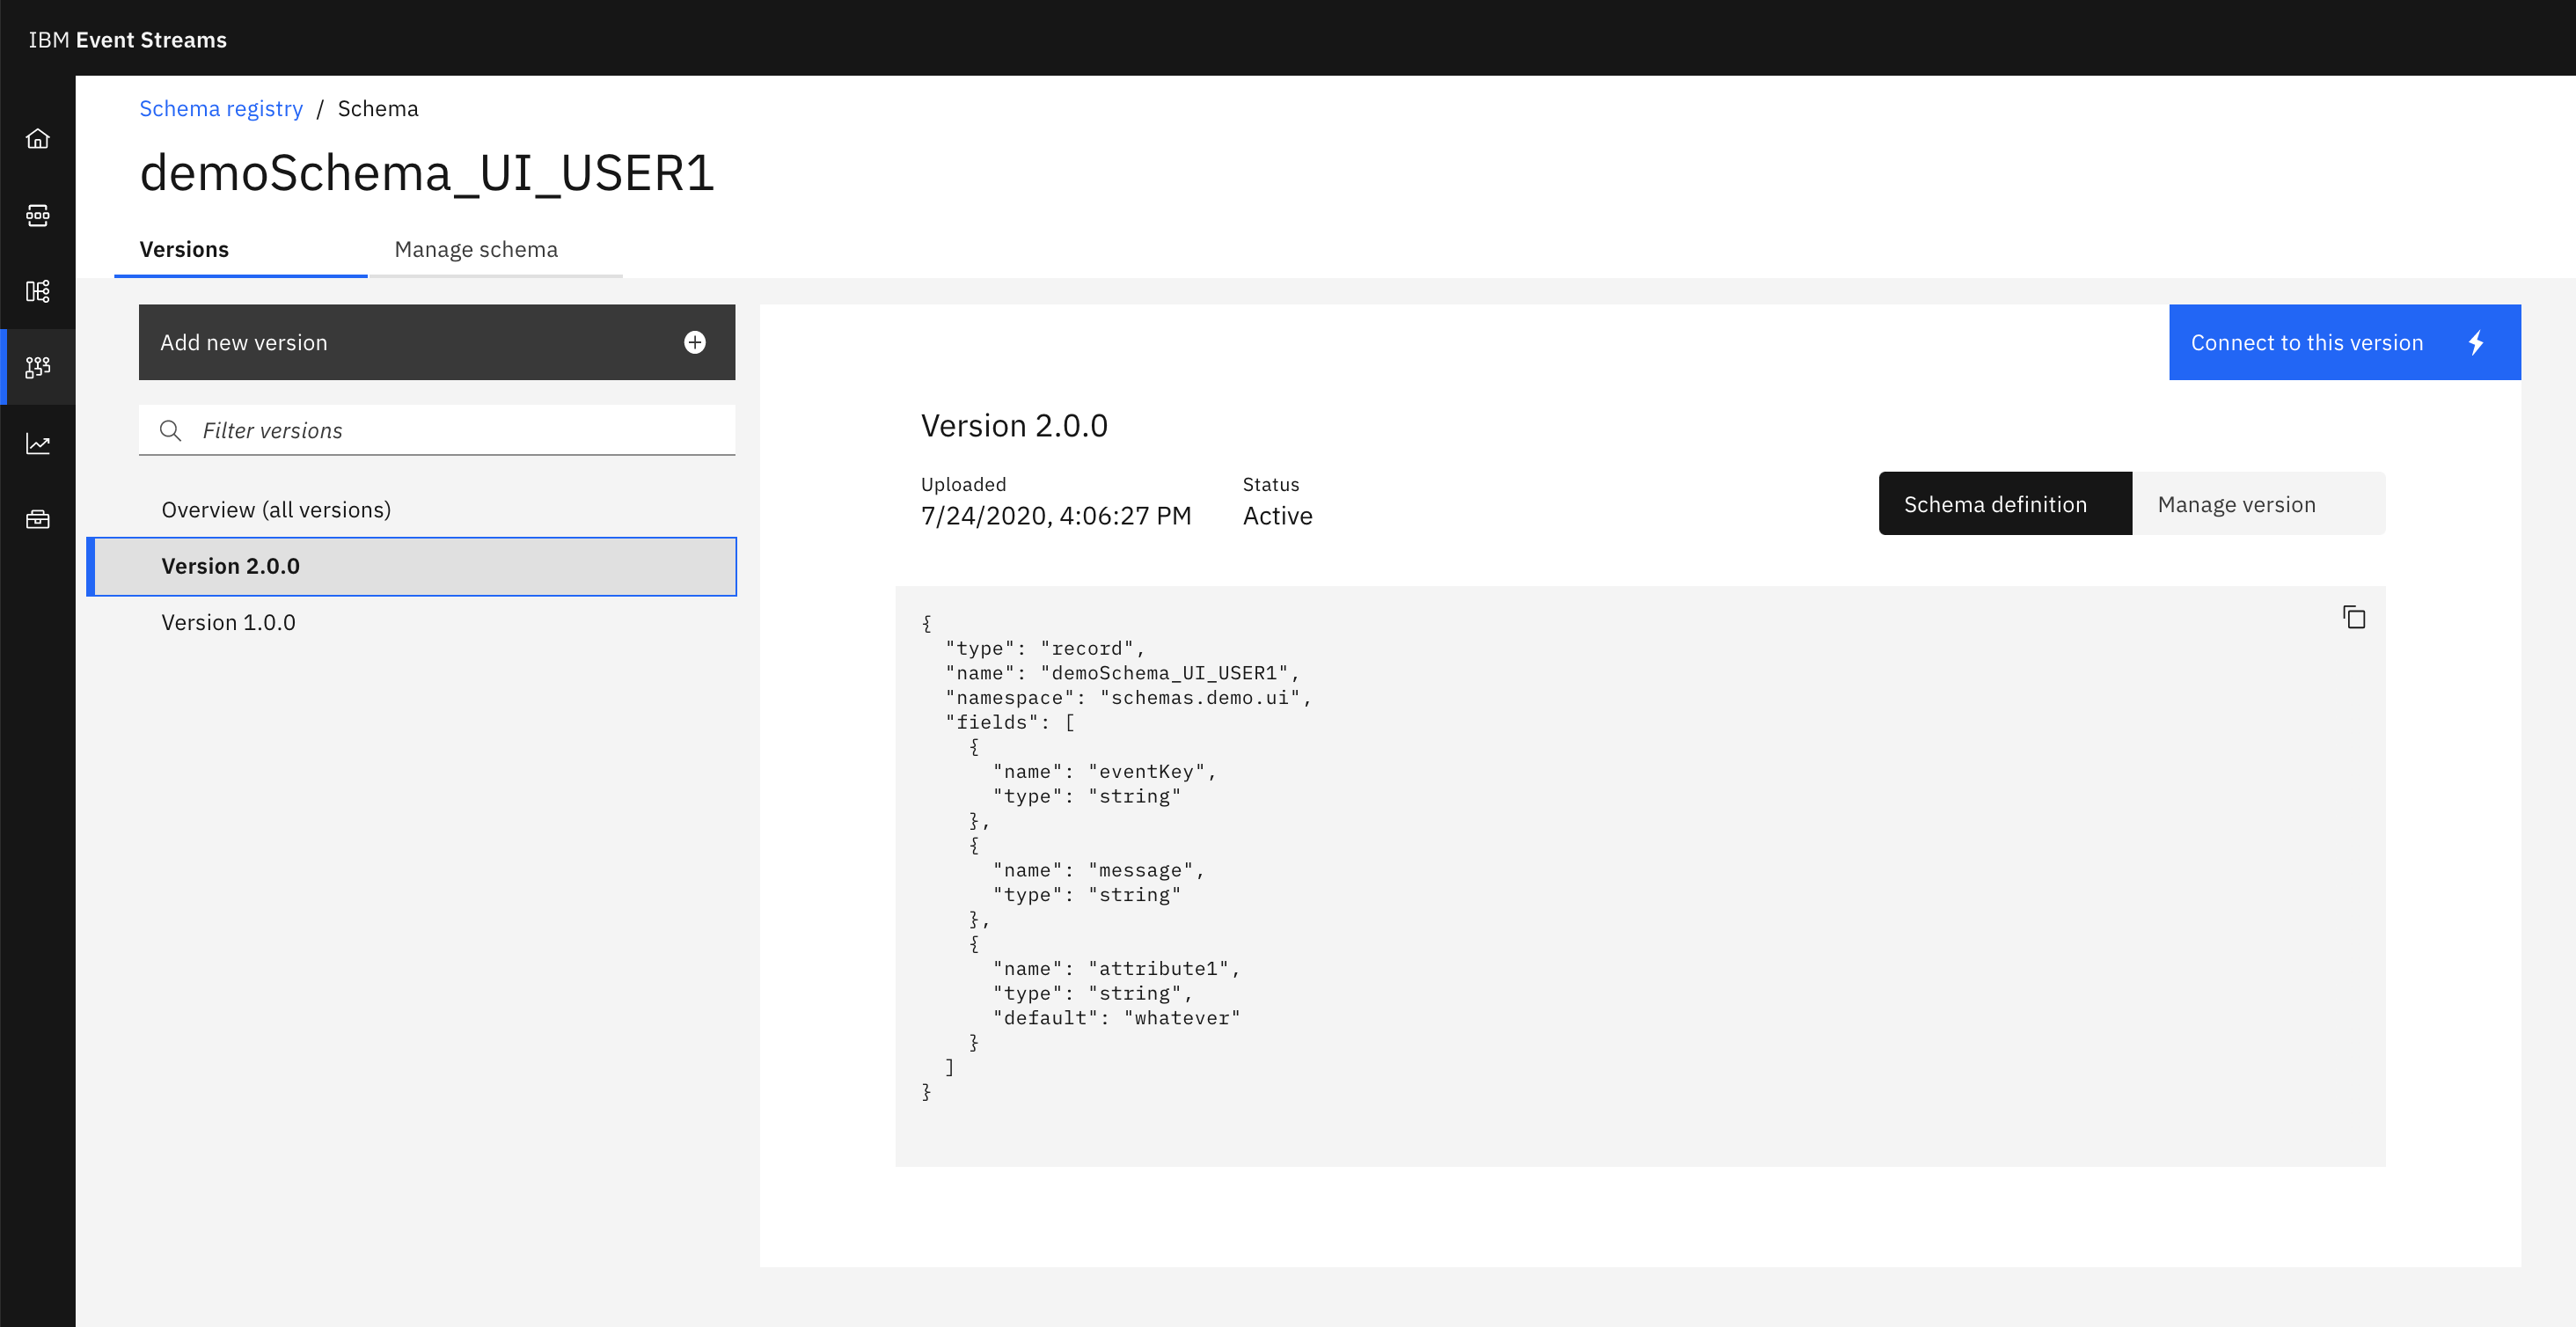
Get latest version of a schema
UI
In order to see the latest version of a data schema using the UI, we just need to go to the Schema Registry web user interface and click on the expand arrow buttton that is on the left:
CLI
In order to see the latest version of a data schema using the CLI, we simply need to run the following command:
cloudctl es schema demoSchema_CLI_USER1 --version 2

{
  "type": "record",
  "name": "demoSchema_CLI_USER1",
  "namespace": "schemas.demo.cli",
  "fields": [
    {
      "name": "eventKey",
      "type": "string"
    },
    {
      "name": "message",
      "type": "string"
    },
    {
      "name": "attribute1",
      "type": "string",
      "default": "whatever"
    }
  ]
}
(*) The version you specify is actually the version ID (2) rather than the version name we gave to the newer schema version (2.0.0):
cloudctl es schema demoSchema_CLI_USER1

Schema demoSchema_CLI_USER1 is active.

Version   Version ID   Schema                 State    Updated                         Comment
1.0.0     1            demoSchema_CLI_USER1   active   Fri, 24 Jul 2020 14:00:45 UTC
2.0.0     2            demoSchema_CLI_USER1   active   Fri, 24 Jul 2020 14:09:37 UTC
OK
Get specific version of a schema
UI
To see a specific version of a schema, go to the Schema Registry web user interface and click on the schema you want to see the version for. You will now see how many version of the schema you have and you can click on any of these in order to see more details about it.
CLI
To see a specific version of a schema using the CLI, simply run the following command with the version ID you would like to get retrieved:
cloudctl es schema demoSchema_CLI_USER1 --version 1

{
  "type": "record",
  "name": "demoSchema_CLI_USER1",
  "namespace": "schemas.demo.cli",
  "fields": [
    {
      "name": "eventKey",
      "type": "string"
    },
    {
      "name": "message",
      "type": "string"
    }
  ]
}
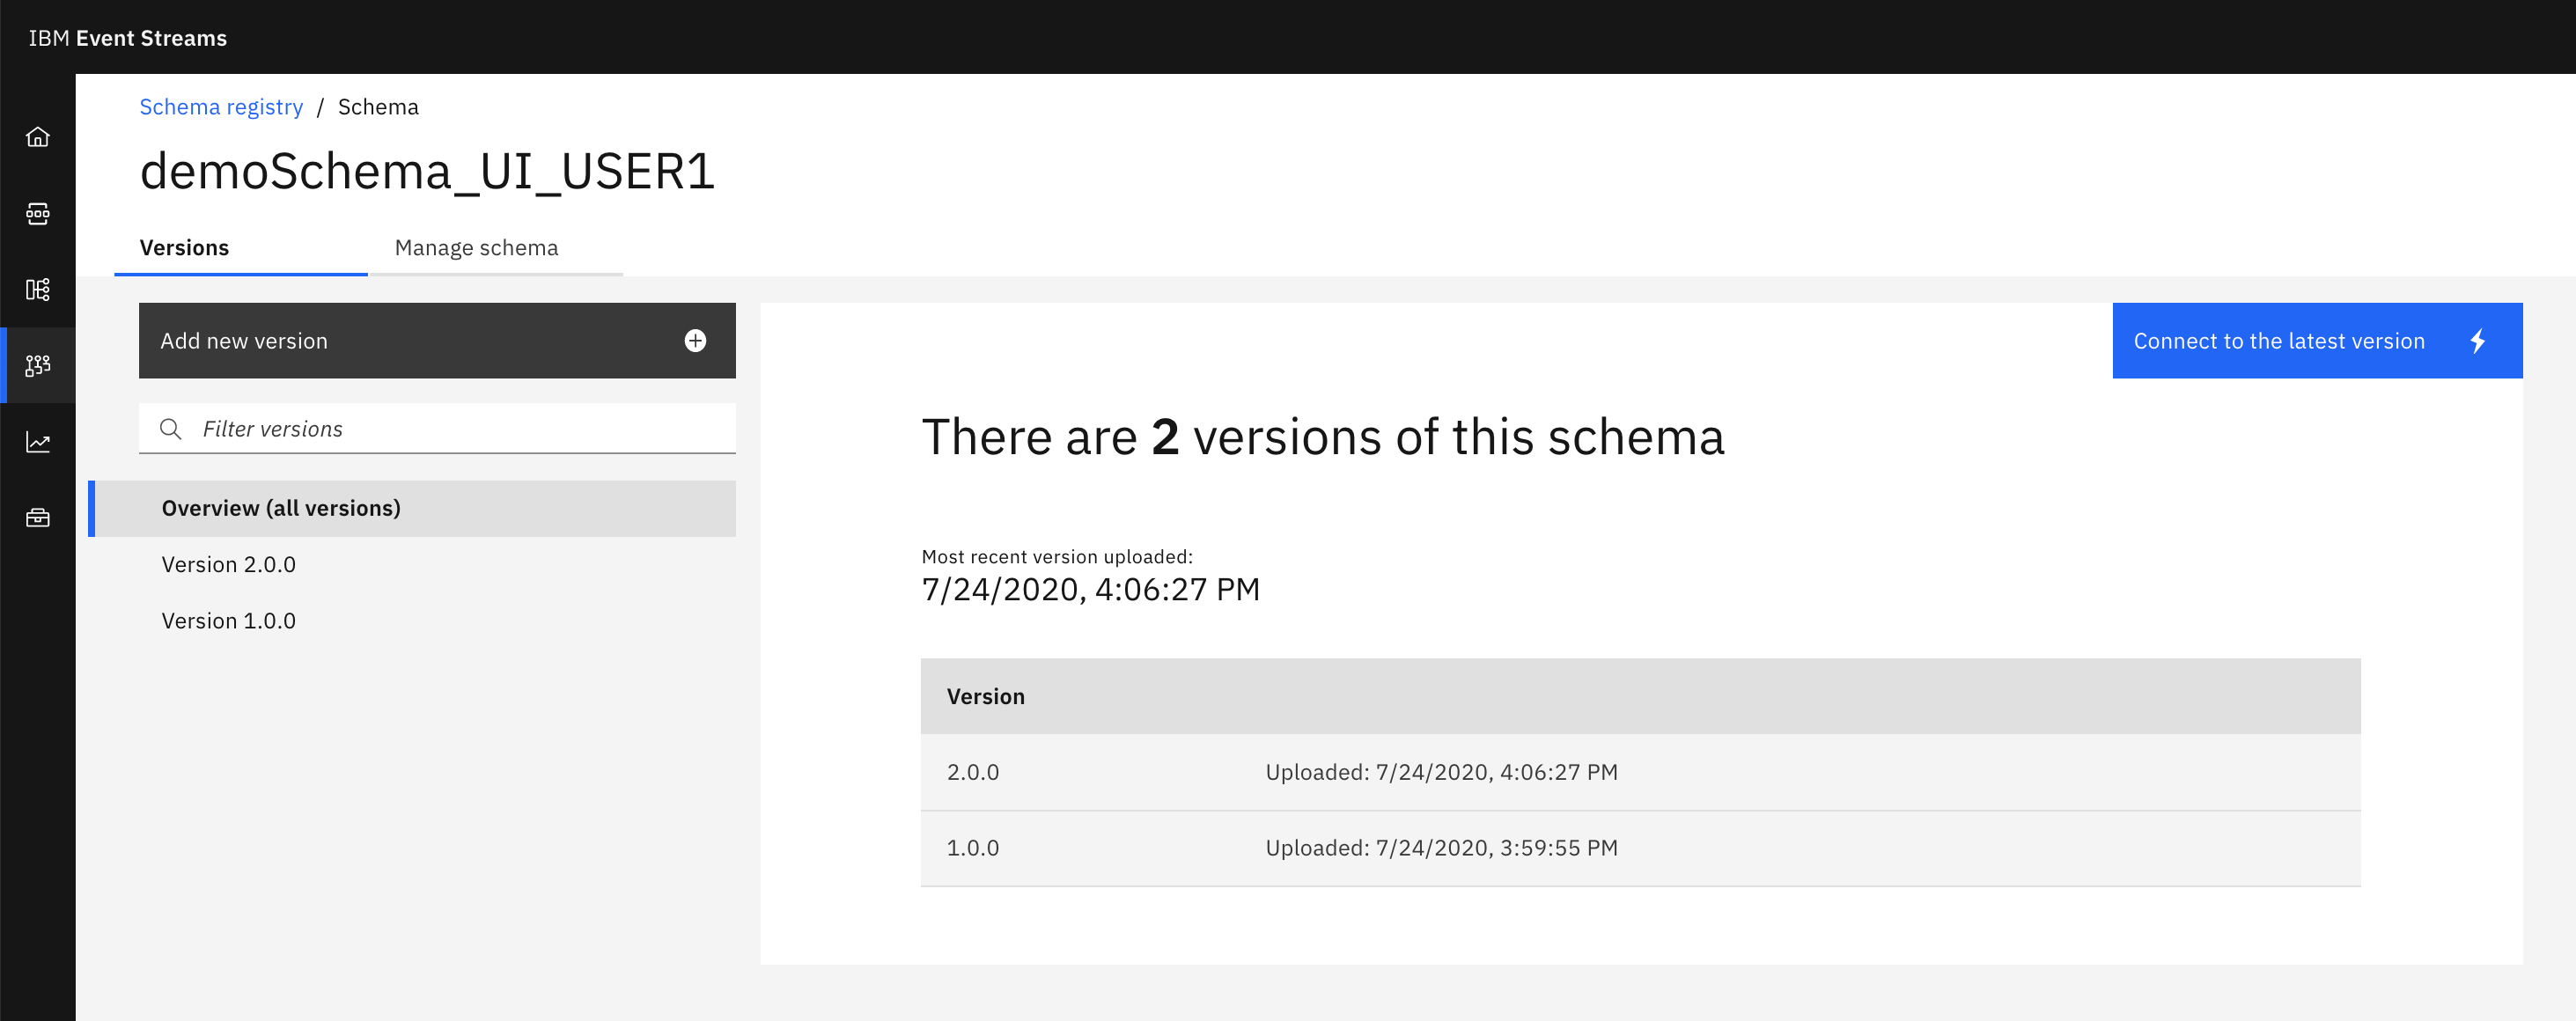
Listing all versions of a schema
UI
To list all versions of schema in the Schema Registry user interface, you simply need to click on the data schema you want and a new page will display these:
CLI
In order to display all versions of a schema, run the following command:
cloudctl es schema demoSchema_CLI_USER1

Schema demoSchema_CLI_USER1 is active.

Version   Version ID   Schema                 State    Updated                         Comment
1.0.0     1            demoSchema_CLI_USER1   active   Fri, 24 Jul 2020 14:00:45 UTC
2.0.0     2            demoSchema_CLI_USER1   active   Fri, 24 Jul 2020 14:09:37 UTC
OK
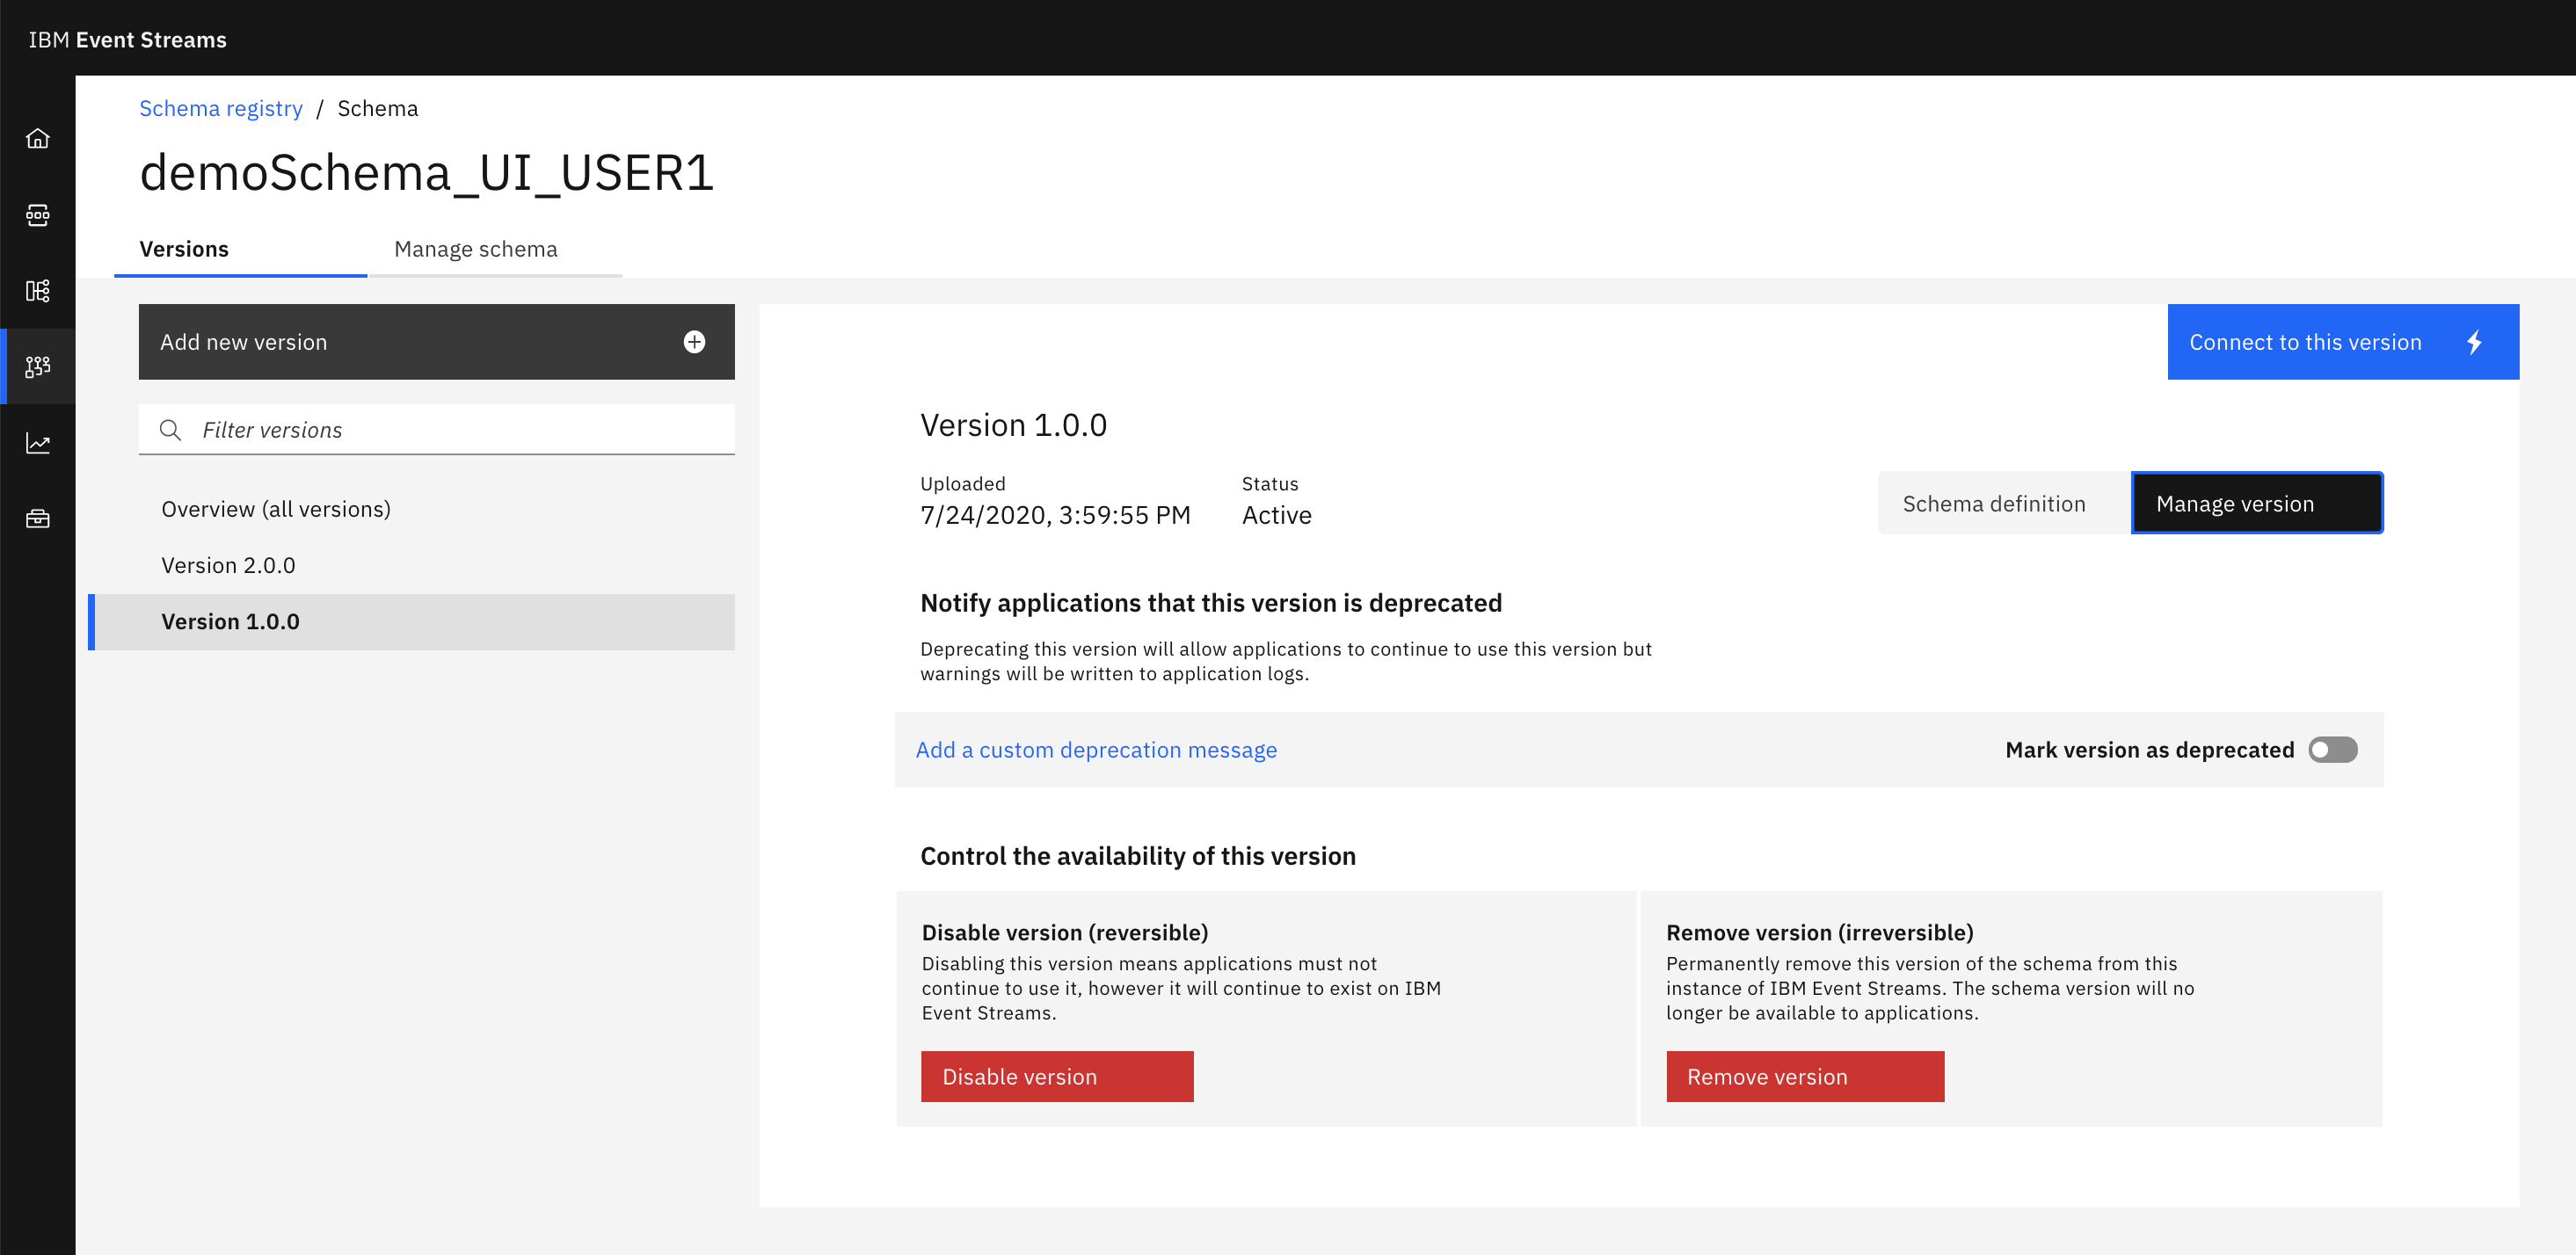
Deleting a version of a schema
UI
In order to delete a version of a schema using the Schema Registry user interface,
- Click on the data schema you want a version of it deleted for.
- Select the version you want to delete on the left hand side.
- Click on Manage version button that is on the top right corner within the main box in the center of the page.
-
Click on Remove version.
CLI
In order to delete a version of a schema through the CLI, execute the following command:
cloudctl es schema-remove demoSchema_CLI_USER1 --version 1

Remove version with ID 1 of schema demoSchema_CLI_USER1? [y/n]> y
Version with ID 1 of schema demoSchema_CLI_USER1 removed.
OK
We can see only version 2 now:
cloudctl es schema demoSchema_CLI_USER1

Schema demoSchema_CLI_USER1 is active.

Version   Version ID   Schema                 State    Updated                         Comment
2.0.0     2            demoSchema_CLI_USER1   active   Fri, 24 Jul 2020 14:09:37 UTC
OK
IBM Event Streams Credentials
We have seen how to interact with the IBM Event Streams Schema Registry in order to create, delete, update, etc schemas that our applications will theoretically used for data correctness and application robusteness. However, the first thing that we need to set up in our IBM Event Streams instance are these applications' service credentials to be able to interact with IBM Event Streams and its Schema Registry. For doing so, we can either use either the GUI or the CLI.
GUI
-
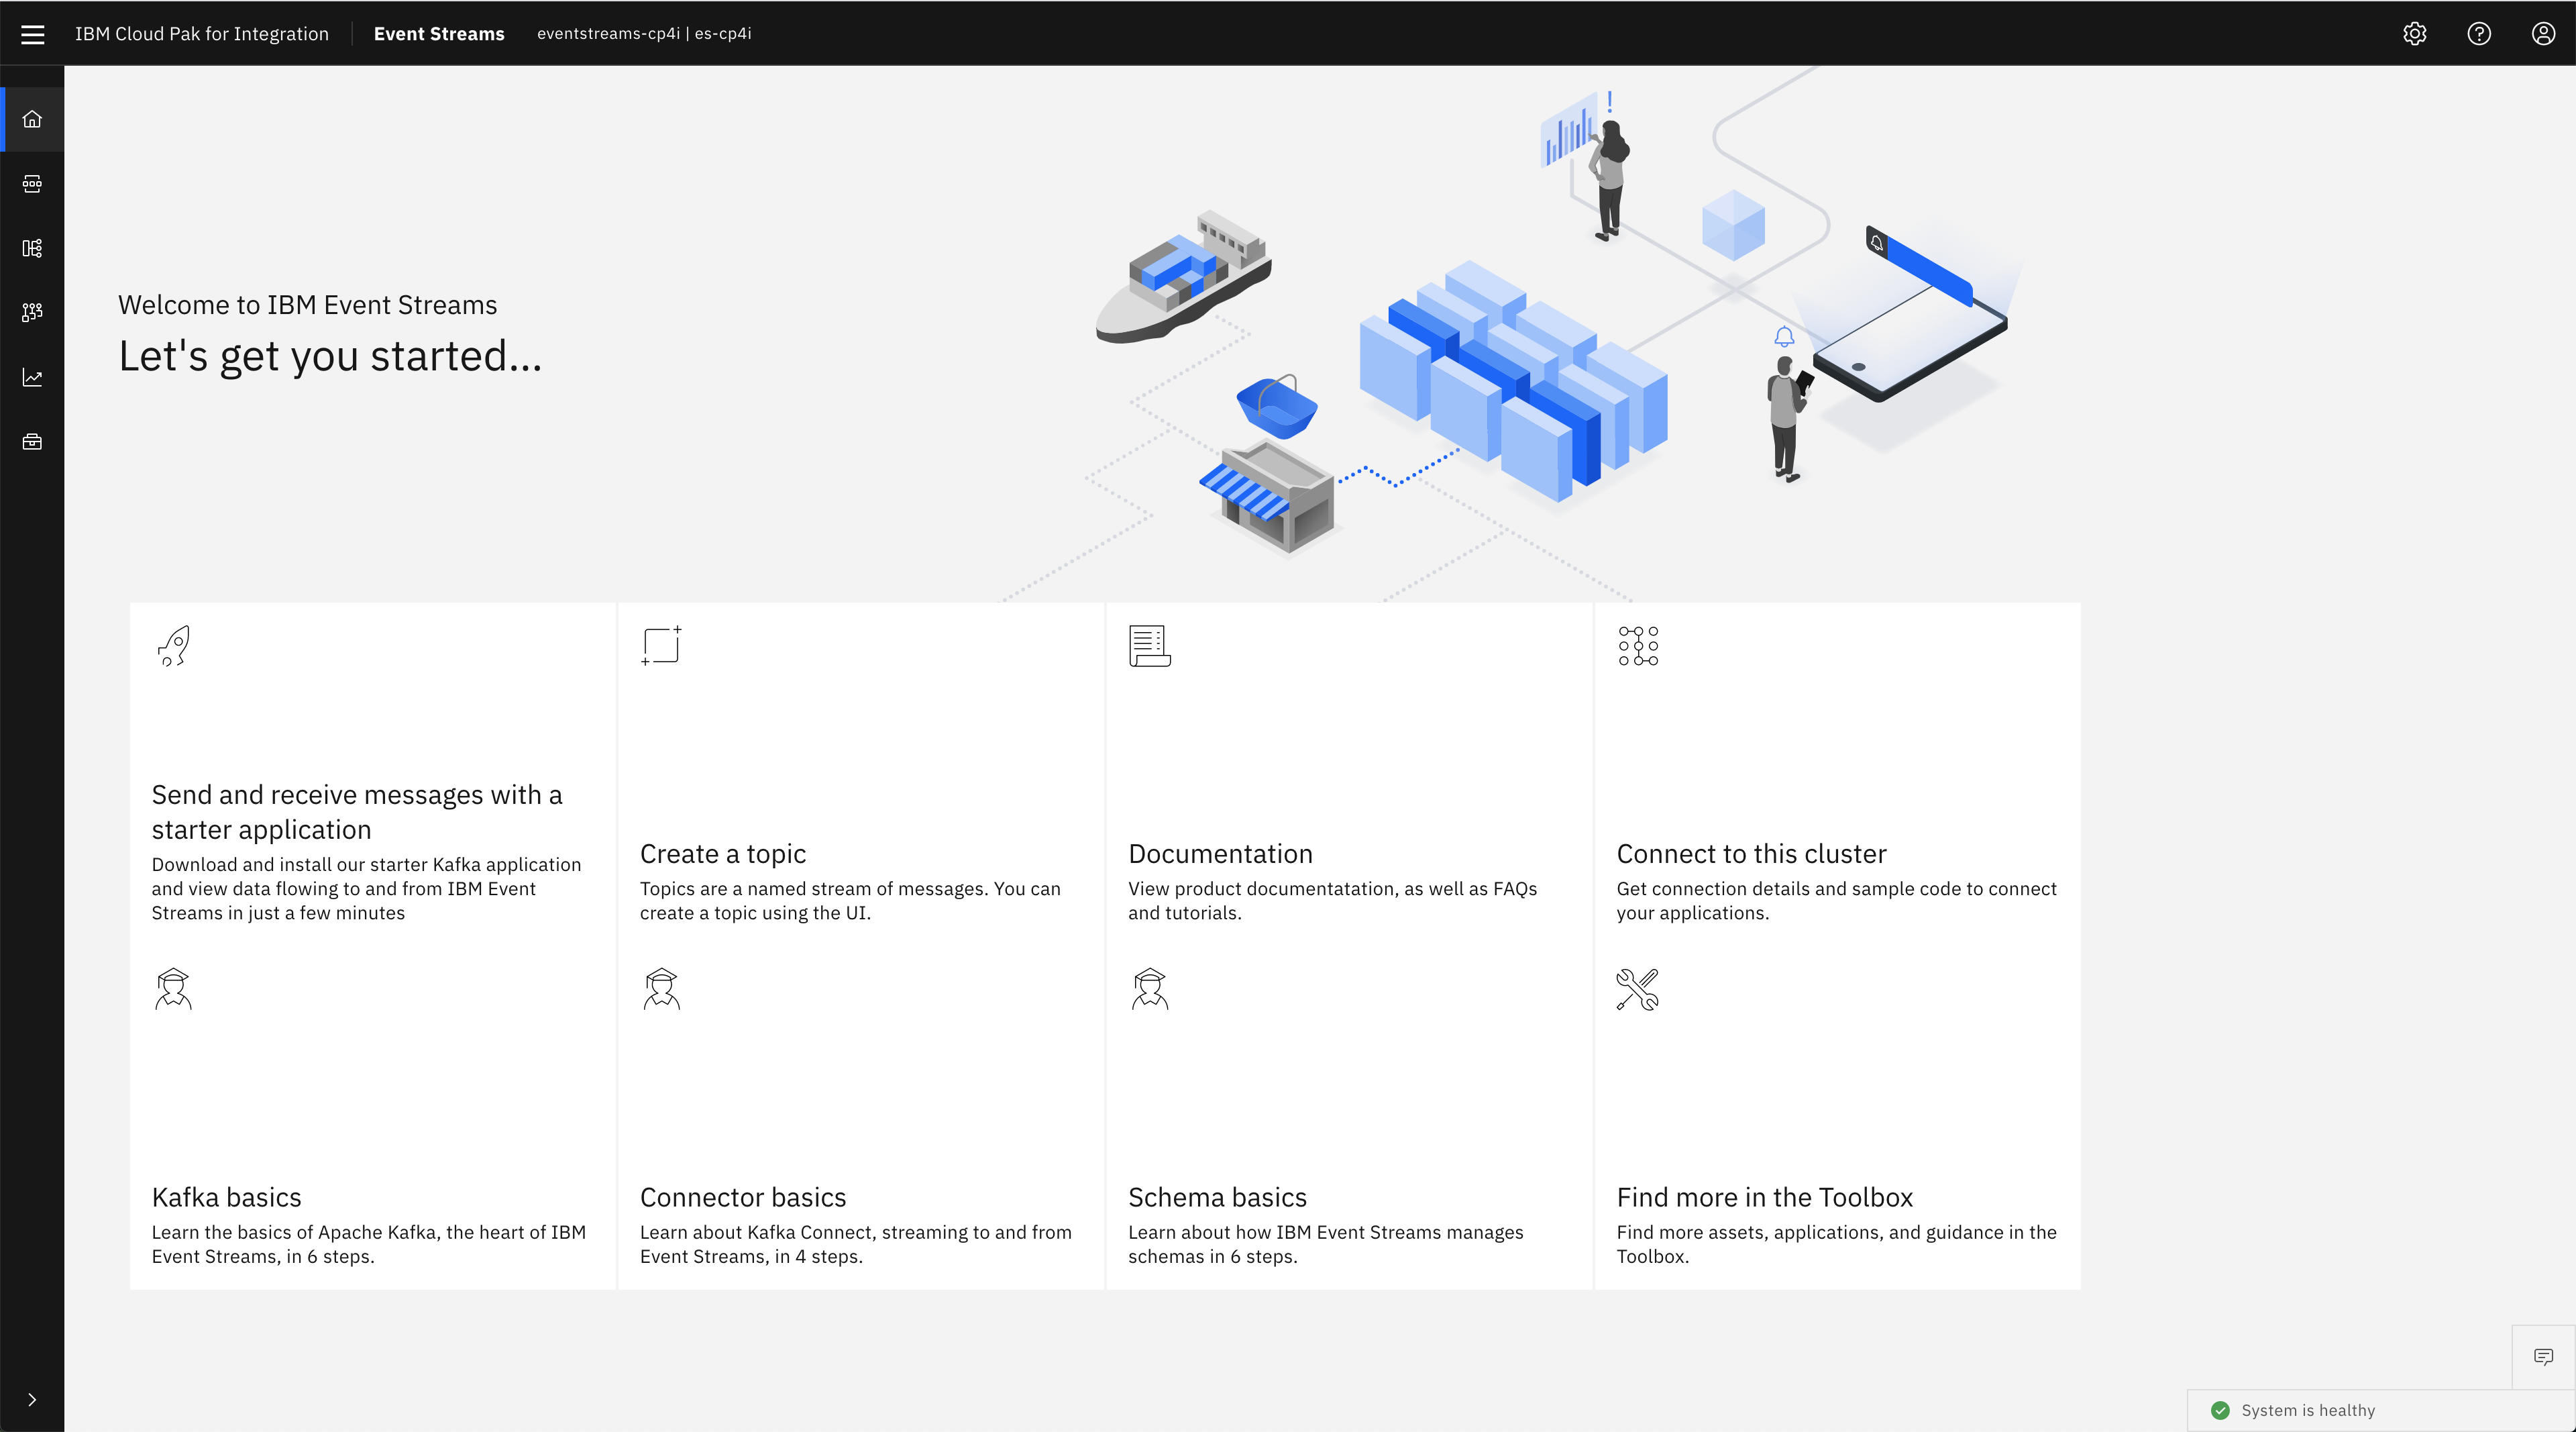
Go to you IBM Event Streams instance console
-
Click on Connect to this cluster
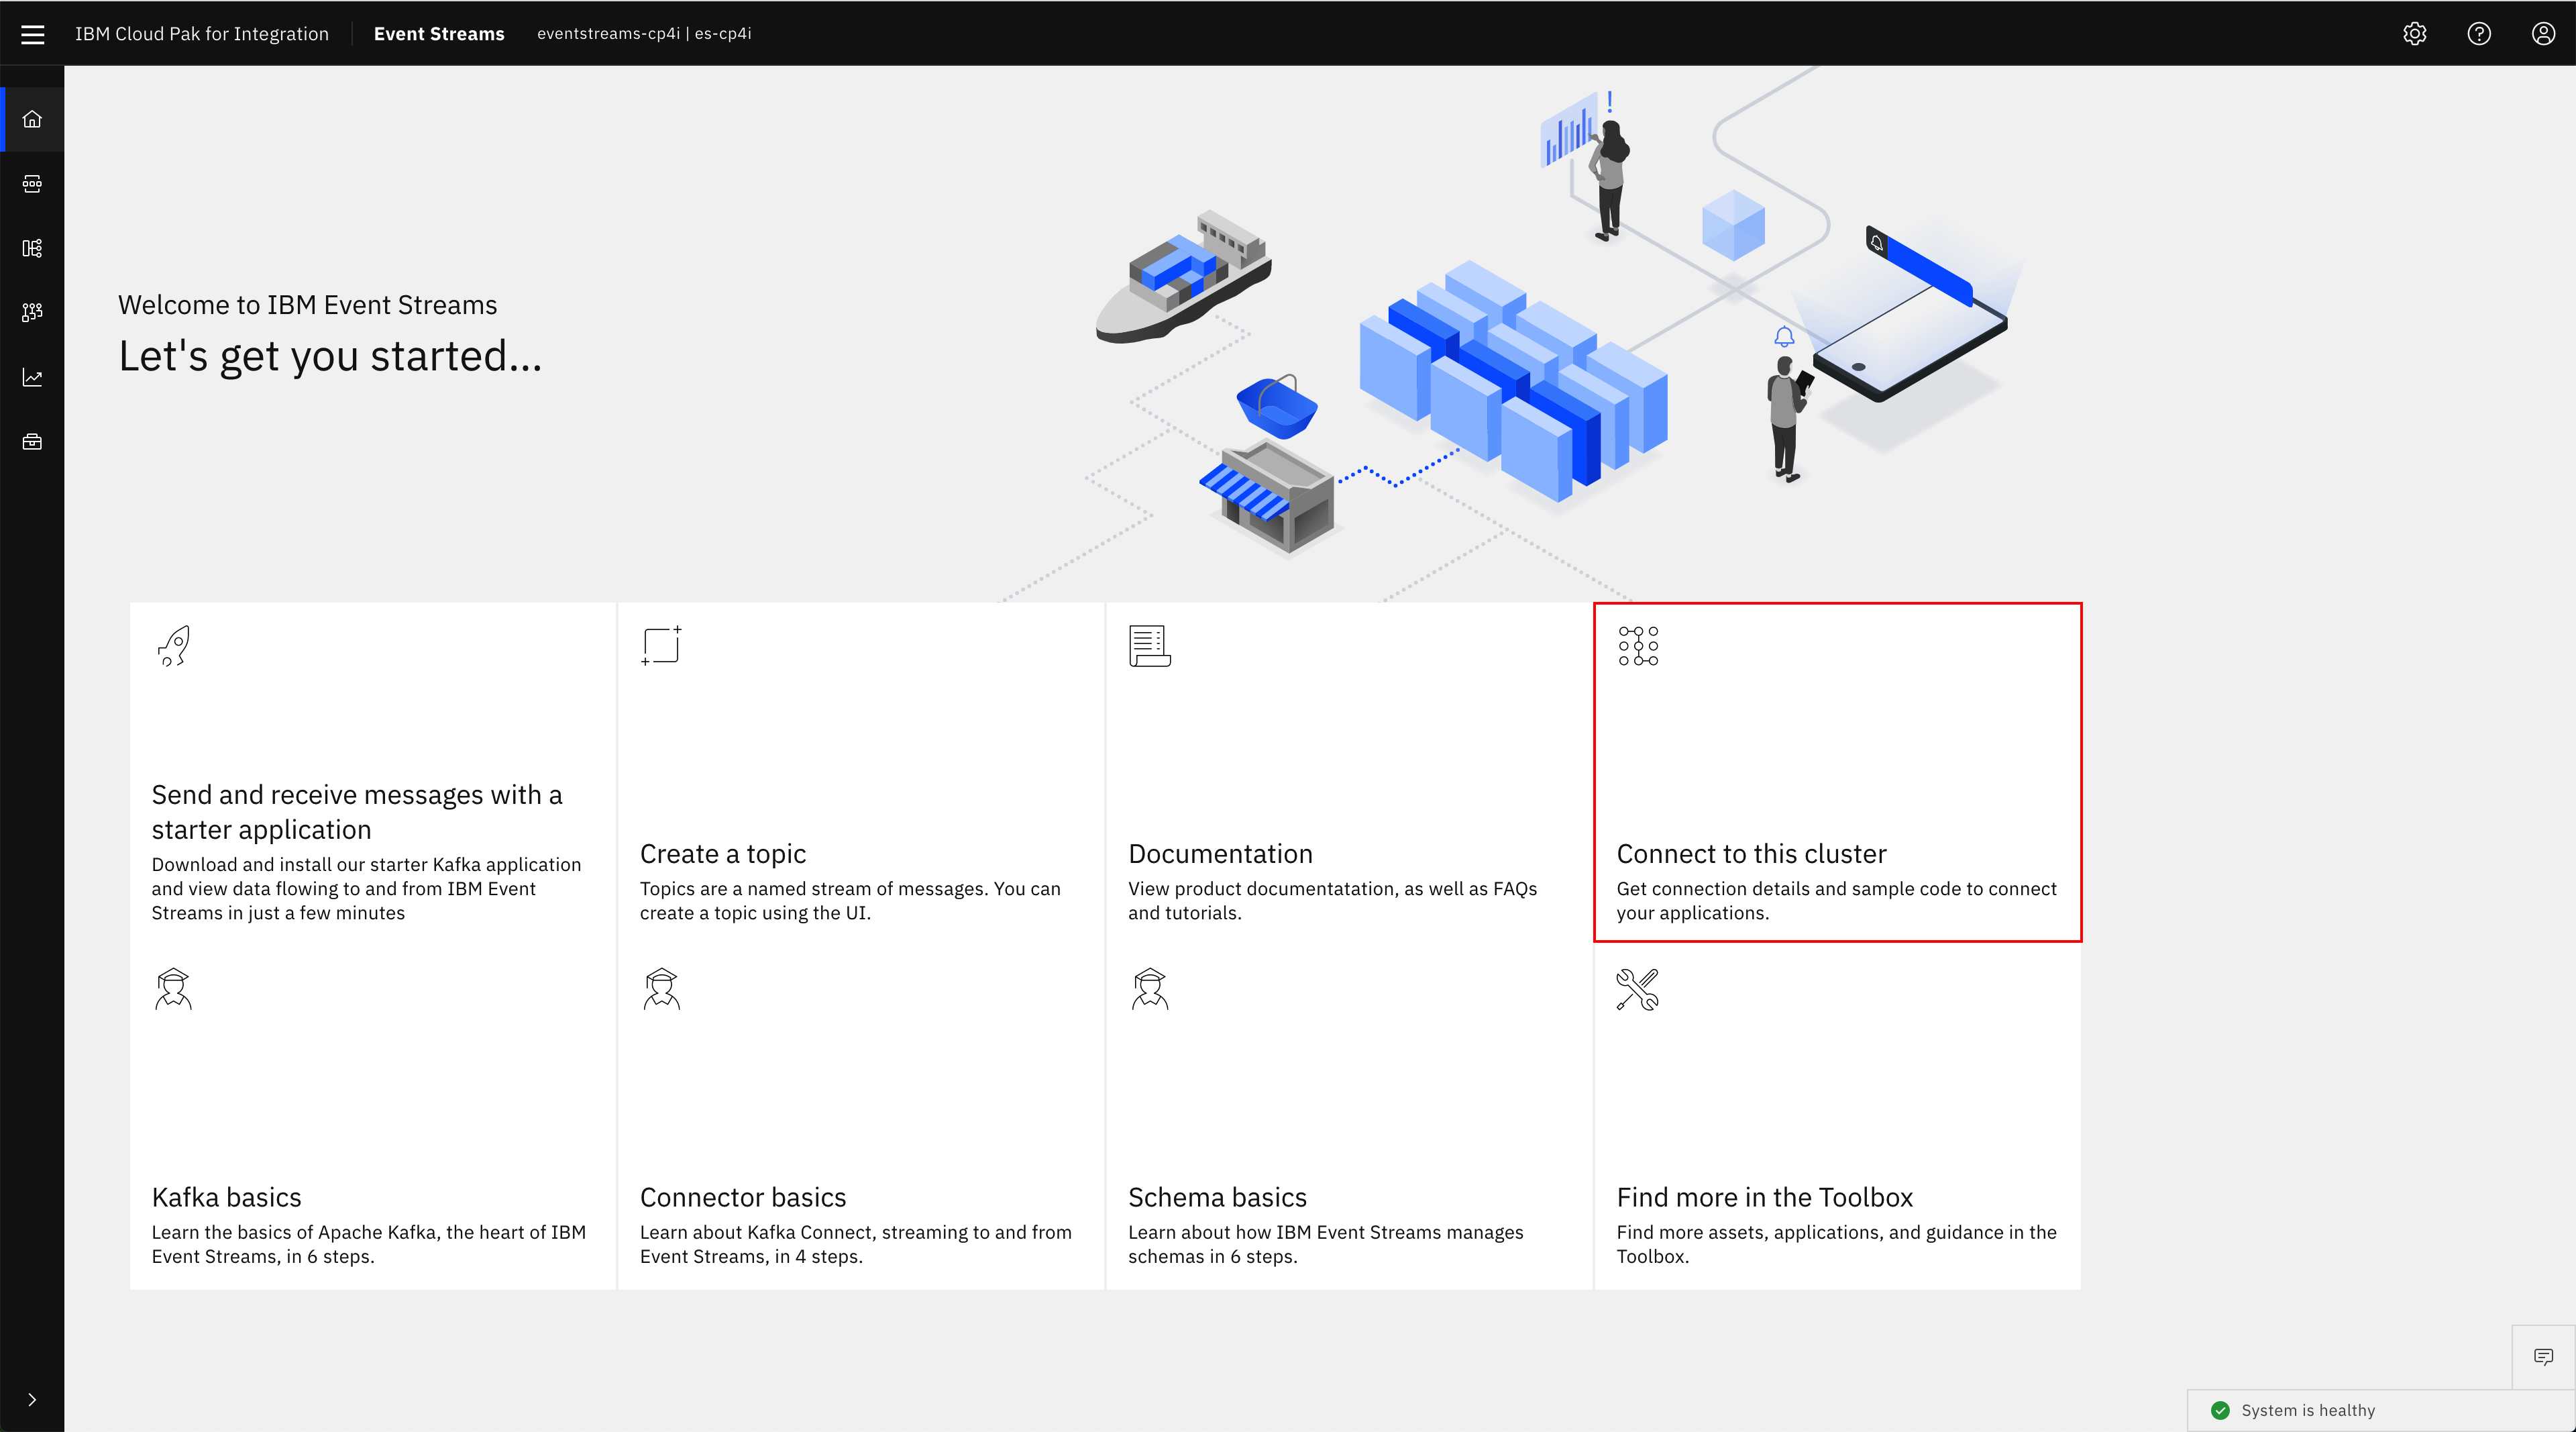
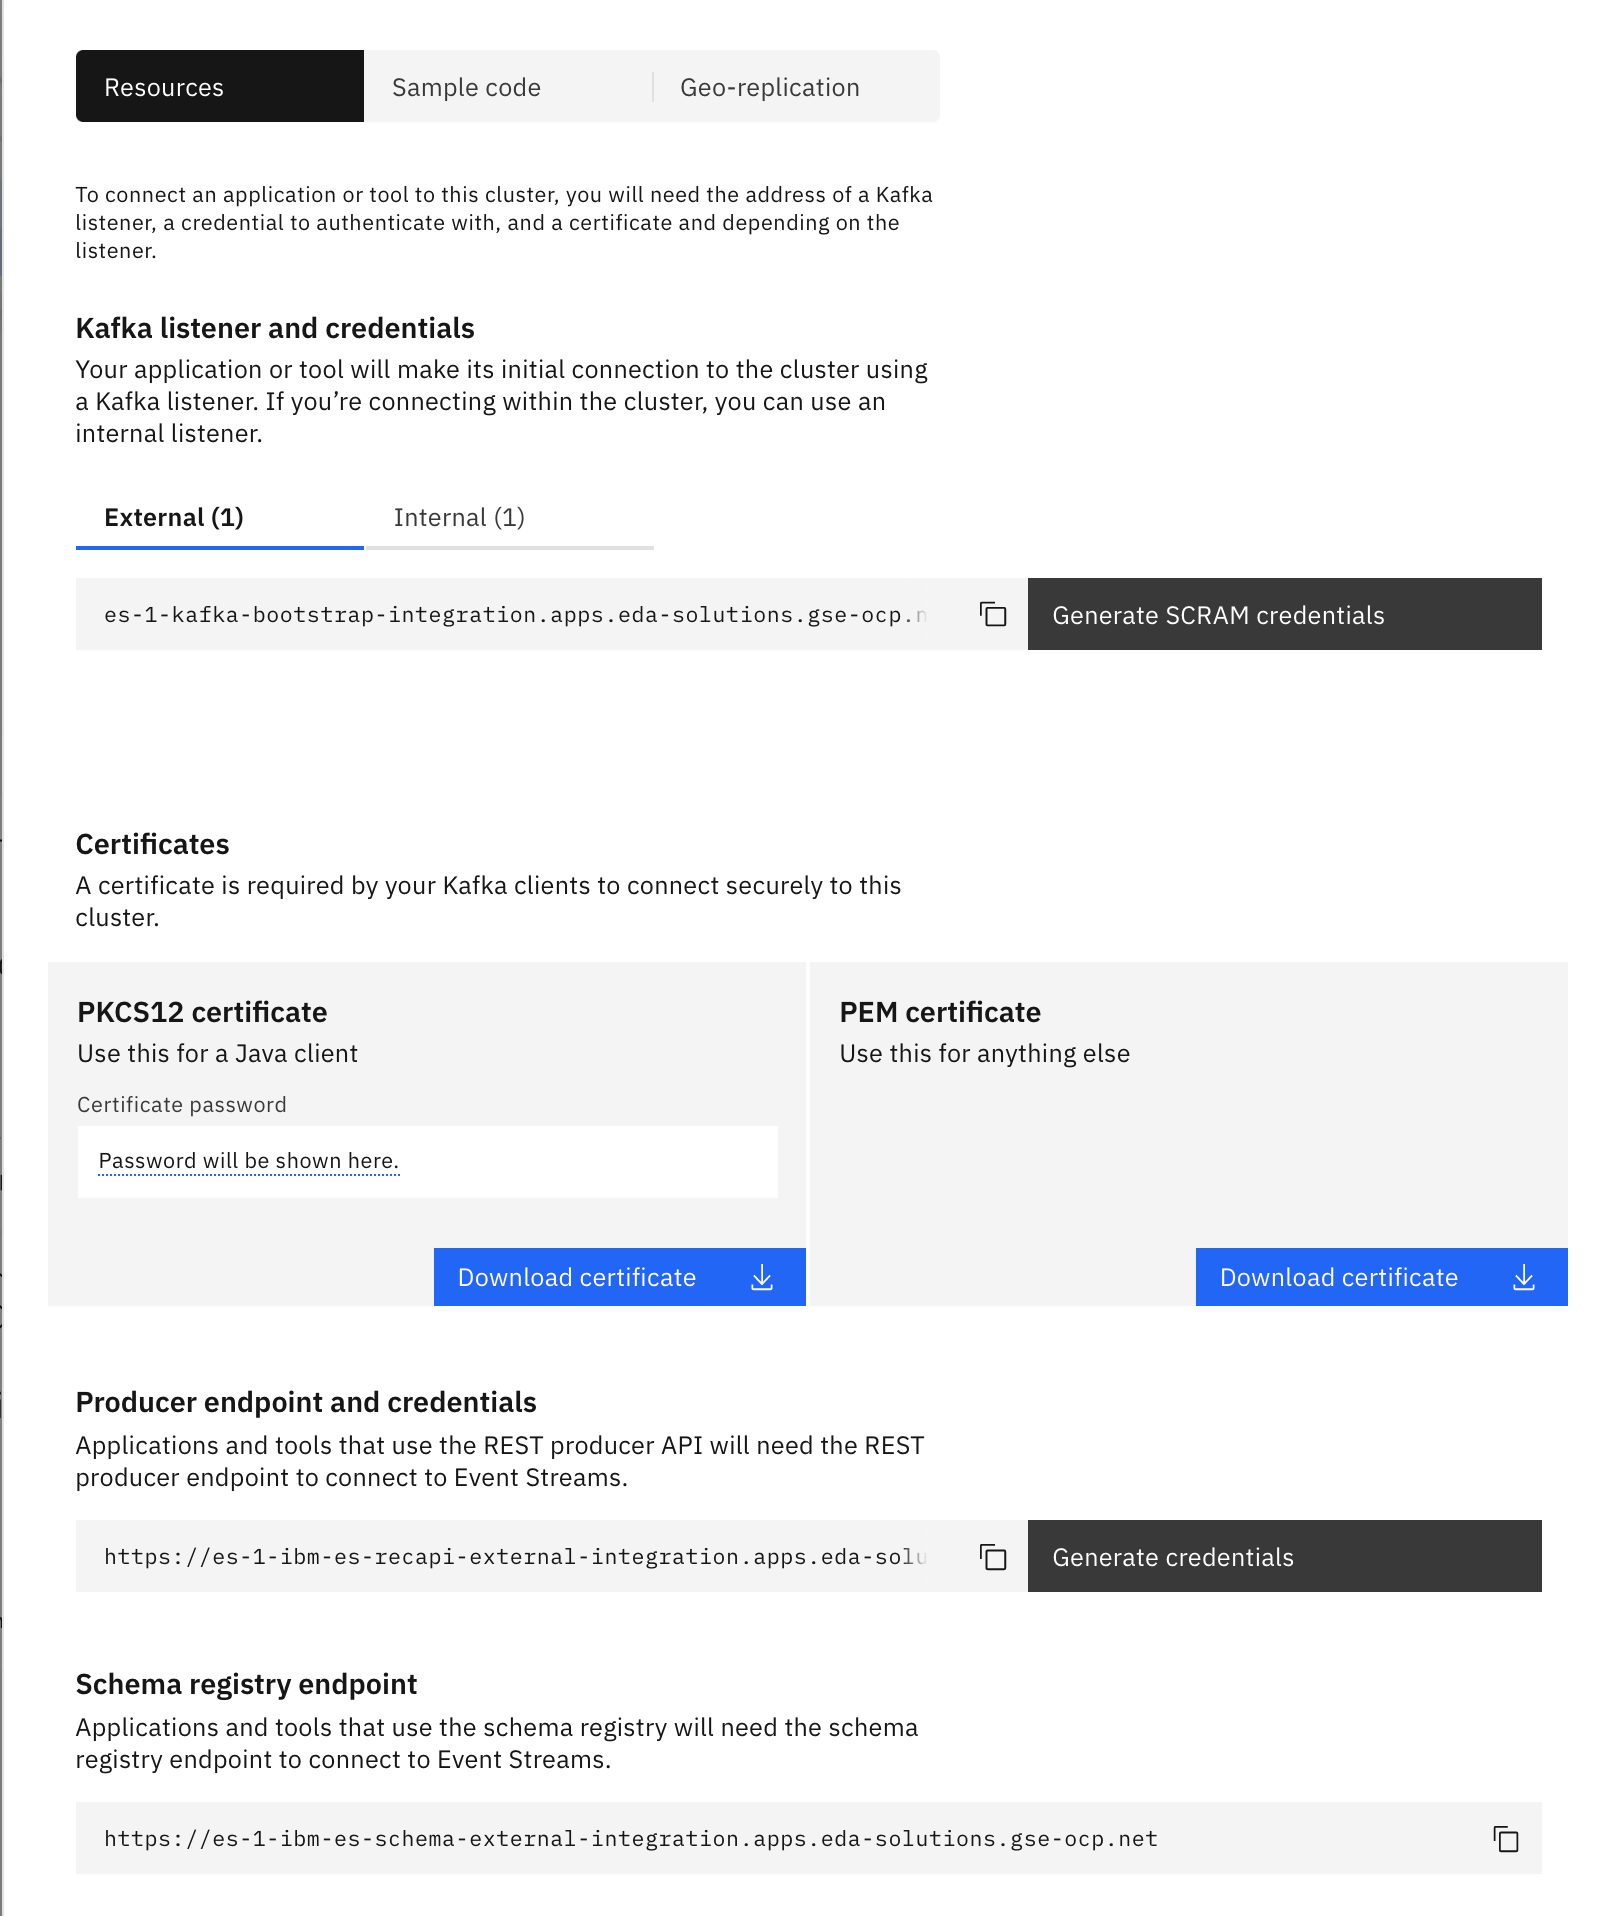
In this panel, you will find
- The Botstrap server to connect your applications to in order to send and receive messages from your IBM Event Streams instance. We can see we have one external listener (whith SCRAM-SHA authentication) and one internal listener (Depending your IBM Event Streams installation you might have different listeners and authentications for these).
- The Schema Registry url your applications will need to work with Apache Avro data schemas.
- A Generate SCRAM credentials button to generate the SCRAM credentials your applications will need to authenticate with.
-
A Certificates section to download either the Java PKCS12 or the PEM certificates (or both) that your applications will need in order to be able to establish the communitaction with your IBM Event Streams instance.
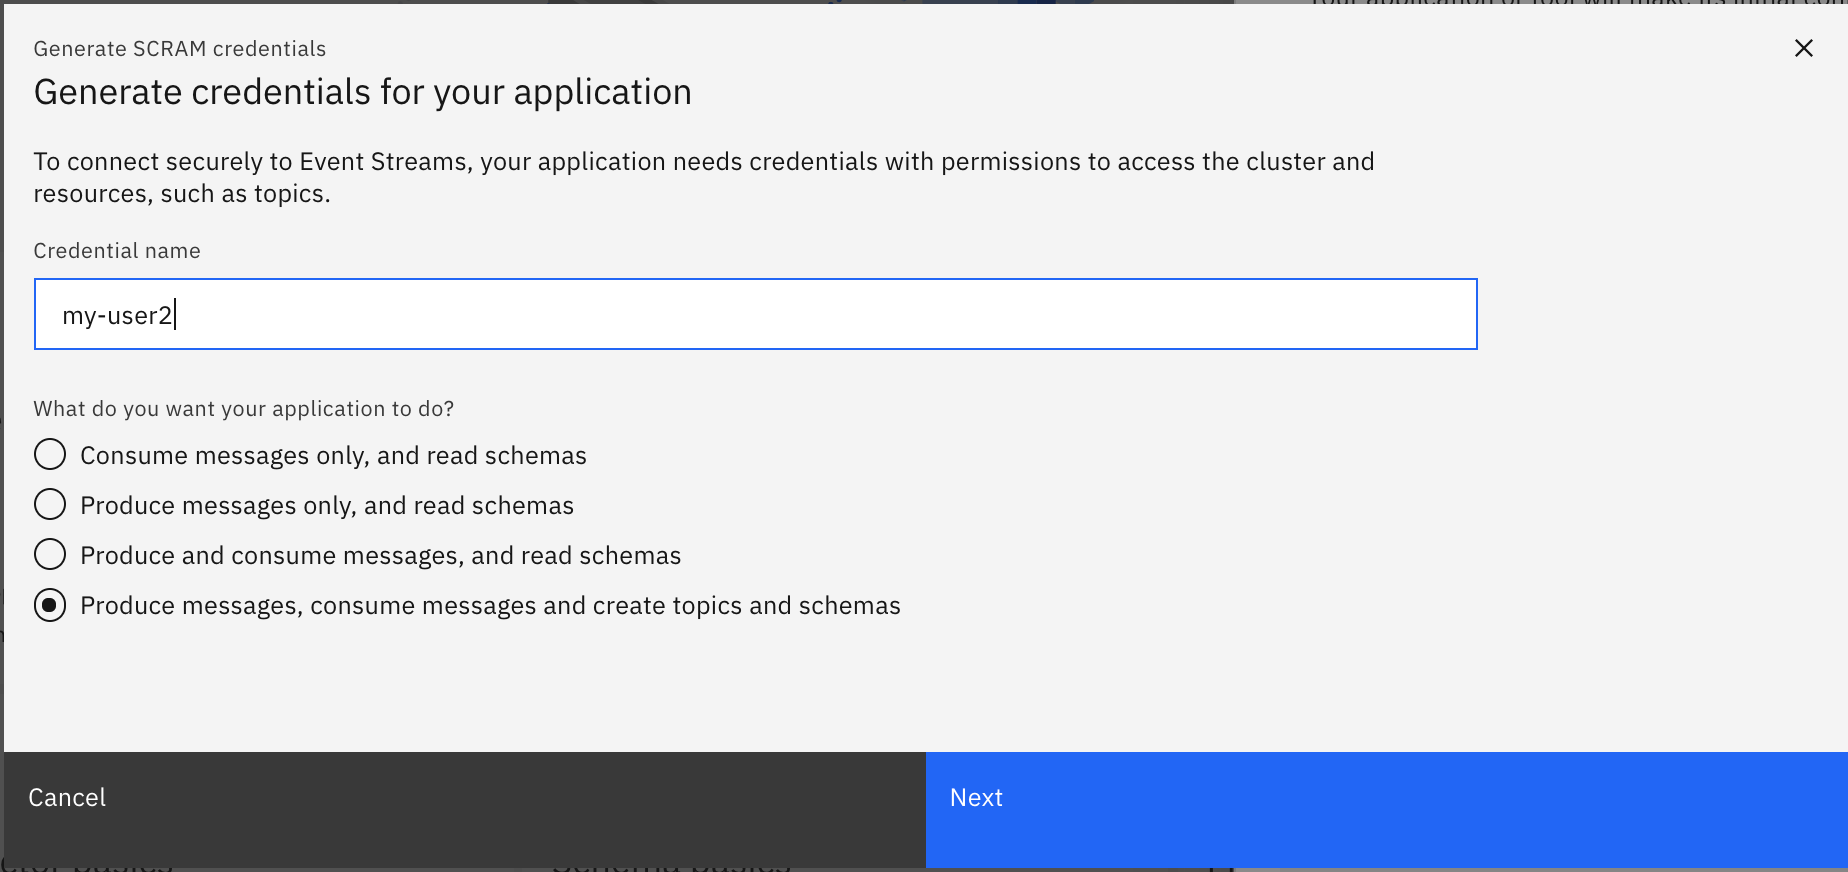
To generate the SCRAM credentials needed by your application to get authenticated against IBM Event Streams to be able to produce and consume messages as well as to create, delete, etc topics and schemas, we need to create a KafkaUser (this happens behind the scenes) which we will set some permissions and get the corresponding SCRAM usernname and password for to be used in our applications kafka clients configuration:
- Click on Generate SCRAM credentials
-
Enter a user name for your credentials and click next (leave the last option selected: Produce messages, consume messages and create topics and schemas so that we give full access to our user for simplicity)
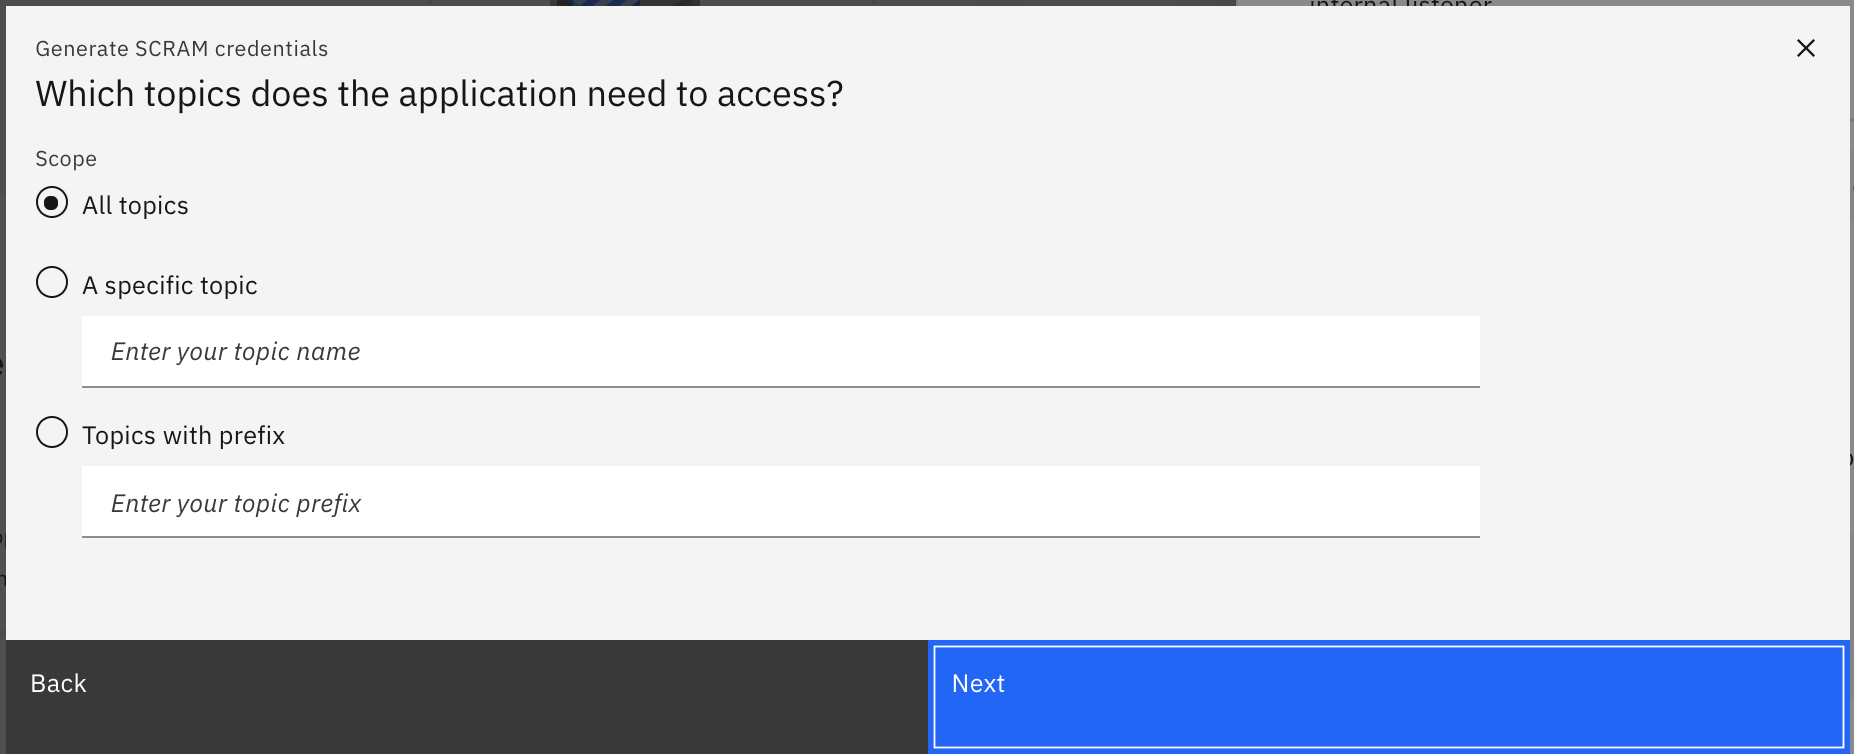
-
Select all topics and click next
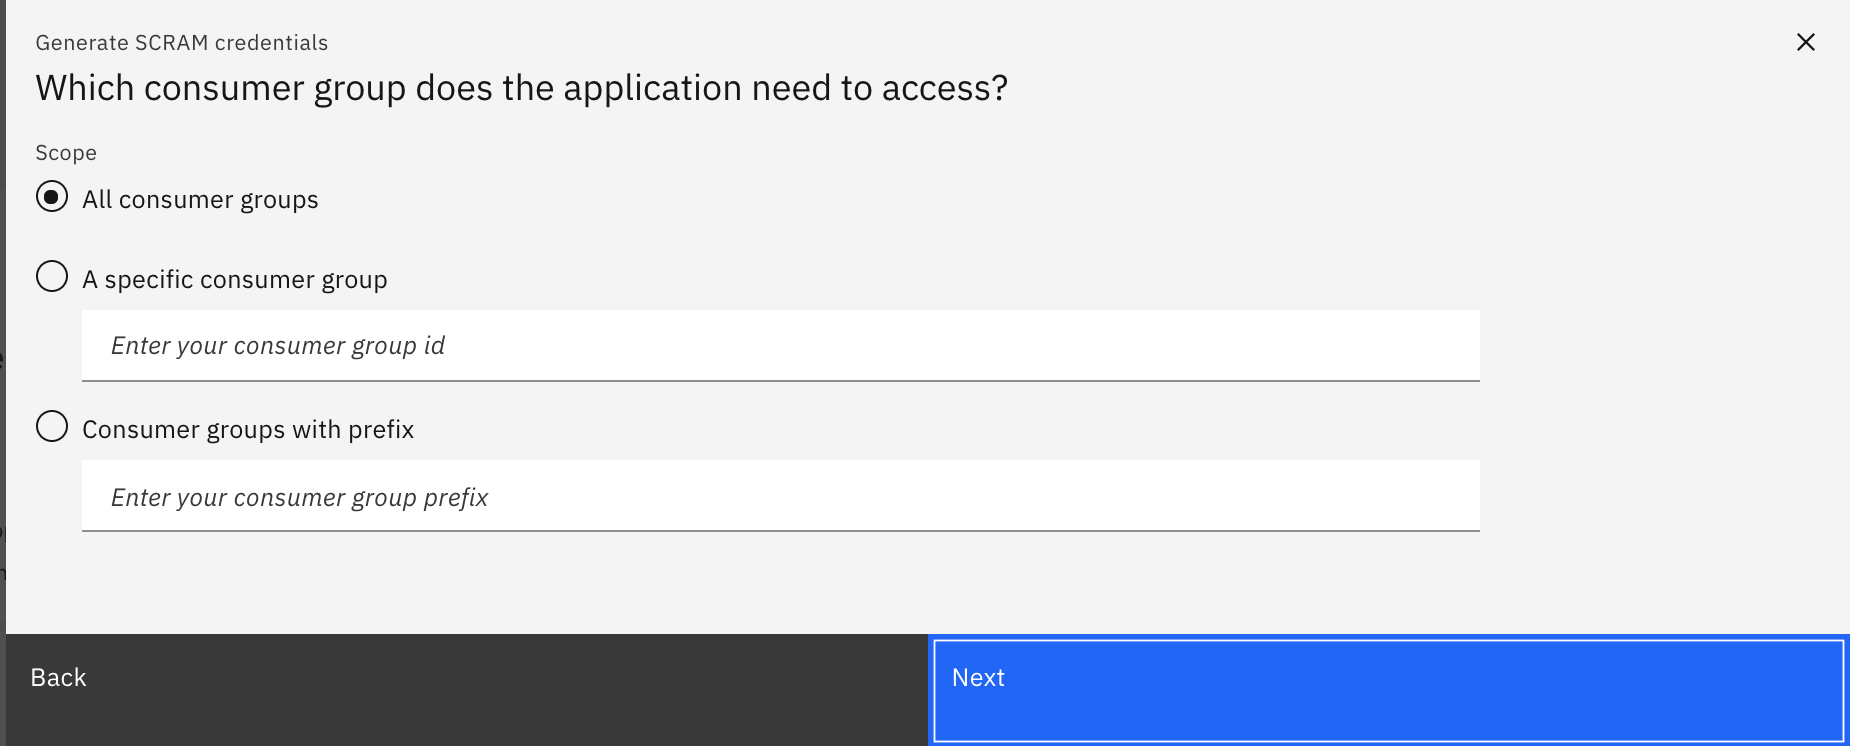
-
Select all consumer groups and click next
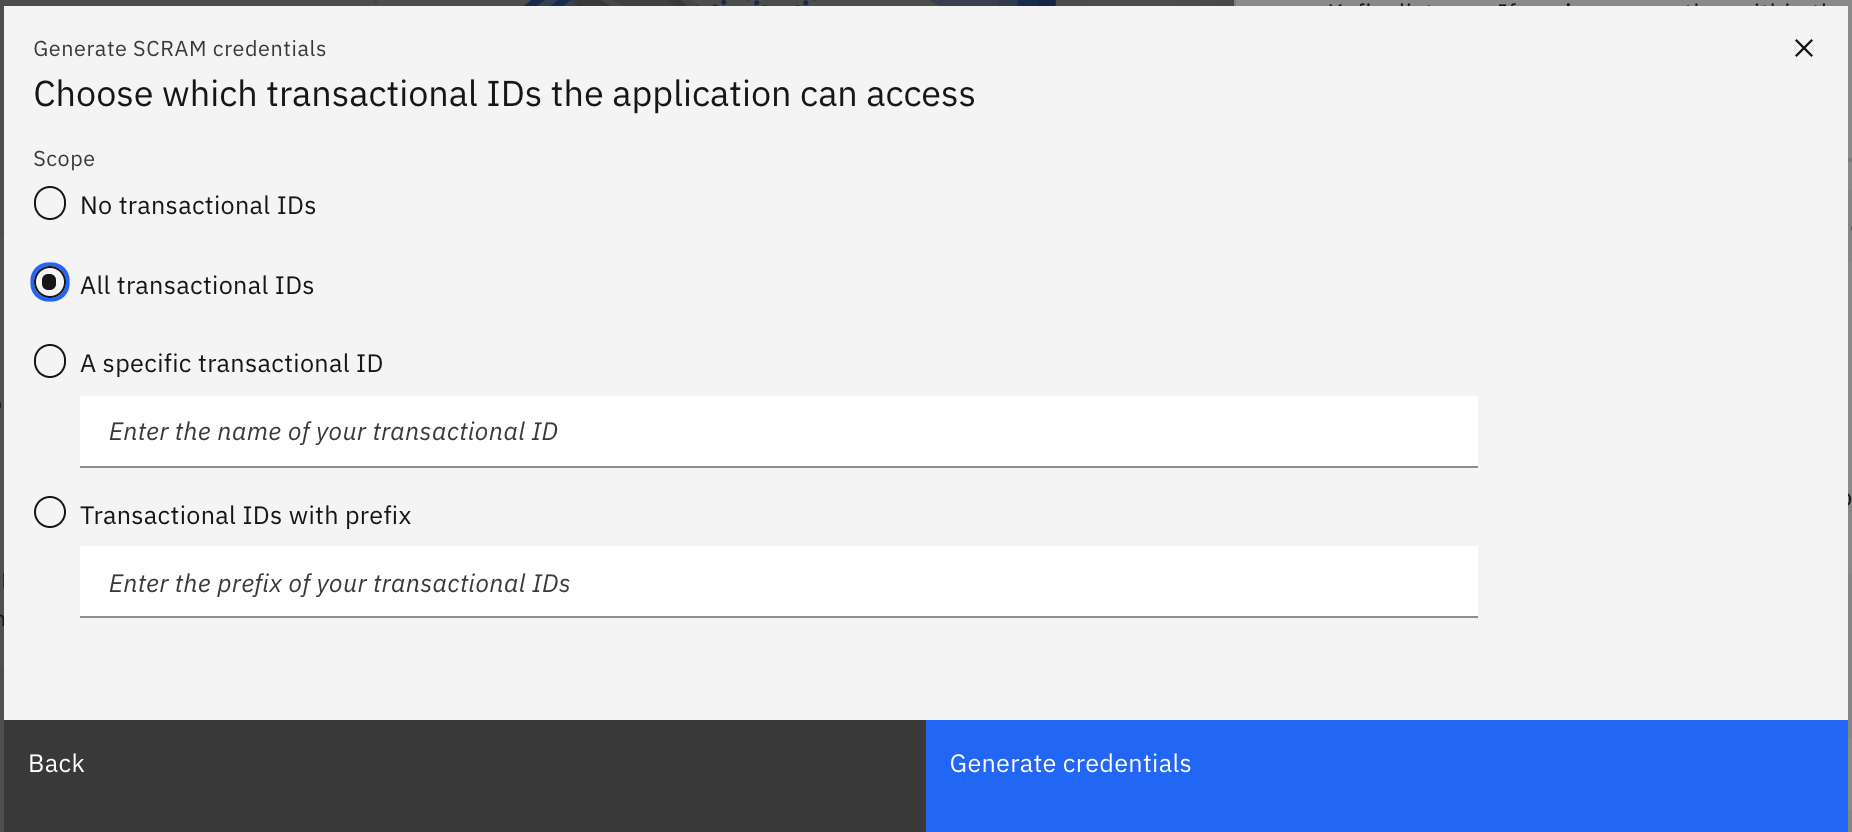
-
Select all transactional IDs and click next
Once you have created your new KafkaUser, you get the SCRAM credentials displayed on the screen:
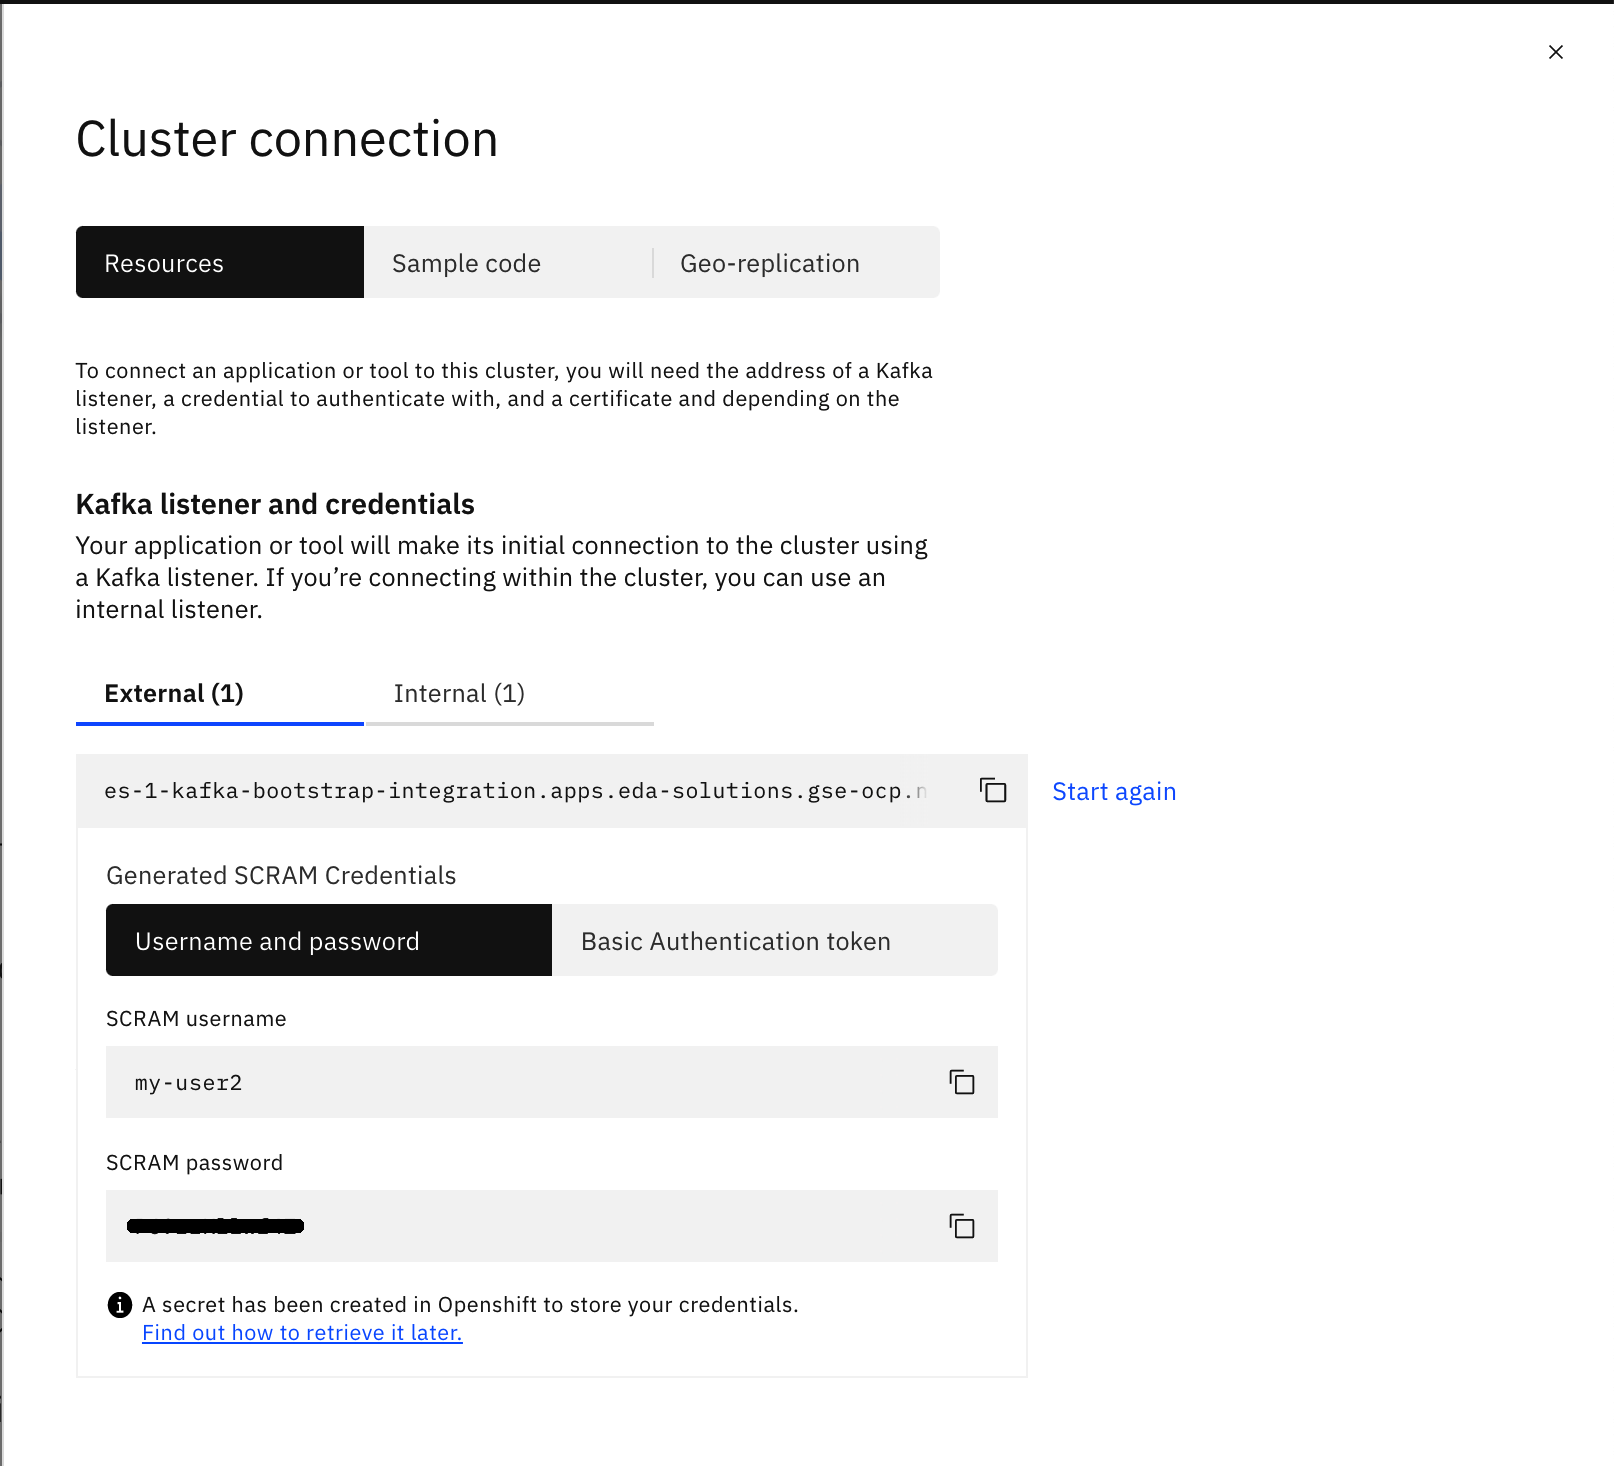
You can download the PEM certificate from the UI and then use the IBM Cloud Shell upload file option on the top bar or you can download it from within your IBM Cloud Shell by using the CLI (see below)
CLI
The following two steps should have been completed already in the previous Accessing the Schema Registry section
-
Log into your cluster with the IBM CloudPak CLI
cloudctl login -a https://cp-console.apps.eda-solutions.gse-ocp.net --skip-ssl-validation Username> admin Password> Authenticating... OK Targeted account mycluster Account Enter a namespace > integration Targeted namespace integration Configuring kubectl ... Property "clusters.mycluster" unset. Property "users.mycluster-user" unset. Property "contexts.mycluster-context" unset. Cluster "mycluster" set. User "mycluster-user" set. Context "mycluster-context" created. Switched to context "mycluster-context". OK Configuring helm: /Users/jesusalmaraz/.helm OK -
Initialize the Event Streams CLI plugin
cloudctl es init

IBM Cloud Platform Common Services endpoint:   https://cp-console.apps.eda-solutions.gse-ocp.net
Namespace:                                     integration
Name:                                          es-1
IBM Cloud Pak for Integration UI address:      No instance of Cloud Pak for Integration has been found. Please check that you have access to it.
Event Streams API endpoint:                    https://es-1-ibm-es-admapi-external-integration.apps.eda-solutions.gse-ocp.net
Event Streams API status:                      OK
Event Streams UI address:                      https://es-1-ibm-es-ui-integration.apps.eda-solutions.gse-ocp.net
Event Streams Schema Registry endpoint:        https://es-1-ibm-es-schema-external-integration.apps.eda-solutions.gse-ocp.net
Event Streams bootstrap address:               es-1-kafka-bootstrap-integration.apps.eda-solutions.gse-ocp.net:443
OK
We can see above the Event Streams bootstrap address and Schema Registry url that our applications will need in order to connect to this Event Streams instance
To be able to establish communication and authenticate against your IBM Event Streams instance, you will need the PEM certificate and an the SCRAM credentials:
-
To download your PEM certificate, you can use the following command:
-
To generate your SCRAM credentials, we first need to create a KafkaUser, you can use the following command:
cloudctl es kafka-user-create --name my-user1 --consumer --producer --schema-topic-create --all-topics --all-groups --all-txnids --auth-type scram-sha-512

KafkaUser name   Authentication   Authorization   Username                                                Secret
my-user1         scram-sha-512    simple          EntityOperator has not created corresponding username   EntityOperator has not created corresponding secret

Resource type     Name        Pattern type   Host   Operation
topic             *           literal        *      Read
topic             __schema_   prefix         *      Read
topic             *           literal        *      Write
topic             *           literal        *      Create
topic             __schema_   prefix         *      Alter
group             *           literal        *      Read
transactionalId   *           literal        *      Write

Created KafkaUser my-user1.
OK
We recommend to carefully set appropriate roles as well as access to topics, groups, transaction IDs and schemas for the API keys that you generate.
When a KafkaUser custom resource is created, the Entity Operator within Event Streams will create the principal in ZooKeeper with appropriate ACL entries. It will also create a Kubernetes Secret that contains the Base64-encoded SCRAM password for the scram-sha-512 authentication type, or the Base64-encoded certificates and keys for the tls authentication type.
-
Retrieve the username and the secret name containing the password of your SCRAM credentials for your KafkaUser:
1. Retrieve the password of your SCRAM credentials from the secret above:
Environment variables
Now that we have generated the appropriate IBM Event Streams credentials for applications to be able to establish communication and authenticate against our IBM Event Streams instance, we are going to set some environment variables that will be used by our Python application:
-
KAFKA_BROKERS which should take the value of bootstrap server:
-
SCRAM_USERNAME which should take the value of the SCRAM username you have generated:
-
SCRAM_PASSWORD which should take the value of the SCRAM password you have generated:
-
PEM_CERT which should take the value of the location where the PEM certificate is within your IBM Cloud Shell:
Set the path appropriately to your IBM Cloud Shell
(*) Don't forget to download both the PEM certificate to your IBM Cloud Shell through the CLI or upload it to your IBM Cloud Shell from your laptop if you used the UI to get the certificate. Review previous section if needed.
-
SCHEMA_REGISTRY_URL which should be a combination of the SCRAM username, the SCRAM password and the Schema Registry url in the form of:
https://<SCRAM_username>:<SCRAM_password>@<Schema_Registry_url>
Python Application
The Python application we have built to see how to produce and consume messages (either plain messages or Avro encoded messages based on Avro Data Schemas) to and from an IBM Event Streams instance installed through the IBM Cloud Pak for Integration is public at the following GitHub repo: https://github.com/ibm-cloud-architecture/refarch-eda-tools/tree/master/labs/es-cp4i-schema-lab-v10
Clone
In order to use and work with this Python application, the first thing we need to do is to clone the GitHub repository where it is published.
-
Clone the github repository on your workstation on the location of your choice:
git clone https://github.com/ibm-cloud-architecture/refarch-eda-tools.git Cloning into 'refarch-eda-tools'... remote: Enumerating objects: 185, done. remote: Counting objects: 100% (185/185), done. remote: Compressing objects: 100% (148/148), done. remote: Total 185 (delta 23), reused 176 (delta 16), pack-reused 0 Receiving objects: 100% (185/185), 6.17 MiB | 4.61 MiB/s, done. Resolving deltas: 100% (23/23), done. -
Change directory into
refarch-eda-tools/labs/es-cp4i-schema-lab-v10to find the assets we will we working from now on for the python demo environment and few other scripts/applications:cd refarch-eda-tools/labs/es-cp4i-schema-lab-v10 $ ls -all total 240 drwxr-xr-x 9 user staff 288 20 May 19:33 . drwxr-xr-x 3 user staff 96 20 May 19:33 .. -rw-r--r-- 1 user staff 112578 20 May 19:33 README.md drwxr-xr-x 5 user staff 160 20 May 19:33 avro_files drwxr-xr-x 6 user staff 192 20 May 19:33 kafka drwxr-xr-x 6 user staff 192 20 May 19:33 src
In the next sections, we are going to briefly explain the implementation of this Python application so that you understand what is being done behind the scenes and more importantly, if you are a developer, how to do so.
Python Avro Producer
In this section we describe the Python scripts we will be using in order to be able to produce avro messages to a Kafka topic.
Produce Message
The python script that we will use to send an avro message to a Kafka topic is ProduceAvroMessage.py where we have the following:
-
A function to parse the arguments:
-
A function to create the event to be sent:
-
The main where we will:
- Parse the arguments
- Get the Avro schemas for the key and value of the event
- Create the Event to be sent
- Print it out for reference
- Create the Kafka Avro Producer and configure it
- Send the event
if __name__ == '__main__':
    # Get the Kafka topic name
    parseArguments()
    # Get the avro schemas for the message's key and value
    event_value_schema = getDefaultEventValueSchema(DATA_SCHEMAS)
    event_key_schema = getDefaultEventKeySchema(DATA_SCHEMAS)
    # Create the event
    event_value, event_key = createEvent()
    # Print out the event to be sent
    print("--- Event to be published: ---")
    print(event_key)
    print(event_value)
    print("----------------------------------------")
    # Create the Kafka Avro Producer
    kafka_producer = KafkaProducer(KAFKA_BROKERS,SCRAM_USERNAME,SCRAM_PASSWORD,SCHEMA_REGISTRY_URL)
    # Prepare the Kafka Avro Producer
    kafka_producer.prepareProducer("ProduceAvroMessagePython",event_key_schema,event_value_schema)
    # Publish the event
    kafka_producer.publishEvent(TOPIC_NAME,event_value,event_key)
As you can see, this python code depends on an Avro Utils for loading the Avro schemas and a Kafka Avro Producer to send the messages. These are explained next.
Avro Utils
This script, called avroEDAUtils.py, contains some very simple utility functions to be able to load Avro schemas from their avsc files in order to be used by the Kafka Avro Producer.
-
A function to get the key and value Avro schemas for the messages to be sent:
(*) Wheredef getDefaultEventValueSchema(schema_files_location): # Get the default event value data schema known_schemas = avro.schema.Names() default_event_value_schema = LoadAvsc(schema_files_location + "/default_value.avsc", known_schemas) return default_event_value_schema def getDefaultEventKeySchema(schema_files_location): # Get the default event key data schema known_schemas = avro.schema.Names() default_event_key_schema = LoadAvsc(schema_files_location + "/default_key.avsc", known_schemas) return default_event_key_schemaknown_schemasis an Avro schema dictionary where all Avro schemas read get stored in order to be able to read nested Avro schemas afterwards. See the python script in detail for examples of this. -
A function to open a file, read its content as an Avro schema and store it in the Avro schema dictionary:
Kafka Avro Producer
This script, called KcAvroProducer.py, will actually be the responsible for creating the Kafka Avro Producer, initialize and configure it and provide the publish method:
-
Initialize and prepare the Kafka Producer
class KafkaProducer: def __init__(self,kafka_brokers = "",scram_username = "",scram_password = "",schema_registry_url = ""): self.kafka_brokers = kafka_brokers self.scram_username = scram_username self.scram_password = scram_password self.schema_registry_url = schema_registry_url def prepareProducer(self,groupID = "pythonproducers",key_schema = "", value_schema = ""): options ={ 'bootstrap.servers': self.kafka_brokers, 'schema.registry.url': self.schema_registry_url, 'group.id': groupID, 'security.protocol': 'SASL_SSL', 'sasl.mechanisms': 'SCRAM-SHA-512', 'sasl.username': self.scram_username, 'sasl.password': self.scram_password, 'ssl.ca.location': os.environ['PEM_CERT'], 'schema.registry.ssl.ca.location': os.environ['PEM_CERT'] } # Print out the configuration print("--- This is the configuration for the avro producer: ---") print(options) print("---------------------------------------------------") # Create the Avro Producer self.producer = AvroProducer(options,default_key_schema=key_schema,default_value_schema=value_schema) -
Publish method
def publishEvent(self, topicName, value, key):
    # Produce the Avro message
    # Important: value DOES NOT come in JSON format from ContainerAvroProducer.py. Therefore, we must convert it to JSON format first
    self.producer.produce(topic=topicName,value=json.loads(value),key=json.loads(value)[key], callback=self.delivery_report)
    # Flush
    self.producer.flush()
Python Avro Consumer
In this section we describe the python scripts we will be using in order to be able to consume Avro messages from a Kafka topic.
Consume Message
The python script that we will use to consume an Avro message from a Kafka topic is ConsumeAvroMessage.py where we have the following:
-
A function to parse arguments:
# Parse arguments to get the container ID to poll for def parseArguments(): global TOPIC_NAME print("The arguments for the script are: " , str(sys.argv)) if len(sys.argv) != 2: print("[ERROR] - The ConsumeAvroMessage.py script expects one arguments: The Kafka topic to events from.") exit(1) TOPIC_NAME = sys.argv[1] -
The main where we will:
- Parse the arguments to get the topic to read from
- Create the Kafka Consumer and configure it
- Poll for next avro message
- Close the Kafka consumer
if __name__ == '__main__':
    # Parse arguments
    parseArguments()
    # Create the Kafka Avro consumer
    kafka_consumer = KafkaConsumer(KAFKA_BROKERS,SCRAM_USERNAME,SCRAM_PASSWORD,TOPIC_NAME,SCHEMA_REGISTRY_URL)
    # Prepare the consumer
    kafka_consumer.prepareConsumer()
    # Consume next Avro event
    kafka_consumer.pollNextEvent()
    # Close the Avro consumer
    kafka_consumer.close()
As you can see, this python code depends on a Kafka Avro Consumer to consume messages. This is explained next.
Kafka Avro Consumer
This script, called KcAvroConsumer.py, will actually be the responsible for creating the Kafka Avro Consumer, initialize and configure it and provide the poll next event method:
-
Initialize and prepare the new Kafka consumer:
class KafkaConsumer: def __init__(self, kafka_brokers = "", scram_username = "",scram_password = "", topic_name = "", schema_registry_url = "", autocommit = True): self.kafka_brokers = kafka_brokers self.scram_username = scram_username self.scram_password = scram_password self.topic_name = topic_name self.schema_registry_url = schema_registry_url self.kafka_auto_commit = autocommit # See https://github.com/edenhill/librdkafka/blob/master/CONFIGURATION.md def prepareConsumer(self, groupID = "pythonconsumers"): options ={ 'bootstrap.servers': self.kafka_brokers, 'group.id': groupID, 'auto.offset.reset': 'earliest', 'schema.registry.url': self.schema_registry_url, 'enable.auto.commit': self.kafka_auto_commit, 'security.protocol': 'SASL_SSL', 'sasl.mechanisms': 'SCRAM-SHA-512', 'sasl.username': self.scram_username, 'sasl.password': self.scram_password, 'ssl.ca.location': os.environ['PEM_CERT'], 'schema.registry.ssl.ca.location': os.environ['PEM_CERT'] } # Print the configuration print("--- This is the configuration for the Avro consumer: ---") print(options) print("---------------------------------------------------") # Create the Avro consumer self.consumer = AvroConsumer(options) # Subscribe to the topic self.consumer.subscribe([self.topic_name]) -
Poll next event method:
# Prints out the message
def traceResponse(self, msg):
    print('[Message] - Next message consumed from {} partition: [{}] at offset {} with key {} and value {}'
                .format(msg.topic(), msg.partition(), msg.offset(), msg.key(), msg.value() ))

# Polls for next event
def pollNextEvent(self):
    # Poll for messages
    msg = self.consumer.poll(timeout=10.0)
    # Validate the returned message
    if msg is None:
        print("[INFO] - No new messages on the topic")
    elif msg.error():
        if ("PARTITION_EOF" in msg.error()):
            print("[INFO] - End of partition")
        else:
            print("[ERROR] - Consumer error: {}".format(msg.error()))
    else:
        # Print the message
        msgStr = self.traceResponse(msg)
Schemas and Messages
In this section we are going to see how Schema Registry works when you have an application that produces and consumes messages based on Avro data schemas. The application we are going to use for this is the python application presented above in the Python Avro Producer and Python Avro Consumer sections.
IMPORTANT: Before start using our Python application we must set the PYTHONPATH environment variable to point to where we have all the Python scripts that make up our application in order for Python to find these at execution time.
- Set the PYTHONPATH variable to the location where you cloned the GitHub repository containing the Python application we are going to be working with
Produce a message
In order to produce a message, we execute the ProduceAvroMessage.py. This script, as you could see in the Python Avro Producer section, is sending the event with key {'key': '1'} and value {'message': 'This is a test message'} according to the schemas defined in default_key.avsc and default_value.avsc for the key and value of the event respectively.
Make sure you are on the right path where the python scripts live: ~/refarch-eda-tools/labs/es-cp4i-schema-lab-v10/src
Change user1
python3 ProduceAvroMessage.py test-schema-user1

 @@@ Executing script: ProduceAvroMessage.py
The arguments for the script are:  ['ProduceAvroMessage.py', 'test-schema-user1']
Creating event...
DONE
--- Event to be published: ---
{"key": 1}
{"message": "This is a test message"}
----------------------------------------
--- This is the configuration for the avro producer: ---
{'bootstrap.servers': 'es-1-kafka-bootstrap-integration.apps.eda-solutions.gse-ocp.net:443', 'schema.registry.url': 'https://my-user1:*****@es-1-ibm-es-schema-external-integration.apps.eda-solutions.gse-ocp.net', 'group.id': 'ProduceAvroMessagePython', 'security.protocol': 'SASL_SSL', 'sasl.mechanisms': 'SCRAM-SHA-512', 'sasl.username': 'my-user1', 'sasl.password': '*****', 'ssl.ca.location': '/home/ALMARAZJ/es-cert.pem', 'schema.registry.ssl.ca.location': '/home/ALMARAZJ/es-cert.pem'}
---------------------------------------------------
Message delivered to test-schema-user1 [0]
We can see our new message delivered in the test-schema-user1 topic by
-
Go into the topics page in the IBM Event Streams UI
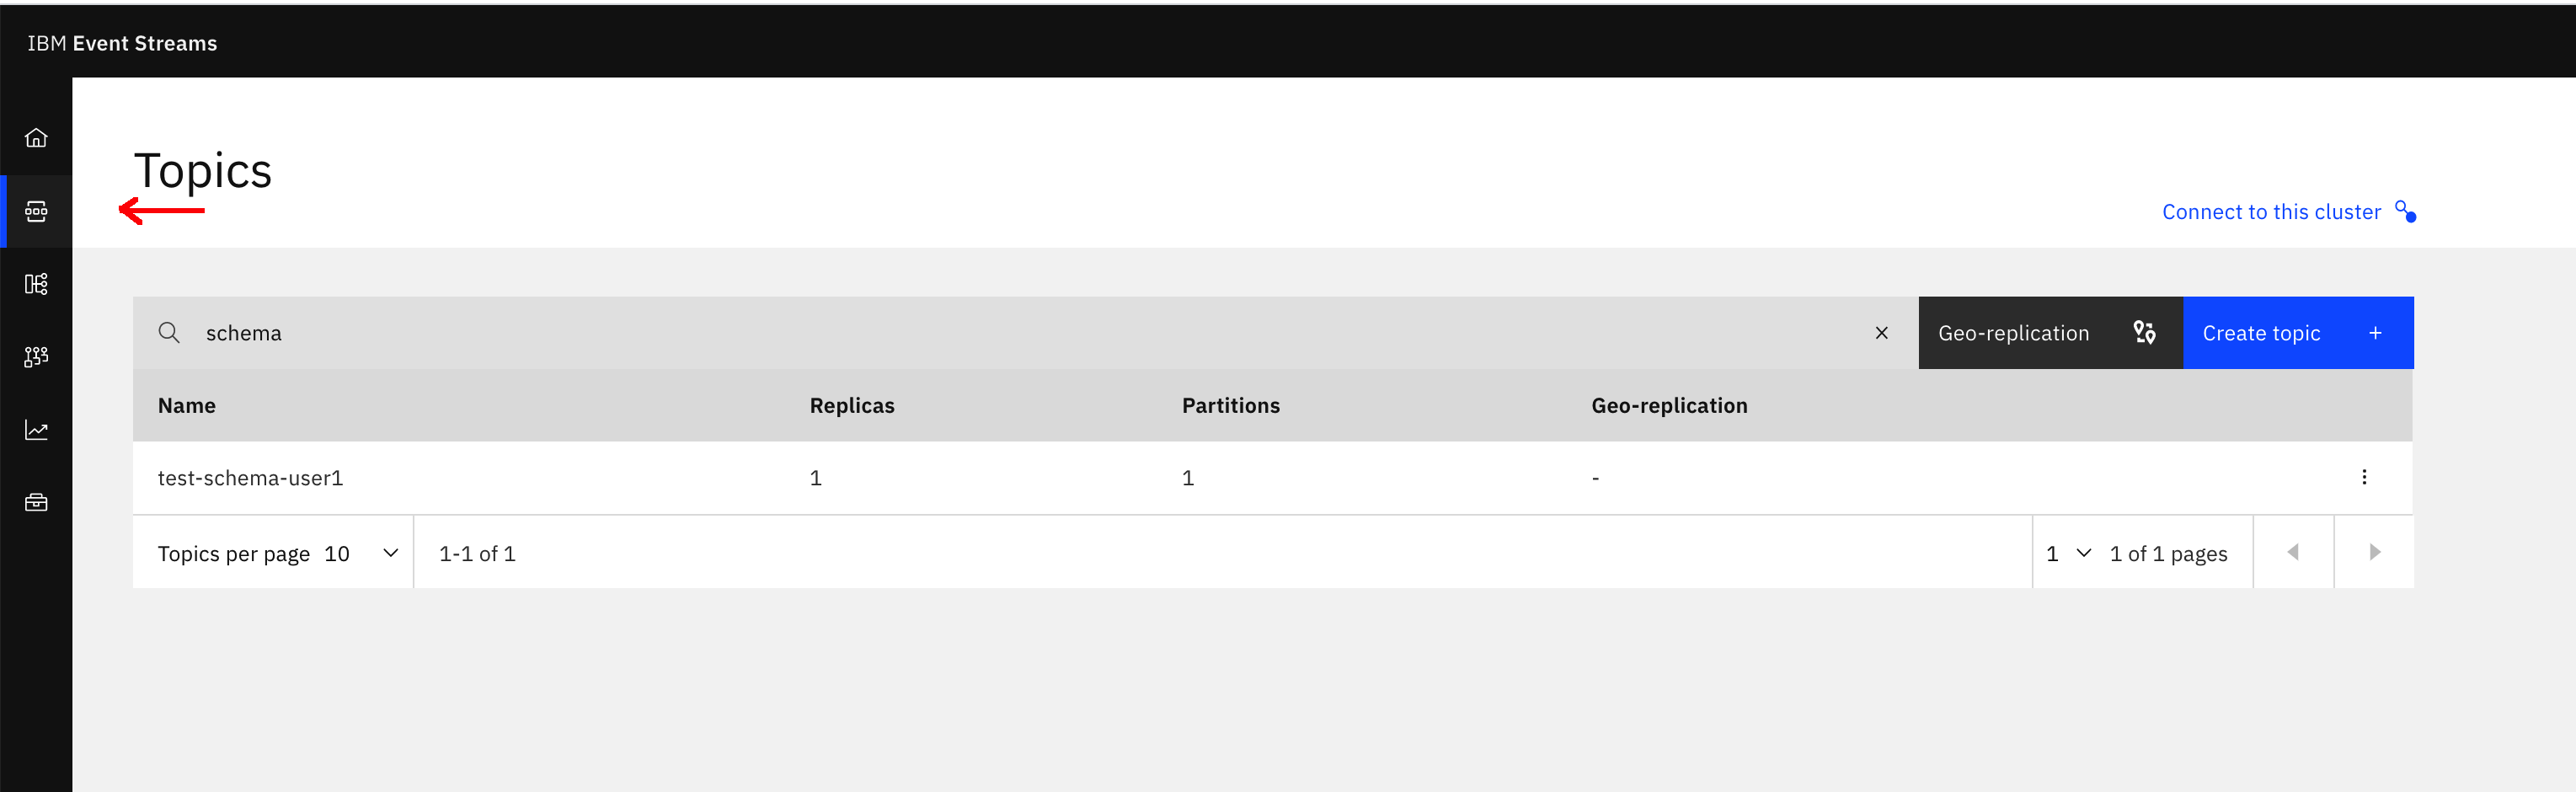
-
Click on the topic and then on the Messages tab at the top. Finally, click on a message to see it displayed on the right hand side of the screen
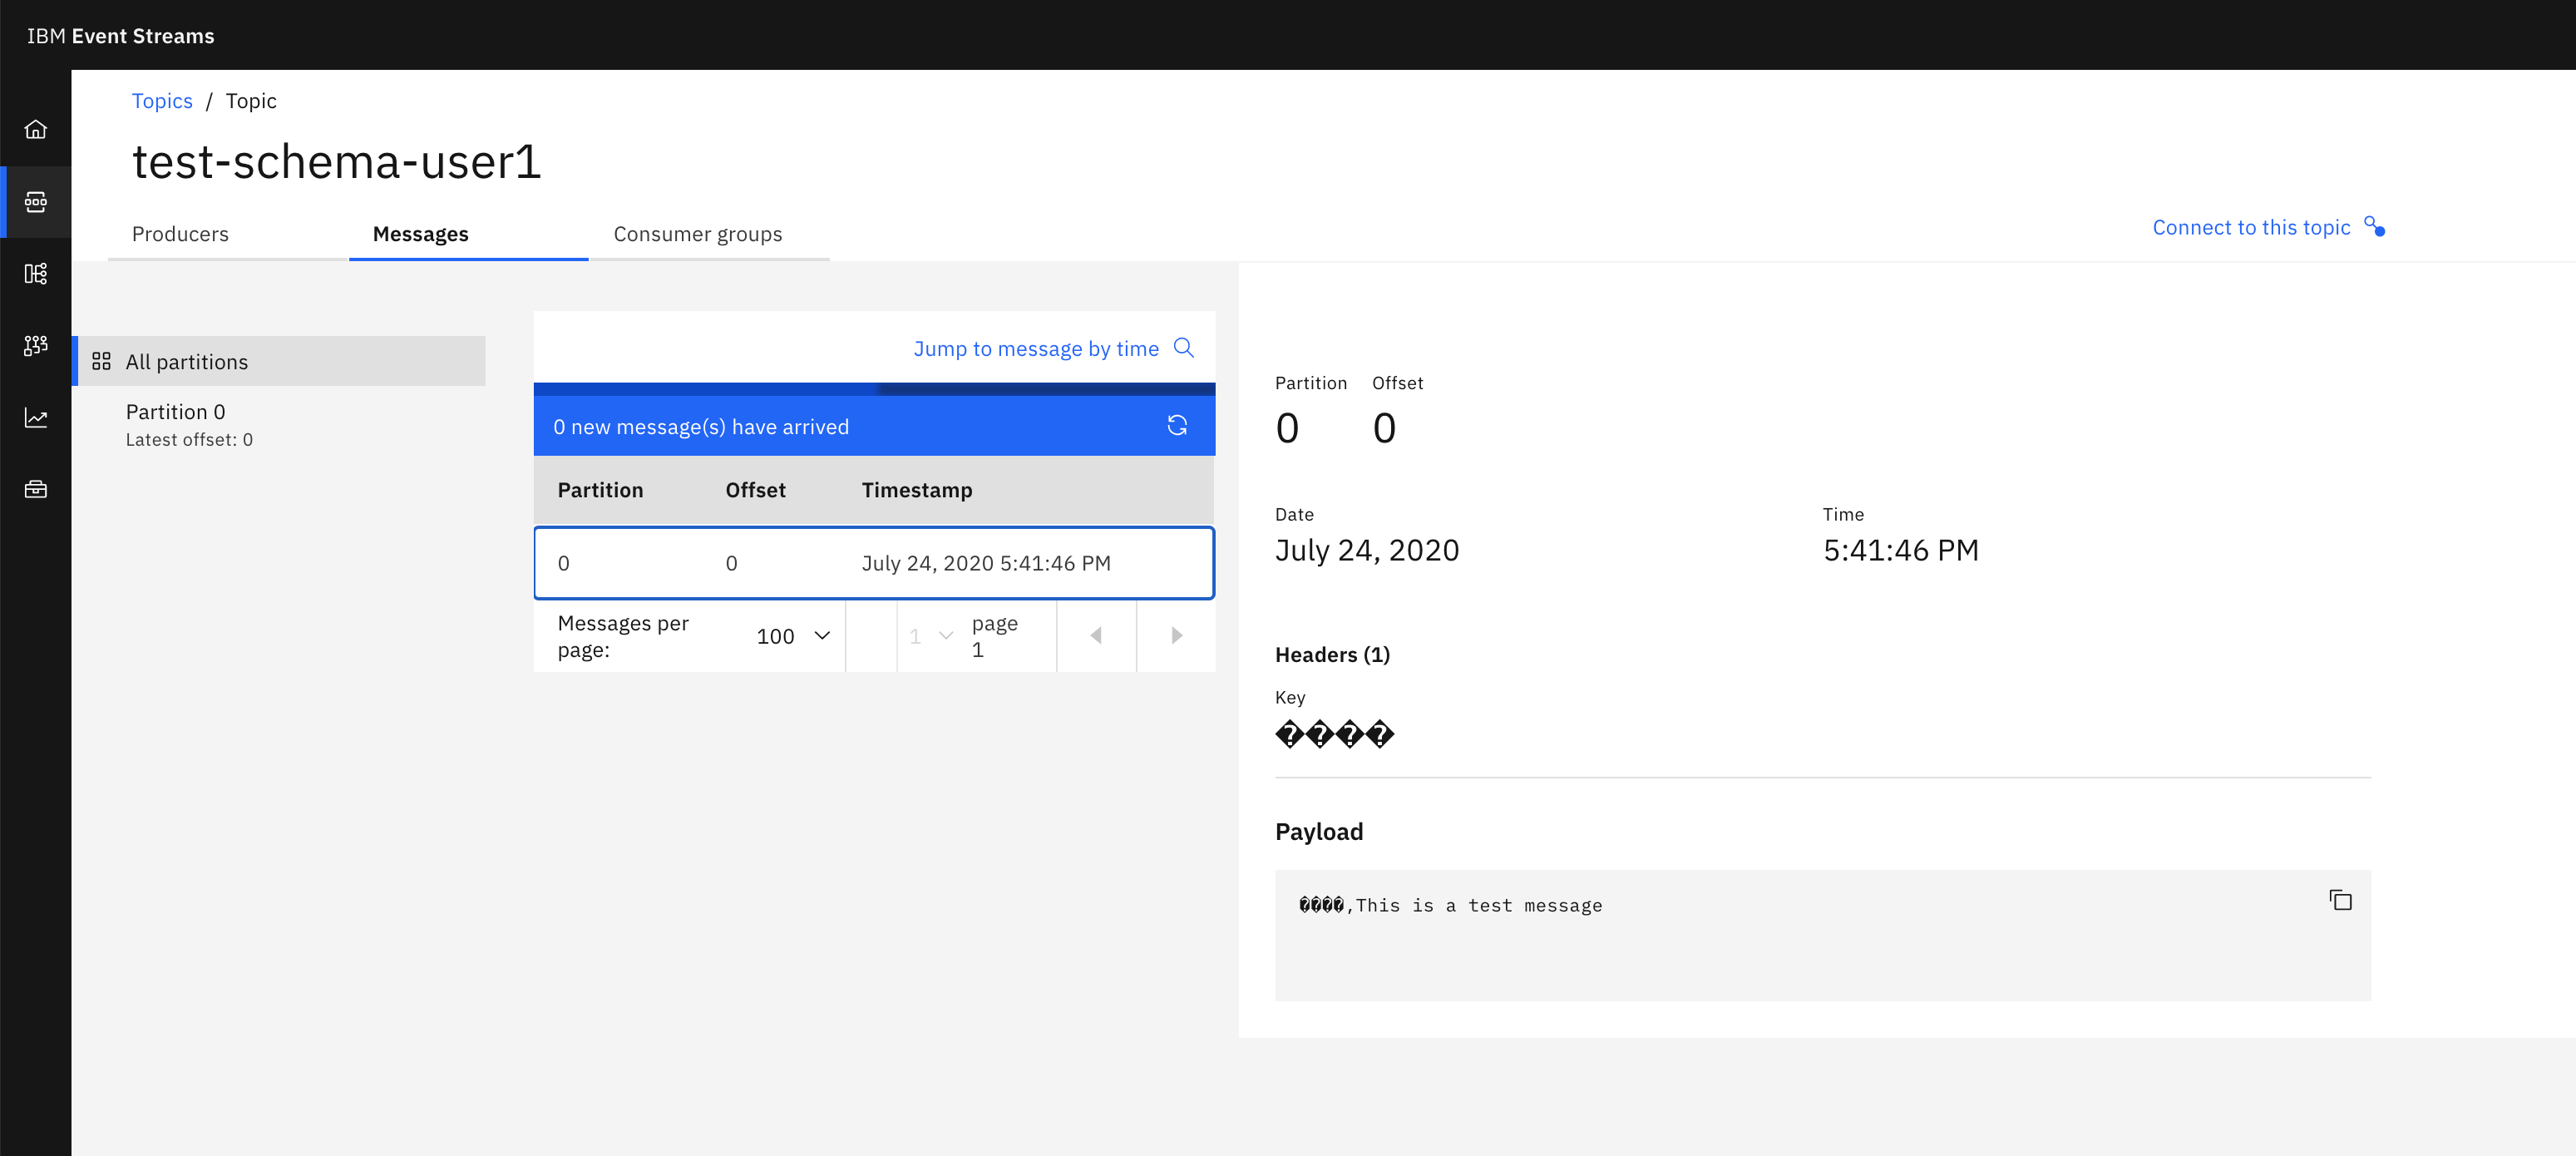
INFO: Mind the message now is not in JSON format as Avro does not repeat every field name with every single record which makes Avro more efficient than JSON for high-volume usage. This is thanks to having Avro schemas.
IMPORTANT: As you can see, we got the test-schema-user1 topic auto-created when we produced the message. The reason for this is that
- Kafka is set out of the box to let applications to auto-create topics.
- We created the SCRAM credentials for our application to allow the application to create topics.
On a production-like environment, you don't want developers creating applications that auto-create topics in your IBM Event Streams instance without any control. For that, we would configure Kafka to forbid topic auto-creation (https://kafka.apache.org/documentation/#auto.create.topics.enable) as well as thoroughly created the SCRAM credentials with the most strict but appropriate permissions that our application needs.
IMPORTANT: Similar to the auto-creation of topics, we can see below that our application got the Avro data schemas for both the key and value of the message produced auto-registered. This is because many client libraries come with a SerDes property to allow them to auto-register the Avro data schemas (https://docs.confluent.io/current/clients/confluent-kafka-python/#avroserializer). However, on a production-like environment we don't want applications to auto-register schemas without any control but yet we can not leave it to the developers to set the auto-registration property off on their libraries. Instead, we would create the SCRAM credentials with the most strict but appropriate permissions that our application needs.
If we look now at the schemas our schema registry has:
cloudctl es schemas

Schema                           State    Latest version   Latest version ID   Updated
demoSchema_CLI_USER1             active   2.0.0            2                   Fri, 24 Jul 2020 14:09:37 UTC
demoSchema_UI_USER1              active   2.0.0            2                   Fri, 24 Jul 2020 14:06:27 UTC
test-schema-user1-key-d89uk      active   1                1                   Fri, 24 Jul 2020 15:41:46 UTC
test-schema-user1-value-tv5efr   active   1                1                   Fri, 24 Jul 2020 15:41:45 UTC
OK
we see two schemas, test-schema-user1-key-d89uk and test-schema-user1-value-tv5efr, which in fact correspond to the Avro data schema used for the key (default_key.avsc) and the value (default_value.avsc) of events sent to the test-schema-user1 topic in the ProduceAvroMessage.py as explained before sending the message.
To make sure of what we are saying, we can inspect those schemas:
cloudctl es schema test-schema-user1-key-d89uk --version 1

{
  "type": "record",
  "name": "defaultKey",
  "namespace": "ibm.eda.default",
  "fields": [
    {
      "type": "int",
      "name": "key",
      "doc": "We expect any int as the event key"
    }
  ],
  "doc": "Default Message's key Avro data schema"
}
cloudctl es schema test-schema-user1-value-tv5efr --version 1

{
  "type": "record",
  "name": "defaultValue",
  "namespace": "ibm.eda.default",
  "fields": [
    {
      "type": "string",
      "name": "message",
      "doc": "Any string"
    }
  ],
  "doc": "Default Message's value Avro data schema"
}
If I now decided that my events should contain another attribute, I would modify the event value schema (default_value.avsc) to reflect that as well as ProduceAvroMessage.py to send that new attribute in the event it sends:
Change user1
python3 ProduceAvroMessage.py test-schema-user1

 @@@ Executing script: ProduceAvroMessage.py
The arguments for the script are:  ['ProduceAvroMessage.py', 'test-schema-user1']
Creating event...
DONE
--- Event to be published: ---
{"key": 1}
{"message": "This is a test message", "anotherAttribute": "Just another test string"}
----------------------------------------
--- This is the configuration for the avro producer: ---
{'bootstrap.servers': 'es-1-kafka-bootstrap-integration.apps.eda-solutions.gse-ocp.net:443', 'schema.registry.url': 'https://my-user1:*****@es-1-ibm-es-schema-external-integration.apps.eda-solutions.gse-ocp.net', 'group.id': 'ProduceAvroMessagePython', 'security.protocol': 'SASL_SSL', 'sasl.mechanisms': 'SCRAM-SHA-512', 'sasl.username': 'my-user1', 'sasl.password': '*****', 'ssl.ca.location': '/home/ALMARAZJ/es-cert.pem', 'schema.registry.ssl.ca.location': '/home/ALMARAZJ/es-cert.pem'}
---------------------------------------------------
Message delivered to test-schema-user1 [0]
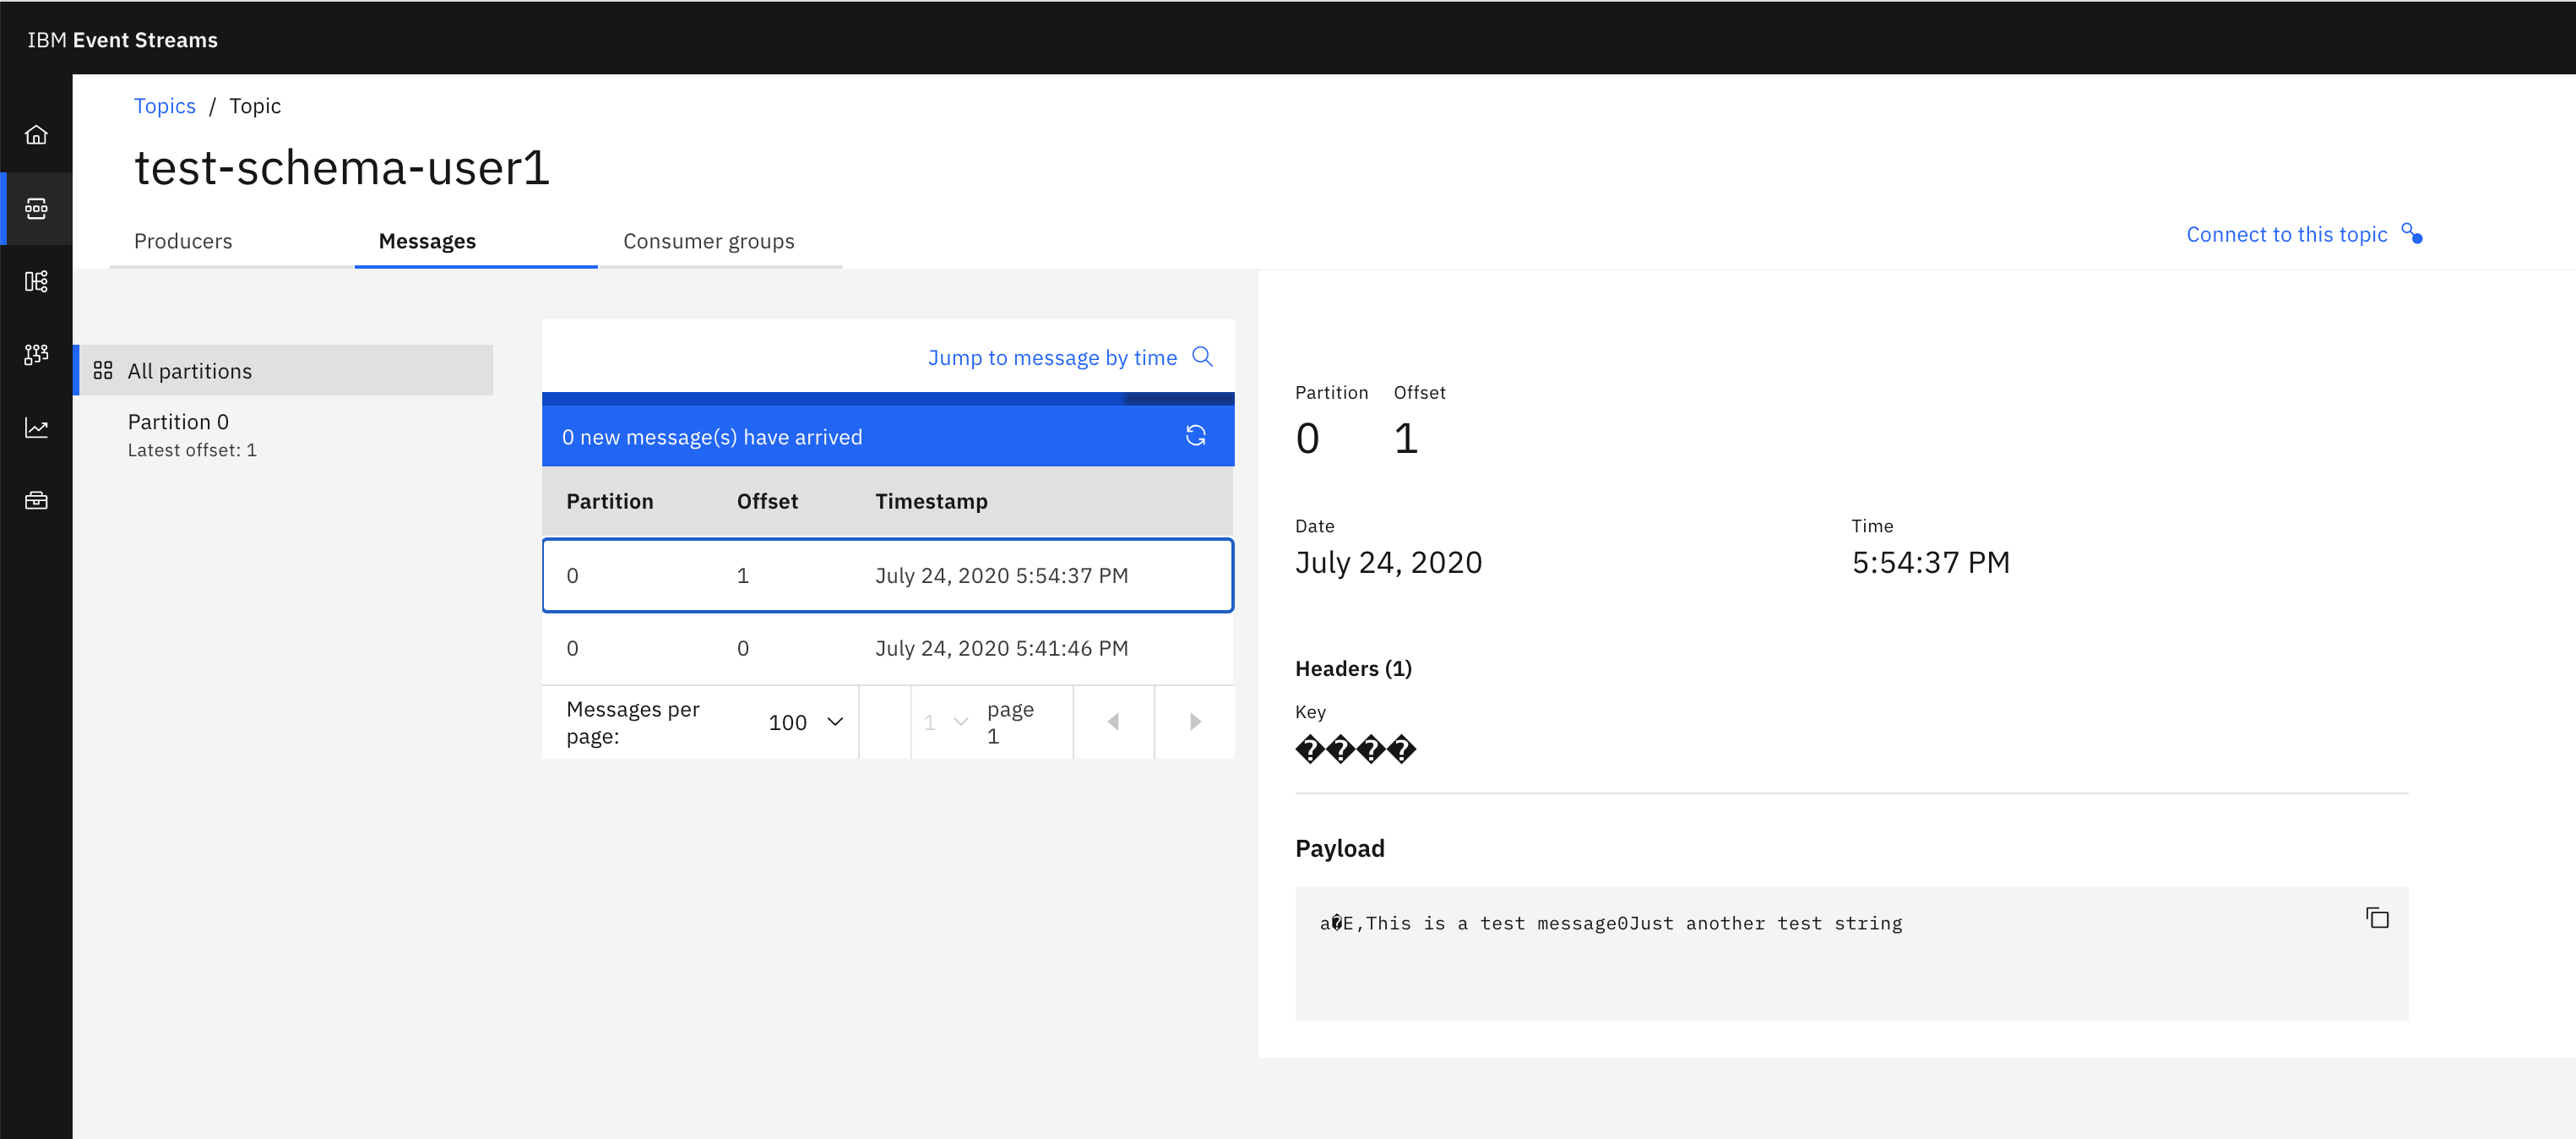
I can see that an event with a new attribute has been sent:
And I can also see that the new shcema has got registered as well:
cloudctl es schemas

Schema                           State    Latest version   Latest version ID   Updated
demoSchema_CLI_USER1             active   2.0.0            2                   Fri, 24 Jul 2020 14:09:37 UTC
demoSchema_UI_USER1              active   2.0.0            2                   Fri, 24 Jul 2020 14:06:27 UTC
test-schema-user1-key-d89uk      active   1                1                   Fri, 24 Jul 2020 15:41:46 UTC
test-schema-user1-value-a5bbaa   active   1                1                   Fri, 24 Jul 2020 15:54:37 UTC
test-schema-user1-value-tv5efr   active   1                1                   Fri, 24 Jul 2020 15:41:45 UTC
OK
If I inspect that new schema, I see my new attribute in it:
cloudctl es schema test-schema-user1-value-a5bbaa --version 1

{
  "type": "record",
  "name": "defaultValue",
  "namespace": "ibm.eda.default",
  "fields": [
    {
      "type": "string",
      "name": "message",
      "doc": "Any string"
    },
    {
      "type": "string",
      "name": "anotherAttribute",
      "doc": "Any other string"
    }
  ],
  "doc": "Default Message's value Avro data schema"
}
The schema evolution above (test-schema-user1-value-a5bbaa) should have got registered as a new version of the already existing schema (test-schema-user1-value-tv5efr). IBM Event Streams allows schemas to auto-register themselves when these are sent along with a message from a producer application. However, the Schema Registry does not pick "new" schemas up as a new version of a previous schema and simply creates a new schema. Anyway, when reading messages off the topic, Schema Registry handles well what schema to return back to the receiver application so messages can get properly deserialized. Will see that in the next section.
SECURITY: As some of you may have already thought, having your clients (that is your applications), auto-register the Avro data schemas that are in the end kind of the contracts that your components of your overal solution agree on in order to understand each other and collaborate between them is NOT a good idea. Specially in microservices architectures where you might have hundreds of microservices talking and collaborating among themselsves. We will see in the Security section how we can control schema registration and evolution based on roles at the schema level also.
Create a non-compliant message
Let's see what happens if we send a message that does not comply with its Avro data schema. Let's say that I send the following message:
and this is the output of that attempt:
Change user1
python3 ProduceAvroMessage.py test-schema-user1

 @@@ Executing script: ProduceAvroMessage.py
The arguments for the script are:  ['ProduceAvroMessage.py', 'test-schema-user1']
Creating event...
DONE
--- Event to be published: ---
{"key": 1}
{"message": 12345}
----------------------------------------
--- This is the configuration for the avro producer: ---
{'bootstrap.servers': 'es-1-kafka-bootstrap-integration.apps.eda-solutions.gse-ocp.net:443', 'schema.registry.url': 'https://my-user1:*****@es-1-ibm-es-schema-external-integration.apps.eda-solutions.gse-ocp.net', 'group.id': 'ProduceAvroMessagePython', 'security.protocol': 'SASL_SSL', 'sasl.mechanisms': 'SCRAM-SHA-512', 'sasl.username': 'my-user1', 'sasl.password': '*****', 'ssl.ca.location': '/home/ALMARAZJ/es-cert.pem', 'schema.registry.ssl.ca.location': '/home/ALMARAZJ/es-cert.pem'}
---------------------------------------------------
Traceback (most recent call last):
  File "ProduceAvroMessage.py", line 81, in <module>
    kafka_producer.publishEvent(TOPIC_NAME,event_value,event_key)
  File "/tmp/lab/kafka/KcAvroProducer.py", line 43, in publishEvent
    self.producer.produce(topic=topicName,value=json.loads(value),key=json.loads(key), callback=self.delivery_report)
  File "/root/.local/lib/python3.7/site-packages/confluent_kafka/avro/__init__.py", line 99, in produce
    value = self._serializer.encode_record_with_schema(topic, value_schema, value)
  File "/root/.local/lib/python3.7/site-packages/confluent_kafka/avro/serializer/message_serializer.py", line 118, in encode_record_with_schema
    return self.encode_record_with_schema_id(schema_id, record, is_key=is_key)
  File "/root/.local/lib/python3.7/site-packages/confluent_kafka/avro/serializer/message_serializer.py", line 152, in encode_record_with_schema_id
    writer(record, outf)
  File "/root/.local/lib/python3.7/site-packages/confluent_kafka/avro/serializer/message_serializer.py", line 86, in <lambda>
    return lambda record, fp: writer.write(record, avro.io.BinaryEncoder(fp))
  File "/root/.local/lib/python3.7/site-packages/avro/io.py", line 771, in write
    raise AvroTypeException(self.writer_schema, datum)
avro.io.AvroTypeException: The datum {'message': 12345} is not an example of the schema {
  "type": "record",
  "name": "defaultValue",
  "namespace": "ibm.eda.default",
  "fields": [
    {
      "type": "string",
      "name": "message",
      "doc": "Any string"
    },
    {
      "type": "string",
      "name": "anotherAttribute",
      "doc": "Any other string"
    }
  ],
  "doc": "Default Message's value Avro data schema"
}
As we can see, the attempt failed as the Avro producer will check the message against the Avro data schema defined for the topic we want to send the message to and yield that this message does not comply (the message value attribute we are sending is an integer rather than a string and we are missing the second attribute).
Therefore, using Avro schemas with IBM Event Streams give us the ability to build our system with robustness protecting downstream data consumers from malformed data, as only valid data will be permitted in the topic.
Consume a message
In order to consume a message, we execute the ConsumeAvroMessage.py within the /tmp/lab/src folder in our python demo environment:
Change user1
python3 ConsumeAvroMessage.py test-schema-user1

 @@@ Executing script: ConsumeAvroMessage.py
The arguments for this script are:  ['ConsumeAvroMessage.py', 'test-schema-user1']
--- This is the configuration for the Avro consumer: ---
{'bootstrap.servers': 'es-1-kafka-bootstrap-integration.apps.eda-solutions.gse-ocp.net:443', 'group.id': 'pythonconsumers', 'auto.offset.reset': 'earliest', 'schema.registry.url': 'https://my-user1:*****@es-1-ibm-es-schema-external-integration.apps.eda-solutions.gse-ocp.net', 'enable.auto.commit': True, 'security.protocol': 'SASL_SSL', 'sasl.mechanisms': 'SCRAM-SHA-512', 'sasl.username': 'my-user1', 'sasl.password': '*****', 'ssl.ca.location': '/home/ALMARAZJ/es-cert.pem', 'schema.registry.ssl.ca.location': '/home/ALMARAZJ/es-cert.pem'}
---------------------------------------------------
[Message] - Next message consumed from test-schema-user1 partition: [0] at offset 0 with key {'key': 1} and value {'message': 'This is a test message'}


python3 ConsumeAvroMessage.py test-schema-user1

 @@@ Executing script: ConsumeAvroMessage.py
The arguments for this script are:  ['ConsumeAvroMessage.py', 'test-schema-user1']
--- This is the configuration for the Avro consumer: ---
{'bootstrap.servers': 'es-1-kafka-bootstrap-integration.apps.eda-solutions.gse-ocp.net:443', 'group.id': 'pythonconsumers', 'auto.offset.reset': 'earliest', 'schema.registry.url': 'https://my-user1:*****@es-1-ibm-es-schema-external-integration.apps.eda-solutions.gse-ocp.net', 'enable.auto.commit': True, 'security.protocol': 'SASL_SSL', 'sasl.mechanisms': 'SCRAM-SHA-512', 'sasl.username': 'my-user1', 'sasl.password': '*****', 'ssl.ca.location': '/home/ALMARAZJ/es-cert.pem', 'schema.registry.ssl.ca.location': '/home/ALMARAZJ/es-cert.pem'}
---------------------------------------------------
[Message] - Next message consumed from test-schema-user1 partition: [0] at offset 1 with key {'key': 1} and value {'message': 'This is a test message', 'anotherAttribute': 'Just another test string'}
As you can see, our script was able to read the Avro messages from the test-schema-user1 topic and map that back to their original structure thanks to the Avro schemas:
[Message] - Next message consumed from test-schema partition: [0] at offset 0 with key {'key': 1} and value {'message': 'This is a test message'}

[Message] - Next message consumed from test-schema partition: [0] at offset 1 with key {'key': 1} and value {'message': 'This is a test message', 'anotherAttribute': 'Just another test string'}
Data Evolution
So far we have more or less seen what Avro is, what an Avro data schema is, what a schema registry is and how this all works together. From creating an Avro data schema for your messages/events to comply with to how the schema registry and Avro data schemas work together. And we have also seen the code for doing all this, from the python code to send and receive Avro encoded messages based on their Avro data schemas to the rich CLI IBM Event Streams provides to interact with.
However, we have said little about the need for data to evolve. When you design an Event Driven architecture for your application (by applying Event Storming or Domain Driven Design for example), it is very hard to come up with data structures/schemas that will not need to evolve/change in time. That is, your data, like your use or business cases, may need to evolve. As a result, Avro data schemas must be somehow flexible to allow your data to evolve along with your application and use cases.
But it is not as easy as adding or removing data that travels in your events/messages or modifying the type of such data. And one of the reasons for this is that Kafka (or any other type of event backbone) is many times used as the source of truth. That is, a place that you can trust as to what has happened. Hence, Kafka will serve as the source of truth where all the events (that is, data) that happened (which could be bank transactions, communications, etc) will get stored (sometimes up to hundreds of years) and will be able to be replayed if needed. As a result, there must be a data schema management and data schema evolution put in place that allow the compatibility of old and new data schemas and, in fact, old and new data at the end of the day.
The IBM Event Streams Schema Registry enforces full compatibility when creating a new version of a schema. Full compatibility means that old data can be read with the new data schema, and new data can also be read with the last data schema.
In data formats like Avro, you can define fields with default values. In that case adding or removing a field with a default value is a fully compatible change. Let's see then how this affects when you want your data to evolve in a way that it needs to add a new attribute or delete an existing attribute.
But let's see what that means in terms of adding and removing attributes from your data schema.
Adding a new attribute
Although we have already seen this in the adding a new version of a schema section, let's try to add a new version of our test-schema-value schema where we have a new attribute. Remember, our default_schema.avsc already contains a new attribute than the original one but that it got registered as a new schema rather than as a new version of the original one. Let's reuse that Avro schema file to register it as a new version (INFO: you might need to copy/download that file to your local workstation in order to be able to then upload it to the IBM Event Streams through its UI)
When doing so from the UI, we see the following error:
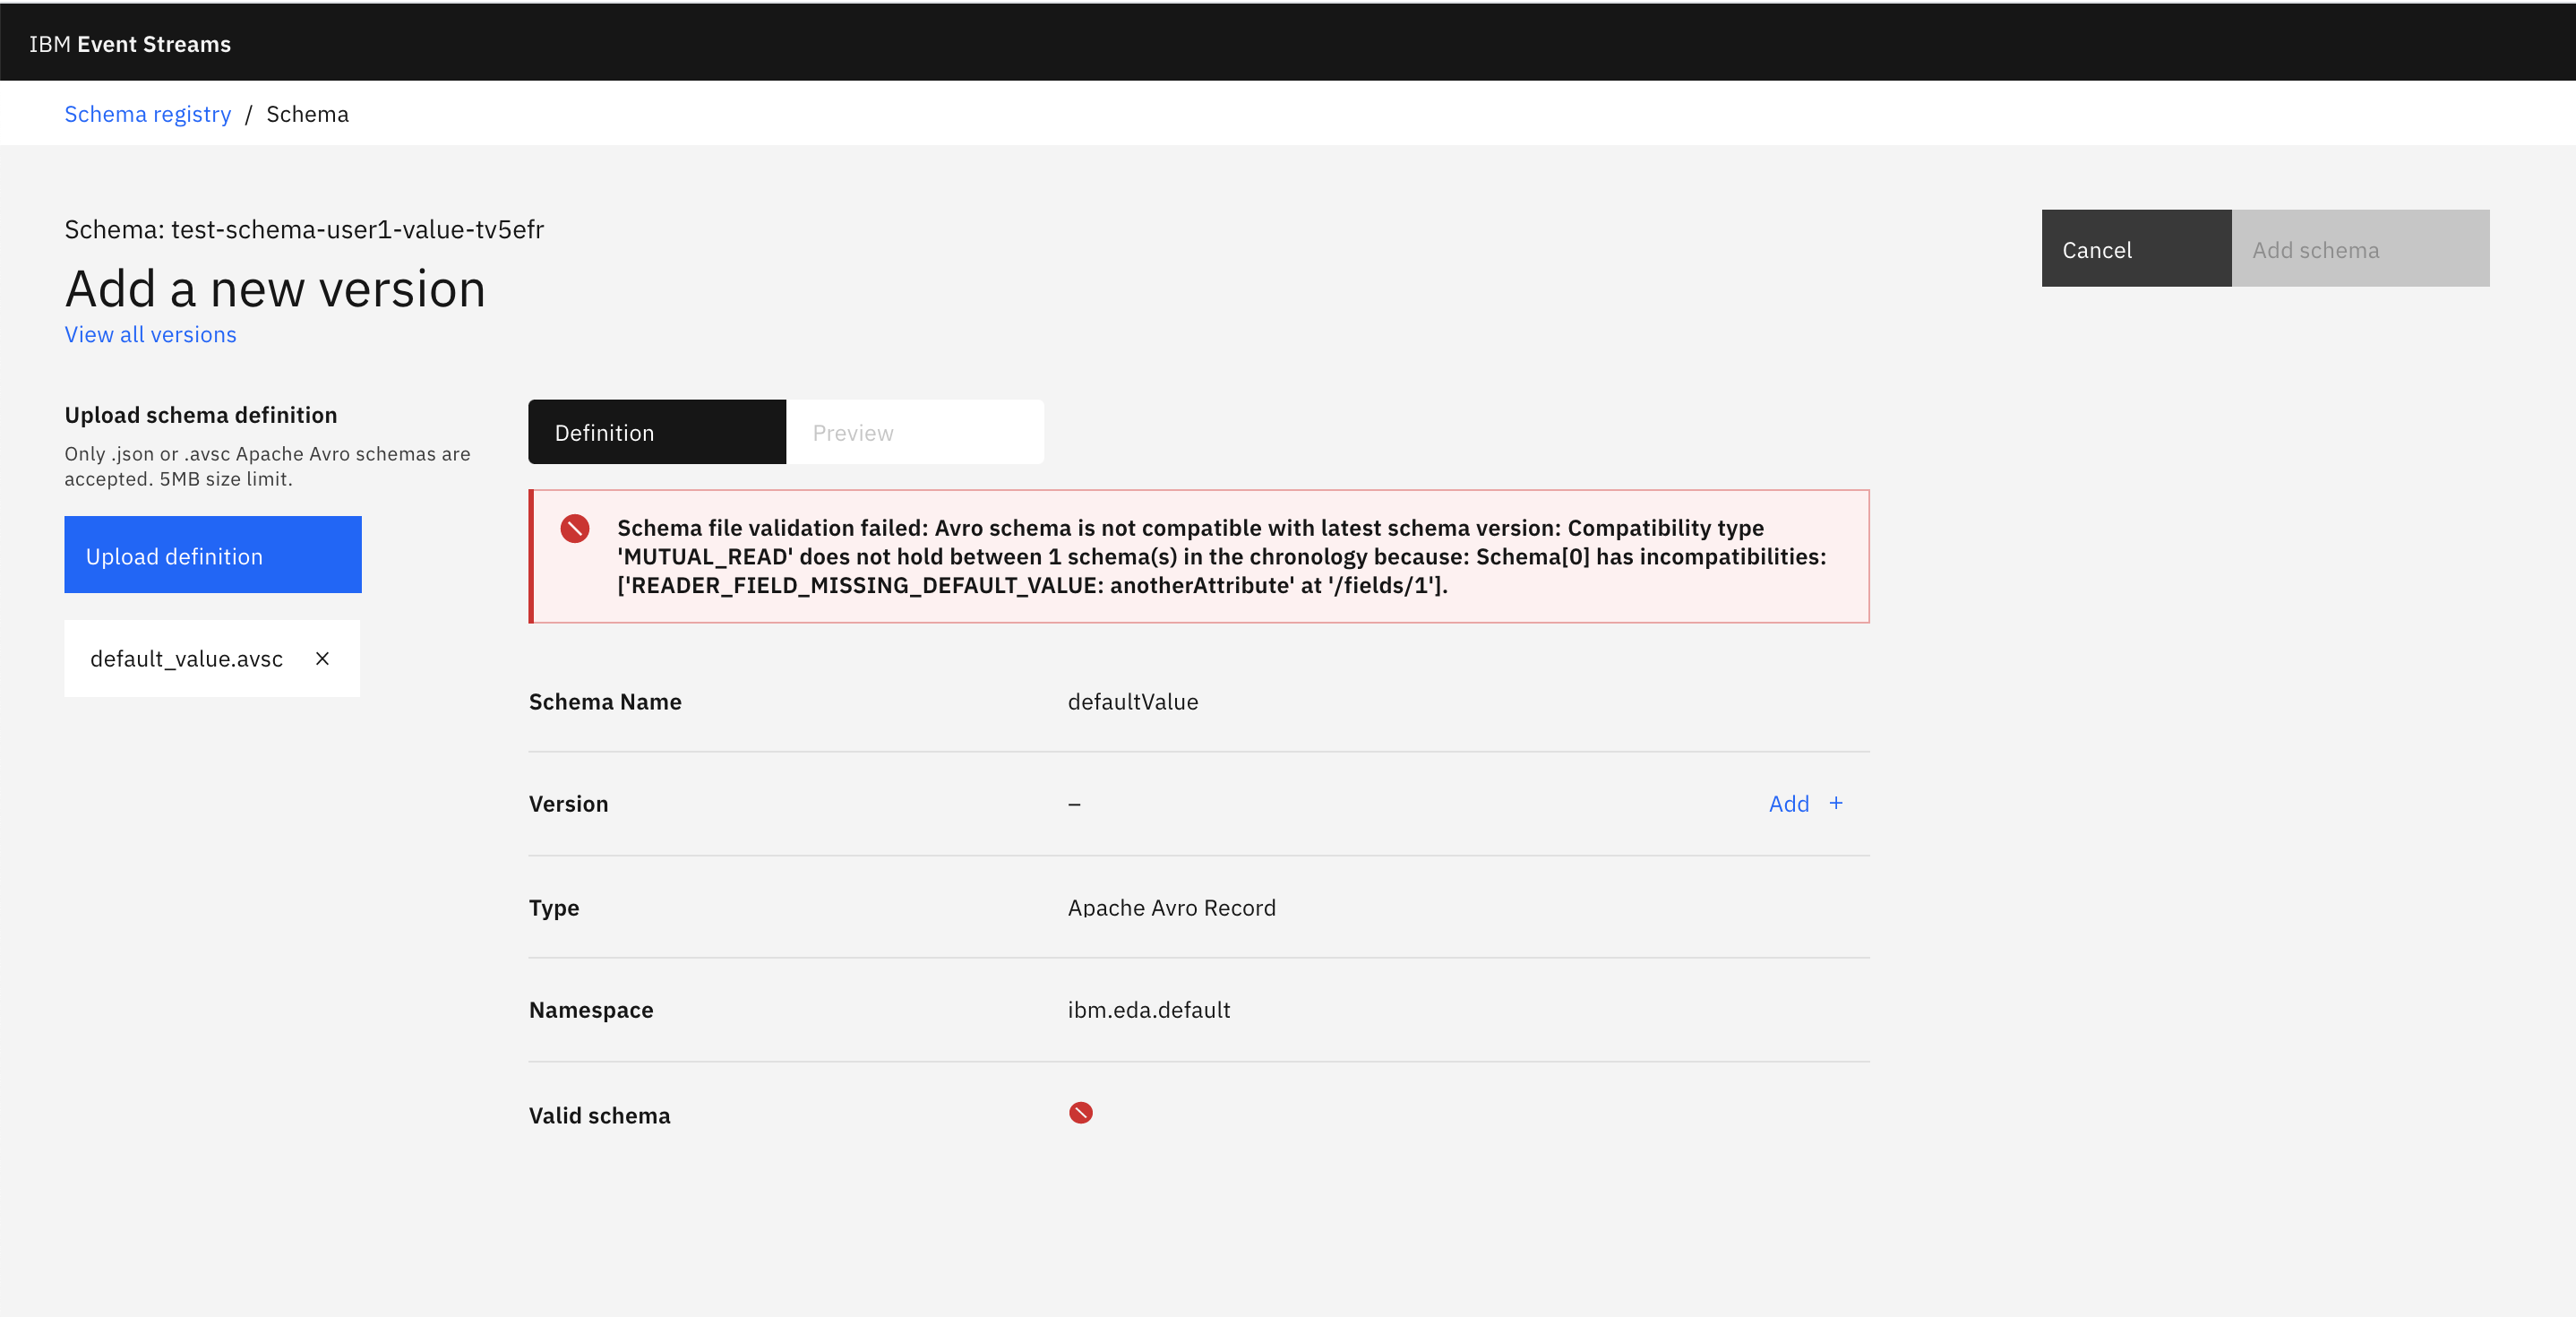
The reason, as alread explained in the add a new version of a schema section, is because full compatibility dictates that you can only add new attributes to a schema if these have a default value. Reason being that a receiver should be able to deserialize messages produced with an older schema using the newer schema. Because old messages were written with an older schema that did not contain our new attribute, those messages won't have that attribute so we need to provide a default value for it in our never version of the schema so that the receiver is able to deserialize those older messages with the newer schema.
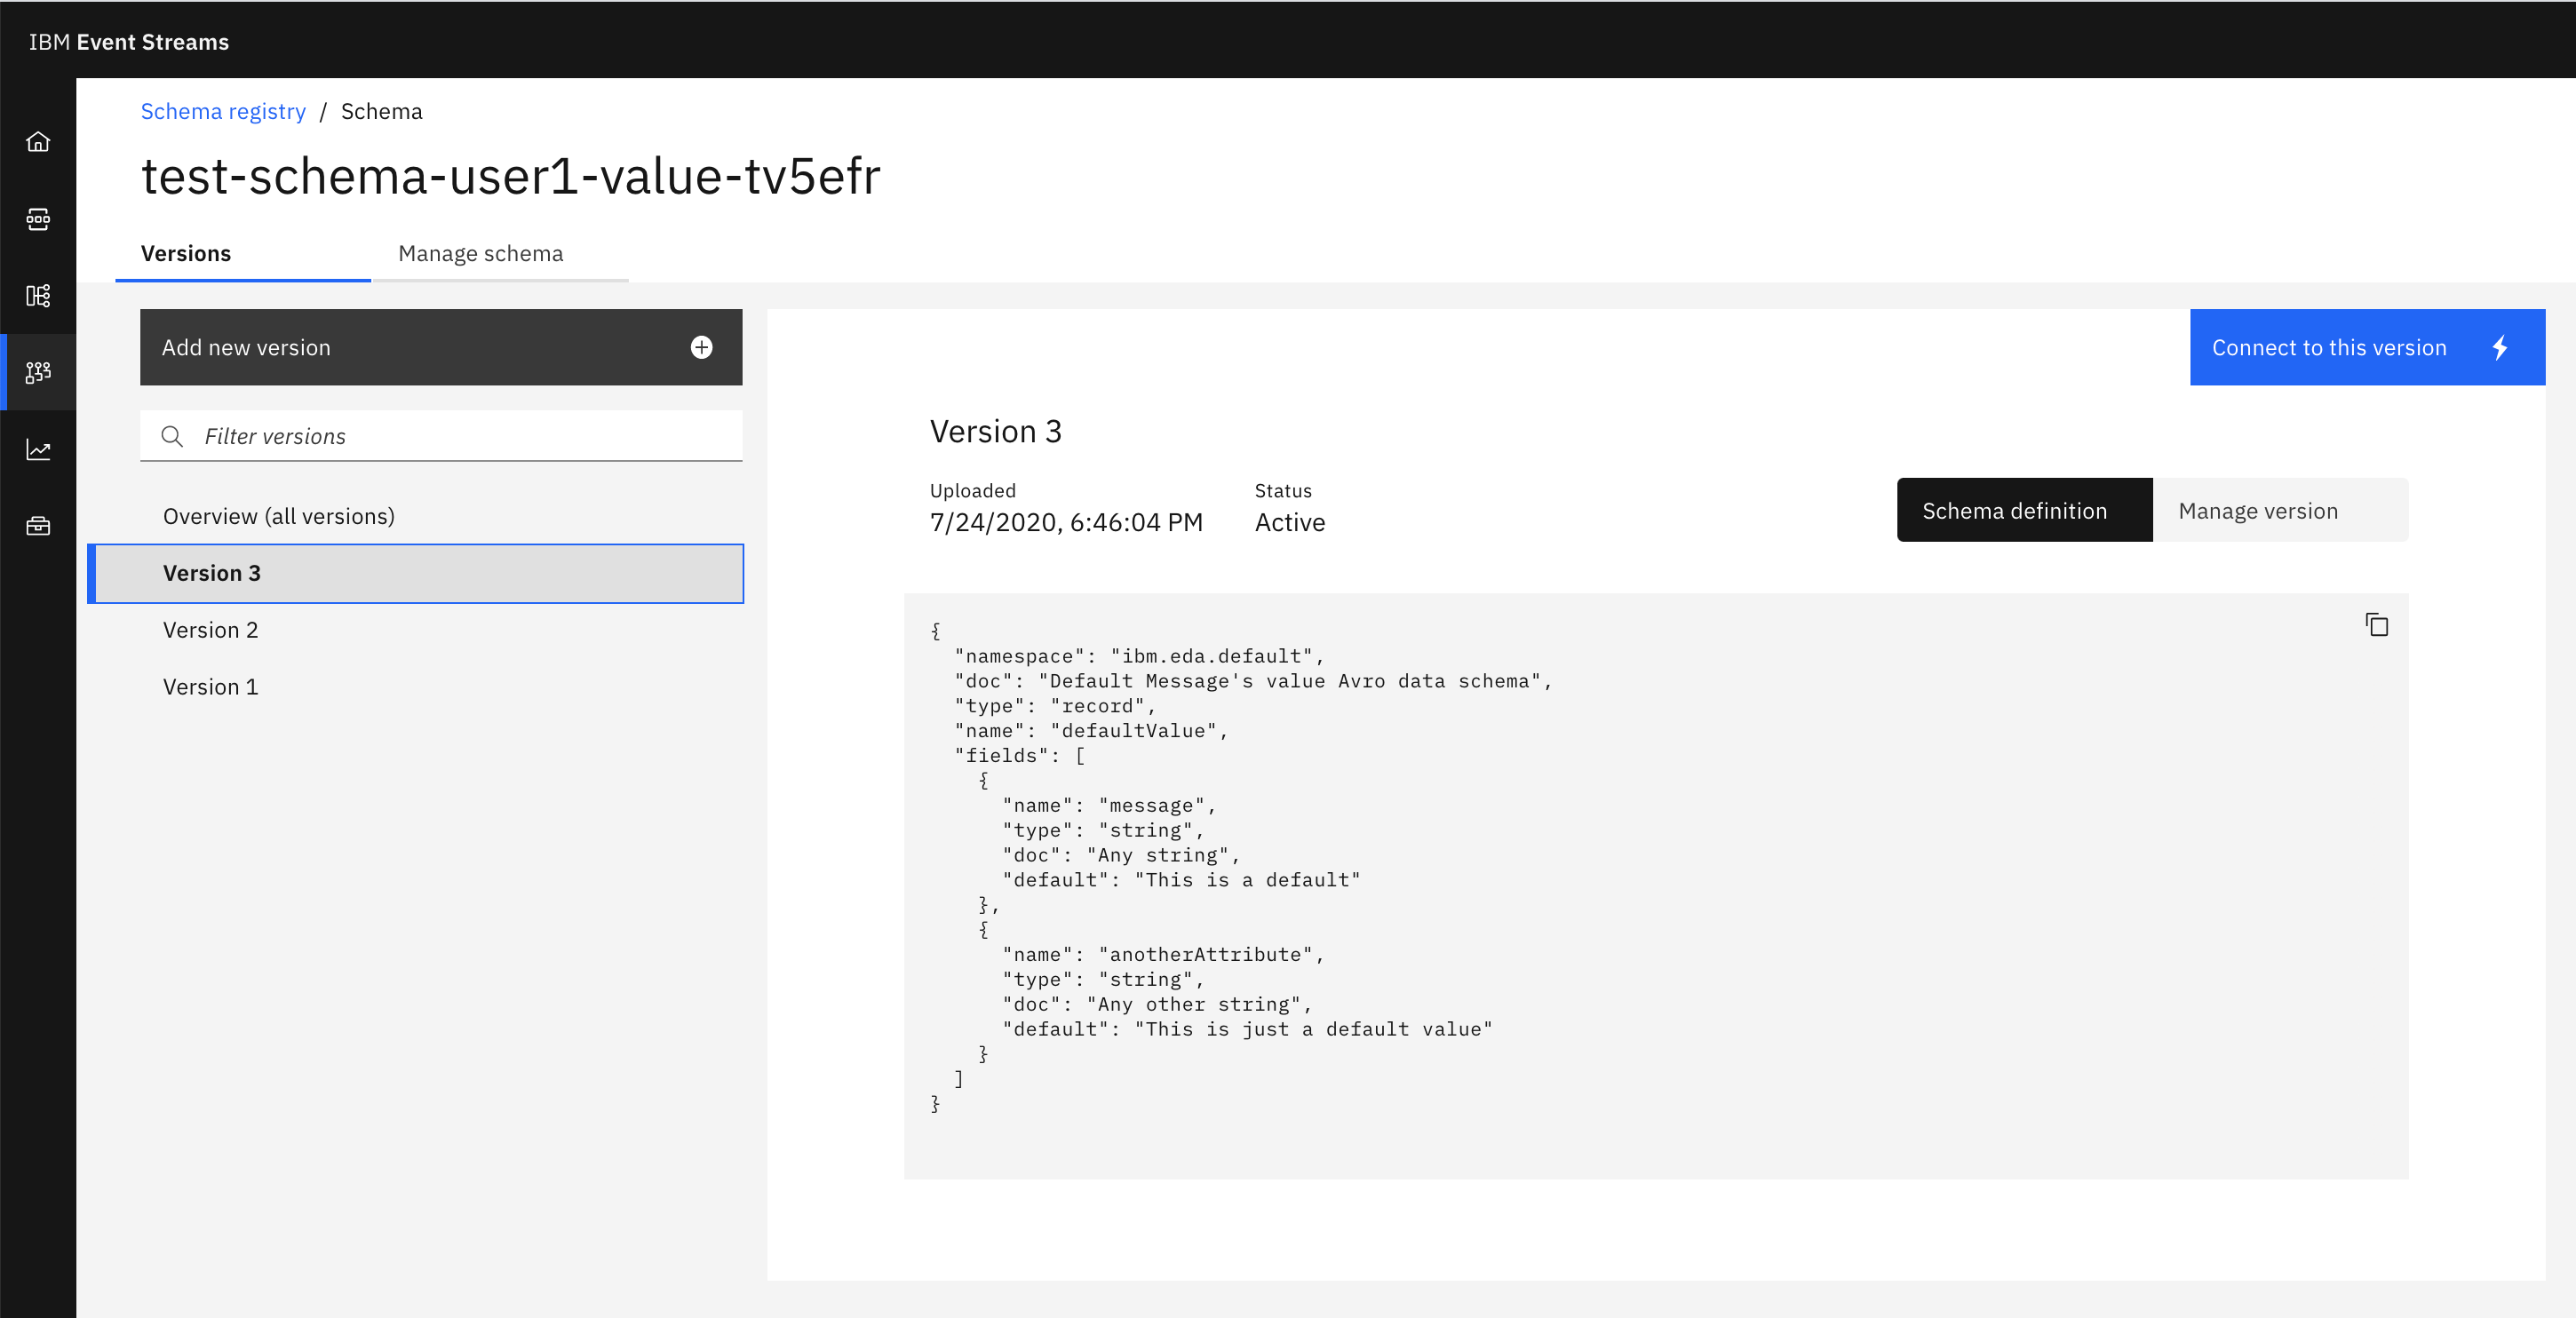
If we add the default value for the new attribute, we see that our newer version is now compatible:
and that it gets registered fine:
Removing an existing attribute
What if we now wanted to remove the original message attribute from our schema. Let's remove it from the default_value.avsc file and try to register that new version:
We, again, get the same error. And the reason is because receivers must be able to read and deserialize messages produced with the newer schema (that is, without the message attribute) but with the older schema (that is, with the schema version that enforces the existence of the message attribute).
In order to work this around, what we need to do is to register first an intermediate schema that defines a default value for the message attribute:
Once we have a default value for the message attribute, we can register a new version of the schema that finally removes that attribute:

Security
As we have already mentioned during the this tutorial, we need to pay attention to the permissions we give to users, groups, applications (and thefore the clients they used to interact with IBM Event Streams), etc since we don't want everyone and everything to be, for instance, creating or deleting topics, schemas, etc.
You can secure your IBM Event Streams resources in a fine-grained manner by managing the access each user and application has to each resource. Within IBM Event Streams, you can secure access to the following resource types, where the names in parentheses are the resource type names used in Access Control List (ACL) rules:
- Topics (topic): you can control the ability of users and applications to create, delete, read, and write to a topic.
- Consumer groups (group): you can control an application’s ability to join a consumer group.
- Transactional IDs (transactionalId): you can control the ability to use the transaction capability in Kafka.
Note: Schemas in the Event Streams Schema Registry are a special case and are secured using the resource type of topic combined with a prefix of __schema_. You can control the ability of users and applications to create, delete, read, and update schemas.
You can find more information about how to secure your IBM Event Streams resources in the official documentation at: https://ibm.github.io/event-streams/security/managing-access/