Kafka Connect to RabbitMQ Source Connector
Info
Updated 11/10/2020 - Lab completed on local computer. Instruction not completed for OpenShift deployment.
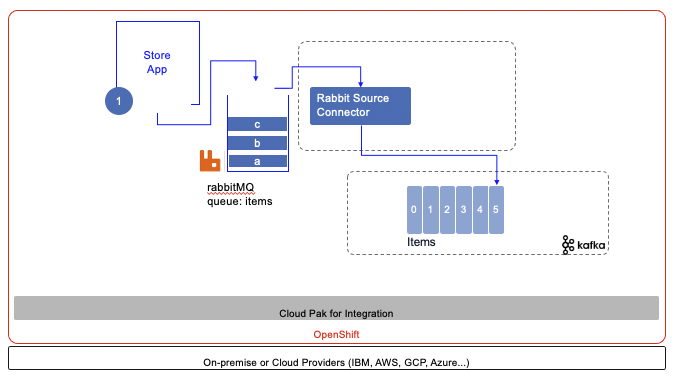
This hands-on lab demonstrates how to use IBM RabbitMQ Kafka source connector to inject message to Event Streams On Premise or any Kafka cluster. We are using the IBM messaging github: source Kafka connector for RabbitMQ open sourced component. The configuration for this connector is also done using Json config file, with a POST to the Kafka connectors URL.
The following diagram illustrates the component of this demo / lab:
The configurations used in this use case are in the refarch-eda-tools repository that you should clone:
under the labs/rabbitmq-source-lab folder.
Just run it!
For demonstration purpose, we have defined a docker compose file and a set of docker images ready to use. So it will be easier to demonstrate the scenario of sending messages to Rabbit MQ items queue, have a Kafka connector configured and a simple Kafka consumer which consumes Json doc from the items Kafka topic.
To send message to RabbitMQ, we have implemented a simple store sale simulator, which sends item sale messages for a set of stores. The code is under eda-store-simulator repository and we have also uploaded the image into dockerhub ibmcase/eda-store-simulator.
Start backend services
To quickly start a local demonstration environment, the github repository for this lab includes a docker compose file under the labs/rabbitmq-source-lab folder.
git clone https://github.com/ibm-cloud-architecture/refarch-eda-tools
cd refarch-eda-tools/labs/rabbitmq-source-lab
docker-compose up -d
docker ps

IMAGE                              NAMES                            PORT
ibmcase/kconnect:v1.0.0            rabbitmq-source-lab_kconnect_1   0.0.0.0:8083->8083/
strimzi/kafka:latest-kafka-2.6.0   rabbitmq-source-lab_kafka_1      0.0.0.0:9092->9092/
ibmcase/eda-store-simulator        rabbitmq-source-lab_simulator_1  0.0.0.0:8080->8080/
rabbitmq:3-management              rabbitmq-source-lab_rabbitmq_1   0.0.0.0:5672->5672/tcp, 15671/tcp, 15691-15692/tcp, 25672/tcp, 0.0.0.0:15672->15672/tcp
strimzi/kafka:latest-kafka-2.6.0   rabbitmq-source-lab_zookeeper_1 0.0.0.0:2181->2181/
Deploy source connector
Once the different containers are started, you can deploy the RabbitMQ source connector using the following POST
# under the folder use the curl to post configuration
./sendRMQSrcConfig.sh localhost:8083

# Trace should look like
{"name":"RabbitMQSourceConnector",
"config":{"connector.class":"com.ibm.eventstreams.connect.rabbitmqsource.RabbitMQSourceConnector",
"tasks.max":"1",
"kafka.topic":"items",
"rabbitmq.host":"rabbitmq",
"rabbitmq.port":"5672",
"rabbitmq.queue":"items",
"rabbitmq.username":"rabbit-user",
"rabbitmq.password":"rabbit-pass",
"rabbitmq.prefetch.count":"500",
"rabbitmq.automatic.recovery.enabled":"true",
"rabbitmq.network.recovery.interval.ms":"10000",
"rabbitmq.topology.recovery.enabled":"true",
"name":"RabbitMQSourceConnector"},
"tasks":[],
"type":"source"}
-
And then looking at the deployed connectors using http://localhost:8083/connectors or the RabbitMQ connector with http://localhost:8083/connectors/RabbitMQSourceConnector to get the same response as the above json.
-
Create
itemstopic into Kafka using the script:
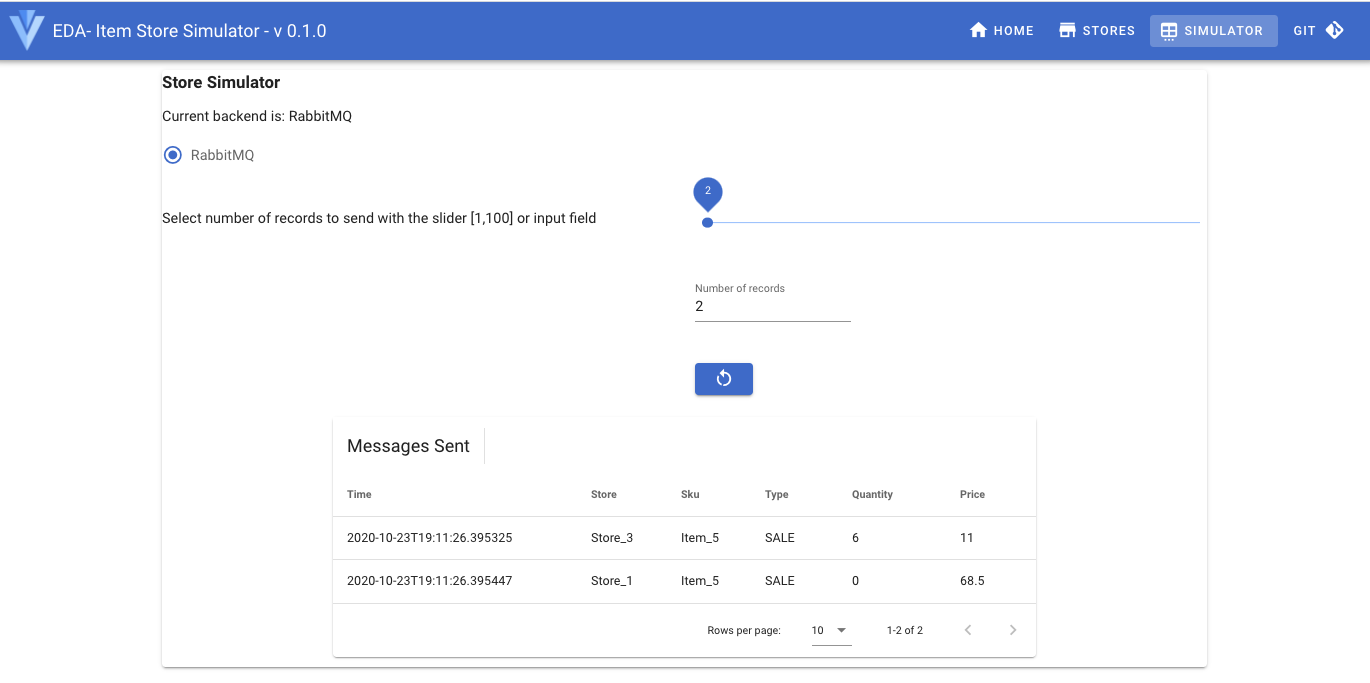
- Send some records using the simulator at the http://localhost:8080/#/simulator URL by first selecting RabbitMQ button and the number of message to send:
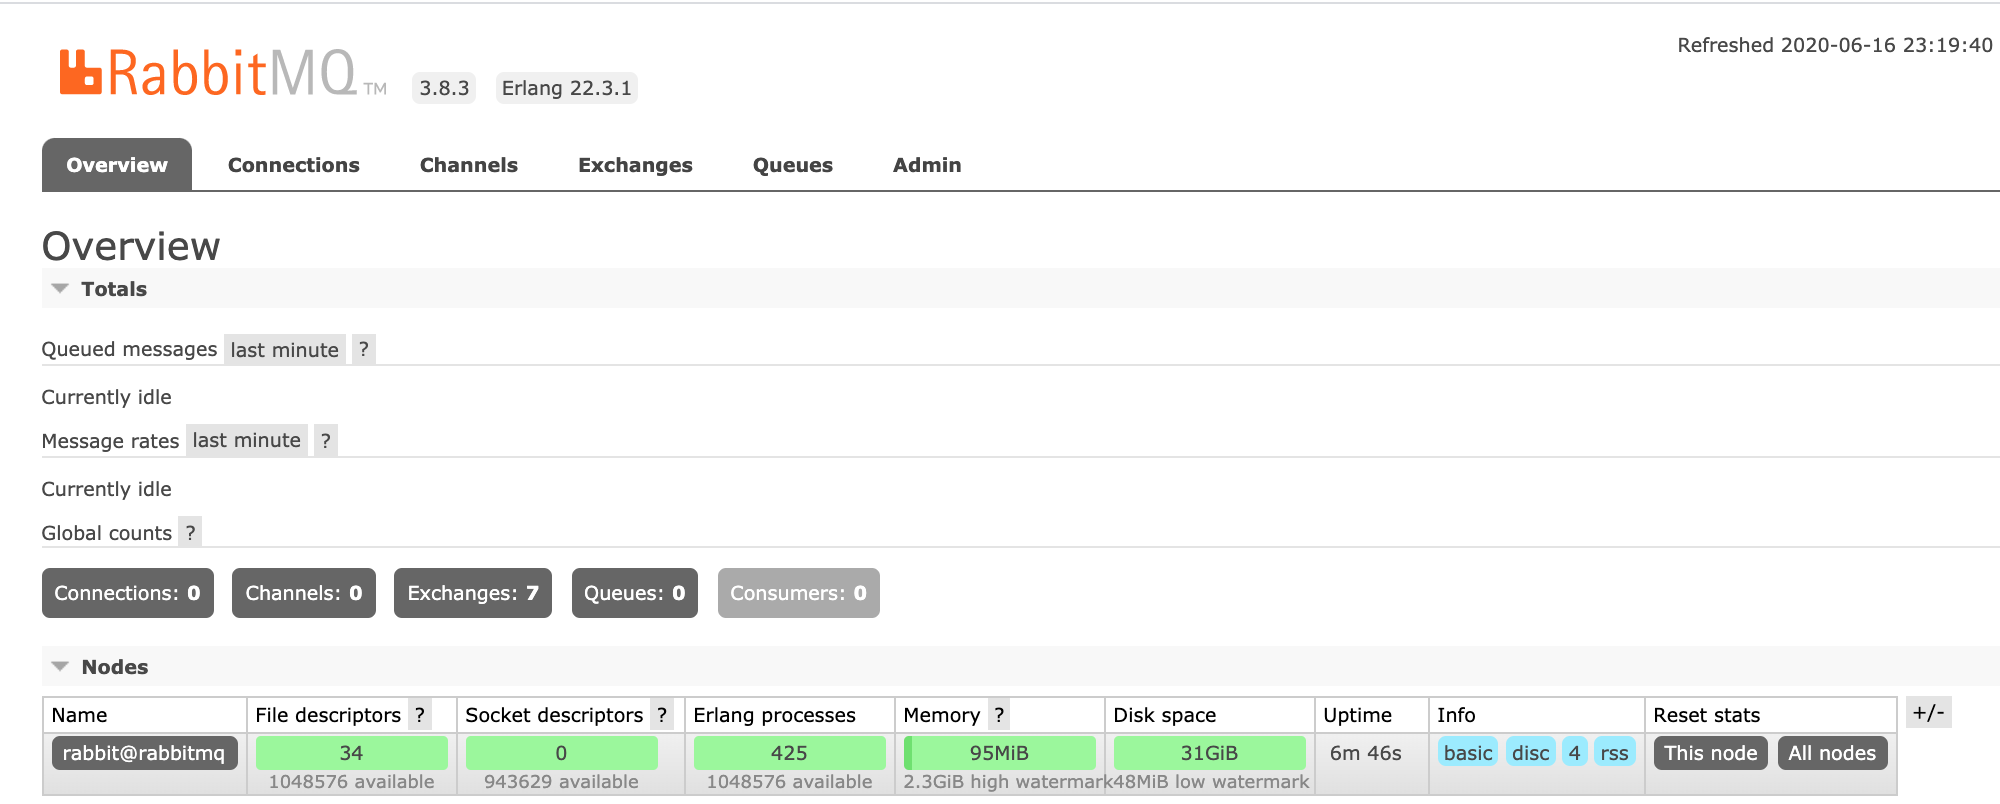
- Verify the RabbitMQ settings
In a Web Browser go to http://localhost:15672/ using the rabbit-user/rabbit-pass login.
You should reach this console:
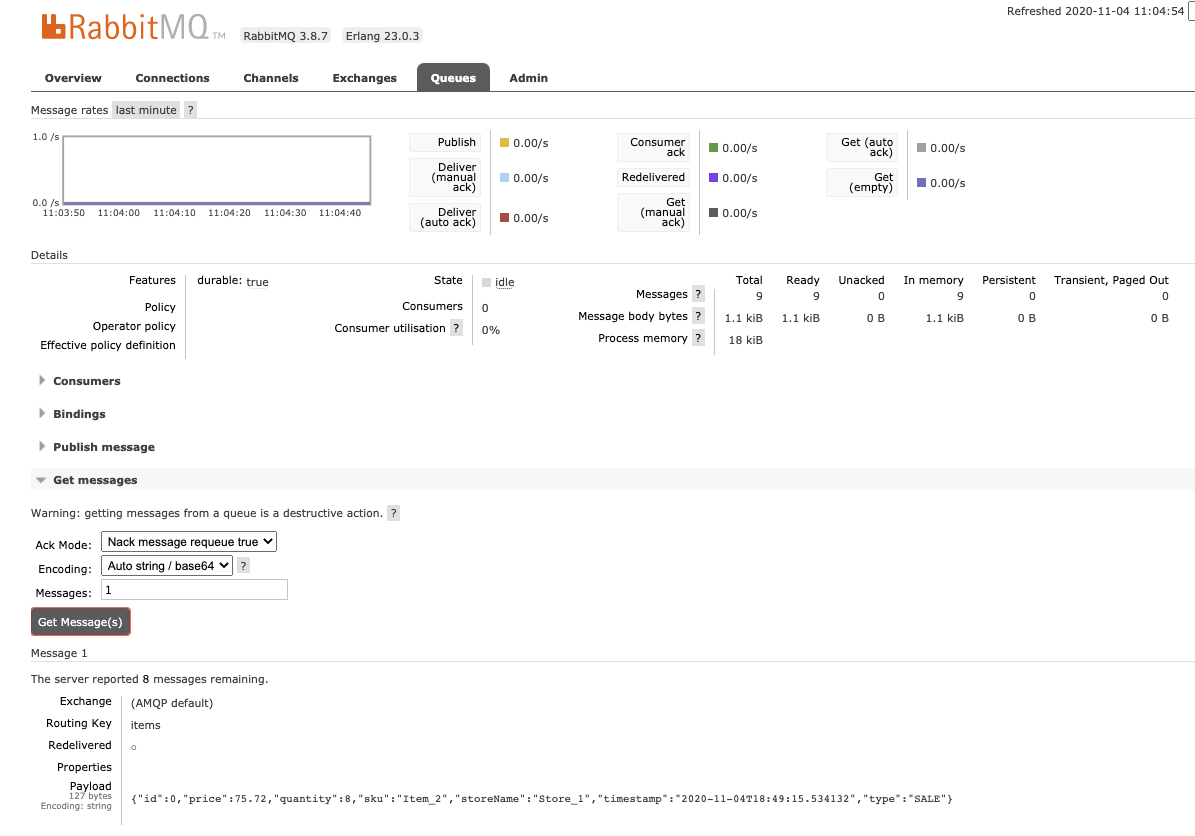
Go to the Queue tab and select the items queue:
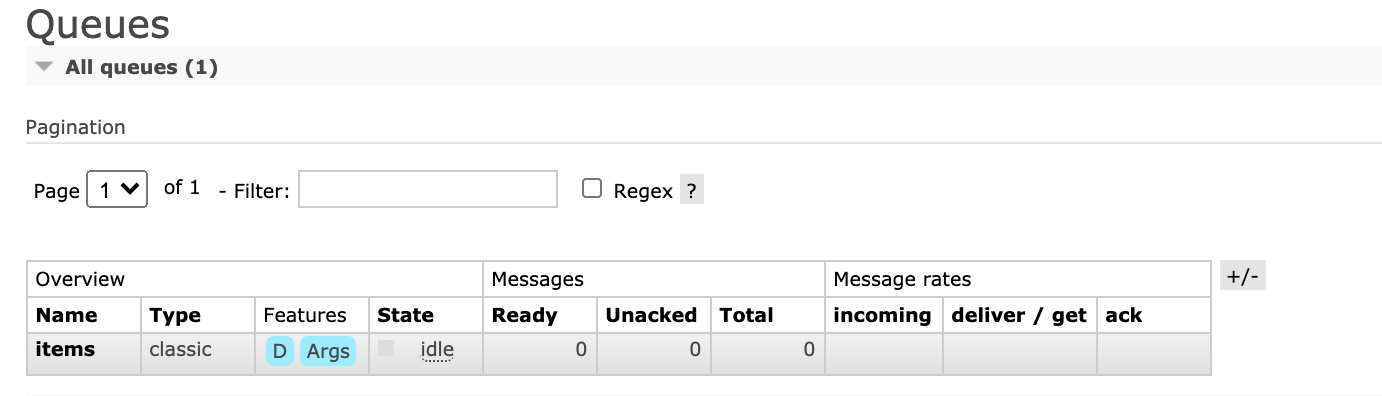
And then get 1 message from the queue:
- Now verify the Kafka connect-* topics are created successfully:
docker run -ti --network  rabbitmq-source-lab_default strimzi/kafka:latest-kafka-2.6.0 bash -c "/opt/kafka/bin/kafka-topics.sh --bootstrap-server kafka:9092 --list"
# you should get at least
__consumer_offsets
connect-configs
connect-offsets
connect-status
items
- Verify the message arrived to the
itemsin kafka topic:
```shell docker run -ti --network rabbitmq-source-lab_default strimzi/kafka:latest-kafka-2.6.0 bash -c "/opt/kafka/bin/kafka-console-consumer.sh --bootstrap-server kafka:9092 --topic items --from-beginning"
# You may have a trace like which maps the messages sent "{\"id\":0,\"price\":11.0,\"quantity\":6,\"sku\":\"Item_5\",\"storeName\":\"Store_3\",\"timestamp\":\"2020-10-23T19:11:26.395325\",\"type\":\"SALE\"}" "{\"id\":1,\"price\":68.5,\"quantity\":0,\"sku\":\"Item_5\",\"storeName\":\"Store_1\",\"timestamp\":\"2020-10-23T19:11:26.395447\",\"type\":\"SALE\"}" ```
You validated the solution works end to end. Now we can try to deploy those components to OpenShift.
Deploy on OpenShift
In this section, you will deploy the Kafka connector and Rabbit MQ on OpenShift using Event Streams on Premise as Kafka cluster.
Pre-requisites
- To run the demonstration be sure to have the event store simulator deployed: see instructions here.
Pull in necessary pre-req from the Realtime Inventory Pre-reqs, like for example the deployment of the store simulator.
Deploy RabbitMQ using operators
See the installation instructions to get a RabbitMQ operator installed, or use our manifests from the refarch-eda-tools repository, which will set user 1000 and 999 for OpenShift deployment. The RabbitMQ cluster operator runs as user ID 1000. The RabbitMQ pod runs the RabbitMQ container as user ID 999 and an init container as user ID 0.
- Create a dedicated project to run RabbitMQ operator to observe any projects, and install CRD, service account, RBAC role, deployment...
oc new-project rabbitmq-system
# under the labs/rabbitmq-source-lab folder do
kubectl apply -f cluster-operator.yml

kubectl get customresourcedefinitions.apiextensions.k8s.io
- Create a second project for RabbitMQ cluster. It is recommended to have separate project for RabbitMQ cluster. Modify the namespace to be able to deploy RabbitMQ cluster into it. So we need to get user 999 authorized. For that we specify a security constraint named:
rabbitmq-cluster
- Update the name space to get openshift scc userid and groupid range. You can do that in two ways, by directly editing the namespace definition:
 oc edit namespace rabbitmq-cluster
 # Then add the following annotations:
 annotations:
   openshift.io/sa.scc.supplemental-groups: 999/1
   openshift.io/sa.scc.uid-range: 0-999/1
Or by using our custom cluster definition: oc apply -f rmq-cluster-ns.yaml
-
For every RabbitMQ cluster assign the previously created security context constraint to the cluster's service account:
oc adm policy add-scc-to-user rabbitmq-cluster -z rmqcluster-rabbitmq-server -
Finally create a cluster instance:
oc apply -f rmq-cluster.yaml. - Define a route on the client service on port 15672
- Get the admin user and password as defined in the secrets
 oc describe secret rmqcluster-rabbitmq-default-user
 # Get user name
 oc get secret rmqcluster-rabbitmq-default-user  -o jsonpath='{.data.username}' | base64 --decode
 # Get password
 oc get secret rmqcluster-rabbitmq-default-user  -o jsonpath='{.data.password}' | base64 --decode
To validate the RabbitMQ cluster runs correctly you can use the RabbitMQ console, and add the items queue.
Configure the kafka connector for Rabbitmq source
The rabbitmq-source.json define the connector and the RabbitMQ connection parameters:
{
    "name": "RabbitMQSourceConnector",
    "config": {
        "connector.class": "com.ibm.eventstreams.connect.rabbitmqsource.RabbitMQSourceConnector",
        "tasks.max": "1",
        "kafka.topic" : "items",
        "rabbitmq.host": "rabbitmq",
        "rabbitmq.port": 5672,
        "rabbitmq.queue" : "items",
        "rabbitmq.prefetch.count" : "500",
        "rabbitmq.automatic.recovery.enabled" : "true",
        "rabbitmq.network.recovery.interval.ms" : "10000",
        "rabbitmq.topology.recovery.enabled" : "true"
    }
}
This file is uploaded to Kafka Connect via a PORT operation:
curl -X POST -H "Content-Type: application/json" http://localhost:8083/connectors --data "@./rabbitmq-source.json"
To verify use: curl -X GET http://localhost:8083/connectors.
In Kafka connect trace you should see:
[Worker clientId=connect-1, groupId=eda-kconnect] Connector RabbitMQSourceConnector config updated
...
Starting connector RabbitMQSourceConnector
...
 Starting task RabbitMQSourceConnector-0
And Rabbitmq that get the connection from Kafka Connect.
rabbitmq_1  [info] <0.1766.0> accepting AMQP connection <0.1766.0> (172.19.0.3:33040 -> 172.19.0.2:5672)
kconnect_1  INFO Creating Channel (com.ibm.eventstreams.connect.rabbitmqsource.RabbitMQSourceTask:61)
rabbitmq_1  connection <0.1766.0> (172.19.0.3:33040 -> 172.19.0.2:5672): user 'rabbit-user' authenticated and granted access to vhost '/'