Kafka Connect - MQ
This extended scenario supports different labs going from simple to more complex and addresses how to integrate IBM MQ with Event Streams Kafka as part of Cloud Pak for Integration using Kafka Connect with IBM MQ Kafka Connectors.
To run the same Lab with Kafka Confluent see the ibm-cloud-architecture/eda-lab-mq-to-kafka readme file.
Audience
We assume readers have good knowledge of OpenShift to login, to naivgate into the Administrator console and use OC and GIT CLIs.
Pre-requisites to all labs
- Access to an OpenShift Cluster and Console
- Login to the OpenShift Console and get the
access tokento useoc login. - Access to git cli from your workstation
- Clone Lab repository
Lab 1: MQ source to Event Streams Using the Admin Console
In this lab we assume Cloud Pak for Integration is deployed with Event Streams cluster created and at least one MQ Broker created. If not see this note to install Event Streams operator and defining one Kafka cluster using the OpenShift Console and this note to install one MQ Operator and one MQ Broker.
The following figure illustrates what we will deploy:
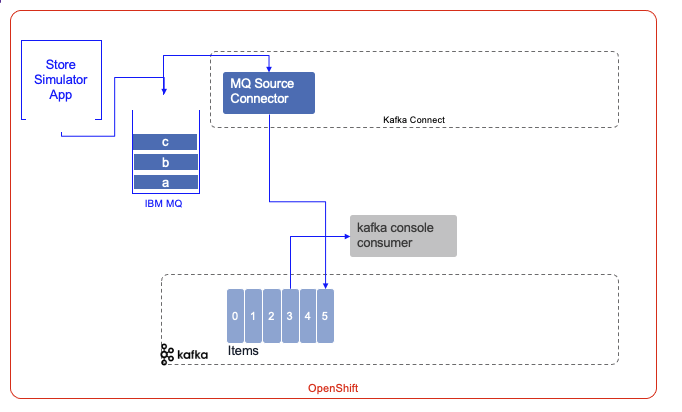
- The Sell Store simulator is a separate application available in the refarch-eda-store-simulator public github and the docker image is accessible from the quay.io registry.
- The Event Streams cluster is named
dev
Get setup
- Get Cloud Pak for Integration
adminuser password
oc get secret platform-auth-idp-credentials -o jsonpath='{.data.admin_password}' -n ibm-common-services | base64 --decode && echo ""
Use this URL to access to the Event Stream console:
- Using the Topic menu, create the
itemstopic with 1 partition, use default retention time, and 3 replicas - Get Internal Kafka bootstrap URL
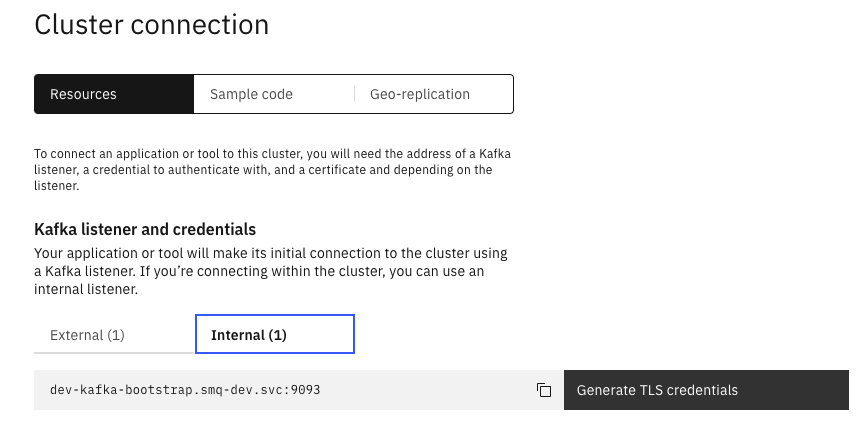
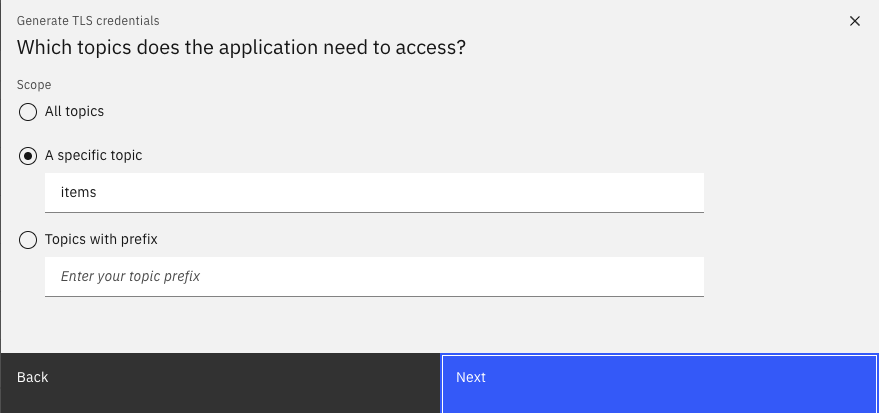
and generate TLS credentials with the name tls-mq-user with the Produce messages, consume messages and create topics and schemas permissions,

on items topic:
All consumer groups, as we may reuse this user for consumers.
You can download the certificates, but in fact it is not necessary as we will use the created secrets to configure MQ Kafka connector.
- Get MQ Console route from the namespace where MQ brokers run
- Access to MQ Broker Console > Manage to see the Broker configured

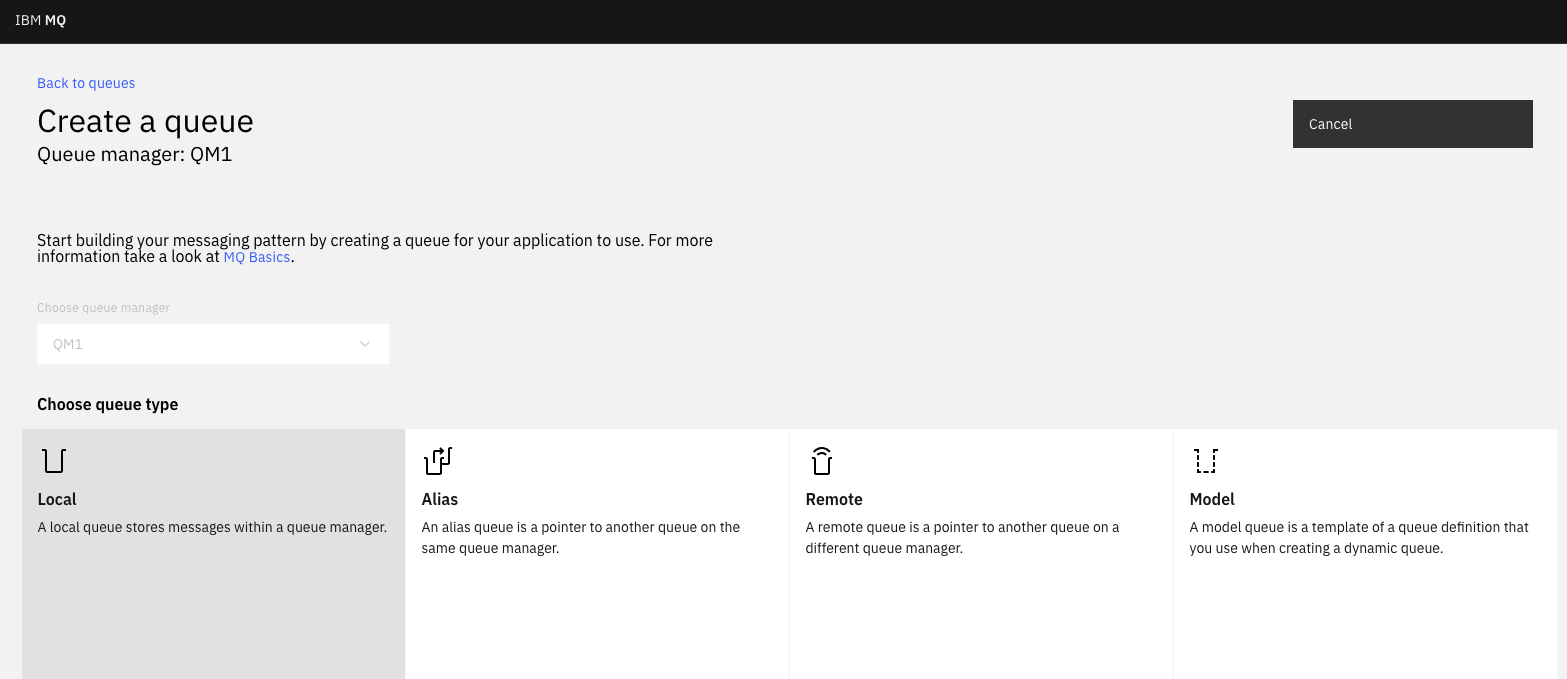
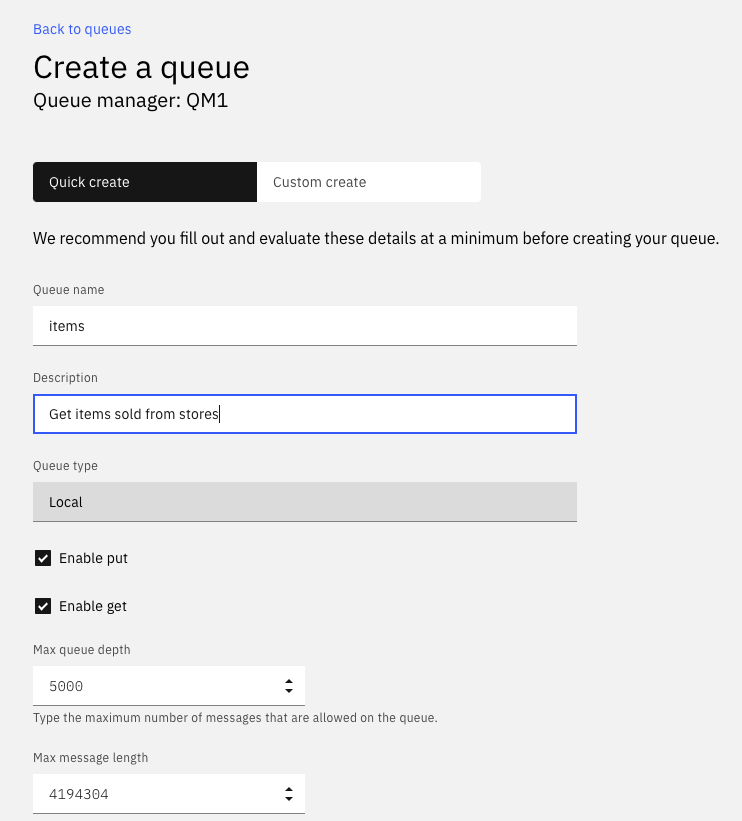
- Add the local
itemsqueue
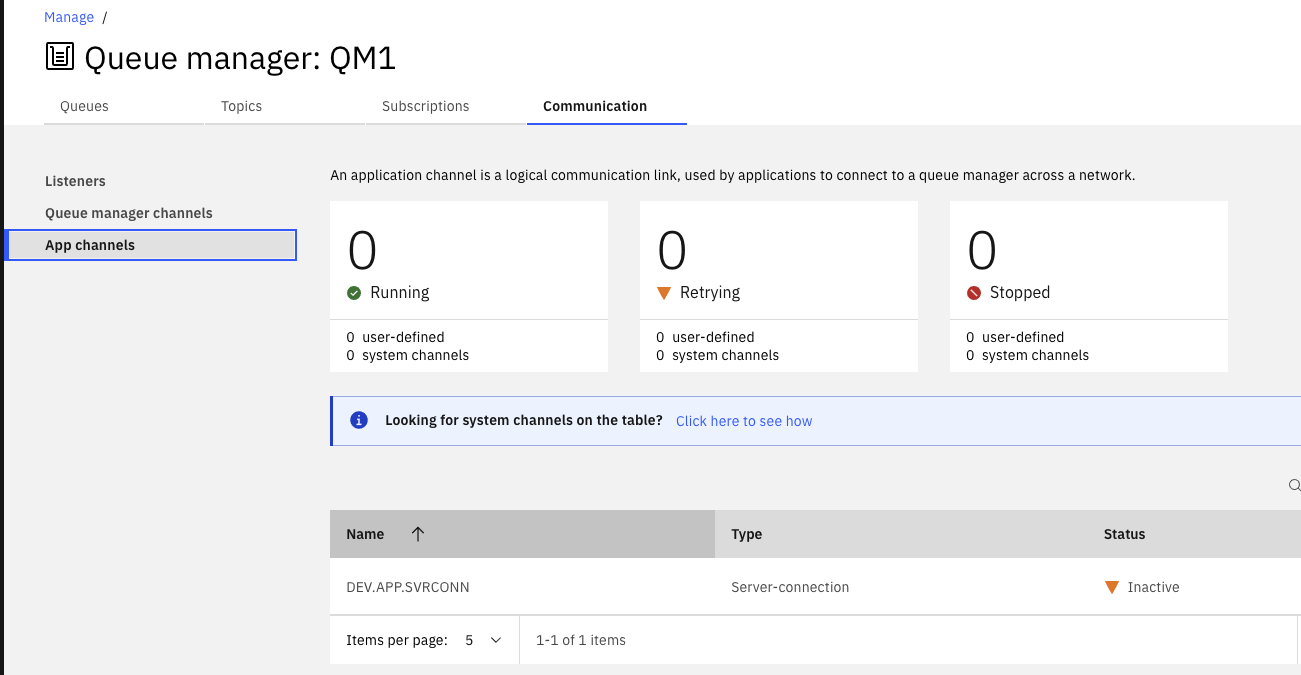
- Verify MQ App channels defined
- Create an OpenShift project named:
mq-es-demowith the command:oc new-project mq-es-demo - Clone the git
ibm-cloud-architecture/eda-lab-mq-to-kafkarepository:
- Update the configMap named
store-simulator-cmin folderkustomize/apps/store-simulator/overlaysfor the store simulator:Workloads > ConfigMaps > Createand use the parameters from MQ_HOST and MQ_CHANNEL.
 apiVersion: v1
 kind: ConfigMap
 metadata:
   name: store-simulator-cm
 data:
   APP_VERSION: 0.0.6
   APP_TARGET_MESSAGING: IBMMQ
   MQ_HOST: store-mq-ibm-mq.cp4i.svc
   MQ_PORT: "1414"
   MQ_QMGR: QM1
   MQ_QUEUE_NAME: items
   MQ_CHANNEL: DEV.APP.SVRCONN
Deploy Store simulator
- Deploy to the OpenShift project
- Access to the application web interface:

Deploy Kafka Connect
The Event Streams MQ Source connector product documentation describes what need to be done in details. Basically we have to do two things:
- Build the connector image with the needed jars for all the connectos we want to use. For example we need jar files for the MQ connector and jars for the MQ client api.
- Start a specific connector with the parameters to connect to the external system and to kafka.
To make the MQ source connector immediatly useable for the demonstration, we have build a connector image at quay.io/ibmcase/demomqconnect and the kafkaconnect.yaml is in this file.
To deploy the kafka connect framework do:
oc apply -f https://raw.githubusercontent.com/ibm-cloud-architecture/eda-lab-mq-to-kafka/main/kustomize/environment/kconnect/es-mq/kafka-connect.yaml
Then start the MQ source connector:
oc apply -f https://raw.githubusercontent.com/ibm-cloud-architecture/eda-lab-mq-to-kafka/main/kustomize/environment/kconnect/es-mq/mq-src-connector.yaml
Demonstration scripts
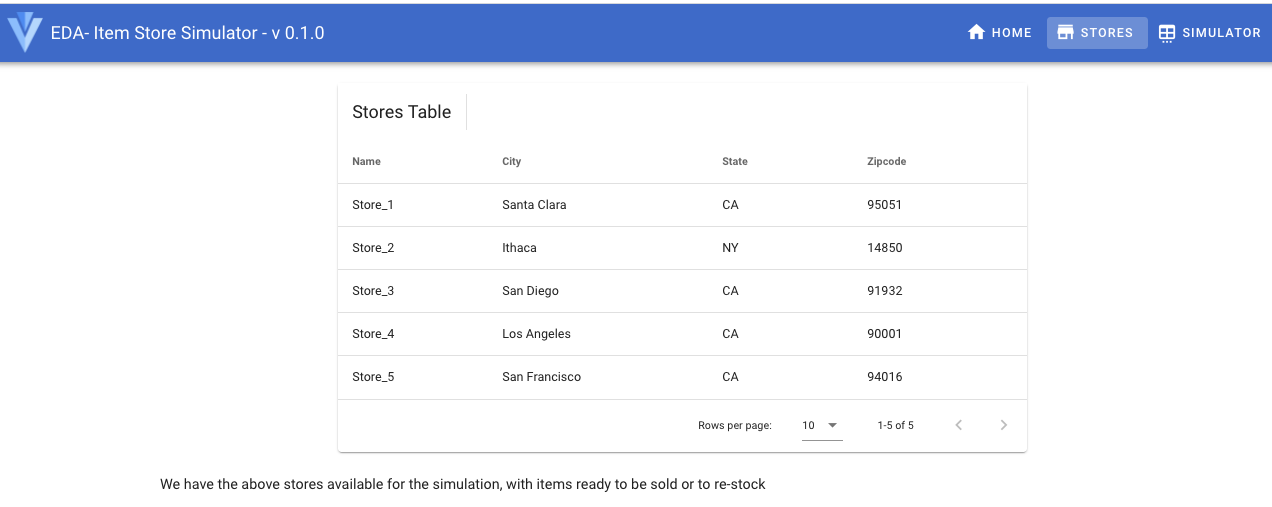
- The solution has multiple stores as presented in the
storesmenu.
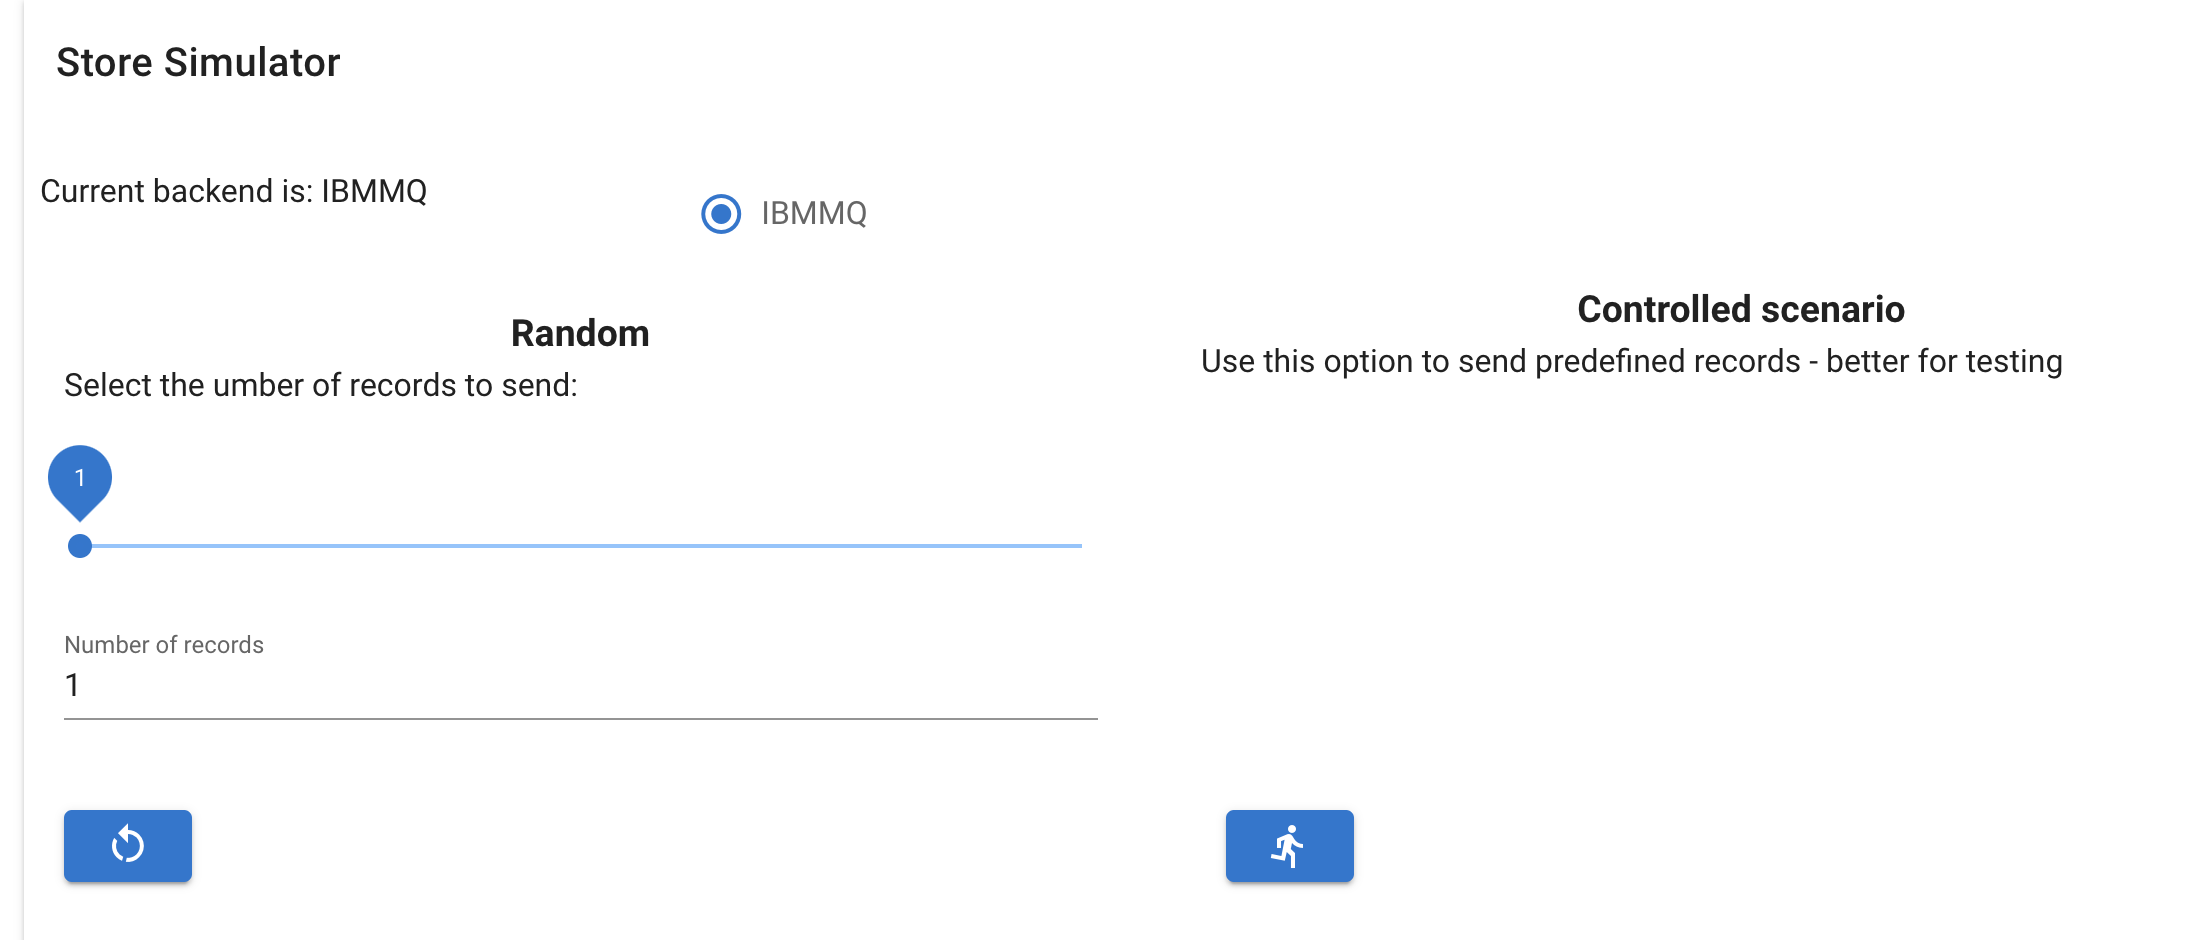
- In the
simulatormenu, select the IBMMQ backend, and send some messages randomly using the left button after selecting the number of messages to send or run the predefined scenario with the right button:
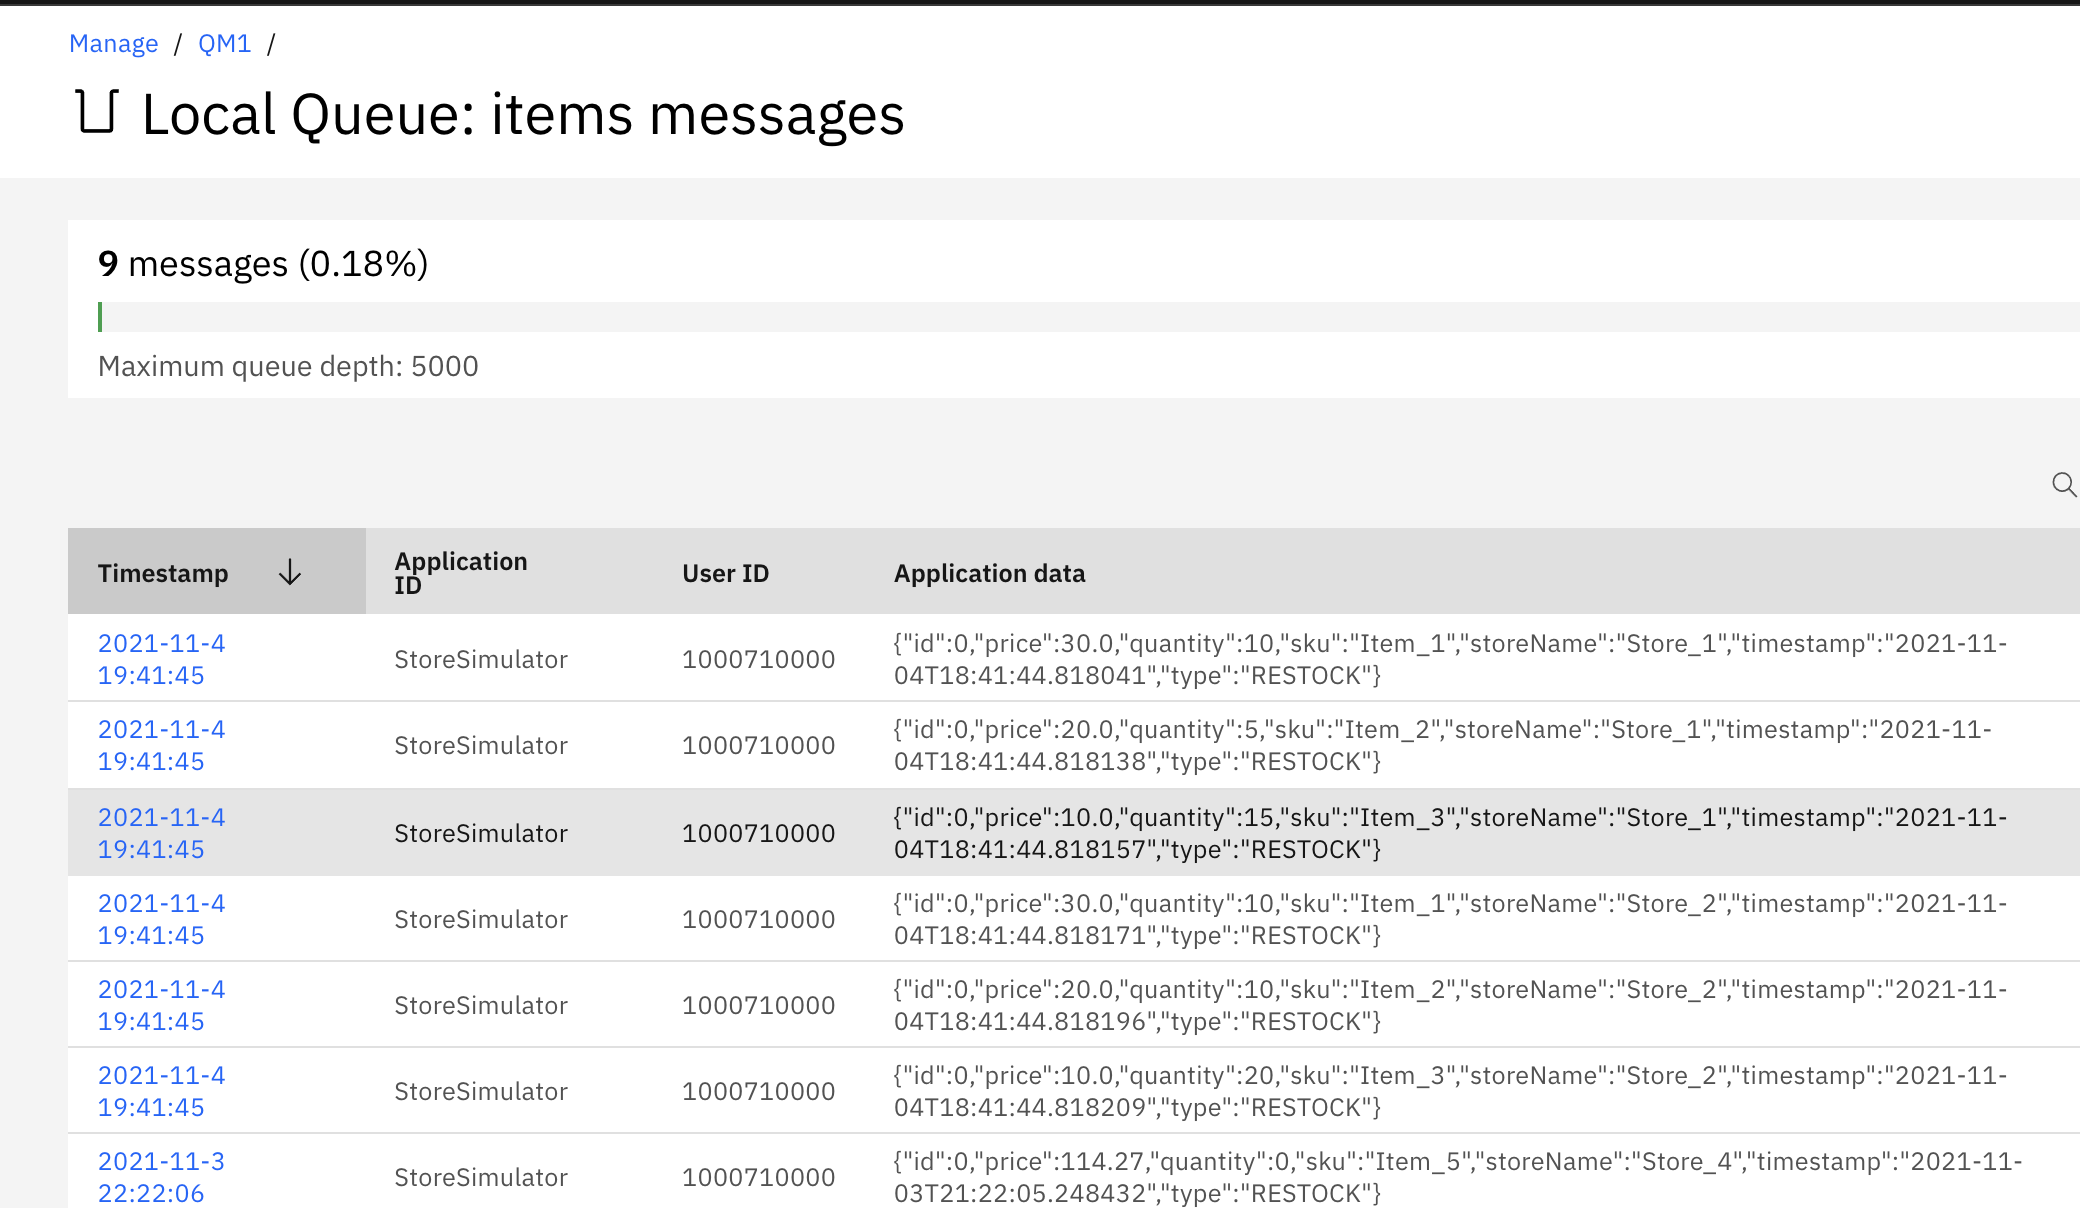
- In MQ Broker Console go to the
itemsqueue to see the messages generated from the simulator
- In Event Streams console goes to the
itemstopic to see the same messages produced by the Kafka MQ Source connector.
Lab 2: MQ source to Event Streams using GitOps
This labs uses GitOps approach with OpenShift GitOps product (ArgoCD) to deploy IBM Event Streams, MQ, the Store Simulator app, and Kafka Connect in the minimum of work. It can be used on a OpenShift Cluster witout any previously deployed Cloud Pak for Integration opersators. Basically as a SRE you will jumpstart the GitOps operator and then starts ArgoCD.
- Clone the
store-mq-gitopsrepo
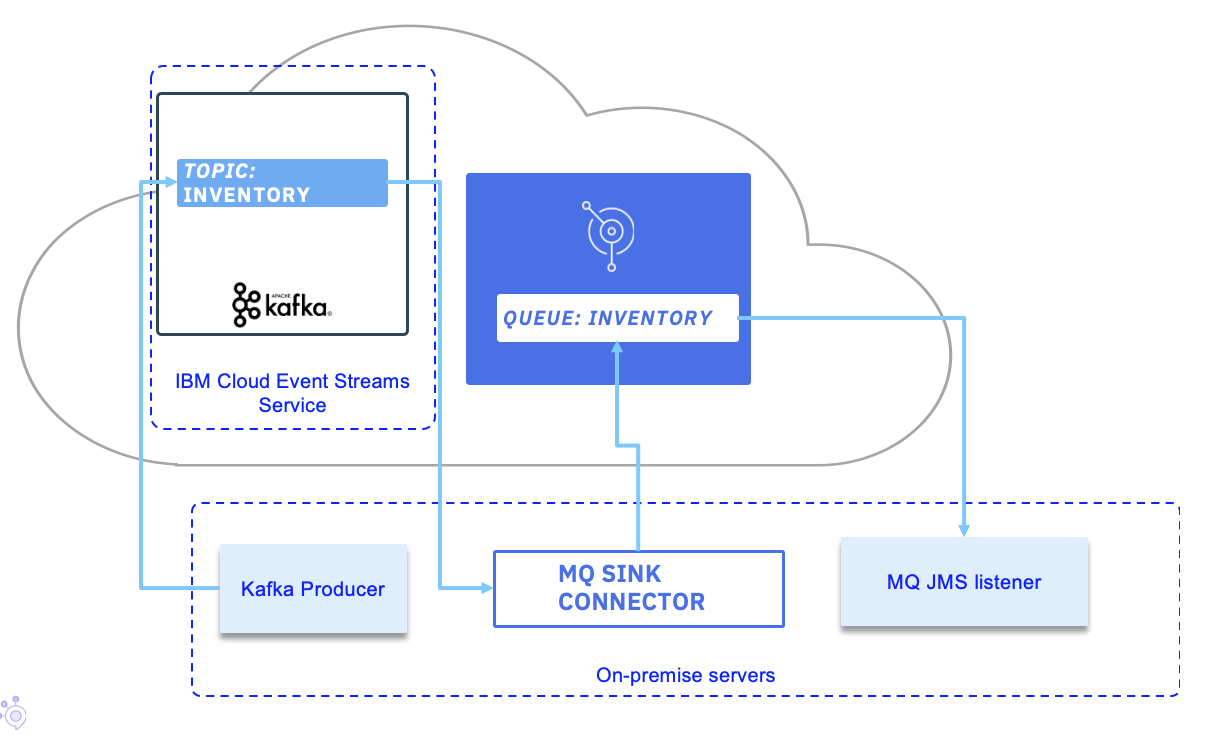
Lab 3: MQ Sink from Kafka
A may be less used Kafka connector will be to use the MQ Sink connector to get data from Kafka to MQ. This lab addresses such integration. The target deployment looks like in the following diagram:
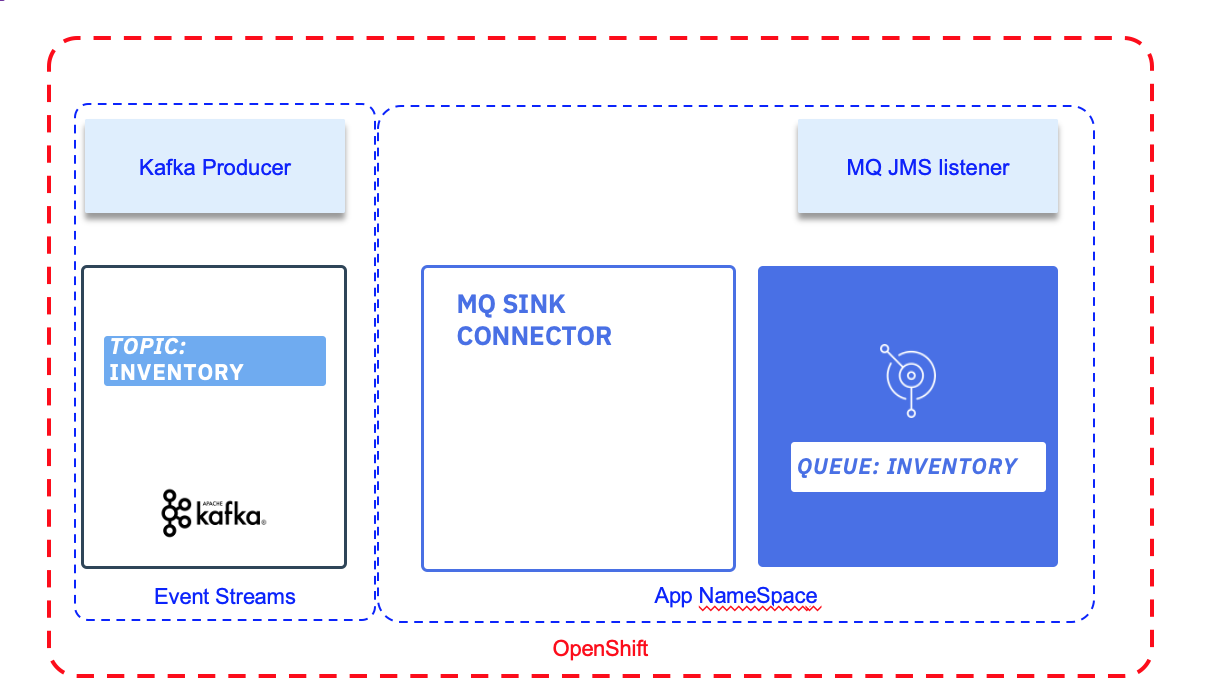
Kafka is runnning in its own namespace, and we are using Event Streams from Cloud Pack for Integration.
Setup MQ Channel
Open a shell on the remote container or use the user interface to define the communication channel to use for the Kafka Connection.
- Using CLI: Change the name of the Q manager to reflect what you defined in MQ configuration.
runmqsc EDAQMGR1
# Define a app channel using server connection
DEFINE CHANNEL(KAFKA.CHANNEL) CHLTYPE(SVRCONN)
# Set the channel authentication rules to accept connections requiring userid and password
SET CHLAUTH(KAFKA.CHANNEL) TYPE(BLOCKUSER) USERLIST('nobody')
SET CHLAUTH('*') TYPE(ADDRESSMAP) ADDRESS('*') USERSRC(NOACCESS)
SET CHLAUTH(KAFKA.CHANNEL) TYPE(ADDRESSMAP) ADDRESS('*') USERSRC(CHANNEL) CHCKCLNT(REQUIRED)
# Set identity of the client connections
ALTER AUTHINFO(SYSTEM.DEFAULT.AUTHINFO.IDPWOS) AUTHTYPE(IDPWOS) ADOPTCTX(YES)

REFRESH SECURITY TYPE(CONNAUTH)
# Define inventory queue
DEFINE QLOCAL(INVENTORY)
# Authorize the IBM MQ user ID to connect to and inquire the queue manager
SET AUTHREC OBJTYPE(QMGR) PRINCIPAL('admin') AUTHADD(CONNECT,INQ)
# Authorize the IBM MQ user ID to use the queue:
SET AUTHREC PROFILE(INVENTORY) OBJTYPE(QUEUE) PRINCIPAL('admin') AUTHADD(ALLMQI)
# done
END
- As an alternate you can use the MQ administration console.
TBD
Setup Kafka Connect Cluster
Connectors can be added to a Kafka Connect environment using OpenShift CLI commands and the source to image customer resource. We will use the Strimzi operator console to setup kafka connect environment.
Once you downloaded the zip file, which is a yaml manifest, define the configuration for a KafkaConnectS2I instance. The major configuration settings are the server certificate settings and the authentication using Mutual TLS authentication, something like:
spec:
  bootstrapServers: sandbox-rp-kafka-bootstrap.eventstreams.svc:9093
  tls:
    trustedCertificates:
    - secretName: sandbox-rp-cluster-ca-cert
      certificate: ca.crt
  authentication:
    type: tls
    certificate: user.crt
    key: user.key
    secretName: sandbox-rp-tls-cred
If you change the name of the connect cluster in the metadata, modify also the name: spec.template.pod.metadata.annotations. productChargedContainers accordingly.
The secrets used above, need to be accessible from the project where the connector is deployed. The simple way to do so is to copy the source certificates from the Event streams project to your current project with the commands like:
oc get secret  sandbox-rp-cluster-ca-cert  -n eventstreams --export -o yaml | oc apply -f -
oc get secret  sandbox-rp-tls-cred  -n eventstreams --export -o yaml | oc apply -f -
If you do not have a TLS client certificate from a TLS user, use this note to create one.
- Deploy the connector cluster
An instance of this custom resource represents a Kafka Connect distributed worker cluster. In this mode, workload balancing is automatic, scaling is dynamic, and tasks and data are fault-tolerant. Each connector is represented by another custom resource called KafkaConnector.
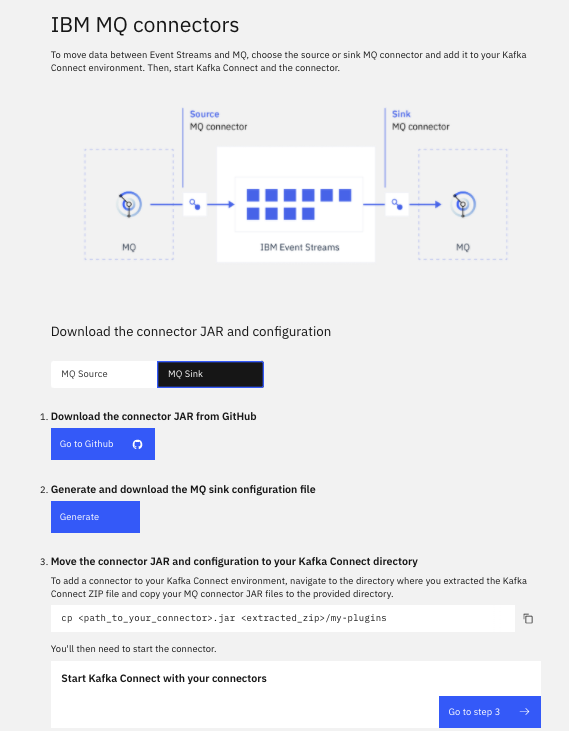
Add the mq-sink connector
The product documentation details the available MQ connectors and the configuration process. Using the event streams console, the process is quite simple to get a connector configuration as json file. Here is an example of the final form to generate the json file:
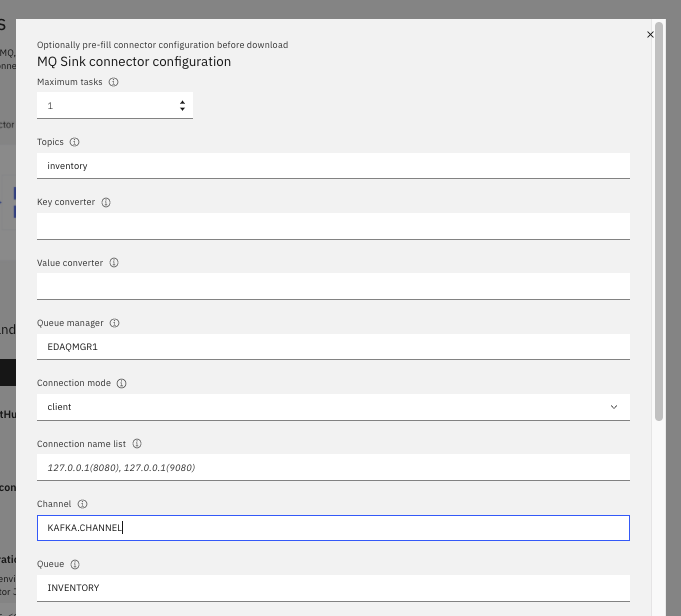
- Once the json is downloaded, complete the settings
{
  "name": "mq-sink",
  "config":
  {
      "connector.class": "com.ibm.eventstreams.connect.mqsink.MQSinkConnector",
      "tasks.max": "1",
      "topics": "inventory",
      "key.converter": "org.apache.kafka.connect.storage.StringConverter",
      "value.converter": "org.apache.kafka.connect.storage.StringConverter",
      "mq.queue.manager": "EDAQMGR1",
      "mq.connection.name.list": "eda-mq-lab-ibm-mq(1414)",
      "mq.user.name": "admin",
      "mq.password": "passw0rd",
      "mq.user.authentication.mqcsp": true,
      "mq.channel.name": "KAFKA.CHANNEL",
      "mq.queue": "INVENTORY",
      "mq.message.builder": "com.ibm.eventstreams.connect.mqsink.builders.DefaultMessageBuilder"
  }
}
- To run the connector within the cluster, we need to connector jar. You can download this jar file from the Event Stream adming console
> Toolkit > Add connector to your Kafka Connect environment > Add Connector > IBM MQ Connectors,
or as an alternate, we cloned the mq-sink code, so a mvn package command under kafka-connect-mq-sink folder will build the jar. Copy this jar under cp4i/my-plugins folder. * Build the connector with source to image component.
With the correct credentials for IBM EventStreams and IBM MQ, Kafka Connect should connect to both services and pull data from the EventStreams topic configured to the MQ Queue configured. You will see signs of success in the container output (via oc logs, or in the UI):
+ curl -X POST -H Content-Type: application/json http://localhost:8083/connectors --data @/opt/kafka-connect-mq-sink/config/mq-sink.json
...
{"name":"mq-sink-connector","config":{"connector.class":"com.ibm.eventstreams.connect.mqsink.MQSinkConnector","tasks.max":"1","topics":"inventory","key.converter":"org.apache.kafka.connect.storage.StringConverter","value.converter":"org.apache.kafka.connect.storage.StringConverter","mq.queue.manager":"QM1","mq.connection.name.list":"mq-service(1414)","mq.user.name":"admin","mq.password":"passw0rd","mq.user.authentication.mqcsp":"true","mq.channel.name":"KAFKA.CHANNEL","mq.queue":"INVENTORY","mq.message.builder":"com.ibm.eventstreams.connect.mqsink.builders.DefaultMessageBuilder","name":"mq-sink-connector"},"tasks":[{"connector":"mq-sink-connector","task":0}],"type":"sink"}
...
[2020-06-23 04:26:26,054] INFO Creating task mq-sink-connector-0 (org.apache.kafka.connect.runtime.Worker:419)
...[2020-06-23 04:26:26,449] INFO Connection to MQ established (com.ibm.eventstreams.connect.mqsink.JMSWriter:229)
[2020-06-23 04:26:26,449] INFO WorkerSinkTask{id=mq-sink-connector-0} Sink task finished initialization and start (org.apache.kafka.connect.runtime.WorkerSinkTask:306)
You should now have the Kafka Connector MQ Sink running on OpenShift.
MQ Sink Connector on virtual or baremetal server, MQ and Event Streams on IBM Cloud
In this second option, we are using our own laptop for the baremetal dedployment, but the current solution will work the same on virtual server.
Pre-requisites
We assume that you have an instance of IBM Event Streams already running on IBM Cloud or on OpenShift with at least administrator credentials created. The credentials will be needed later on for configuring the Kafka Connect framework to be able to connect and work with your IBM Event Streams instance. Also, this scenario requires a topic called inventory in your IBM Event Streams instance. For gathering the credentials and creating the topic required for this scenario, please review the Common pre-requisites. IMPORTANT: if you are sharing your IBM Event Streams instance, append some unique identifier to the topic you create in IBM Event Streams.
Create Local IBM MQ Instance
In this section we are going to use Docker to create a local IBM MQ instance to simulate an IBM MQ instance somewhere in our datacenter.
- Create a data directory to mount onto the container.
- Run the IBM MQ official Docker image by execting the following command.
docker run                     \
  --name mq                    \
  --detach                     \
  --publish 1414:1414          \
  --publish 9443:9443          \
  --publish 9157:9157          \
  --volume qm1data:/mnt/mqm    \
  --env LICENSE=accept         \
  --env MQ_QMGR_NAME=QM1       \
  --env MQ_APP_PASSWORD=admin  \
  --env MQ_ENABLE_METRICS=true \
  ibmcom/mq
mq, it will run in detached mode (i.e. in the background), it will expose the ports IBM MQ uses for communication and the image we are actually running ibmcom/mq. - You could make sure your IBM MQ Docker image is running by listing the Docker containers in your workstation.
$ docker ps
CONTAINER ID   IMAGE       COMMAND            CREATED         STATUS         PORTS                                                                    NAMES
a7b2a115a3c6   ibmcom/mq   "runmqdevserver"   6 minutes ago   Up 6 minutes   0.0.0.0:1414->1414/tcp, 0.0.0.0:9157->9157/tcp, 0.0.0.0:9443->9443/tcp   mq
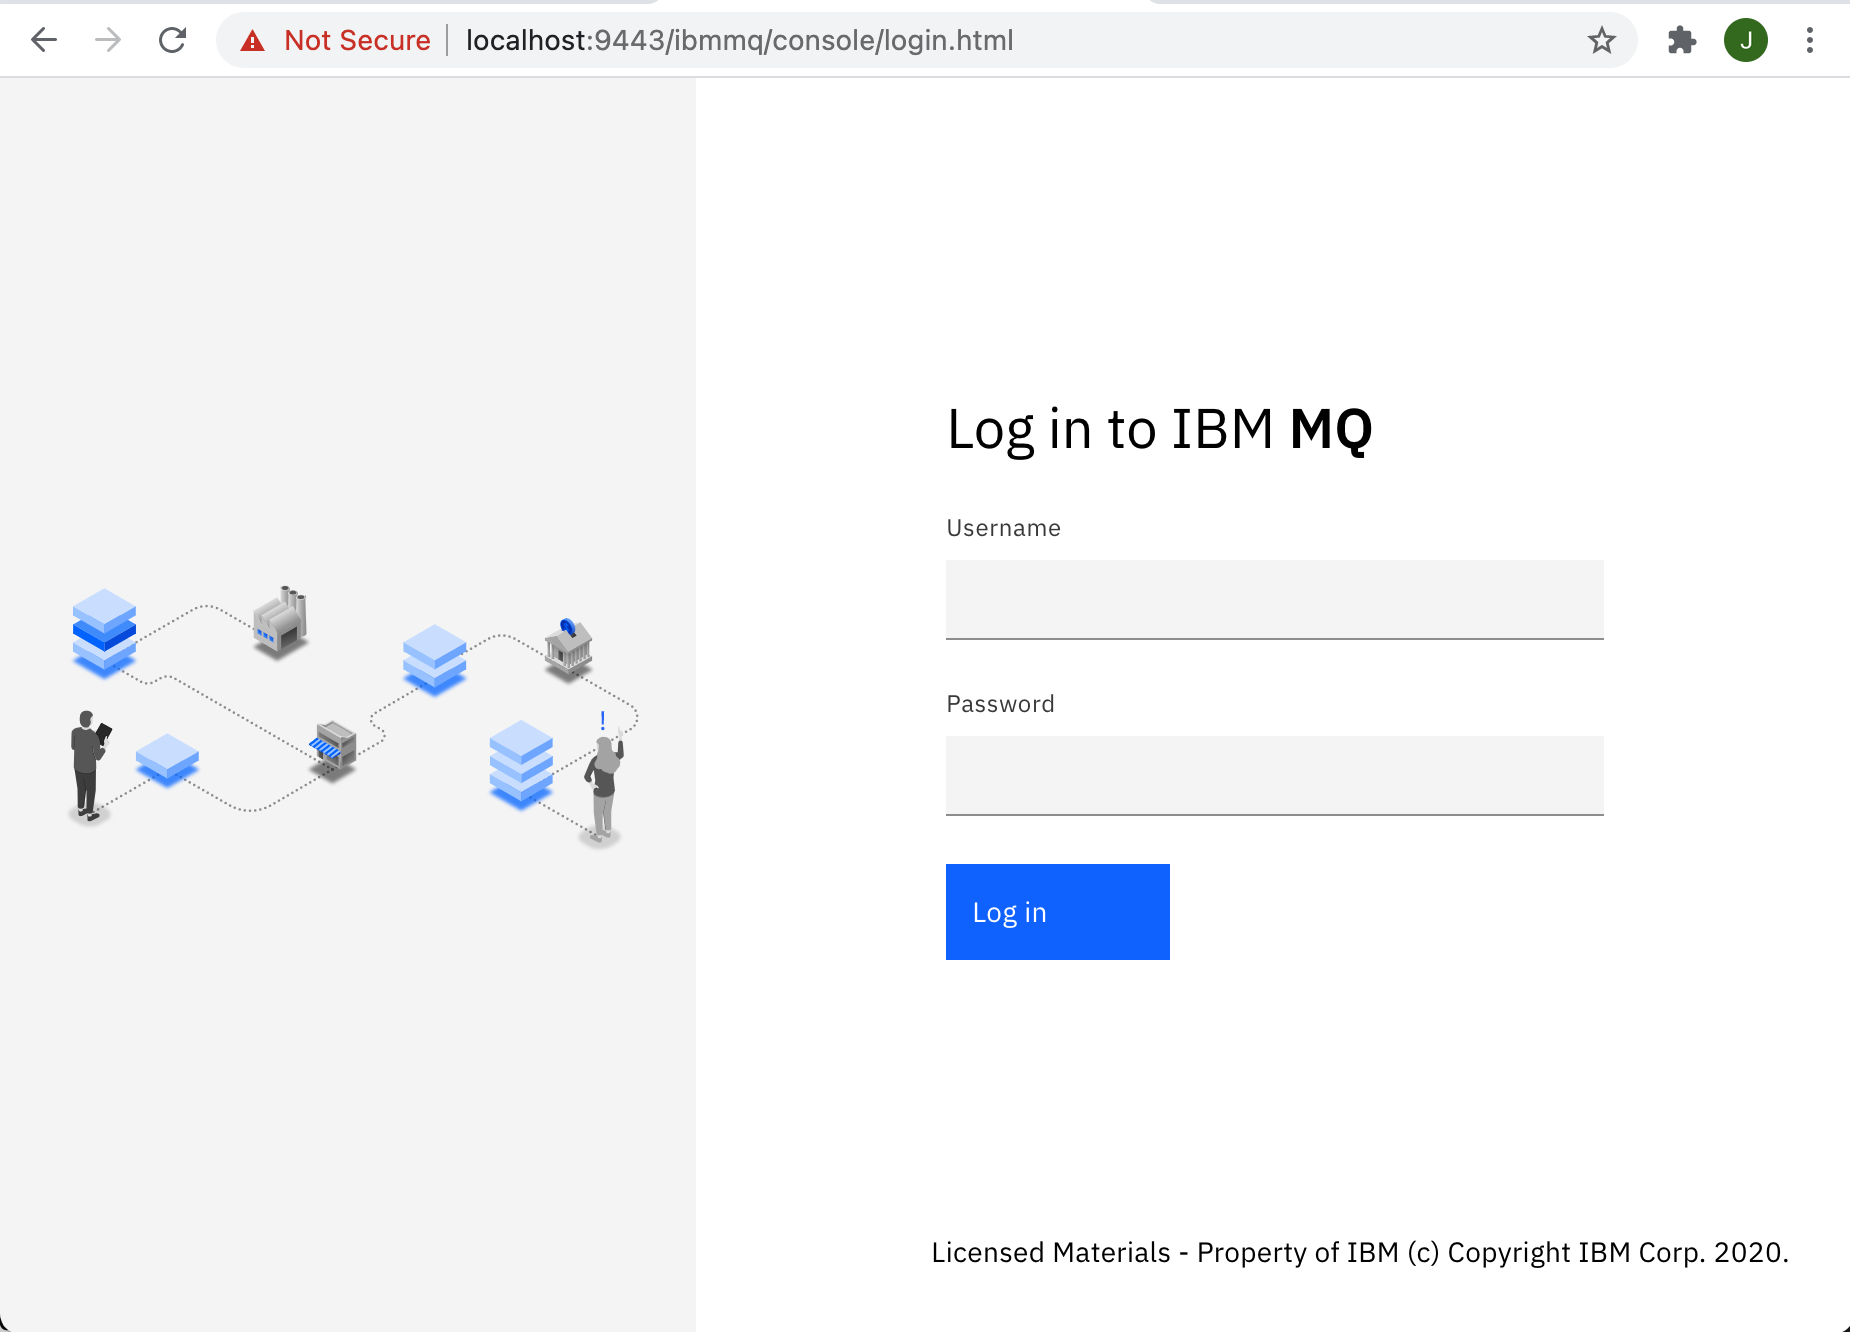
- You should also be able to log into the MQ server on port 9443 (https://localhost:9443) with default user
adminand passwordpassw0rd.
Now, we need to configure our local IBM MQ instance Queue Manager in order to define a server connection (KAFKA.CHANNEL) with authentication (user admin, password admin) and the queue (INVENTORY) where our messages from Kafka will be sinked to. And we are going to so it using the IBM MQ CLI.
- Get into the IBM MQ Docker container we have started above by executing the following command that will give us a
bashinteractive terminal:
- Now that we are in the container, start the queue manager
QM1by executing:
- Start the
runmqsctool to configure the queue manager by executing:
- Create a server-connection channel called
KAFKA.CHANNELby executing:
- Set the channel authentication rules to accept connections requiring userid and password by executing:
SET CHLAUTH(KAFKA.CHANNEL) TYPE(BLOCKUSER) USERLIST('nobody')
SET CHLAUTH('*') TYPE(ADDRESSMAP) ADDRESS('*') USERSRC(NOACCESS)
SET CHLAUTH(KAFKA.CHANNEL) TYPE(ADDRESSMAP) ADDRESS('*') USERSRC(CHANNEL) CHCKCLNT(REQUIRED)
- Set the identity of the client connections based on the supplied context, the user ID by executing:
- Refresh the connection authentication information by executing:
- Create the
INVENTORYqueue for the connector to use by executing:
- Authorize
adminto connect to and inquire the queue manager by executing:
- Finally authorize
adminto use the queue by executing:
- End
runmqscby executing:
You should see the following output:
9 MQSC commands read.
No commands have a syntax error.
One valid MQSC command could not be processed.
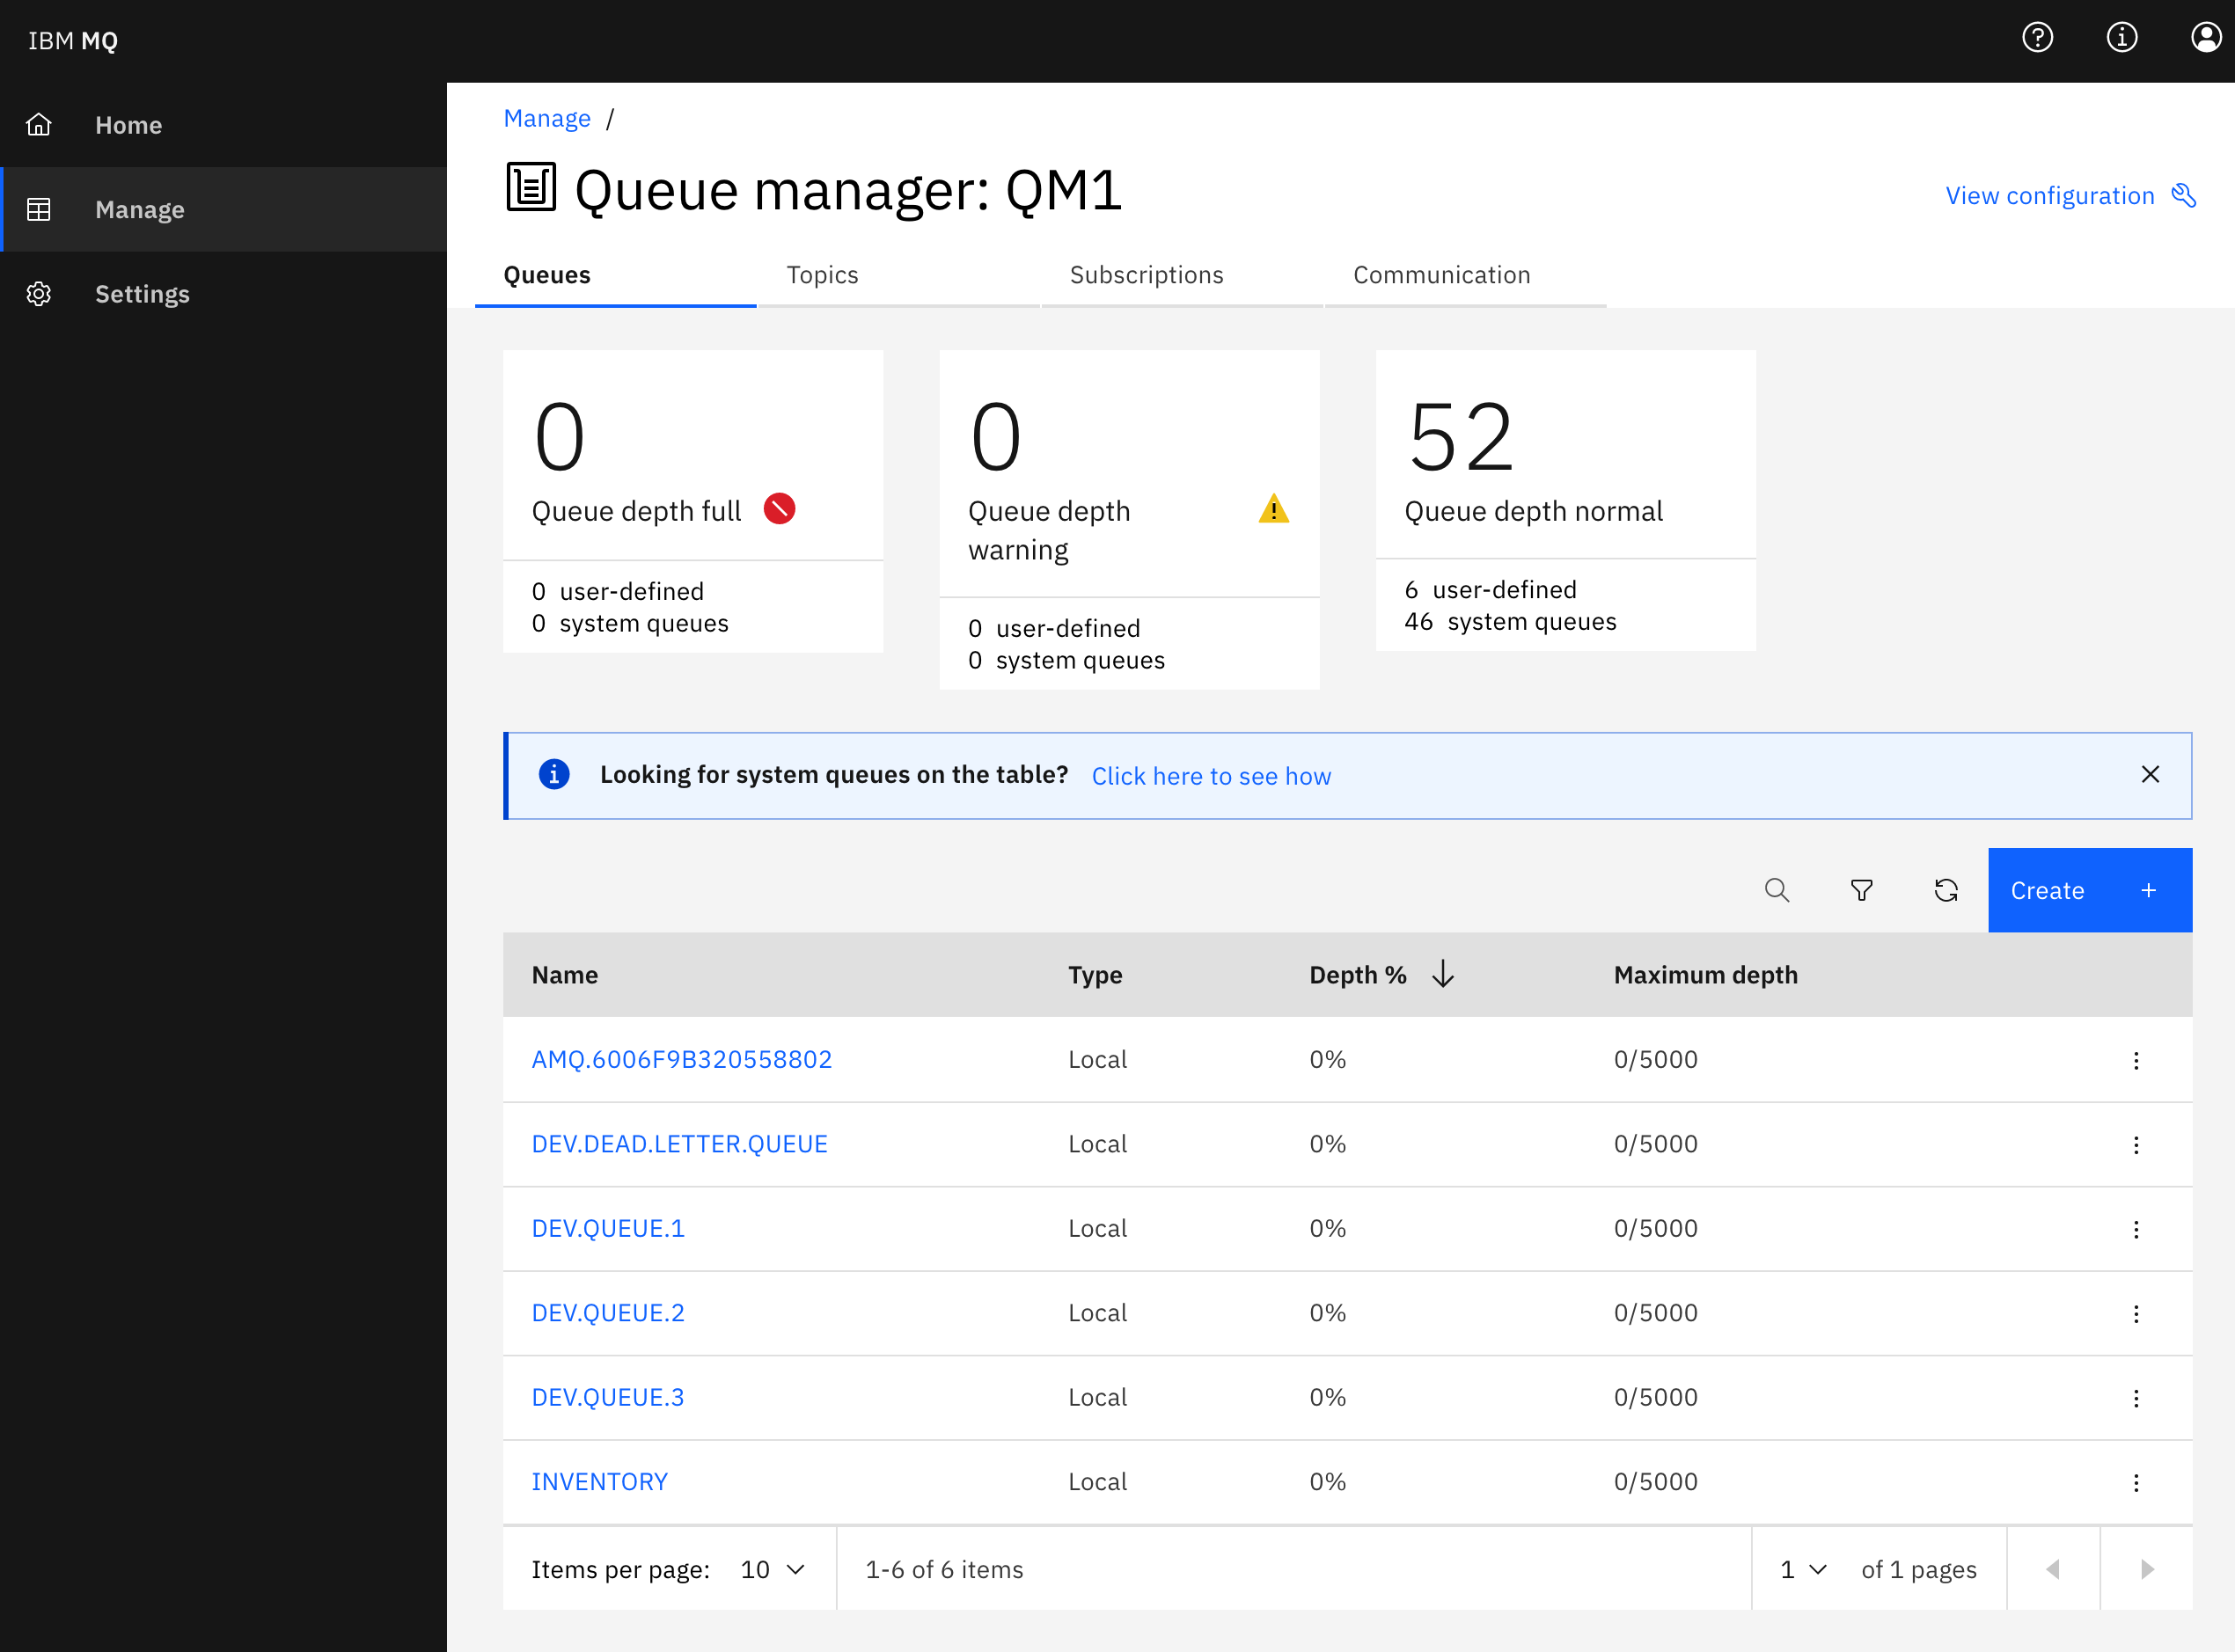
Exit the container by executing:
If you check your IBM MQ dashboard you should see your newly created INVENTORY queue:
Create MQ Kafka Connector Sink
The MQ Connector Sink can be downloaded from this Github. The Github site includes exhaustive instructions for further detail on this connector and its usage.
- Clone the repository with the following command:
- Change directory into the
kafka-connect-mq-sinkdirectory:
- Build the connector using Maven:
- Create a directory (if it does not exist yet) to contain the Kafka Connect framework configuration and cd into it.
- Create a configuration file called
connect-distributed.propertiesfor the Kafka Connect framework with the following properties in it:
# A list of host/port pairs to use for establishing the initial connection to the Kafka cluster.
bootstrap.servers=REPLACE_WITH_YOUR_BOOTSTRAP_URL
ssl.enabled.protocols=TLSv1.2
ssl.protocol=TLS
ssl.truststore.location=/opt/kafka/config/es-cert.p12
ssl.truststore.password=REPLACE_WITH_YOUR_PKCS12_CERTIFICATE_PASSWORD
ssl.truststore.type=PKCS12
security.protocol=SASL_SSL
sasl.mechanism=SCRAM-SHA-512
sasl.jaas.config=org.apache.kafka.common.security.scram.ScramLoginModule required username="REPLACE_WITH_YOUR_SCRAM_USERNAME" password="REPLACE_WITH_YOUR_SCRAM_PASSWORD";

# Consumer side configuration
consumer.bootstrap.servers=REPLACE_WITH_YOUR_BOOTSTRAP_URL
consumer.security.protocol=SASL_SSL
consumer.ssl.protocol=TLSv1.2
consumer.ssl.truststore.location=/opt/kafka/config/es-cert.p12
consumer.ssl.truststore.password=REPLACE_WITH_YOUR_PKCS12_CERTIFICATE_PASSWORD
consumer.ssl.truststore.type=PKCS12
consumer.sasl.mechanism=SCRAM-SHA-512
consumer.sasl.jaas.config=org.apache.kafka.common.security.scram.ScramLoginModule required username="REPLACE_WITH_YOUR_SCRAM_USERNAME" password="REPLACE_WITH_YOUR_SCRAM_PASSWORD";

# Producer Side
producer.bootstrap.servers=REPLACE_WITH_YOUR_BOOTSTRAP_URL
producer.security.protocol=SASL_SSL
producer.ssl.protocol=TLSv1.2
producer.ssl.truststore.location=/opt/kafka/config/es-cert.p12
producer.ssl.truststore.password=REPLACE_WITH_YOUR_PKCS12_CERTIFICATE_PASSWORD
producer.ssl.truststore.type=PKCS12
producer.sasl.mechanism=SCRAM-SHA-512
producer.sasl.jaas.config=org.apache.kafka.common.security.scram.ScramLoginModule required username="REPLACE_WITH_YOUR_SCRAM_USERNAME" password="REPLACE_WITH_YOUR_SCRAM_PASSWORD";

plugin.path=/opt/kafka/libs

# unique name for the cluster, used in forming the Connect cluster group. Note that this must not conflict with consumer group IDs
group.id=mq-sink-cluster-REPLACE_WITH_UNIQUE_IDENTIFIER

# The converters specify the format of data in Kafka and how to translate it into Connect data. Every Connect user will
# need to configure these based on the format they want their data in when loaded from or stored into Kafka
key.converter=org.apache.kafka.connect.json.JsonConverter
value.converter=org.apache.kafka.connect.json.JsonConverter
# Converter-specific settings can be passed in by prefixing the Converter's setting with the converter we want to apply
# it to
key.converter.schemas.enable=true
value.converter.schemas.enable=true

# Topic to use for storing offsets.
offset.storage.topic=connect-offsets-REPLACE_WITH_UNIQUE_IDENTIFIER
offset.storage.replication.factor=3
#offset.storage.partitions=25

# Topic to use for storing connector and task configurations; note that this should be a single partition, highly replicated, and compacted topic.
config.storage.topic=connect-configs-REPLACE_WITH_UNIQUE_IDENTIFIER
config.storage.replication.factor=3

# Topic to use for storing statuses. This topic can have multiple partitions and should be replicated and compacted.
status.storage.topic=connect-status-REPLACE_WITH_UNIQUE_IDENTIFIER
status.storage.replication.factor=3
status.storage.partitions=5

# Flush much faster than normal, which is useful for testing/debugging
offset.flush.interval.ms=10000
IMPORTANT: You must replace all occurences of the following placeholders in the properties file above with the appropriate values for the Kafka Connect framework to work with your IBM Event Streams instance: * REPLACE_WITH_YOUR_BOOTSTRAP_URL: Your IBM Event Streams bootstrap url. * REPLACE_WITH_YOUR_PKCS12_CERTIFICATE_PASSWORD: Your PCKS12 TLS certificate password. * REPLACE_WITH_YOUR_SCRAM_USERNAME: Your SCRAM service credentials username. * REPLACE_WITH_YOUR_SCRAM_PASSWORD: Your SCRAM service credentials password. * REPLACE_WITH_UNIQUE_IDENTIFIER: A unique identifier so that the resources your kafka connect cluster will create on your IBM Event Streams instance don't collide with other users' resources (Note: there are 4 placeholders of this type. Replace them all).
Review the Common pre-requisites instructions if you don't know how to find out any of the config properties above.
-
Download the IBM Event Streams TLS certificate so that your Kafka Connect framework local instance can establish secure communication with your IBM Event Streams instance. IMPORTANT: download the PKCS12 certificate. How to get the certificate in the Common pre-requisites section.
-
Create a log4j configuration file named
connect-log4j.propertiesbased on the template below.
log4j.rootLogger=DEBUG, stdout

log4j.appender.stdout=org.apache.log4j.ConsoleAppender
log4j.appender.stdout.layout=org.apache.log4j.PatternLayout
log4j.appender.stdout.layout.ConversionPattern=[%d] %p %m (%c:%L)%n

log4j.logger.org.apache.kafka=INFO
- Back out of the
configdirectory to thekafka-connect-mq-sinkdirectory:
- Build the Docker image for your Kafka Connect framework that will contain the IBM MQ Sink connector and all the properties files you have created and tailored earlier so that your Kafka Connect framework can work with your IBM Event Streams instance we have set up previously in this exercise (mind the dot at the end of the command. It is necessary):
- Run the Kafka Connect MQ Sink container.
docker run                                 \
  --name mq-sink                           \
  --detach                                 \
  --volume $(pwd)/config:/opt/kafka/config \
  --publish 8083:8083                      \
  --link mq:mq                             \
  kafkaconnect-with-mq-sink:1.3.0
- Now that we have a Kafka Connect framework running with the configuration to connect to our IBM Event Streams instance and the IBM MQ Sink Connector jar file in it, is to create a JSON file called
mq-sink.jsonto startup an instance of the IBM MQ Sink connector in our Kafka Connect framework with the appropriate config to work read messages from the IBM Event Streams topic we desire and sink those to the IBM MQ instance we have running locally. IMPORTANT: If you are sharing your IBM Event Streams instance and followed the instructions on this readme, you should have appended a unique identifier to the name of the topic (inventory) that you are meant to create in IBM Event Streams. As a result, modify the line"topics": "inventory"in the following JSON object accordignly.
{
   "name": "mq-sink",
   "config":
   {
       "connector.class": "com.ibm.eventstreams.connect.mqsink.MQSinkConnector",
       "tasks.max": "1",
       "topics": "inventory",

       "key.converter": "org.apache.kafka.connect.storage.StringConverter",
       "value.converter": "org.apache.kafka.connect.storage.StringConverter",

       "mq.queue.manager": "QM1",
       "mq.connection.name.list": "mq(1414)",
       "mq.user.name": "admin",
       "mq.password": "passw0rd",
       "mq.user.authentication.mqcsp": true,
       "mq.channel.name": "KAFKA.CHANNEL",
       "mq.queue": "INVENTORY",
       "mq.message.builder": "com.ibm.eventstreams.connect.mqsink.builders.DefaultMessageBuilder"
   }
}
- Last piece of the puzzle is to tell our Kafka Connect framework to create and startup the IBM MQ Sink connector based on the configuration we have in the previous json file. To do so, execute the following
POSTrequest.
curl -X POST -H "Content-Type: application/json" http://localhost:8083/connectors   --data "@./mq-sink.json"

# The response returns the metadata about the connector
{"name":"mq-sink","config":{"connector.class":"com.ibm.eventstreams.connect.mqsink.MQSinkConnector","tasks.max":"1","topics":"inventory","key.converter":"org.apache.kafka.connect.storage.StringConverter","value.converter":"org.apache.kafka.connect.storage.StringConverter","mq.queue.manager":"QM1","mq.connection.name.list":"ibmmq(1414)","mq.user.name":"admin","mq.password":"passw0rd","mq.user.authentication.mqcsp":"true","mq.channel.name":"KAFKA.CHANNEL","mq.queue":"INVENTORY","mq.message.builder":"com.ibm.eventstreams.connect.mqsink.builders.DefaultMessageBuilder","name":"mq-sink"},"tasks":[{"connector":"mq-sink","task":0}],"type":"sink"}
- You can query your Kafka Connect framework to make sure of this. Execute the following command that should return all the connectors up and running in your Kafka Connect cluster.
You should now have a working MQ Sink connector getting messages from your topic in IBM Event Streams and sending these to your local IBM MQ instance. In order to check that out working, we first need to send few messages to that IBM Event Streams topic and then check out our INVENTORY queue in our local IBM MQ instance.
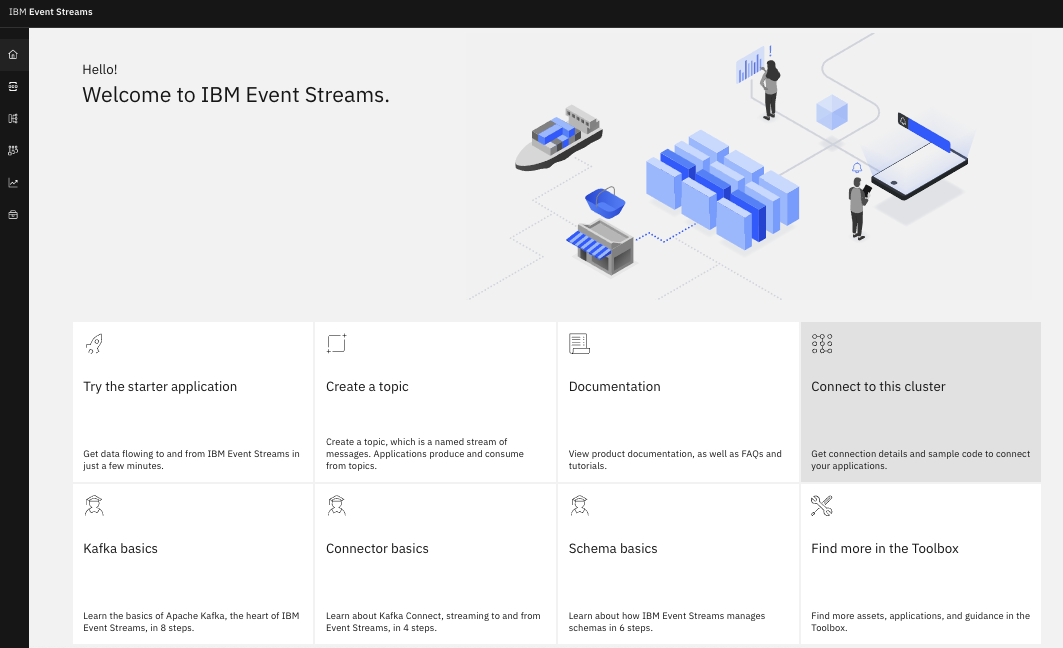
- In order to send messages to IBM Event Streams, we are going to use the IBM Event Streams Starter application. You can find the instruction either in the IBM Event Streams official documentation [here] or on the IBM Event Streams dashboard:
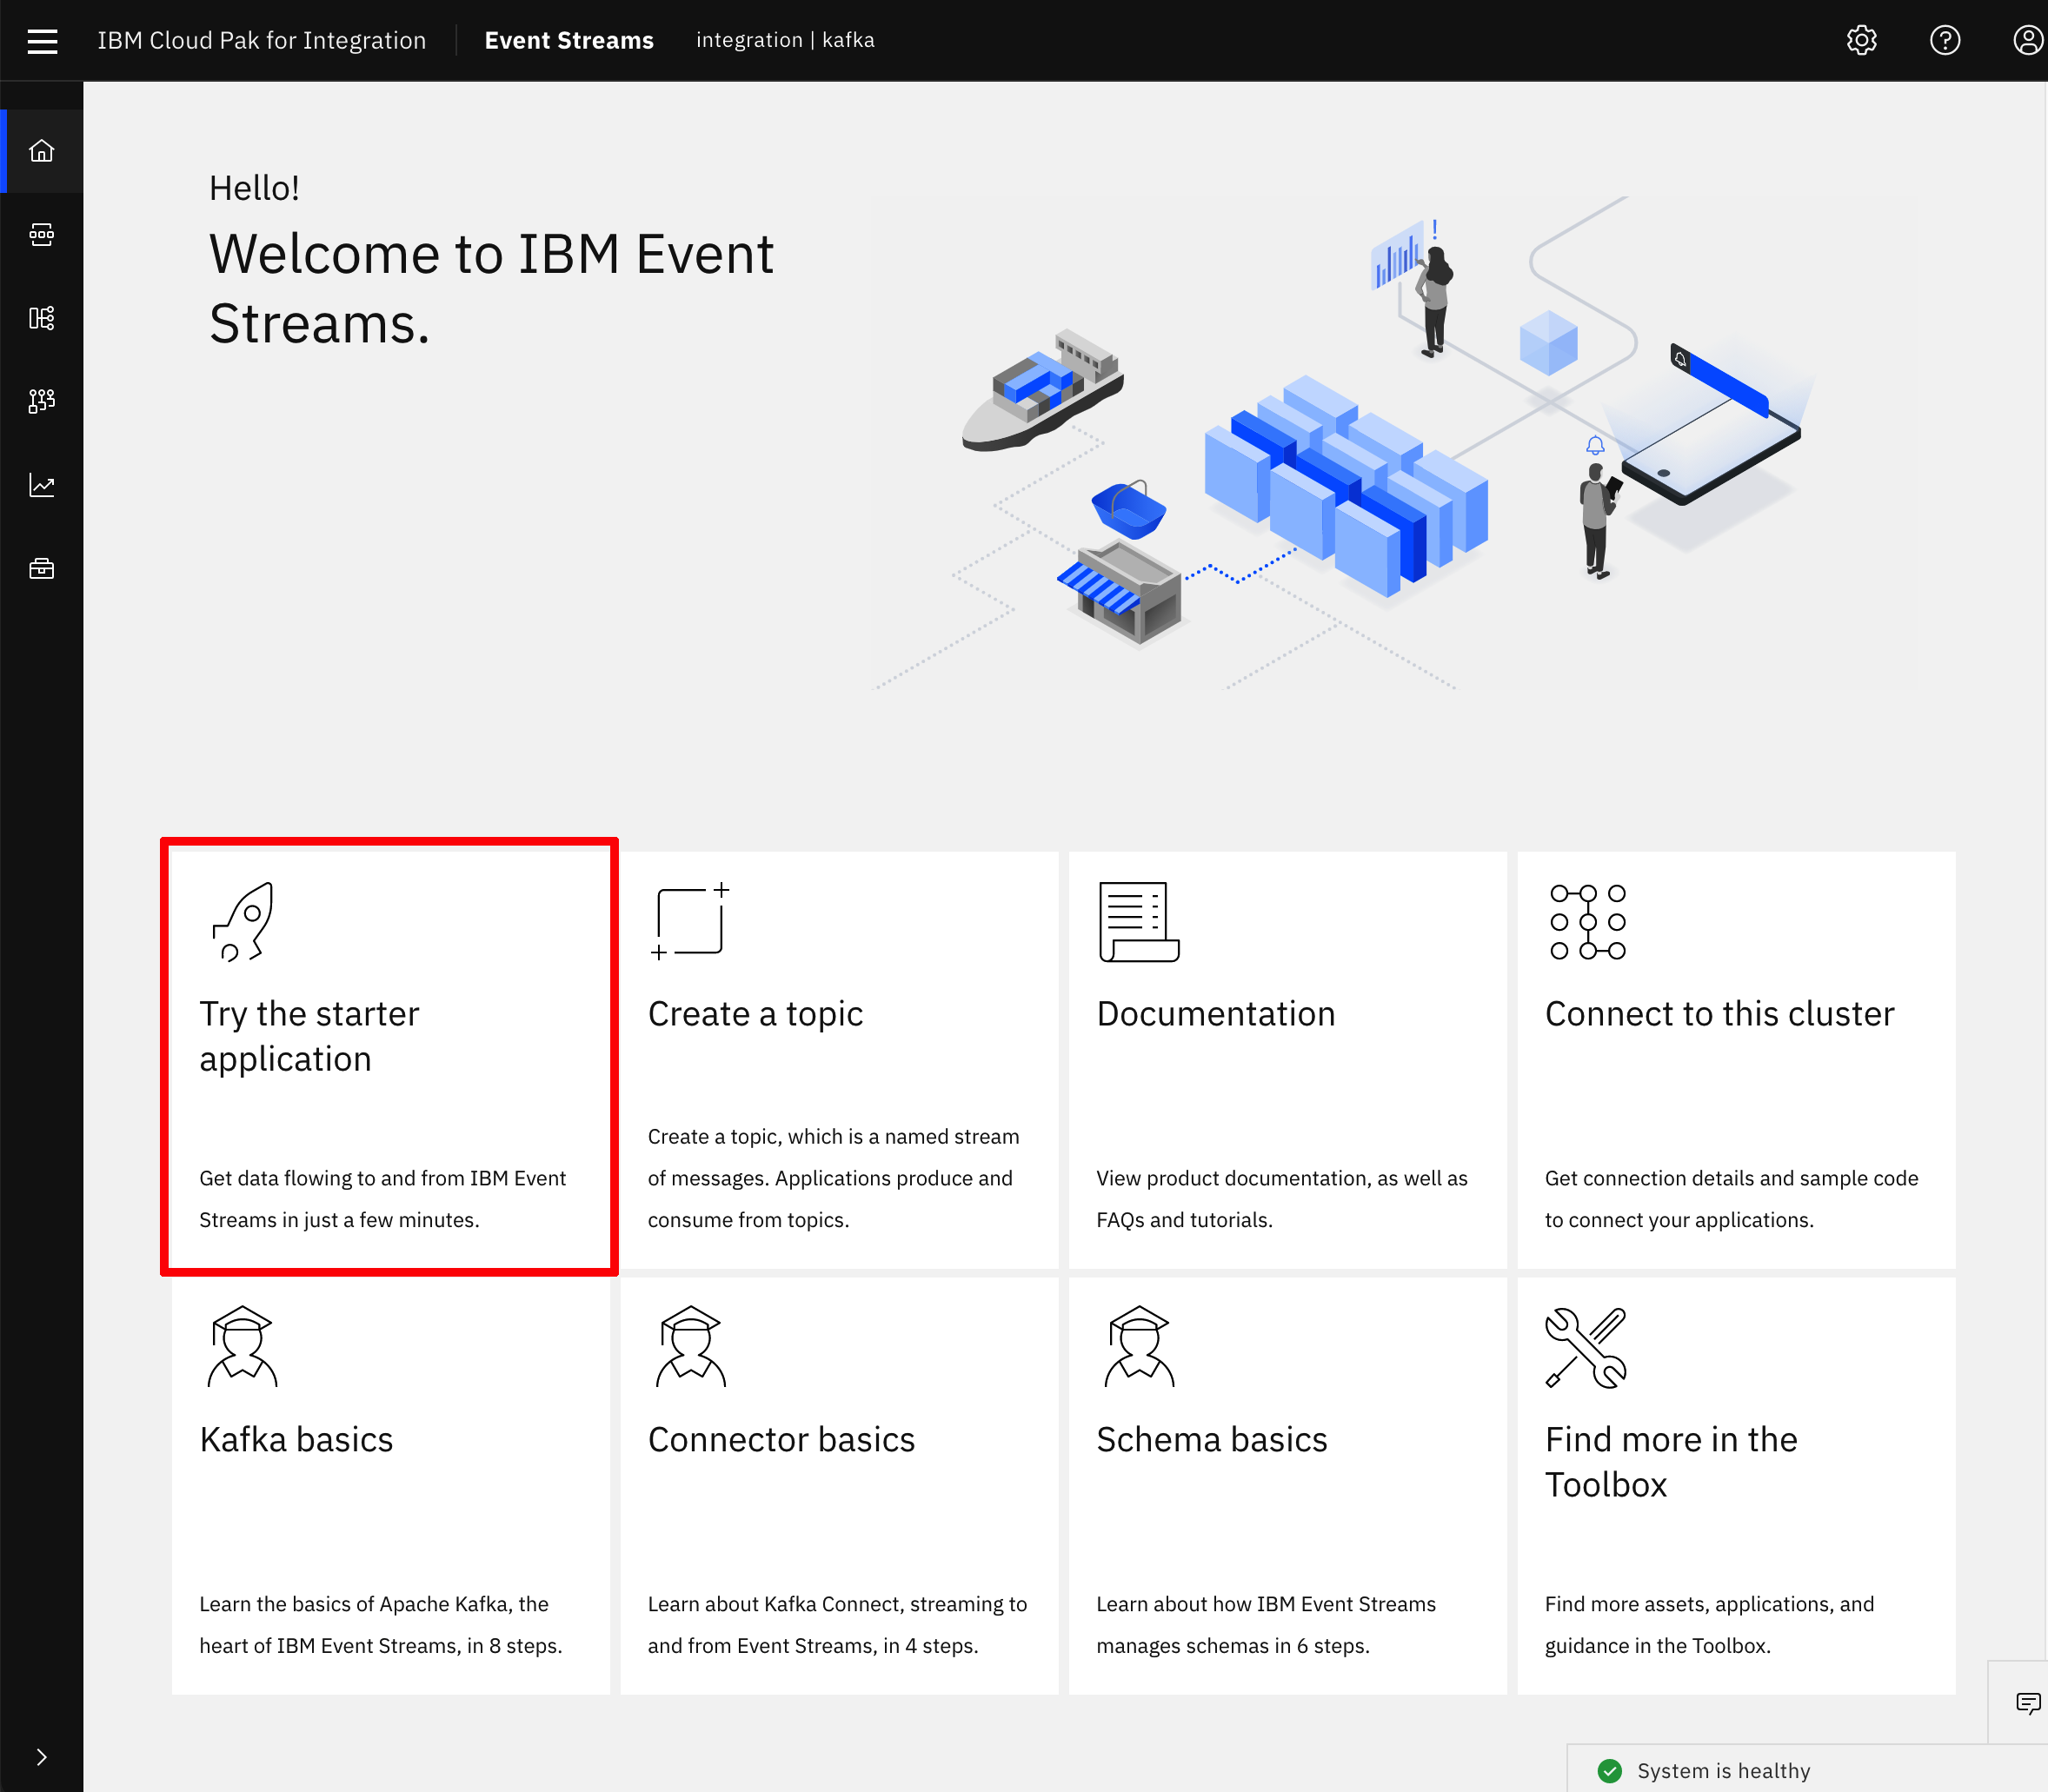
- Follow the instructions to run the IBM Event Streams starter application from your workstation. IMPORTANT: When generating the properties for your IBM Event Streams starter application, please choose to connect to an existing topic and select the topic you created previously as part of this exercise so that the messages we send into IBM Event Streams end up in the appropriate topic that is being monitored by your IBM MQ Sink connector runnning on the Kafka Connect framework.

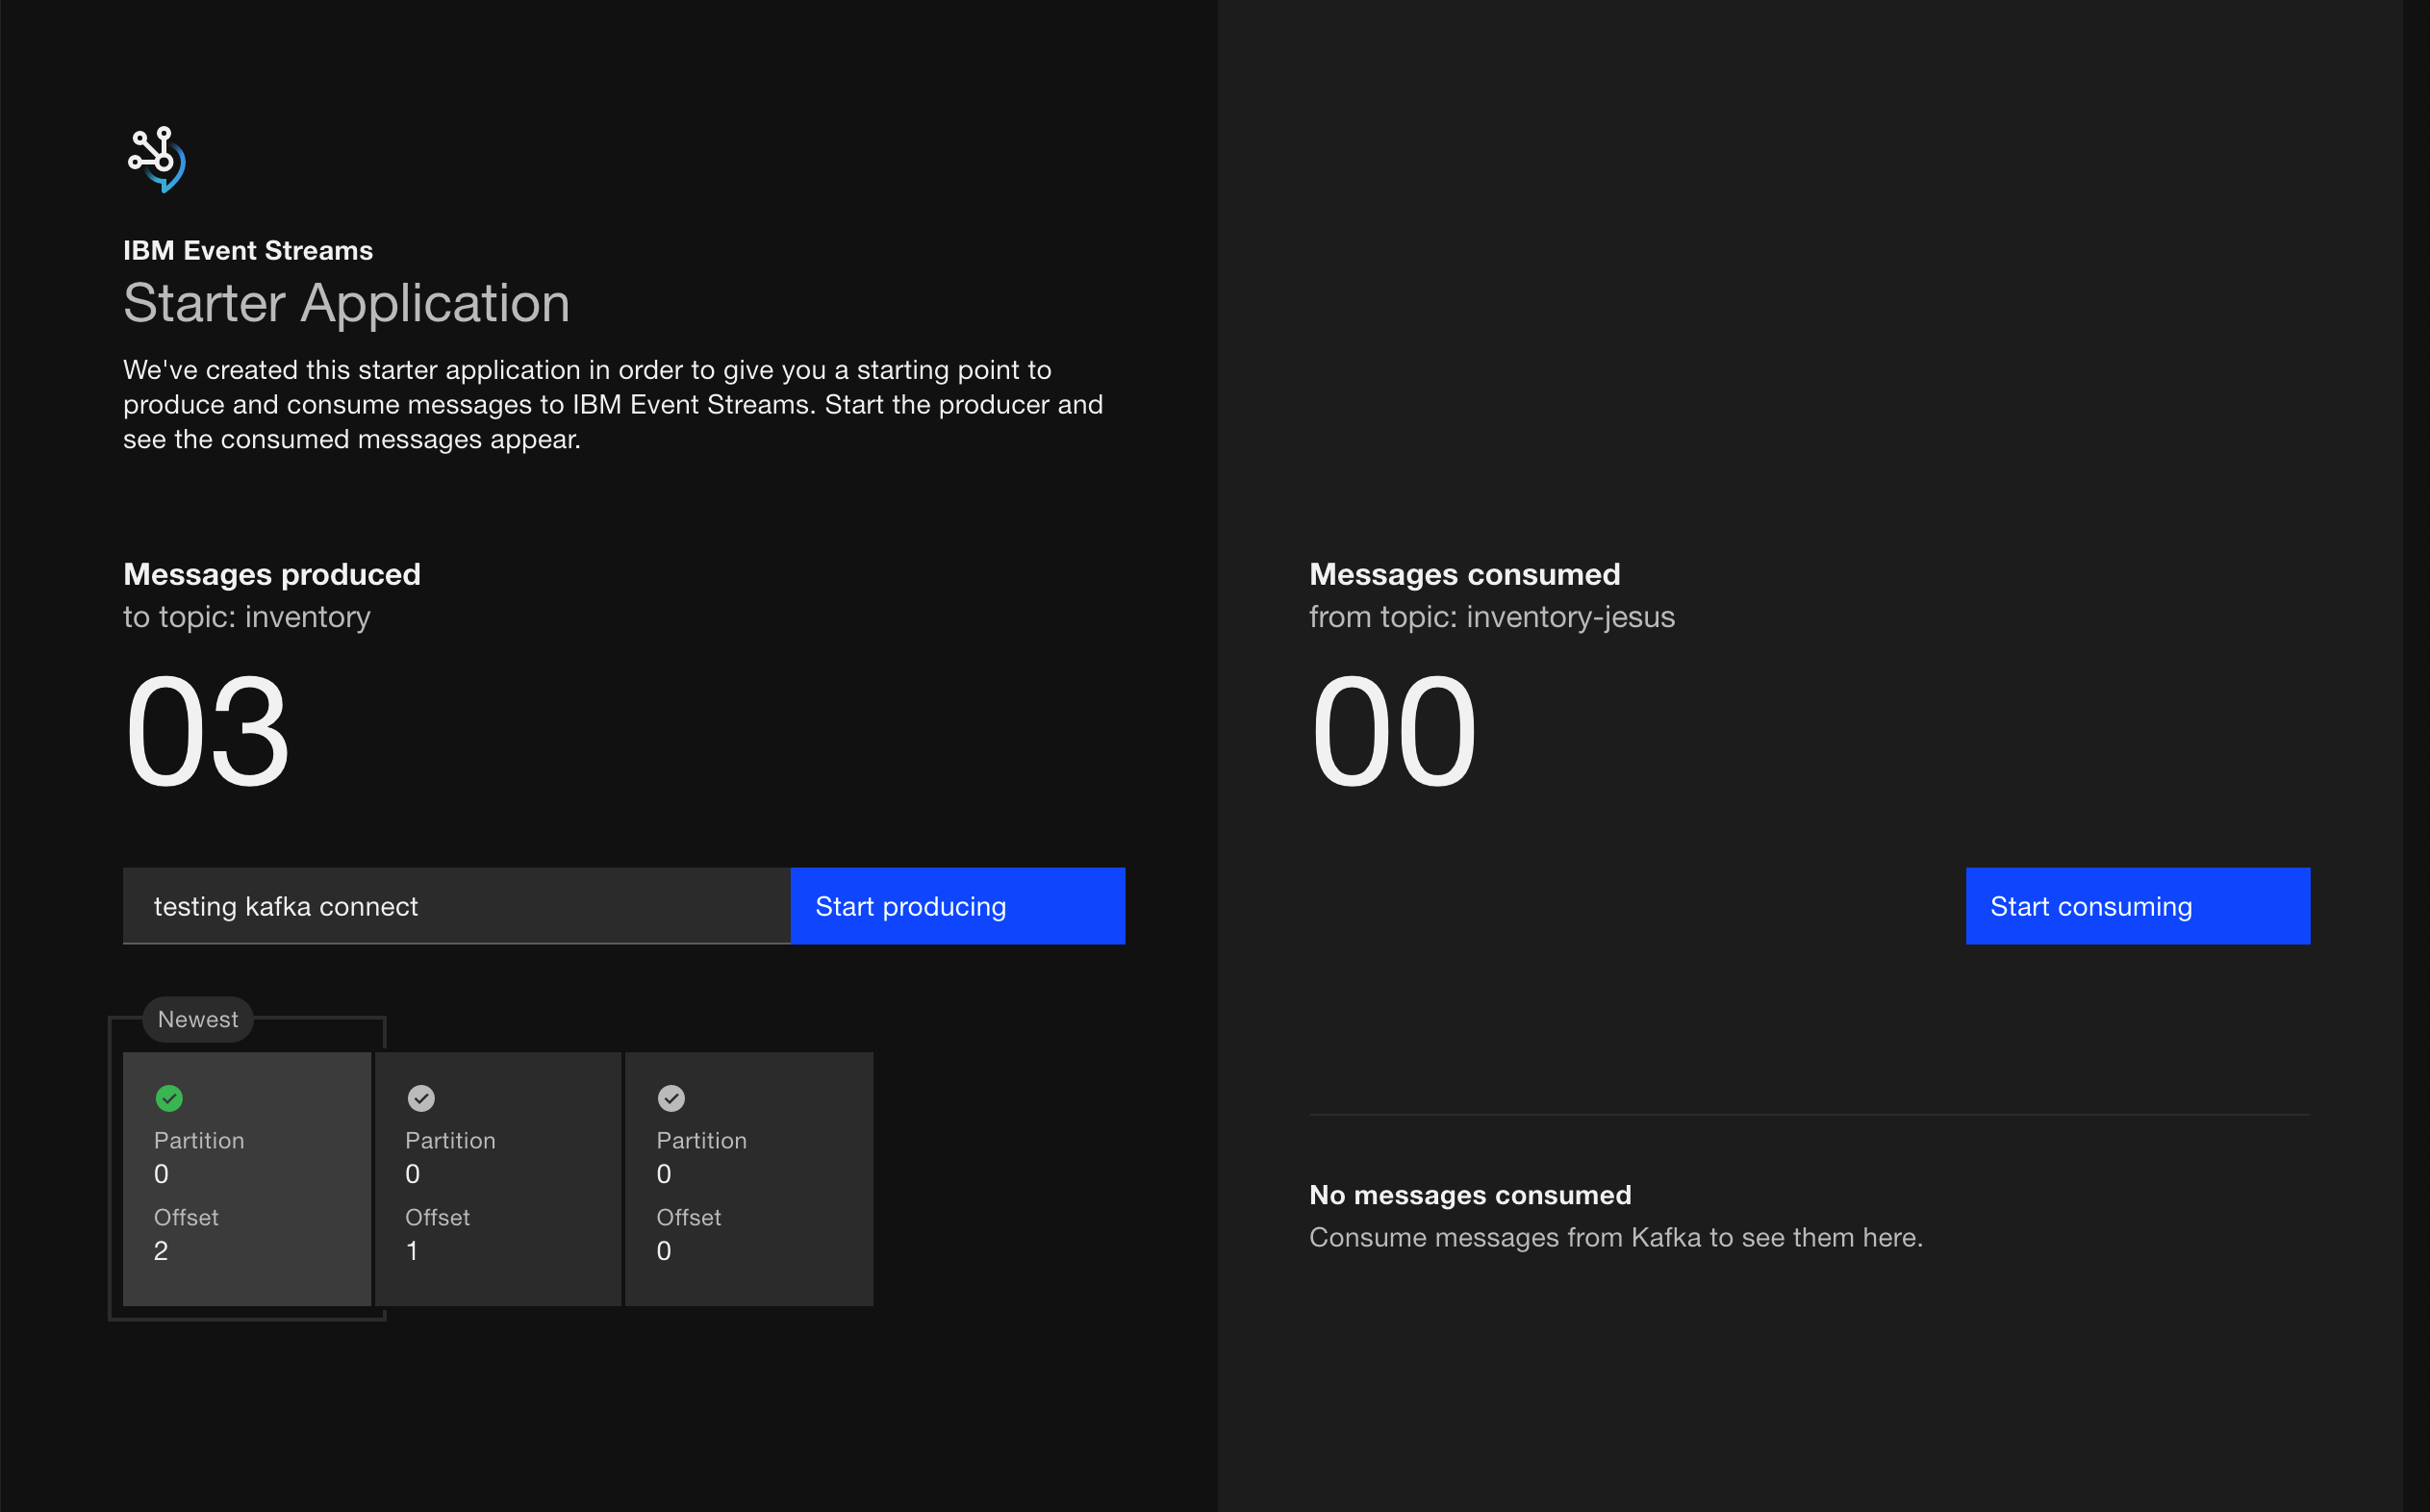
- Once you have your application running, open it up in your web browser, click on
Start producing, let the application produce a couple of messages and then click onStop producing
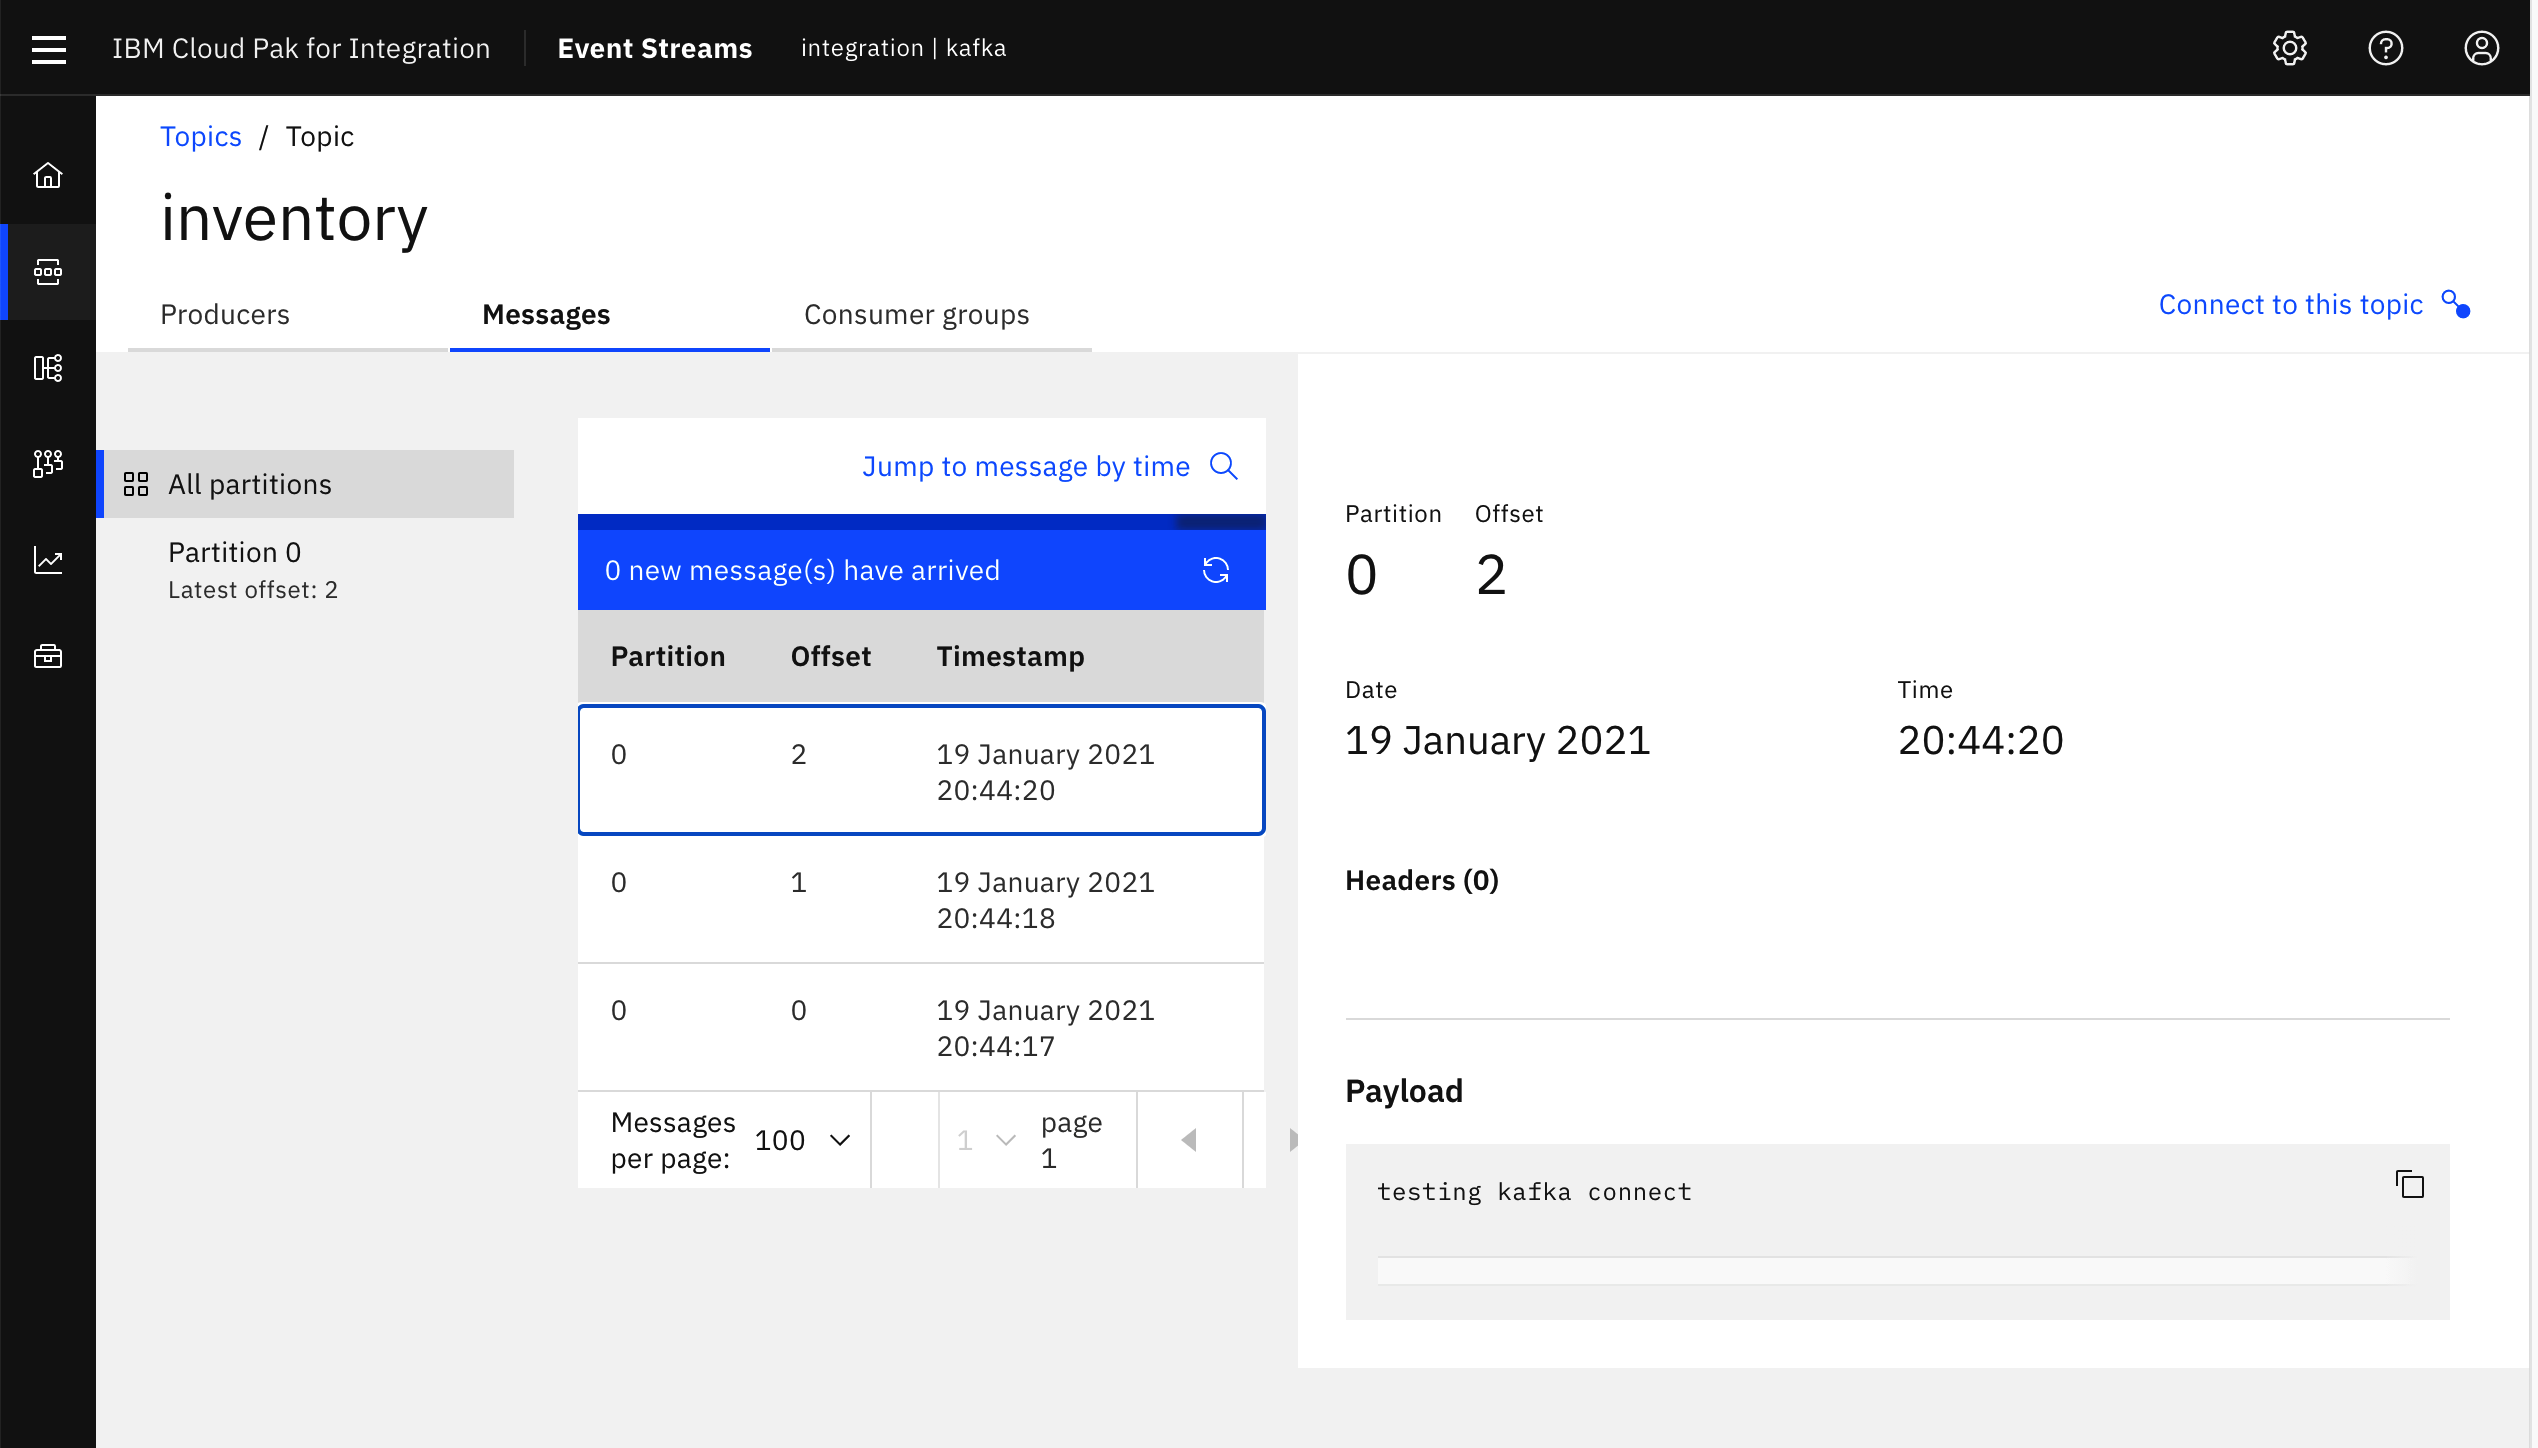
- Check out your those messages got into the Kafka topic
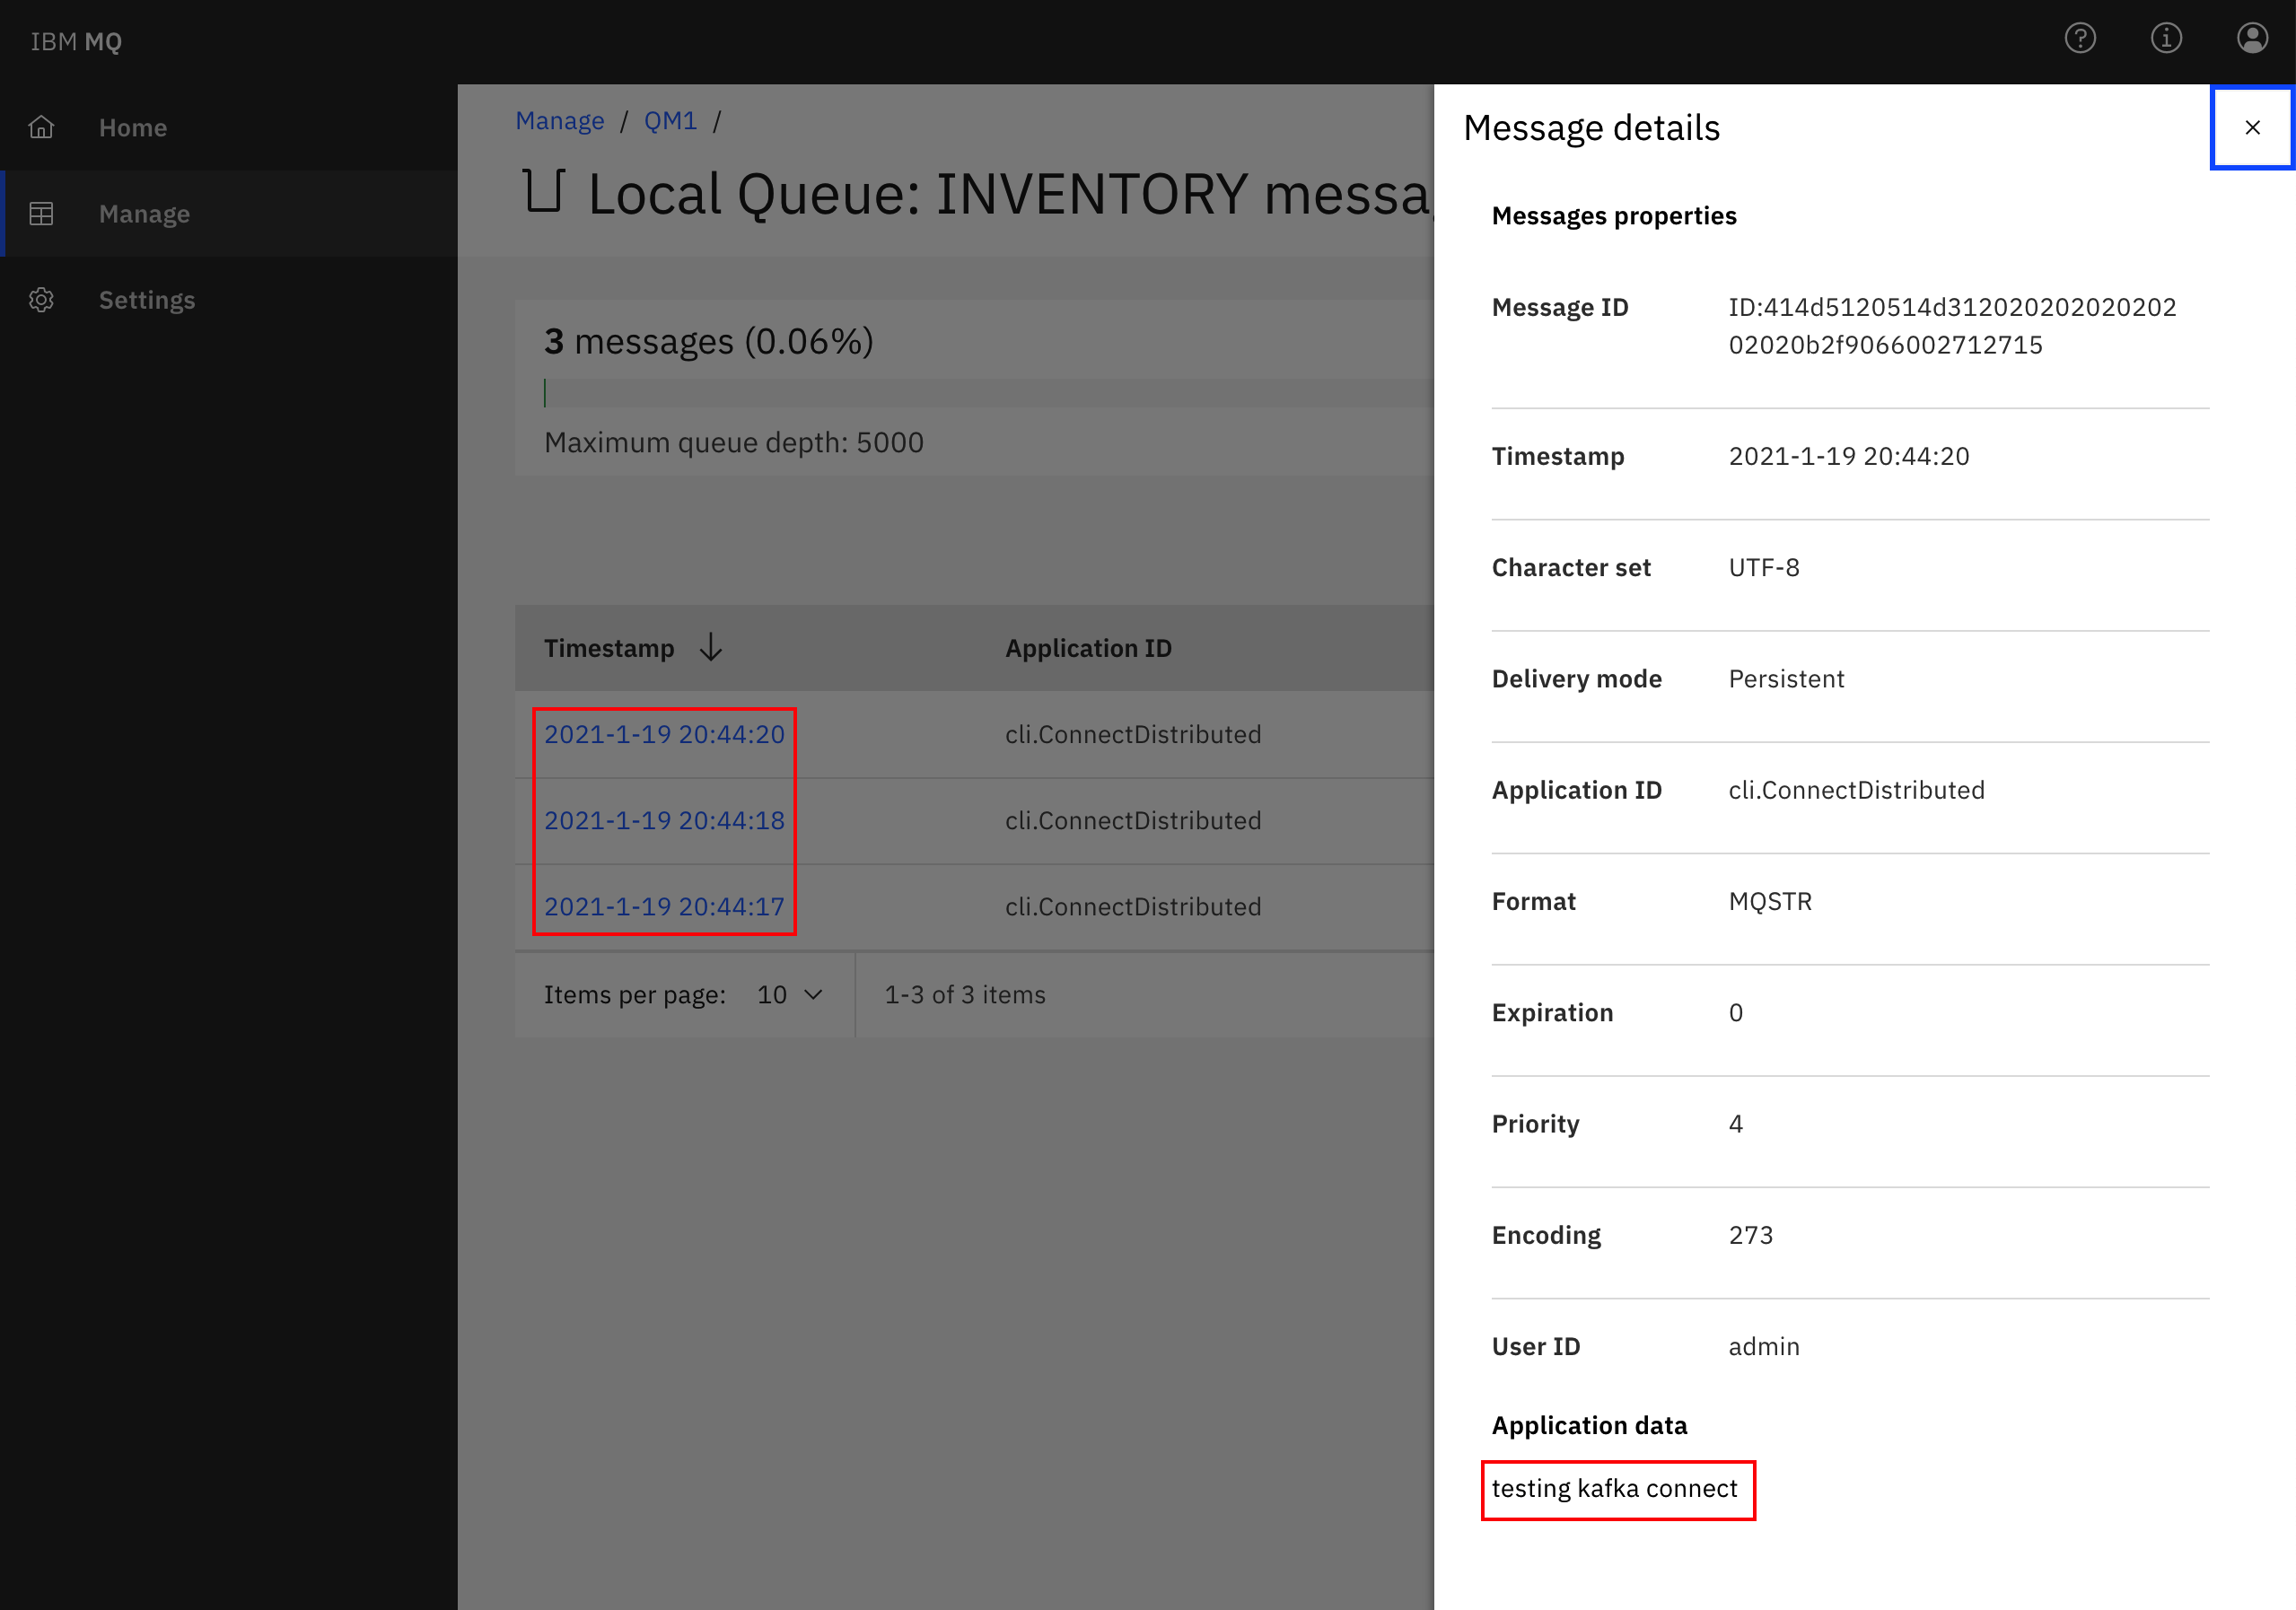
- Check out your messages in the Kafka topic have already reached your
INVENTORYqueue in your local IBM MQ instance
- You could also inspect the logs of your Kafka Connect Docker container running on your workstation:
docker logs mq-sink
...
[2021-01-19 19:44:17,110] DEBUG Putting record for topic inventory, partition 0 and offset 0 (com.ibm.eventstreams.connect.mqsink.MQSinkTask:89)
[2021-01-19 19:44:17,110] DEBUG Value schema Schema{STRING} (com.ibm.eventstreams.connect.mqsink.builders.DefaultMessageBuilder:60)
[2021-01-19 19:44:18,292] DEBUG Flushing up to topic inventory, partition 0 and offset 1 (com.ibm.eventstreams.connect.mqsink.MQSinkTask:110)
[2021-01-19 19:44:18,292] INFO WorkerSinkTask{id=mq-sink-0} Committing offsets asynchronously using sequence number 636: {inventory-0=OffsetAndMetadata{offset=1, leaderEpoch=null, metadata=''}} (org.apache.kafka.connect.runtime.WorkerSinkTask:346)
[2021-01-19 19:44:18,711] DEBUG Putting record for topic inventory, partition 0 and offset 1 (com.ibm.eventstreams.connect.mqsink.MQSinkTask:89)
[2021-01-19 19:44:18,711] DEBUG Value schema Schema{STRING} (com.ibm.eventstreams.connect.mqsink.builders.DefaultMessageBuilder:60)
[2021-01-19 19:44:20,674] DEBUG Putting record for topic inventory, partition 0 and offset 2 (com.ibm.eventstreams.connect.mqsink.MQSinkTask:89)
[2021-01-19 19:44:20,675] DEBUG Value schema Schema{STRING} (com.ibm.eventstreams.connect.mqsink.builders.DefaultMessageBuilder:60)
[2021-01-19 19:44:28,293] DEBUG Flushing up to topic inventory, partition 0 and offset 3 (com.ibm.eventstreams.connect.mqsink.MQSinkTask:110)
[2021-01-19 19:44:28,293] INFO WorkerSinkTask{id=mq-sink-0} Committing offsets asynchronously using sequence number 637: {inventory-0=OffsetAndMetadata{offset=3, leaderEpoch=null, metadata=''}} (org.apache.kafka.connect.runtime.WorkerSinkTask:346)
[2021-01-19 19:44:38,296] DEBUG Flushing up to topic inventory, partition 0 and offset 3 (com.ibm.eventstreams.connect.mqsink.MQSinkTask:110)
To cleanup your environment, you can do
- Remove the connector from your Kafka Connect framework instance (this isn't really needed if you are going to stop and remove the Kafka Connect Docker container)
- Stop both IBM MQ and Kakfa Connect Docker containers running on your workstation
- Remove both IBM MQ and Kakfa Connect Docker containers from your workstation
Lab 4: MQ Connector with Kafka Confluent
- Clone the git
ibm-cloud-architecture/eda-lab-mq-to-kafkarepository and follow the readme.