Lab 3: Item inventory demonstration deployment
Duration: 20 minutes
Goals
In this lab, you will learn how to deploy the real-time solution by simply using this repository and a minimum set of commands. The approach is to present reusable structure you may want to use for your own future proof of concept development, so it will be easy to demonstrate your solution.
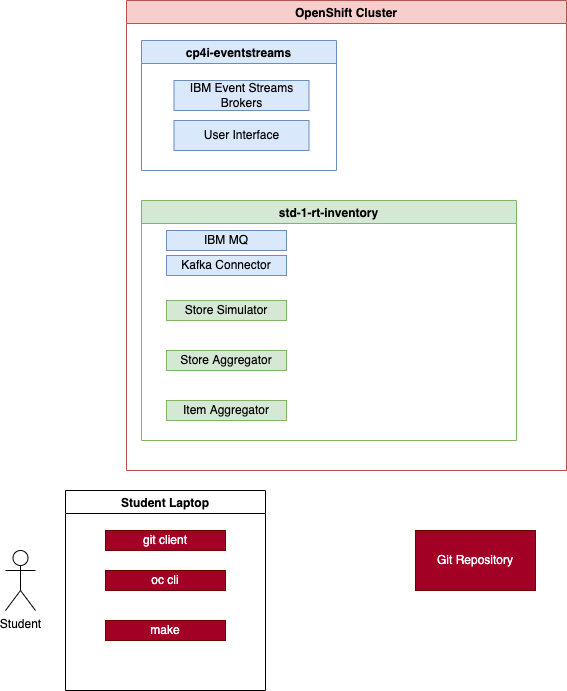
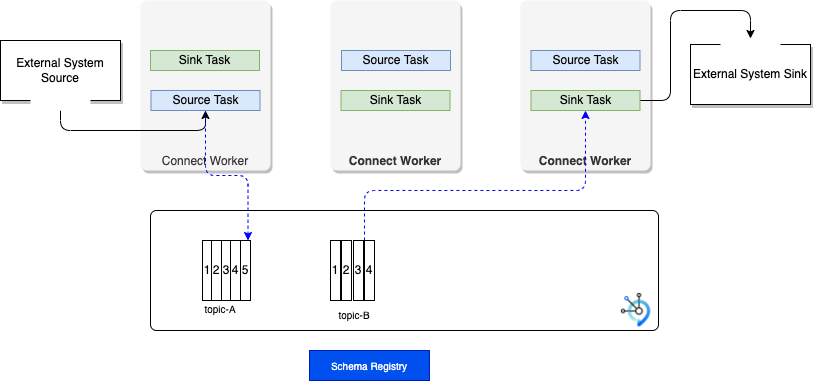
The following diagram illustrates the components, you will deploy in your student's namespace using this repository.
More context
A traditional solution may be organized with one git repository per application, and at least one GitOps repository to define the deployment artifacts. If you look at the demonstration you are running in this lab, the source code is in the public git account ibm-cloud-architecture with other repositories with following structure:
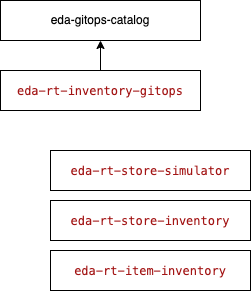
- eda-rt-inventory-gitops: the solution gitops repo, built with kam cli which includes everything to declare ArgoCD apps and deployment descriptors
- eda-gitops-catalog: a git repository to define the different Cloud Pak for Integration operator versions.
- store simulator application the simulator to send messages to different middleware
- store aggregator / inventory application to compute store inventory aggregates with Kafka Streams
- item aggregator / inventory application same for item inventory cross store.
pre-requisites
See Pre-requisites section in the main page.
MAC users can run all the commands in this lab from terminal window.
Windows users will have to run the commands from a WSL Command window. Open a CMD window and type 'bash' to enter the WSL prompt.
Preparation
Each Student will have received a unique identifier and will modify the current settings in this folder with their student id. All the current kubernetes configurations are currently set for poe1.
We assume the following are pre-set in you OpenShift cluster, which is the same as CoC integration cluster:
- Platform navigator is deployed in
cp4iproject. -
Event Streams is installed under
cp4i-eventstreamsproject. -
Login to the OpenShift cluster assigned to you (poe or ashoka) using the login command from the OpenShift Console

Then copy this line:
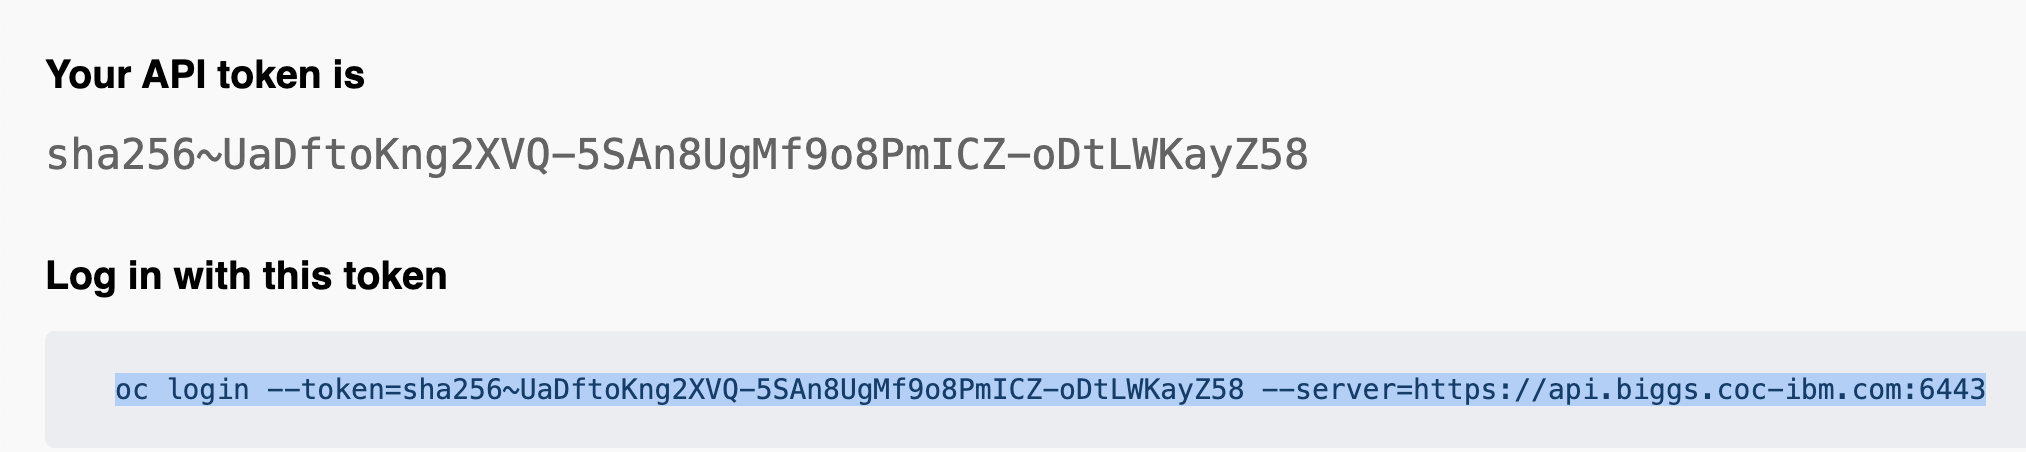
Accept the insecure connection
-
Verify your
occli works -
Work under the
lab3-4folder of this repository.
Modify existing configuration
We will prepare the configuration for the following green components in figure below:
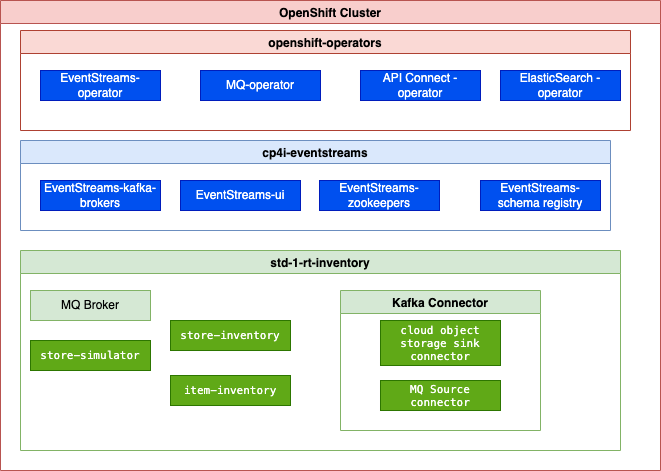
The blue components should have been deployed with the Cloud Pak for Integration deployment.
-
The demonstration will run on its own namespace. The
env/basefolder includes the definition of the namespace, roles, role binding needed to deploy the demonstration. This is a classical way to isolate apps in kubernetes.Running the
updateStudent.shshell script, will modify all the yaml files used by the solution with your student id. As an example we will be studentpoe10and the deployment will be done inpoe10namespace.-
Mac User:
-
Windows user (in Linux shell)
-
Folder structure
This lab3-4folder is a reduced version of what the Red Hat's Kubernetes Application Management tool is creating normally. If you want to see a full fledge GitOps version for this demonstration see the eda-rt-inventory-gitops repository.
| Folder | Intent |
|---|---|
| apps | Defines deployment, config map, service and route for the 3 applications and kafka connector |
| env | Defines the namespace for each deployment, and some service account |
| services | Defines MQ broker instance, Kafka Connect cluster, and event streams topics |
| argocd | Define the ArgoCD project and apps to monitor this git repo. It will be used for lab 4 |
Deploy
The deployment will configure topics in event streams using a naming convention to avoid conflicts between students, deploy the three apps, deploy MQ broker and Kafka Connect cluster with the MQ source connector configured.
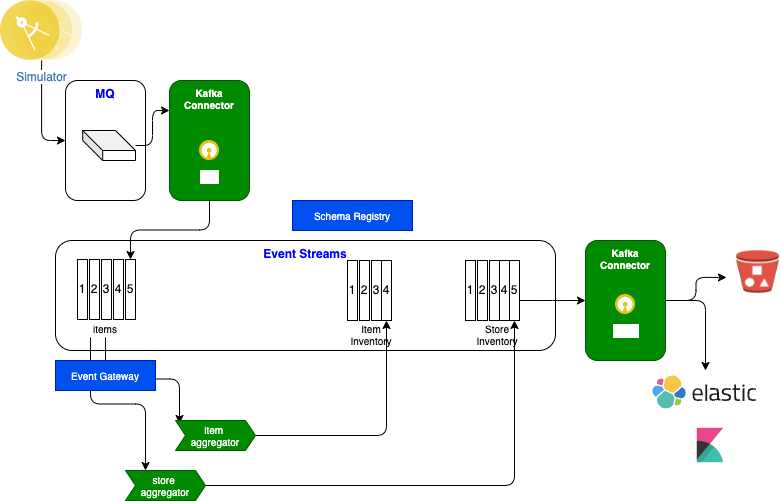
Event Gateway, schema registry, and Cloud Object Storage sink connector are not used in this lab
-
Start the deployment
-
Verify the solution is up and running
oc project $PREFIX
oc get pods
oc get routes
oc get kafkatopic -n cp4i-eventstreams
oc get kafkauser -n  cp4i-eventstreams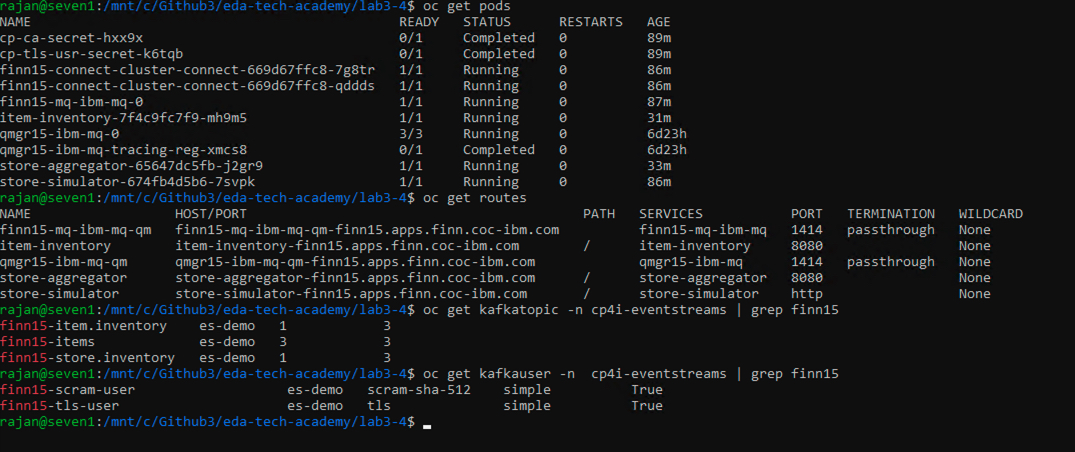
-
Access to the MQ console (replace the namespace and base url)
-
Verify the queue manager has the ITEMS queue
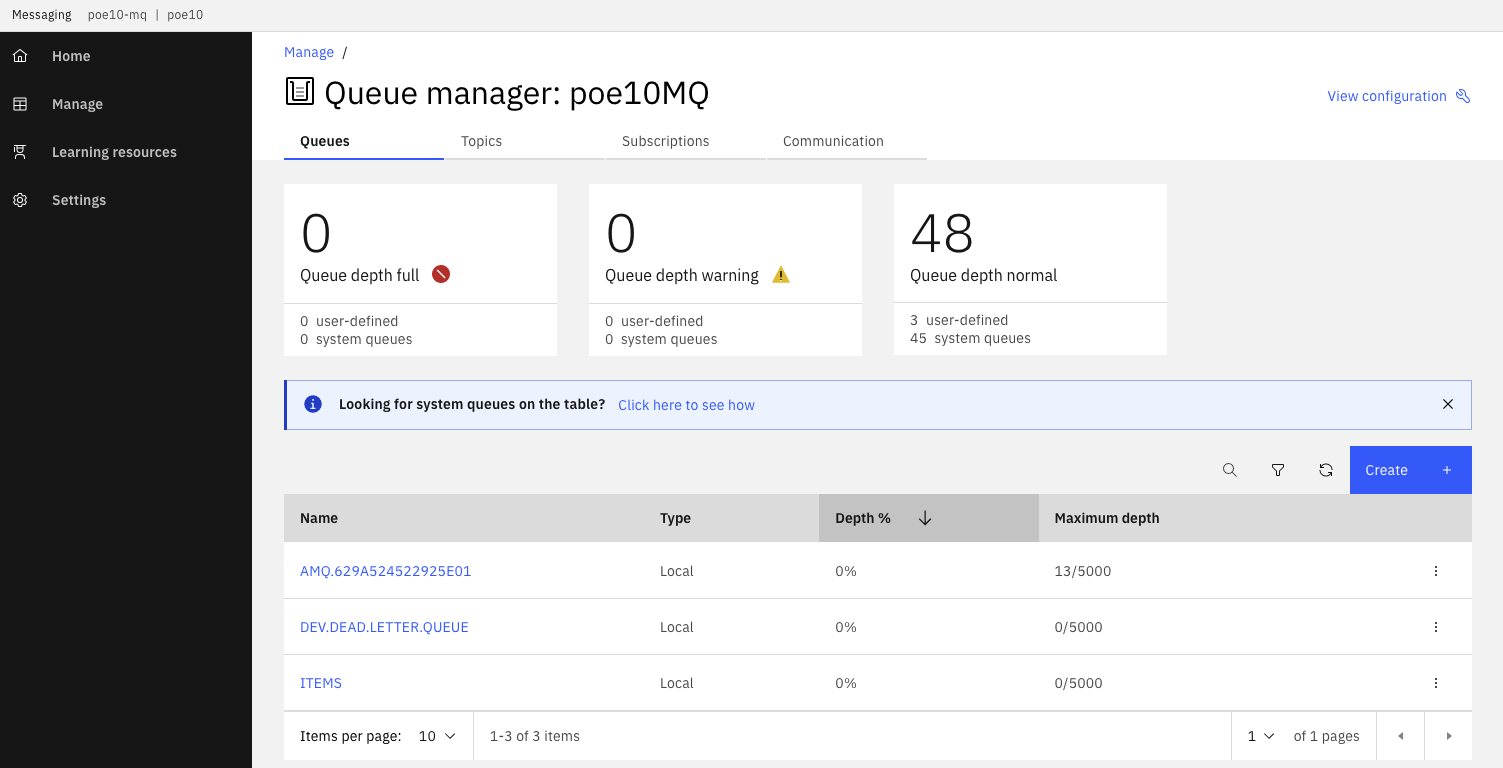
-
Access to the simulator console
Get the URL of the Store Simulator and open it in a browser.
oc get route store-simulator -o jsonpath='{.status.ingress[].host}'
Go to the SIMULATOR tab. If you want to test with the MQ source connector, select IBMMQ backend, and starts the
Controlled scenarioto send predefined messages: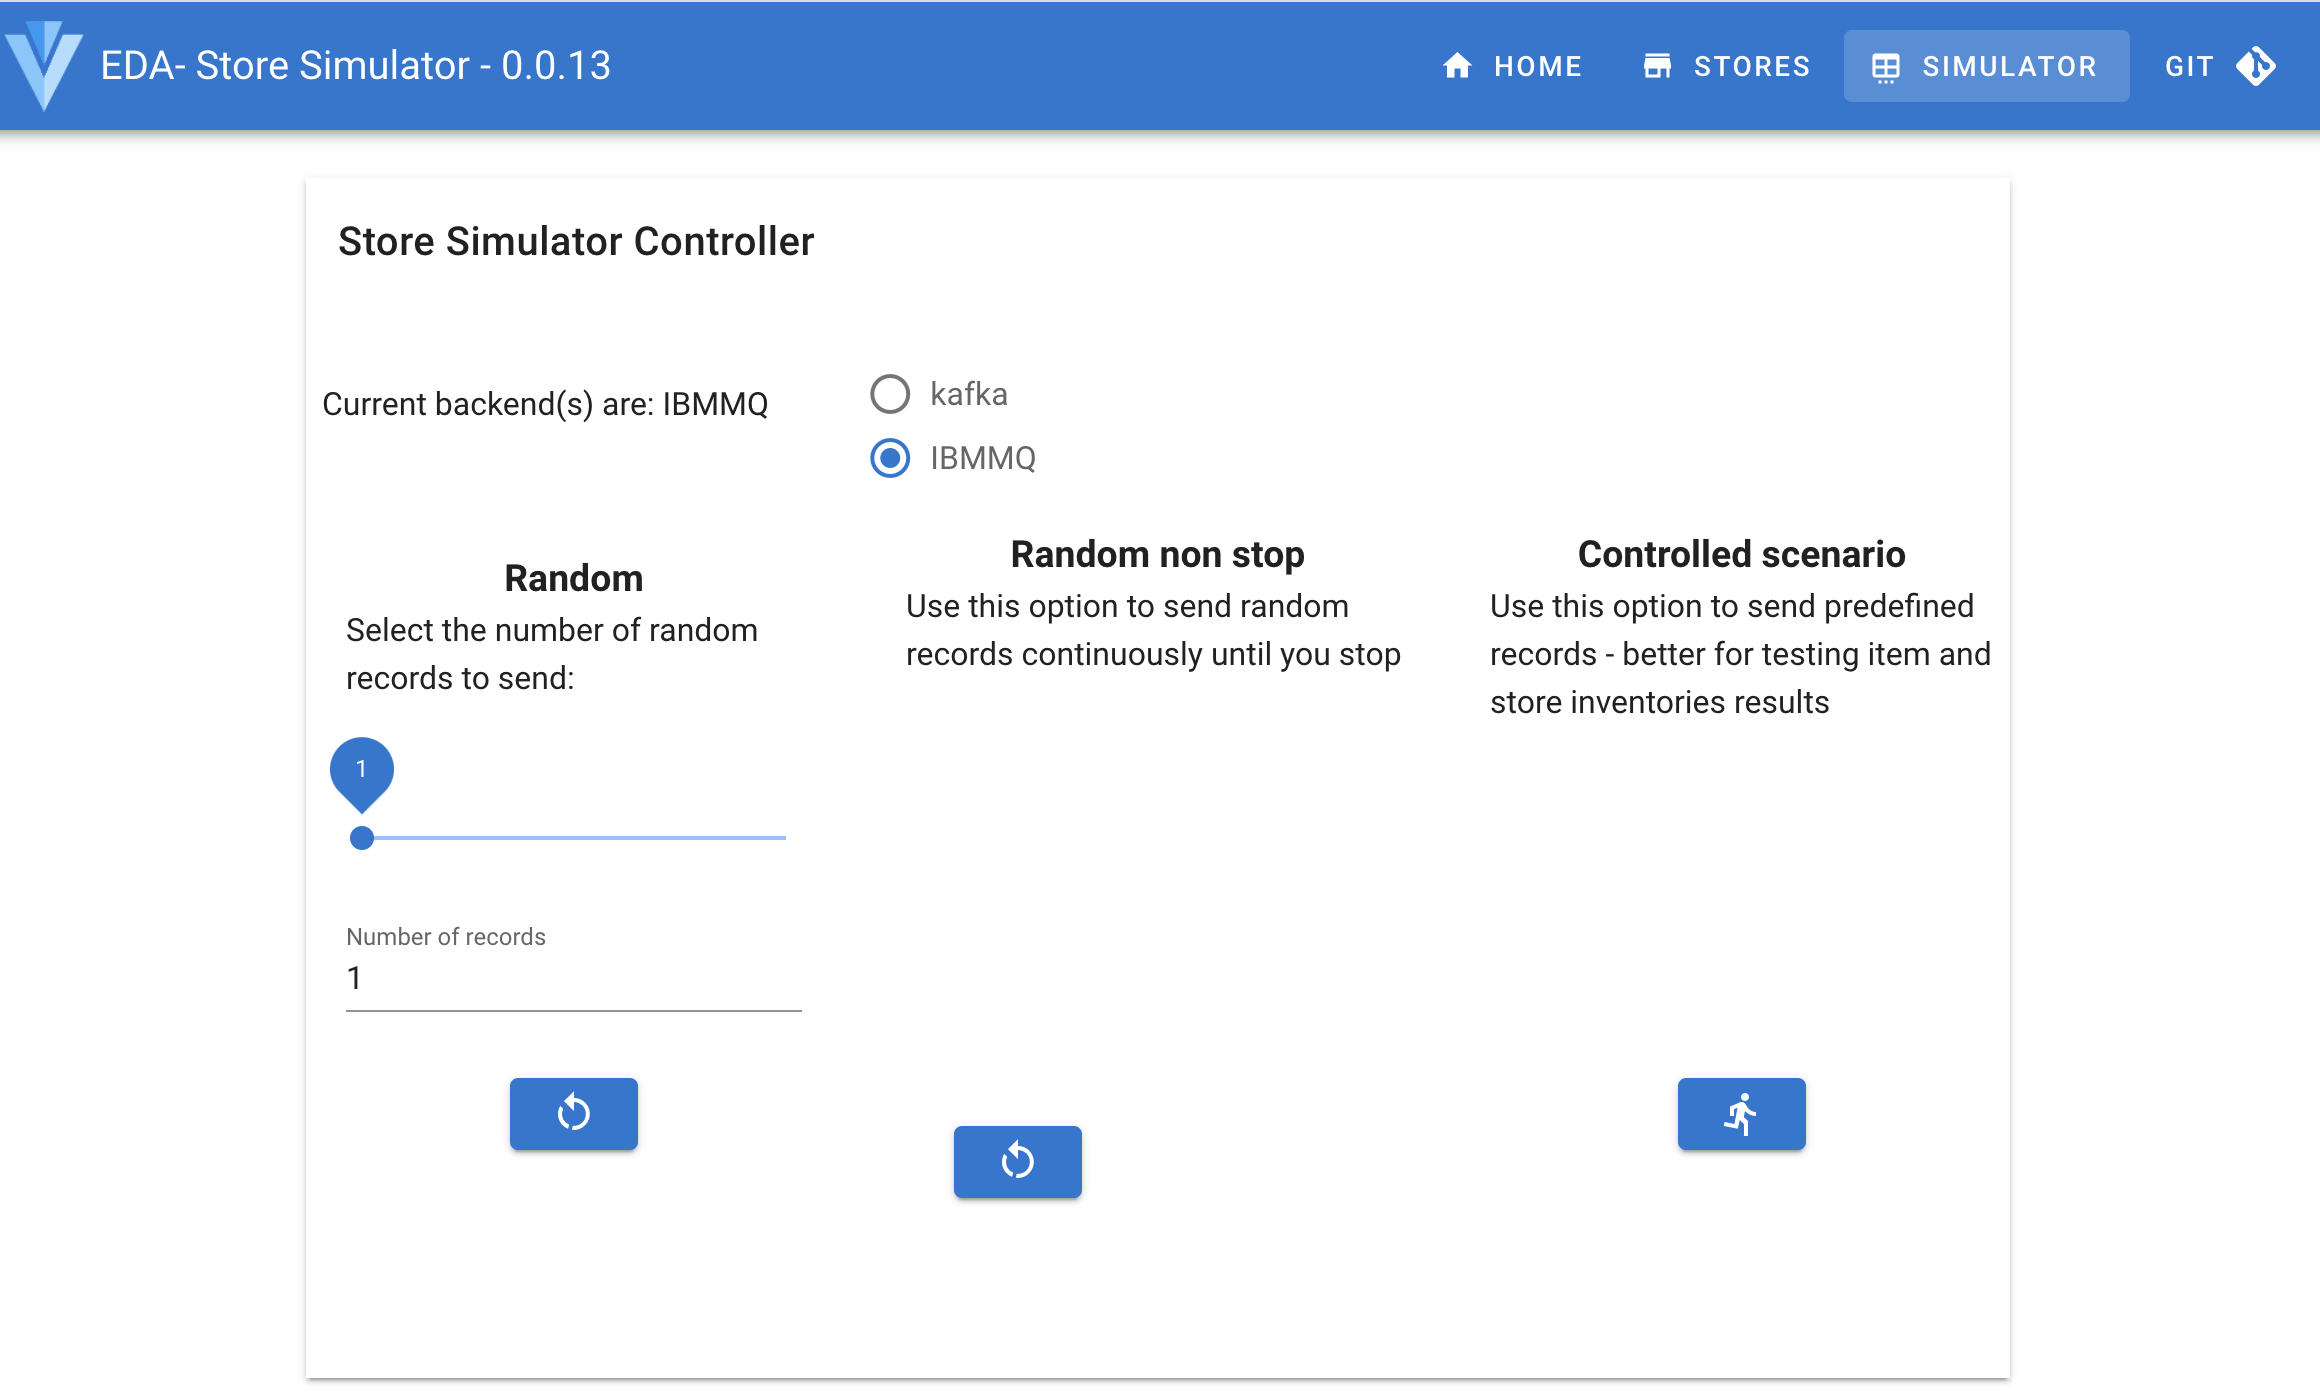
Normally you should not see the messages in the ITEMS queue as they are immediatly processed by the Kafka Connector.
You should get a set of predefined messages sent to MQ, and then to Kafka
$PREFIX-itemstopic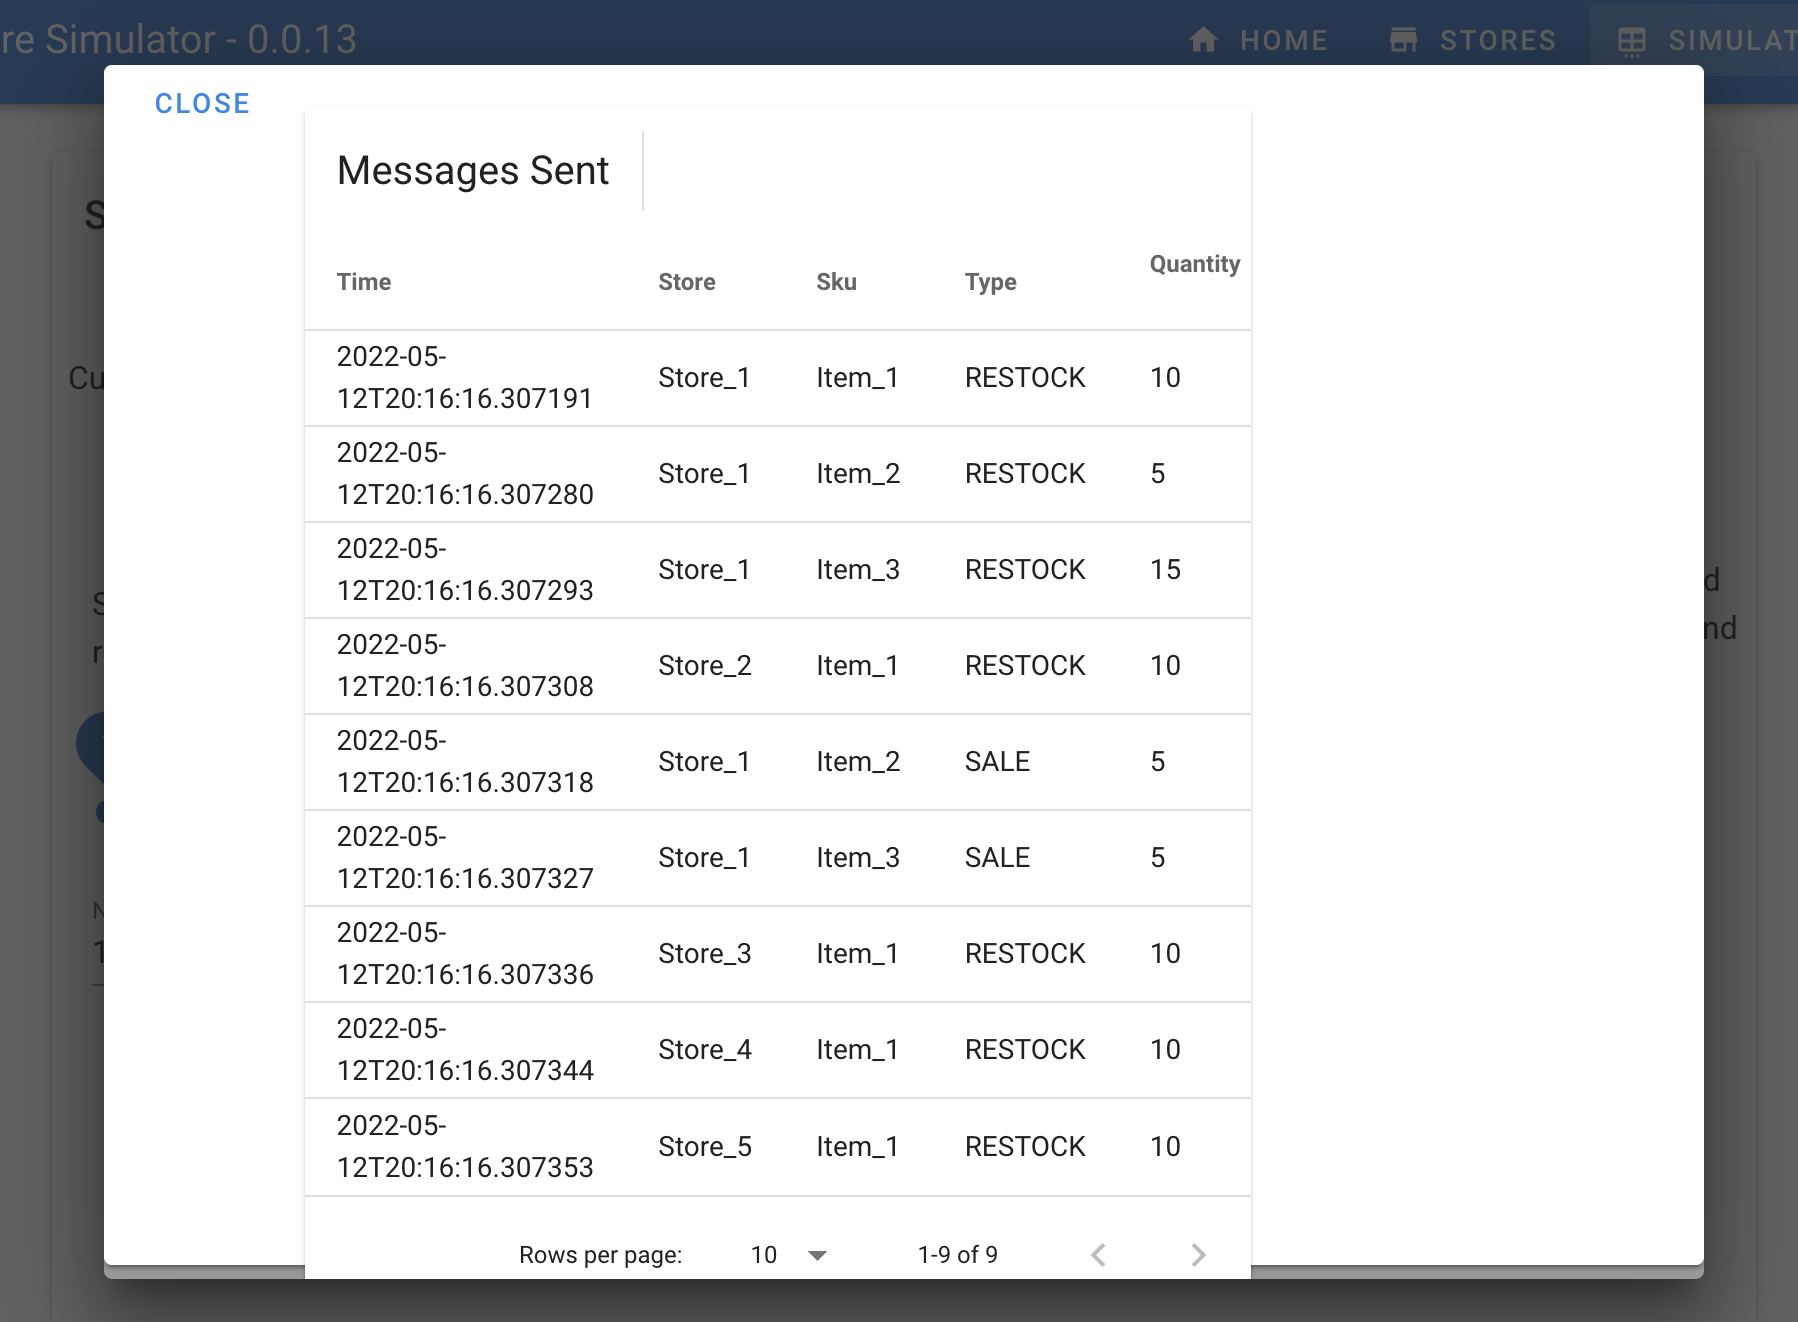
Go to the Event Streams console.
If you select
Kafkaas backend, then the simulator sends directly the messages to Kafka$PREFIX-itemstopic. -
The two other options for the Store simulator is to send from 1 to 100 random messages (left choice in the controller view), or continuously send messages (start / stop control in the middle of the page).
-
Access the Event Stream console to look at topic content:
# Open this link in a browser. change poe to the OCP cluster name. Login with you user-id using the Enterprise LDAP.
https://cpd-cp4i.apps.poe.coc-ibm.com/integration/kafka-clusters/cp4i-eventstreams/es-demo/
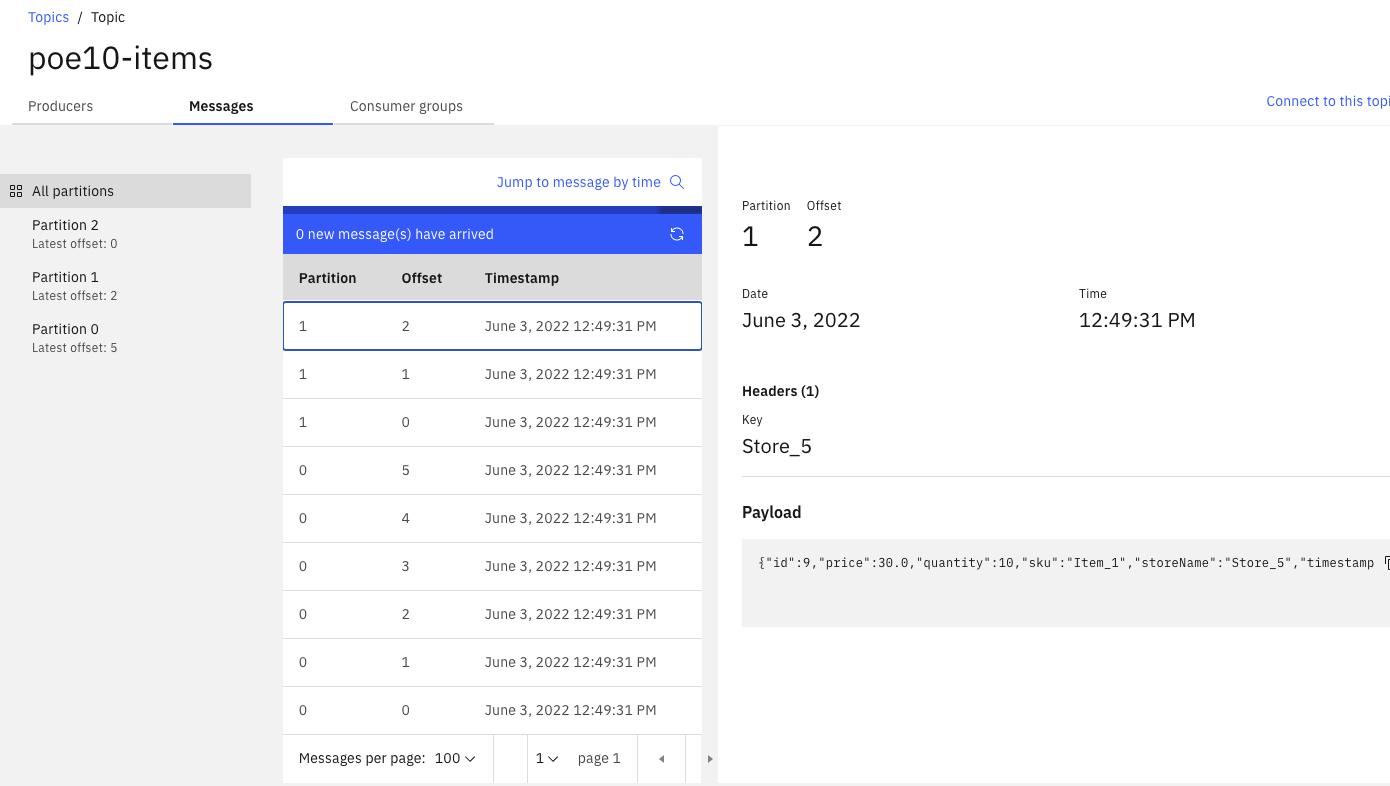
The items topic content the store transactions:
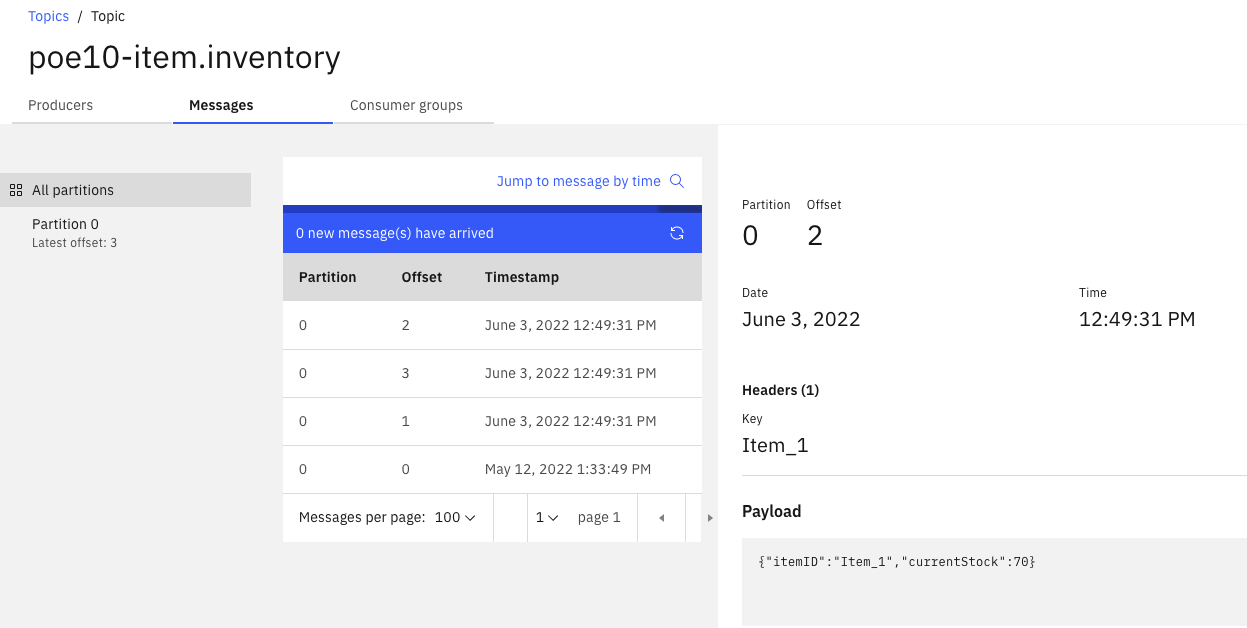
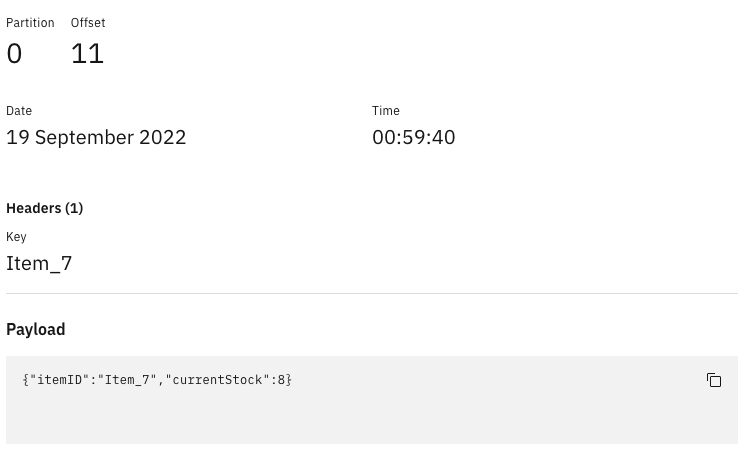
The item.inventory topic has the aggregates cross stores, as illustrates in figure below:
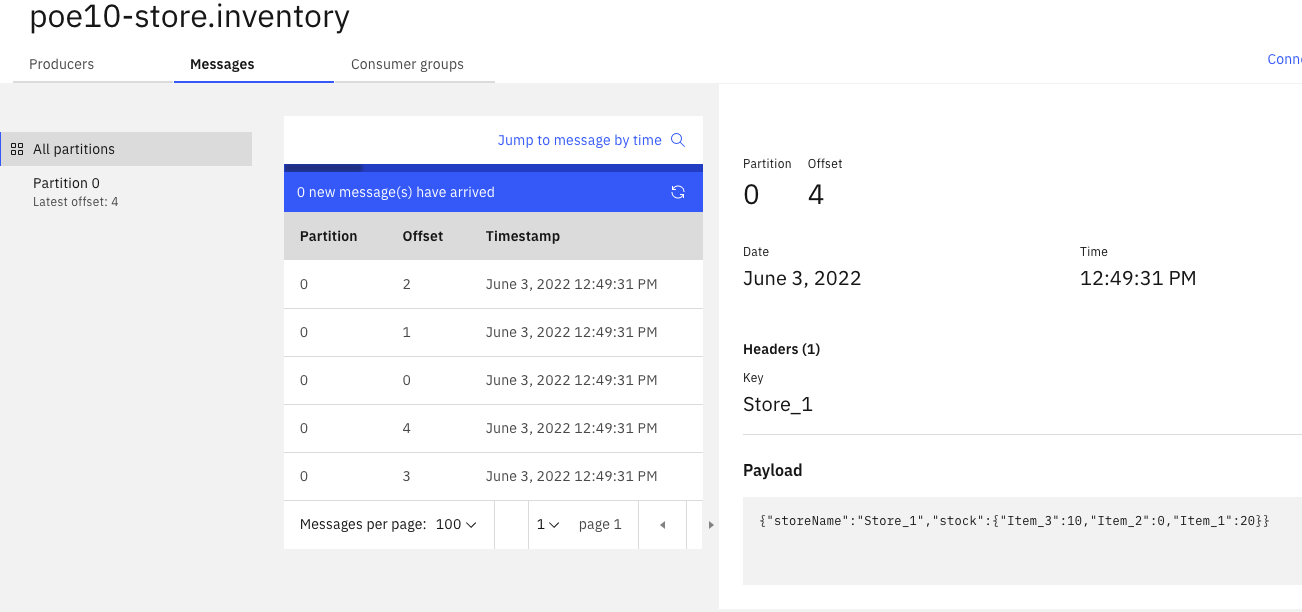
And the store.inventory includes events on current inventory per store:
Test the Full Setup
- From the EventStreams portal, go to Topics and open the items-inventory topic (USERID-item.inventory)
- Go to Messages.
- Open the first few messages and take note of the ItemID and CurrentStock. E.g.
- From the Store Simulator page -> Click on Simulator.
- Choose IBM MQ for BackEnd.
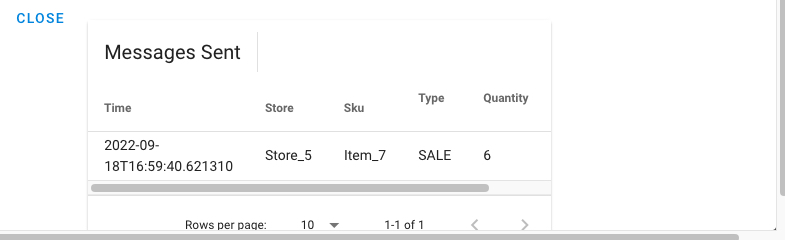
- Send one random message. Take note of the message sent. In particular, take note of Item number, Type (either SALE or RESTOCK) and quantity.
- Go to the EventStreams portal and check if the new message has arrived in USERID-items topic.
- From the EventStreams portal one new message should also be delivered to the USERID-item.inventory topic. Check the message. The quantity should have been increased (Type RESTOCK) or reduced (SALE) by the quantity number (sent via Store Simulator).
- You can also do a similar check in USERID-store.inventory topic.
Read more on the demonstration script
The demonstration instructions are in a separate note as this is a demonstration available in the public git and shareable with anyone.
Kafka connector configuration
The Kafka connect cluster is defined in the kafka-connect.yam file in the services/kconnect folder. The important part of this file is the Event Streams bootstrap server URL, the kafka version used, and the name of the topic used to persist states of the connector. Each student has its own topic names for offsets, config and status topics.
  version: 3.0.0
  replicas: 2
  bootstrapServers: es-demo-kafka-bootstrap.cp4i-eventstreams.svc:9093
  image: quay.io/ibmcase/eda-kconnect-cluster-image:latest
  # ...
  config:
    group.id: poe10-connect-cluster
    offset.storage.topic: poe10-connect-cluster-offsets
    config.storage.topic: poe10-connect-cluster-configs
    status.storage.topic: poe10-connect-cluster-status
    config.storage.replication.factor: 3
    offset.storage.replication.factor: 3
    status.storage.replication.factor: 3
Recall that the kafka connect cluster runs connectors in parallel and use Kafka consumer and producer API to do the data transfer.
The image references a custom image we built to have the MQ source connector and some sink. The Dockerfile for this image is in this repository, you can start from it to add more connector.
To set the status of the kafka connect cluster runs the following command:
- The MQ source connector is defined as an app, in the
apps/mq-sourcefolder. Below are the important parts to consider:
  config:
    mq.queue.manager: poe10MQ
    mq.connection.name.list: poe10-mq-ibm-mq.poe10.svc
    mq.channel.name: DEV.APP.SVRCONN
    mq.queue: ITEMS
    topic: poe10-items
    key.converter: org.apache.kafka.connect.storage.StringConverter
    value.converter: org.apache.kafka.connect.storage.StringConverter
    mq.record.builder: com.ibm.eventstreams.connect.mqsource.builders.DefaultRecordBuilder
    mq.connection.mode: client
    mq.message.body.jms: true
    mq.record.builder.key.header: JMSCorrelationID
We do not need to apply any logic on the value conversion. As the messages in MQ are json, we can just consider them as String. The mq.record.builder.key.header: JMSCorrelationID is very important to get the key from the MQ message header. This is a trick here to avoid having a kafks streams program to extract the key from the message and write to another topic, as it could be in real life. The store simulator uses the JMSCorrelationID to post the "StoreName" value as a a future key. The Kafka connector use this to write a kafka Producer Record with this key.
 public void sendMessage(Item item) {
    try {
      String msg = parser.toJson(item);
      TextMessage message = jmsContext.createTextMessage(msg);
      message.setJMSCorrelationID(item.storeName);
      producer.send(destination, message);
      ...
If you want to see the status of the connectors
oc get kafkaconnectors
# example of results
NAME        CLUSTER                 CONNECTOR CLASS                                           MAX TASKS   READY
mq-source   poe10-connect-cluster   com.ibm.eventstreams.connect.mqsource.MQSourceConnector   1           True
Read more on Kafka connector
Cleaning your OpenShift project
Run the following command to clean the demonstration deployment. You MUST clean the deployment if you will do next GitOps lab.
Upon cleaning, check if there are any pods or topics.
Troubleshooting
Message not sent to MQ
This could come from a connection issue between the simulator and MQ. Get the logs for the simulator pod:
Some topics Not created.
- If the USERID-items topic is not created, try submitting some messages from the Store Simulator.
- If topics like USERID-item.invetory or USERID-store.inventory is not created, try restarting the following pods: store-simulator-*.
item-inventory-*.
Then, try sending some messages through the Store Simulator.
Running locally
Do this step ONLY if you do not have an openshift environment.
You will require Docker to complete this step.
During proof of concept development you can run Event Streams, MQ and your code on your own laptop with docker engine. We give you a docker compose file to do so. Here are the commands to run the same demonstration locally:
- Access simulator user interface at http://localhost:8080.
- Access MQ UI at https://localhost:9443.
- Access Kafdrop UI http://localhost:9000 to look at the topic content.